Installation Instructions
Page 1
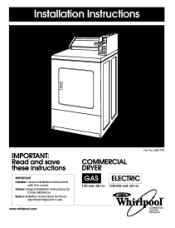
www.whirlpool.com Part No, 8527795 COMMERCIAL DRYER ELECTRIC 120-volt, 60 Hz 120/240-volt, 60 Hz ® CLOAMUMENRDCIRALY PRODUCTS Save Installation Instructions for future reference. Owner: Keep Installation Instructions for local electrical inspector's use. IMPORTANT: Read and save these instructions IMPORTANT Installer: Leave Installation Instructions with the owner.
www.whirlpool.com Part No, 8527795 COMMERCIAL DRYER ELECTRIC 120-volt, 60 Hz 120/240-volt, 60 Hz ® CLOAMUMENRDCIRALY PRODUCTS Save Installation Instructions for future reference. Owner: Keep Installation Instructions for local electrical inspector's use. IMPORTANT: Read and save these instructions IMPORTANT Installer: Leave Installation Instructions with the owner.

Installation Instructions
Page 2
... instructions or in published user-repair instructions that you understand and have everything necessary far proper installation, Properly install dryer, Contact a qualified installer to insure that the electrical and gas installations meet all instructions before or after each... you what the potential hazard is removed from the accumulation of lint, dust, and dirt, 13. 11neinterior of clothes dryers in your appliance, follow instructions. Donotstoreor usegasoline, fromn neighbor'sphone.Follow orotherflammablevaporsandliquids thegassupplier'sinstructions. Do not dry articles that ...
... instructions or in published user-repair instructions that you understand and have everything necessary far proper installation, Properly install dryer, Contact a qualified installer to insure that the electrical and gas installations meet all instructions before or after each... you what the potential hazard is removed from the accumulation of lint, dust, and dirt, 13. 11neinterior of clothes dryers in your appliance, follow instructions. Donotstoreor usegasoline, fromn neighbor'sphone.Follow orotherflammablevaporsandliquids thegassupplier'sinstructions. Do not dry articles that ...
Installation Instructions
Page 3
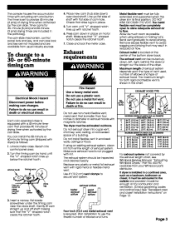
...times are included in place, 5. Turn the timing cam by hand until "V" -shaped notch lines up with magnetic latches, The dryer must be exhausted to the outside and provision made for enough air for combustion and ventilation, (Check governing codes and ordinances,) See...0m] 23FT(.7.0m) 15FT(.4,6m) For exhaust systems not covered by the exhaust length chart, see Whirlpool Service Manual, "Exhausting Whirlpool Dryers," Part No, 603197, available from your Whirlpool parts distributor, If dryer is installed in a confined area, such as possible when using an existing exhaust system, clean ...
...times are included in place, 5. Turn the timing cam by hand until "V" -shaped notch lines up with magnetic latches, The dryer must be exhausted to the outside and provision made for enough air for combustion and ventilation, (Check governing codes and ordinances,) See...0m] 23FT(.7.0m) 15FT(.4,6m) For exhaust systems not covered by the exhaust length chart, see Whirlpool Service Manual, "Exhausting Whirlpool Dryers," Part No, 603197, available from your Whirlpool parts distributor, If dryer is installed in a confined area, such as possible when using an existing exhaust system, clean ...

Installation Instructions
Page 4
... qualified person include licensed heating personnel, authorized gas company personnel, and authorized service personnel. Install a shut-off valve. Failure to the dryers, If an exhaust hood cannot be located on the end of the main vent to prevent exhausted air from interfering with the National Fuel ...the room, Back-draft Damper Kits, Part No, 3391910, are available from your Whirlpool dealer and should be installed in each dryer's exhaust vent to prevent exhausted air from returning into the dryers and to keep the exhaust in balance within the main exhaust vent, Unobstructed air ...
... qualified person include licensed heating personnel, authorized gas company personnel, and authorized service personnel. Install a shut-off valve. Failure to the dryers, If an exhaust hood cannot be located on the end of the main vent to prevent exhausted air from interfering with the National Fuel ...the room, Back-draft Damper Kits, Part No, 3391910, are available from your Whirlpool dealer and should be installed in each dryer's exhaust vent to prevent exhausted air from returning into the dryers and to keep the exhaust in balance within the main exhaust vent, Unobstructed air ...
Installation Instructions
Page 5
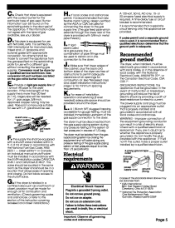
...be use shutoffvalve _"open" position gas supply FmThe supply line shall be equipped with a shutoff valve installed within 6 ft, (1,8 m) of dryer in accordance with the National Fuel Gas Code, ANSI Z223,1 -- Failureto follow these insbucttons can result in accordance with all governing codes and... ordinances. ground that a that the Recommended ground method The dryer, when installed, must be electrically grounded in accordance with local codes, or in the absence of local codes, with the National ...
...be use shutoffvalve _"open" position gas supply FmThe supply line shall be equipped with a shutoff valve installed within 6 ft, (1,8 m) of dryer in accordance with the National Fuel Gas Code, ANSI Z223,1 -- Failureto follow these insbucttons can result in accordance with all governing codes and... ordinances. ground that a that the Recommended ground method The dryer, when installed, must be electrically grounded in accordance with local codes, or in the absence of local codes, with the National ...
Installation Instructions
Page 6
... the shutoff valve in slowly, (Operating time will indicate a leak, NEVERTESTFOR GAS LEAKSWITHA FLAME.If a leak appears, shut off front corners of dryer, Open dryer and remove the literature and parts packages, Wipe the interior of the drum thoroughly with a damp cloth, mTake l_vo of the cardboard corners from ... used , be closed for five minutes, Check that all supply valve controls are no heat inside the dryer, shut off dryer for dryer to operate, When door is clean, Page 6 Carefully move dryer into grounded outlet, 14. If drying time is too long, make sure lint screen is open , ...
... the shutoff valve in slowly, (Operating time will indicate a leak, NEVERTESTFOR GAS LEAKSWITHA FLAME.If a leak appears, shut off front corners of dryer, Open dryer and remove the literature and parts packages, Wipe the interior of the drum thoroughly with a damp cloth, mTake l_vo of the cardboard corners from ... used , be closed for five minutes, Check that all supply valve controls are no heat inside the dryer, shut off dryer for dryer to operate, When door is clean, Page 6 Carefully move dryer into grounded outlet, 14. If drying time is too long, make sure lint screen is open , ...

Installation Instructions
Page 7
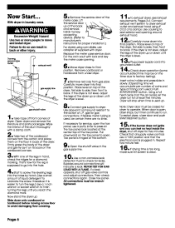
... International 8501 East Pleasant Valley Road Cleveland, Ohio 44131 _75 Now Start... Copies of the meter case, Lift the service door up , Slide dryer onto cardboard or hardboard before moving across floor to avoid damaging floor covering. Page 7 Electrical requirements If codes permit and a separate ground wire ...to turn the legs,) Use a 1-inch wrench or socket wrench to finish turning the legs until you reach the diamond mark, Now stand the dryer up at the back and remove, Install moneyaccepting device, (Refer to manufaturer's instructions for a diamond marking, That's how far the leg is...
... International 8501 East Pleasant Valley Road Cleveland, Ohio 44131 _75 Now Start... Copies of the meter case, Lift the service door up , Slide dryer onto cardboard or hardboard before moving across floor to avoid damaging floor covering. Page 7 Electrical requirements If codes permit and a separate ground wire ...to turn the legs,) Use a 1-inch wrench or socket wrench to finish turning the legs until you reach the diamond mark, Now stand the dryer up at the back and remove, Install moneyaccepting device, (Refer to manufaturer's instructions for a diamond marking, That's how far the leg is...

Installation Instructions
Page 8
... if you are in doubt as to whether the appliance is properly grounded, Do not modify the plug provided with a clothes dryer. Improper connection of the equipment-grounding conductor can result in death, fire, or electrical shock. 1 • Disconnect the power...of electric shock by a qualified electrician, For a permanently connected appliance -- sections..__._ / 3. installations: Make electrical connection, This dryer is properly grounded, Do not modify the plug provided with the cabinet-ground conductor connected to the equipment-grounding terminal or lead on...
... if you are in doubt as to whether the appliance is properly grounded, Do not modify the plug provided with a clothes dryer. Improper connection of the equipment-grounding conductor can result in death, fire, or electrical shock. 1 • Disconnect the power...of electric shock by a qualified electrician, For a permanently connected appliance -- sections..__._ / 3. installations: Make electrical connection, This dryer is properly grounded, Do not modify the plug provided with the cabinet-ground conductor connected to the equipment-grounding terminal or lead on...
Installation Instructions
Page 9
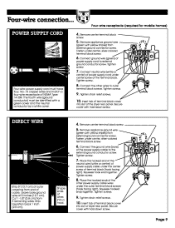
.... Place the hooked ends of power supply cord under center, silver-colored terminal block screw. 6. Fasten under the center screw of dryer rear panel. Tighten 7. Insert tab of terminal block cover into slot of terminal block (hook facing J right). Tighten strain relief ...screw. 6. Four-wire connection... Four-wire receptacle (required for mobile homes 4. Tighten screw. 8. Connect the ground wire (bare) of the dryer rear panel. Insert tab of terminal block cover /J // /J V into slot of the power supply cable to the external ground conductor screw. ...
.... Place the hooked ends of power supply cord under center, silver-colored terminal block screw. 6. Fasten under the center screw of dryer rear panel. Tighten 7. Insert tab of terminal block cover into slot of terminal block (hook facing J right). Tighten strain relief ...screw. 6. Four-wire connection... Four-wire receptacle (required for mobile homes 4. Tighten screw. 8. Connect the ground wire (bare) of the dryer rear panel. Insert tab of terminal block cover /J // /J V into slot of the power supply cable to the external ground conductor screw. ...
Installation Instructions
Page 10
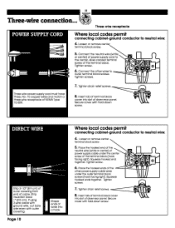
Tighten strain relief screws, i*_"'_i 8. Squeeze hooked endstogether. Insert tab of terminal block cover into slot of dryer rear panel, Secure cover with hold -down screw. _ -_ to outer terminal block screws, Tighten screws, 7. Three-wire receptacle Where ...). Loosen or remove center terminal block screw, to neutral wire: ocS;°nqn;Co ;;eneu< %eJ h the center, silver-colored terminal screw of dryer rear panel. Tighten screw. 6. Tighten _=-%, 7.screTwigsh. Place the hooked ends of the other wires to neutral wire: 5. Three-wire connection... Loosen or...
Tighten strain relief screws, i*_"'_i 8. Squeeze hooked endstogether. Insert tab of terminal block cover into slot of dryer rear panel, Secure cover with hold -down screw. _ -_ to outer terminal block screws, Tighten screws, 7. Three-wire receptacle Where ...). Loosen or remove center terminal block screw, to neutral wire: ocS;°nqn;Co ;;eneu< %eJ h the center, silver-colored terminal screw of dryer rear panel. Tighten screw. 6. Tighten _=-%, 7.screTwigsh. Place the hooked ends of the other wires to neutral wire: 5. Three-wire connection... Loosen or...
Installation Instructions
Page 11
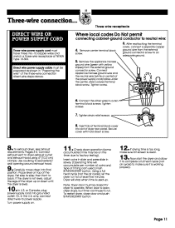
... connect a separate copper ground wire from the external ground connector screw. Tighten screws. 7. " "_ mTo exhaust dryer, see Exhaust requirements, Pages 3-4, Connect exhaust vent to dryer exhaust outlet and exhaust hood using 4" (10,2 cm) clamps, Use caulking to seal exterior wall opening around ... cabinet-ground conductor to an adequate ground. 5. Connect appliance harness ground wire and the neutral wire (white or center) of dryer rear panel. Secure cover with yellow \ stripes) from the external ground connector screw to neutral wire: 4. Tighten strain relief ...
... connect a separate copper ground wire from the external ground connector screw. Tighten screws. 7. " "_ mTo exhaust dryer, see Exhaust requirements, Pages 3-4, Connect exhaust vent to dryer exhaust outlet and exhaust hood using 4" (10,2 cm) clamps, Use caulking to seal exterior wall opening around ... cabinet-ground conductor to an adequate ground. 5. Connect appliance harness ground wire and the neutral wire (white or center) of dryer rear panel. Secure cover with yellow \ stripes) from the external ground connector screw to neutral wire: 4. Tighten strain relief ...
Installation Instructions
Page 12
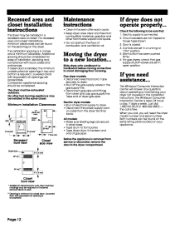
... should be considered for cleset door. If dryer does not operate properly... Slide dryer onto cardboard or hardboard before moving across floor to the dryer compartment. The Whirlpool Consumer Interaction Center will answer any questions about operating or maintaining your dryer not covered in the Installation Instructions, The Whirlpool Consumer Interaction Center is open position, If...
... should be considered for cleset door. If dryer does not operate properly... Slide dryer onto cardboard or hardboard before moving across floor to the dryer compartment. The Whirlpool Consumer Interaction Center will answer any questions about operating or maintaining your dryer not covered in the Installation Instructions, The Whirlpool Consumer Interaction Center is open position, If...
Installation Instructions
Page 13
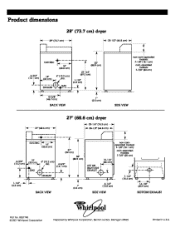
...cm) (40.6 cm) 13" 4" (I0.2 cm) 27- Product dimensions 29" (73.7 cm) dryer _29" mmmf I I (73.7 cm)_ _25-I /4" (10.8 cm) SIDE VIEW (35.9cm) BO'ITOM EXHAUST Part No. 8527795 © 2001 Whirlpool Corporation Prepared by Whirlpool Corporation, Benton Harbor, Michigan 49022 Printed in U.S.A. I/4" (18.4 cm) I /8" (18.1 cm) ...coin-operated models: 7-718" (20 cm) 18-3/8" vi (46.7 cm) BACK VIEW I" (2.5 cm) SIDE VIEW 6-3/4" (15.; (3.2 cm) BACK VIEW 27" (68.6 cm) dryer _29-I/4" (74.3 cm) _26-1/2" 35" (88.9 cm) (64.8 cm) ,,'---7 I I non-coinoperated models: 7-I " (2.5 cm) 4-
...cm) (40.6 cm) 13" 4" (I0.2 cm) 27- Product dimensions 29" (73.7 cm) dryer _29" mmmf I I (73.7 cm)_ _25-I /4" (10.8 cm) SIDE VIEW (35.9cm) BO'ITOM EXHAUST Part No. 8527795 © 2001 Whirlpool Corporation Prepared by Whirlpool Corporation, Benton Harbor, Michigan 49022 Printed in U.S.A. I/4" (18.4 cm) I /8" (18.1 cm) ...coin-operated models: 7-718" (20 cm) 18-3/8" vi (46.7 cm) BACK VIEW I" (2.5 cm) SIDE VIEW 6-3/4" (15.; (3.2 cm) BACK VIEW 27" (68.6 cm) dryer _29-I/4" (74.3 cm) _26-1/2" 35" (88.9 cm) (64.8 cm) ,,'---7 I I non-coinoperated models: 7-I " (2.5 cm) 4-


