
User Manual
Page 3
English Contents PRODUCT SAFETY INSTRUCTIONS 4 Antenna Installation Safety 5 Safety Guidelines 6 LCD TV Overview 7 Package Contents 7 Front View of the LCD TV 7 Rear View of the LCD TV 7 Side View of the LCD TV 8 Control Key 8 Input Connector 9 Remote Control 10 Installation 12 Function adjustment 15 Viewing OSD Menu 15 Picture 16 Audio Setting 18 Channels 19 Settings 22 Locks 29 Guide 32 Product Specification 33 Troubleshooting 34 2
English Contents PRODUCT SAFETY INSTRUCTIONS 4 Antenna Installation Safety 5 Safety Guidelines 6 LCD TV Overview 7 Package Contents 7 Front View of the LCD TV 7 Rear View of the LCD TV 7 Side View of the LCD TV 8 Control Key 8 Input Connector 9 Remote Control 10 Installation 12 Function adjustment 15 Viewing OSD Menu 15 Picture 16 Audio Setting 18 Channels 19 Settings 22 Locks 29 Guide 32 Product Specification 33 Troubleshooting 34 2

User Manual
Page 4
... cloth, then wipe the surface. Thank you for damage resulting from the use of any ammonia or alcohol-based cleaners on the LCD TV screen or case. Disclaimer Westinghouse Digital does not recommend the use of any ammonia or alcohol-based cleaners. Wipe the screen with a clean, soft, lint-free cloth. This..., apply a small amount of non-ammonia, non-alcohol based glass cleaner onto a clean, soft, lint-free cloth, and wipe the screen. To clean the case: 1. Westinghouse Digital will not be liable for purchasing a Westinghouse LCD TV www.westinghousedigital.com 3
... cloth, then wipe the surface. Thank you for damage resulting from the use of any ammonia or alcohol-based cleaners on the LCD TV screen or case. Disclaimer Westinghouse Digital does not recommend the use of any ammonia or alcohol-based cleaners. Wipe the screen with a clean, soft, lint-free cloth. This..., apply a small amount of non-ammonia, non-alcohol based glass cleaner onto a clean, soft, lint-free cloth, and wipe the screen. To clean the case: 1. Westinghouse Digital will not be liable for purchasing a Westinghouse LCD TV www.westinghousedigital.com 3
User Manual
Page 5
... cover. Your warranty does not cover repairs or attempted repairs by anyone not authorized by Westinghouse Digital. • If your LCD TV in installation such as vases, shall not be placed on your LCD TV away from overheating, these openings must not be exposed to . Skin oils are not ...cords and each end of the cords for a long period of the LCD TV and to protect it off and contact the Westinghouse Service Center. • WARNING - To ensure reliable operation of time, unplug the LCD TV and remove the batteries from the remote control. English PRODUCT SAFETY INSTRUCTIONS Follow...
... cover. Your warranty does not cover repairs or attempted repairs by anyone not authorized by Westinghouse Digital. • If your LCD TV in installation such as vases, shall not be placed on your LCD TV away from overheating, these openings must not be exposed to . Skin oils are not ...cords and each end of the cords for a long period of the LCD TV and to protect it off and contact the Westinghouse Service Center. • WARNING - To ensure reliable operation of time, unplug the LCD TV and remove the batteries from the remote control. English PRODUCT SAFETY INSTRUCTIONS Follow...
User Manual
Page 6
... proper grounding of the mast and supporting structure, grounding of the lead-in the vicinity of time, unplug it does not operate normally, or the TV has been dropped. lightning may strike while you are holding the cable cord, causing serious injury. type plug. When a cart is used, use caution... an antenna discharge unit, connection to grounding electrodes, and requirements for a long period of time. 14) Refer all instructions. 5) Do not use the LCD TV near any heat sources such as the power-supply cord or plug is left unattended and unused for the weather to improve. Turn off your...
... proper grounding of the mast and supporting structure, grounding of the lead-in the vicinity of time, unplug it does not operate normally, or the TV has been dropped. lightning may strike while you are holding the cable cord, causing serious injury. type plug. When a cart is used, use caution... an antenna discharge unit, connection to grounding electrodes, and requirements for a long period of time. 14) Refer all instructions. 5) Do not use the LCD TV near any heat sources such as the power-supply cord or plug is left unattended and unused for the weather to improve. Turn off your...

User Manual
Page 7
...no guarantee that to provide reasonable protection against harmful interference in the United States and Canada. For LCD TVs that is certified for this device. 6 The cord set is a NEMA1-15 style , UL Listed,...a desk or table, type SVT or SJT cord sets may be used to correct the interference by Westinghouse Digital will not occur in a particular installation. Also, any unauthorized changes or modifications not expressly approved by...for assistance. However, there is connected. • Consult the Westinghouse Service Center or an experienced radio/TV technician for the LCD...
...no guarantee that to provide reasonable protection against harmful interference in the United States and Canada. For LCD TVs that is certified for this device. 6 The cord set is a NEMA1-15 style , UL Listed,...a desk or table, type SVT or SJT cord sets may be used to correct the interference by Westinghouse Digital will not occur in a particular installation. Also, any unauthorized changes or modifications not expressly approved by...for assistance. However, there is connected. • Consult the Westinghouse Service Center or an experienced radio/TV technician for the LCD...
User Manual
Page 8
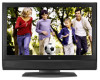
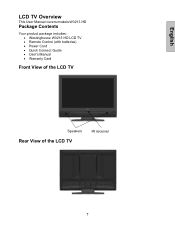
English LCD TV Overview This User Manual covers models:W3213 HD Package Contents Your product package includes: • Westinghouse W3213 HD LCD TV • Remote Control (with batteries) • Power Cord • Quick Connect Guide • User's Manual • Warranty Card Front View of the LCD TV Speakers Rear View of the LCD TV IR receiver 7
English LCD TV Overview This User Manual covers models:W3213 HD Package Contents Your product package includes: • Westinghouse W3213 HD LCD TV • Remote Control (with batteries) • Power Cord • Quick Connect Guide • User's Manual • Warranty Card Front View of the LCD TV Speakers Rear View of the LCD TV IR receiver 7

User Manual
Page 9
Input source 5. Menu + VOL - 2. Power Turn OSD Menu ON/OFF Increase/Decrease sound volume or adjust a highlighted control while in the OSD Menu Channel up/down when input is TV or highlight a control while in the OSD Menu Select Active Video Input or choose a selection while in the OSD MENU Power ON/OFF 8 English Side View of the LCD TV Control keys Spine Design Input connector Control Key MENU 1. Volume + / + CH - 3. Channel + / INPUT 4.
Input source 5. Menu + VOL - 2. Power Turn OSD Menu ON/OFF Increase/Decrease sound volume or adjust a highlighted control while in the OSD Menu Channel up/down when input is TV or highlight a control while in the OSD Menu Select Active Video Input or choose a selection while in the OSD MENU Power ON/OFF 8 English Side View of the LCD TV Control keys Spine Design Input connector Control Key MENU 1. Volume + / + CH - 3. Channel + / INPUT 4.
User Manual
Page 10
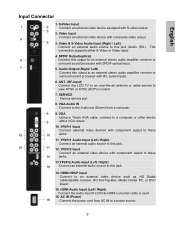
ANT. (RF-input) Connect the LCD TV to an over-the-air antenna or cable service to -HDMI converter cable is used. 16. HDMI Audio Input (Left / Right) Connect the audio input ...
ANT. (RF-input) Connect the LCD TV to an over-the-air antenna or cable service to -HDMI converter cable is used. 16. HDMI Audio Input (Left / Right) Connect the audio input ...
User Manual
Page 11
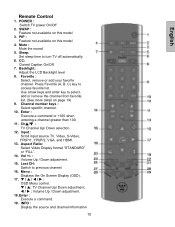
..., S-Video, YPbPr1, YPbPr2, VGA, and HDMI. 13. Vol +/- : Volume Up / Down adjustment. 15. Last CH: Switch to turn TV off automatically. 6. T / S: TV Channel Up/ Down adjustment. W / X : Volume Up / Down adjustment. 18. CC: Closed Caption On/Off. 7. Enter : Execute a command....Mute : Mute the sound 5. Backlight: Adjust the LCD Backlight level 8. Use arrow keys and enter key to access favorite list. Ch▲/▼ : TV Channel Up/ Down selection. 12. Aspect Ratio: Select Video Display format "STANDARD" or "FILL". 14. English Remote Control 1. Press Favorite (A, B, C)...
..., S-Video, YPbPr1, YPbPr2, VGA, and HDMI. 13. Vol +/- : Volume Up / Down adjustment. 15. Last CH: Switch to turn TV off automatically. 6. T / S: TV Channel Up/ Down adjustment. W / X : Volume Up / Down adjustment. 18. CC: Closed Caption On/Off. 7. Enter : Execute a command....Mute : Mute the sound 5. Backlight: Adjust the LCD Backlight level 8. Use arrow keys and enter key to access favorite list. Ch▲/▼ : TV Channel Up/ Down selection. 12. Aspect Ratio: Select Video Display format "STANDARD" or "FILL". 14. English Remote Control 1. Press Favorite (A, B, C)...
User Manual
Page 12
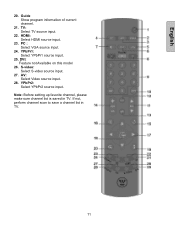
YPbPr1: Select YPbPr1 source input. 25. DVI: Feature not Available on this model 26. If not, perform channel scan to save a channel list in TV. S-video: Select S-video source input. 27. Guide Show program information of current channel. 21. TV: Select TV source input. 22. Note: Before setting up favorite channel, please make sure channel list is saved in TV. 11 HDMI: Select HDMI source input. 23. PC : Select VGA source input. 24. YPbPr2: Select YPbPr2 source input. AV: Select Video source input. 28. English 20.
YPbPr1: Select YPbPr1 source input. 25. DVI: Feature not Available on this model 26. If not, perform channel scan to save a channel list in TV. S-video: Select S-video source input. 27. Guide Show program information of current channel. 21. TV: Select TV source input. 22. Note: Before setting up favorite channel, please make sure channel list is saved in TV. 11 HDMI: Select HDMI source input. 23. PC : Select VGA source input. 24. YPbPr2: Select YPbPr2 source input. AV: Select Video source input. 28. English 20.

User Manual
Page 14
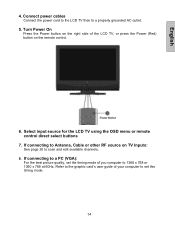
English Connect one or all device are turned off. 2. Connect Video, S-Video, YPbPr, Antenna/Cable to Video Devices Connect Video/Audio cables from compatible devices to the AUDIO IN port on the LCD TV. 3. AUDIO CONNECTION: Connect a stereo mini cable from your PC VGA OUT port to the TV , make sure all of the following into the back of the LCD TV. 13 Connect audio and video cables from a PC VGA CONNECTION: Connect an analog VGA cable from the PC's AUDIO OUT port to the back panel of the LCD TV. IMPORTANT: Before connecting to the LCD TV VGA IN port.
English Connect one or all device are turned off. 2. Connect Video, S-Video, YPbPr, Antenna/Cable to Video Devices Connect Video/Audio cables from compatible devices to the AUDIO IN port on the LCD TV. 3. AUDIO CONNECTION: Connect a stereo mini cable from your PC VGA OUT port to the TV , make sure all of the following into the back of the LCD TV. 13 Connect audio and video cables from a PC VGA CONNECTION: Connect an analog VGA cable from the PC's AUDIO OUT port to the back panel of the LCD TV. IMPORTANT: Before connecting to the LCD TV VGA IN port.
User Manual
Page 15
... and edit available channels. 8. Refer to the graphic card's user guide of your computer to set the timing mode of the LCD TV, or press the Power (Red) button on TV Inputs: See page 20 to 1366 x 768 or 1360 x 768 at 60Hz. If connecting to a properly grounded AC outlet. 5. Select ...input source for the LCD TV using the OSD menu or remote control direct select buttons 7. Connect power cables Connect the power cord to the LCD TV then to Antenna, Cable or other RF source on the remote control. 6. English 4.
... and edit available channels. 8. Refer to the graphic card's user guide of your computer to set the timing mode of the LCD TV, or press the Power (Red) button on TV Inputs: See page 20 to 1366 x 768 or 1360 x 768 at 60Hz. If connecting to a properly grounded AC outlet. 5. Select ...input source for the LCD TV using the OSD menu or remote control direct select buttons 7. Connect power cables Connect the power cord to the LCD TV then to Antenna, Cable or other RF source on the remote control. 6. English 4.

User Manual
Page 16
Viewing OSD Menu To display the OSD main menu, press the Menu button on the remote control. English Function adjustment There are six main OSD menus, these are Picture, Audio, Channels, Settings, Locks and Guide. Press arrow keys to select desired OSD Menu and Enter keys to select desired OSD setting. 15 All the functions can be adjusted either by the remote control or using the control keys on the of the LCD TV or the MENU key on the right side of front control keys of LCD TV's right side.
Viewing OSD Menu To display the OSD main menu, press the Menu button on the remote control. English Function adjustment There are six main OSD menus, these are Picture, Audio, Channels, Settings, Locks and Guide. Press arrow keys to select desired OSD Menu and Enter keys to select desired OSD setting. 15 All the functions can be adjusted either by the remote control or using the control keys on the of the LCD TV or the MENU key on the right side of front control keys of LCD TV's right side.

User Manual
Page 17
Standard Displays the image exactly as broadcast. Fill Stretches the image to close picture setting menu. English Picture Picture Settings Press arrow keys to select or adjust your TV screen to handle different picture formats. Aspect Ratio Adjust your favorite picture settings, Done button to fit the screen (Note: No part of the image is cut off, but the image may display distorted) 16
Standard Displays the image exactly as broadcast. Fill Stretches the image to close picture setting menu. English Picture Picture Settings Press arrow keys to select or adjust your TV screen to handle different picture formats. Aspect Ratio Adjust your favorite picture settings, Done button to fit the screen (Note: No part of the image is cut off, but the image may display distorted) 16

User Manual
Page 19
Analog Preference Select an analog audio preference or turn on SAP(Secondary Audio Program) or alternate language. TV Speaker User arrow keys to select audio out from both speakers. English Audio Setting Bass, Treble & Balance Use arrow keys to a home theater or stereo Both Audio from internal, external or both internal and external speakers. 18 Internal Audio from internal speaker only External Audio from external speaker if your TV is connected to adjust the bass, treble and balance.
Analog Preference Select an analog audio preference or turn on SAP(Secondary Audio Program) or alternate language. TV Speaker User arrow keys to select audio out from both speakers. English Audio Setting Bass, Treble & Balance Use arrow keys to a home theater or stereo Both Audio from internal, external or both internal and external speakers. 18 Internal Audio from internal speaker only External Audio from external speaker if your TV is connected to adjust the bass, treble and balance.
User Manual
Page 23
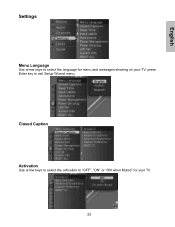
Closed Caption Activation Use arrow keys to select the activation to exit Setup Wizard menu. English Settings Menu Language Use arrow keys to select the language for your TV, press Enter key to "OFF" ,"ON" or "ON when Muted" for menu and messages showing on your TV. 22
Closed Caption Activation Use arrow keys to select the activation to exit Setup Wizard menu. English Settings Menu Language Use arrow keys to select the language for your TV, press Enter key to "OFF" ,"ON" or "ON when Muted" for menu and messages showing on your TV. 22

User Manual
Page 24
Advanced Appearance Use arrow keys to adjust closed caption settings to Always Basic, Always Advance or Automatic for programs broadcast with basic caption. Caption preference Use arrow keys to select caption preference to use for your TV. 23 English Basic Selection Choose the type of closed caption appearance such as font and size, each change can be previewed on bottom of menu.
Advanced Appearance Use arrow keys to adjust closed caption settings to Always Basic, Always Advance or Automatic for programs broadcast with basic caption. Caption preference Use arrow keys to select caption preference to use for your TV. 23 English Basic Selection Choose the type of closed caption appearance such as font and size, each change can be previewed on bottom of menu.

User Manual
Page 25
Press Reset button to reset all of closed caption settings, Don't Reset button to give a label 24 Use ▲/▼ key to select input which you made to turn off TV. Sleep Time Set the sleep time to factory default setting. English Reset CC Reset all closed caption setting you want to ignore the reset. Input labels Customize the label associated with each input.
Press Reset button to reset all of closed caption settings, Don't Reset button to give a label 24 Use ▲/▼ key to select input which you made to turn off TV. Sleep Time Set the sleep time to factory default setting. English Reset CC Reset all closed caption setting you want to ignore the reset. Input labels Customize the label associated with each input.

User Manual
Page 26
... automatically. ON If last DC power status is on automatically when power is plugged in TV and switch input source setting of your TV to Normal or Energy Saving Normal TV will boot within few sec. (default) Energy Saving TV will power on , TV will turn off all power, resulting in longer boot up time.
... automatically. ON If last DC power status is on automatically when power is plugged in TV and switch input source setting of your TV to Normal or Energy Saving Normal TV will boot within few sec. (default) Energy Saving TV will power on , TV will turn off all power, resulting in longer boot up time.
User Manual
Page 27
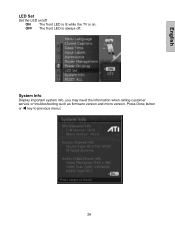
Press Done button or W key to previous menu. 26 English LED Set Set the LED on . OFF The front LED is on /off ON The front LED is lit while the TV is always off. System Info Display important system info, you may need the information when calling customer service or troubleshooting such as firmware version and micro version.
Press Done button or W key to previous menu. 26 English LED Set Set the LED on . OFF The front LED is on /off ON The front LED is lit while the TV is always off. System Info Display important system info, you may need the information when calling customer service or troubleshooting such as firmware version and micro version.


