Quick Start Guide
Page 1
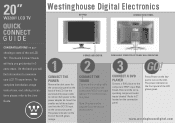
... OPTIONAL WALL MOUNTING 3 GO! CONNECT THE TUNER Connect either analog cable or TV antenna wire to turn on the connection panel. CONNECT A DVD PLAYER Connect a DVD player to maximize your LCD TV experience. www.westinghousedigital.com On the back you will help you do not ... easy steps. CONNECT THE POWER Remove the dust cover for the connection panel on the front panel of the LCD. 20" W32001 LCD TV QUICK CONNECT GUIDE Westinghouse Digital Electronics KEYPAD CONNECTION PANEL CONGRATULATIONS on the connection panel. This Quick Connect Guide will find information to the ...
... OPTIONAL WALL MOUNTING 3 GO! CONNECT THE TUNER Connect either analog cable or TV antenna wire to turn on the connection panel. CONNECT A DVD PLAYER Connect a DVD player to maximize your LCD TV experience. www.westinghousedigital.com On the back you will help you do not ... easy steps. CONNECT THE POWER Remove the dust cover for the connection panel on the front panel of the LCD. 20" W32001 LCD TV QUICK CONNECT GUIDE Westinghouse Digital Electronics KEYPAD CONNECTION PANEL CONGRATULATIONS on the connection panel. This Quick Connect Guide will find information to the ...
Quick Start Guide
Page 2
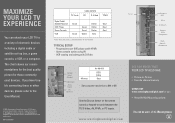
... quality picture for our: • Versatile Wall Mounting options Specifications subject to change without notice. , Westinghouse and You can attach your LCD TV to a variety of Westinghouse Electric Corporation and are used devices. TYPICAL SETUP • Progressive scan DVD players with YPbPr •...the Source button on the remote control or keypad to the User Manual. © 2004 Westinghouse Digital Electronics, LLC. www.westinghousedigital.com DID YOU KNOW THAT YOUR LCD TV ALSO HAS: • Picture-in-Picture • Favorite channel memory CHECK OUT www.westinghousedigital...
... quality picture for our: • Versatile Wall Mounting options Specifications subject to change without notice. , Westinghouse and You can attach your LCD TV to a variety of Westinghouse Electric Corporation and are used devices. TYPICAL SETUP • Progressive scan DVD players with YPbPr •...the Source button on the remote control or keypad to the User Manual. © 2004 Westinghouse Digital Electronics, LLC. www.westinghousedigital.com DID YOU KNOW THAT YOUR LCD TV ALSO HAS: • Picture-in-Picture • Favorite channel memory CHECK OUT www.westinghousedigital...
User Manual
Page 7
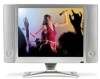
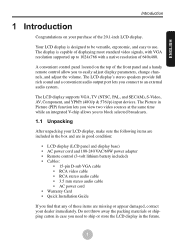
...remote control allow you to 1024x768 with VGA resolution supported up to easily adjust display parameters, change channels, and adjust the volume. Your LCD display is capable of displaying most standard video signals, with a native resolution of 640x480. A convenient control panel located on your dealer... immediately. The display is designed to be versatile, ergonomic, and easy to ship or store the LCD display in case you need to use. The LCD display supports VGA, TV (NTSC, PAL, and SECAM), S-Video, AV, Component, and YPbPr (480i/p & 576i/p) input devices.
...remote control allow you to 1024x768 with VGA resolution supported up to easily adjust display parameters, change channels, and adjust the volume. Your LCD display is capable of displaying most standard video signals, with a native resolution of 640x480. A convenient control panel located on your dealer... immediately. The display is designed to be versatile, ergonomic, and easy to ship or store the LCD display in case you need to use. The LCD display supports VGA, TV (NTSC, PAL, and SECAM), S-Video, AV, Component, and YPbPr (480i/p & 576i/p) input devices.
User Manual
Page 10
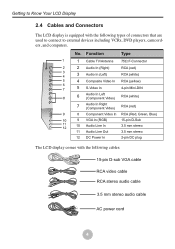
No. Function Type 1 1 Cable TV/Antenna 75Ω F-Connector 2 2 Audio In (Right) RCA (red) 3 4 3 Audio In (Left) RCA (white) 5 4 Composite Video In...Line Out 15-pin D-Sub 3.5 mm stereo 3.5 mm stereo 12 DC Power In 2-pin DC plug The LCD display comes with the following cables: 15-pin D-sub VGA cable RCA video cable RCA stereo audio cable 3.5 ...mm stereo audio cable AC power cord 4 Getting to Know Your LCD Display 2.4 Cables and Connectors The LCD display is equipped with the following types of connectors that are used to connect to external ...
No. Function Type 1 1 Cable TV/Antenna 75Ω F-Connector 2 2 Audio In (Right) RCA (red) 3 4 3 Audio In (Left) RCA (white) 5 4 Composite Video In...Line Out 15-pin D-Sub 3.5 mm stereo 3.5 mm stereo 12 DC Power In 2-pin DC plug The LCD display comes with the following cables: 15-pin D-sub VGA cable RCA video cable RCA stereo audio cable 3.5 ...mm stereo audio cable AC power cord 4 Getting to Know Your LCD Display 2.4 Cables and Connectors The LCD display is equipped with the following types of connectors that are used to connect to external ...
User Manual
Page 11
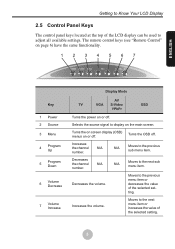
.... 1234567 POWER SOURCE MENU PRG VOL Key 1 Power 2 Source 3 Menu 4 Program Up 5 Program Down 6 Volume Decrease 7 Volume Increase Display Mode AV TV VGA S-Video YPbPr OSD Turns the power on or off . ENGLISH Getting to Know Your LCD Display 2.5 Control Panel Keys The control panel keys located at the top of the...
.... 1234567 POWER SOURCE MENU PRG VOL Key 1 Power 2 Source 3 Menu 4 Program Up 5 Program Down 6 Volume Decrease 7 Volume Increase Display Mode AV TV VGA S-Video YPbPr OSD Turns the power on or off . ENGLISH Getting to Know Your LCD Display 2.5 Control Panel Keys The control panel keys located at the top of the...
User Manual
Page 18
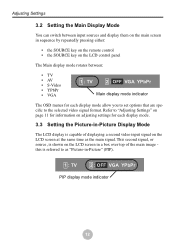
...options that are specific to as the main signal. Refer to "Adjusting Settings" on page 11 for information on the LCD screen at the same time as "Picture-in-Picture" (PIP). 1 : TV 2 : OFF VGA YPbPr PIP display mode indicator 12 This second signal, or source, is shown on the... LCD screen in sequence by repeatedly pressing either: • the SOURCE key on the remote control • the SOURCE key on the LCD control panel The Main display mode...
...options that are specific to as the main signal. Refer to "Adjusting Settings" on page 11 for information on the LCD screen at the same time as "Picture-in-Picture" (PIP). 1 : TV 2 : OFF VGA YPbPr PIP display mode indicator 12 This second signal, or source, is shown on the... LCD screen in sequence by repeatedly pressing either: • the SOURCE key on the remote control • the SOURCE key on the LCD control panel The Main display mode...
User Manual
Page 19
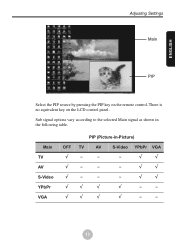
... S-Video YPbPr VGA PIP (Picture-in the following table. Sub signal options vary according to the selected Main signal as shown in -Picture) OFF TV AV S-Video YPbPr VGA √− − − √ √ √− − − √ √ √− − − √ √ √√ √ &#... There is no equivalent key on the remote control. Adjusting Settings Main ENGLISH PIP Select the PIP source by pressing the PIP key on the LCD control panel.
... S-Video YPbPr VGA PIP (Picture-in the following table. Sub signal options vary according to the selected Main signal as shown in -Picture) OFF TV AV S-Video YPbPr VGA √− − − √ √ √− − − √ √ √− − − √ √ √√ √ &#... There is no equivalent key on the remote control. Adjusting Settings Main ENGLISH PIP Select the PIP source by pressing the PIP key on the LCD control panel.
User Manual
Page 20
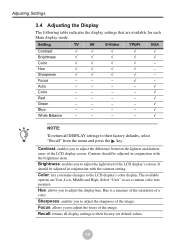
... image. Sharpness: enables you make changes to adjust the light level of the image. Focus: allows you to the LCD display's color display. Brightness: enables you to set default values. 14 It should be adjusted in conjunction with the contrast...and darkest areas of a color. Adjusting Settings 3.4 Adjusting the Display The following table indicates the display settings that are User, Low, Middle and High. Setting TV AV S-Video YPbPr VGA Contrast √ √ √ Brightness √ √ √ Color √ √ √ Hue √ ...
... image. Sharpness: enables you make changes to adjust the light level of the image. Focus: allows you to the LCD display's color display. Brightness: enables you to set default values. 14 It should be adjusted in conjunction with the contrast...and darkest areas of a color. Adjusting Settings 3.4 Adjusting the Display The following table indicates the display settings that are User, Low, Middle and High. Setting TV AV S-Video YPbPr VGA Contrast √ √ √ Brightness √ √ √ Color √ √ √ Hue √ ...

User Manual
Page 21
... displays a number incrementing from 1 to begin scan- GRB TV CH-Scan C.CPT V-Chip TV-SYSTEM 125 OFF CATV 3 Press PRG/CH to select CH-Scan. 4 Press VOL + to 125 (for NTSC systems in the USA and other countries) as the LCD display scans for available channels. 6 Scanning is complete when the...NOTE: Several minutes are required for available channels. GRB TV CH-Scan C.CPT V-Chip TV-SYSTEM OFF AIR To scan for channels: 1 Press MENU to turn the OSD on. 2 Press VOL+ to switch to a television antenna or CATV cable, the LCD display can automatically scan for channel scanning to the &#...
... displays a number incrementing from 1 to begin scan- GRB TV CH-Scan C.CPT V-Chip TV-SYSTEM 125 OFF CATV 3 Press PRG/CH to select CH-Scan. 4 Press VOL + to 125 (for NTSC systems in the USA and other countries) as the LCD display scans for available channels. 6 Scanning is complete when the...NOTE: Several minutes are required for available channels. GRB TV CH-Scan C.CPT V-Chip TV-SYSTEM OFF AIR To scan for channels: 1 Press MENU to turn the OSD on. 2 Press VOL+ to switch to a television antenna or CATV cable, the LCD display can automatically scan for channel scanning to the &#...
User Manual
Page 23
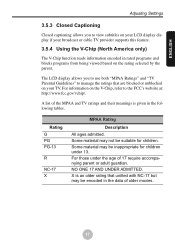
NO ONE 17 AND UNDER ADMITTED. The LCD display allows you to view subtitles on your LCD display display if your TV. Some material may not be suitable for children under the age of 17 require accompanying parent or adult guardian. For those under 13. A ... material may be encoded in the following tables. ENGLISH Adjusting Settings 3.5.3 Closed Captioning Closed captioning allows you to use both "MPAA Ratings" and "TV Parental Guidelines" to manage the ratings that unified with NC-17 but may be inappropriate for children. For information on the rating selected by the...
NO ONE 17 AND UNDER ADMITTED. The LCD display allows you to view subtitles on your LCD display display if your TV. Some material may not be suitable for children under the age of 17 require accompanying parent or adult guardian. For those under 13. A ... material may be encoded in the following tables. ENGLISH Adjusting Settings 3.5.3 Closed Captioning Closed captioning allows you to use both "MPAA Ratings" and "TV Parental Guidelines" to manage the ratings that unified with NC-17 but may be inappropriate for children. For information on the rating selected by the...
User Manual
Page 24
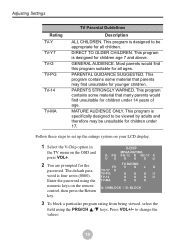
... press VOL+. 2 You are prompted for younger children. This program is specifically designed to set up the ratings system on your LCD display. 1 Select the V-Chip option in the TV menu on the remote control, then press the Return key. to be unsuitable for children under 14 years of age. Enter the...
... press VOL+. 2 You are prompted for younger children. This program is specifically designed to set up the ratings system on your LCD display. 1 Select the V-Chip option in the TV menu on the remote control, then press the Return key. to be unsuitable for children under 14 years of age. Enter the...
User Manual
Page 28
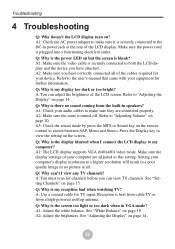
...cables required for TV input. Q: Why is securely connected to make sure it is the screen too light or too dark when in power jack at all of the LCD display. A1:... Make sure the video cable is the display blurred when I view any TV channels? A1: Check your computer are connected ...computer? A1: Adjust the white balance. A2: Adjust the brightness. Make sure the display settings of the LCD screen. A: Use a coaxial cable for your computer's display resolution to this setting. See "White Balance...
...cables required for TV input. Q: Why is securely connected to make sure it is the screen too light or too dark when in power jack at all of the LCD display. A1:... Make sure the video cable is the display blurred when I view any TV channels? A1: Check your computer are connected ...computer? A1: Adjust the white balance. A2: Adjust the brightness. Make sure the display settings of the LCD screen. A: Use a coaxial cable for your computer's display resolution to this setting. See "White Balance...
User Manual
Page 30
... display adjusting settings, 11 menus, 11 OSD, 11 using the control panel, 11 using the remote control, 11 P Power adapter connecting to LCD TV, 10 replacement adapter, 10 safety notes, 10 troubleshooting, 22 Q Quick channels assigning, 16 deleting, 16 R Ratings setting channel ratings, 17 ... mode, 13 T Television settings setting channels, 15 troubleshooting, 22 Troubleshooting, 22 Turning on the LCD display, 10 V V-Chip about, 17 MPAA Ratings, 17 resetting password, 19 TV Parental Guidelines, 17 VGA adjusting settings automatically, 19 adjusting settings manually, 19 main display mode, 12...
... display adjusting settings, 11 menus, 11 OSD, 11 using the control panel, 11 using the remote control, 11 P Power adapter connecting to LCD TV, 10 replacement adapter, 10 safety notes, 10 troubleshooting, 22 Q Quick channels assigning, 16 deleting, 16 R Ratings setting channel ratings, 17 ... mode, 13 T Television settings setting channels, 15 troubleshooting, 22 Troubleshooting, 22 Turning on the LCD display, 10 V V-Chip about, 17 MPAA Ratings, 17 resetting password, 19 TV Parental Guidelines, 17 VGA adjusting settings automatically, 19 adjusting settings manually, 19 main display mode, 12...


