
User Manual
Page 2
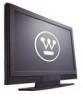
TABLE OF CONTENTS 1. GENERAL INFORMATION 4 2.1 Overview 4 2.2 Feature 7 2.3 Controls and Ports of the Monitor 9 2.4 Accessories 12 2.5 Remote Control 13 3. INSTALLATION & FUNCTION ADJUSTMENT 15 3.1 Installation 15 3.2 How to assemble the Base 17 3.3 How to remove the Base 18 3.4 Function Adjustment 19 4 TROUBLESHOOTING 25 5 PRODUCT SPECIFICATION 28 1 IMPORTANT SAFETY AND PRECAUTIONS 1 1.1 Important Information 1 1.2 Important Safety Instructions 2 2.
TABLE OF CONTENTS 1. GENERAL INFORMATION 4 2.1 Overview 4 2.2 Feature 7 2.3 Controls and Ports of the Monitor 9 2.4 Accessories 12 2.5 Remote Control 13 3. INSTALLATION & FUNCTION ADJUSTMENT 15 3.1 Installation 15 3.2 How to assemble the Base 17 3.3 How to remove the Base 18 3.4 Function Adjustment 19 4 TROUBLESHOOTING 25 5 PRODUCT SPECIFICATION 28 1 IMPORTANT SAFETY AND PRECAUTIONS 1 1.1 Important Information 1 1.2 Important Safety Instructions 2 2.

User Manual
Page 4
... : Do not leave stationary images, patterns, PIP windows, or letterbox images on the screen for prolonged periods of electric shock to the LCD panel. The symbol is recommended to operate it. copyright laws. Certain Canadian programs may also be copyrighted and any unauthorized recording in whole or in... is not covered under warranty. Important: One Federal Court has held that improper use as a stand alone MONITOR as well as a display device for LCD display technology; Do not open. Caution : FCC/ CSA regulations state that fill the screen as often as this may be in product ...
... : Do not leave stationary images, patterns, PIP windows, or letterbox images on the screen for prolonged periods of electric shock to the LCD panel. The symbol is recommended to operate it. copyright laws. Certain Canadian programs may also be copyrighted and any unauthorized recording in whole or in... is not covered under warranty. Important: One Federal Court has held that improper use as a stand alone MONITOR as well as a display device for LCD display technology; Do not open. Caution : FCC/ CSA regulations state that fill the screen as often as this may be in product ...

User Manual
Page 7
2. Front View of the HD Video Monitor Left Channel Speaker IR receiver & LED indicator Right Channel Speaker 4 GENERAL INFORMATION 2.1 Overview A.
2. Front View of the HD Video Monitor Left Channel Speaker IR receiver & LED indicator Right Channel Speaker 4 GENERAL INFORMATION 2.1 Overview A.

User Manual
Page 8
Français Español English B. Rear View of the HD Video Monitor 5
Français Español English B. Rear View of the HD Video Monitor 5

User Manual
Page 9
C. Side View of the HD Video Monitor Right Side Function Buttons Use the function buttons on the right side of the HD Monitor or on the remote control to display the On Screen Display (OSD). 6
C. Side View of the HD Video Monitor Right Side Function Buttons Use the function buttons on the right side of the HD Monitor or on the remote control to display the On Screen Display (OSD). 6

User Manual
Page 10
... x 768 @ 75Hz 1280 x720 @ 60Hz, 1280 x 1024 @ 60Hz, 1280 x 1024 @ 75Hz ,1280 x 800 @ 60Hz, 1920 x 1080 @ 60Hz 7 The Westinghouse VM-42/47F140S features a 1920 x 1080 resolution display with more than 2 million pixels. z True 1080p The Westinghouse VM-42/47F140S 1080p monitor is a true 1080p monitor. Français Español English 2.2 Feature z Highest Resolution It's the highest resolution...
... x 768 @ 75Hz 1280 x720 @ 60Hz, 1280 x 1024 @ 60Hz, 1280 x 1024 @ 75Hz ,1280 x 800 @ 60Hz, 1920 x 1080 @ 60Hz 7 The Westinghouse VM-42/47F140S features a 1920 x 1080 resolution display with more than 2 million pixels. z True 1080p The Westinghouse VM-42/47F140S 1080p monitor is a true 1080p monitor. Français Español English 2.2 Feature z Highest Resolution It's the highest resolution...
User Manual
Page 11
.... Because of your existing surround sound system. It's true art, Westinghouse-style. Amazingly thin for external receivers and surround-sound processors. 8 z Great Sound Right Out of the Box The Westinghouse VM-42/47F140S is the largest screen you can use them to all your wall...z Design Excellence The Westinghouse VM-42/47F140S 1080p monitor is a complete entertainment package. Convenient switched stereo audio outputs allow the ultimate flexibility for its ingenious and efficient design, you can fit in a 40" or 42". A pair of mounting this 47" display in the same space ...
.... Because of your existing surround sound system. It's true art, Westinghouse-style. Amazingly thin for external receivers and surround-sound processors. 8 z Great Sound Right Out of the Box The Westinghouse VM-42/47F140S is the largest screen you can use them to all your wall...z Design Excellence The Westinghouse VM-42/47F140S 1080p monitor is a complete entertainment package. Convenient switched stereo audio outputs allow the ultimate flexibility for its ingenious and efficient design, you can fit in a 40" or 42". A pair of mounting this 47" display in the same space ...

User Manual
Page 12
..., HDMI3) 5. NOTE 2: The picture of LCD MONITOR display is appeared, press the button to select or access the sub-menu. 2. 2.3 Controls and Ports of your MONITOR, including the on or off. 6. POWER: Turns the LCD-MONITOR on -screen menu. Front Panel Views Français Español English ... ─ Power On ORANGE LIGHT ─ Power Sleep OFF LIGHT ─ Power Off NOTE 1: These buttons control the basic features of the Panel A. To use advanced features, you must use as the left/right arrow button for reference only. 9 When OSD is for menu. 3. CHANNEL...
..., HDMI3) 5. NOTE 2: The picture of LCD MONITOR display is appeared, press the button to select or access the sub-menu. 2. 2.3 Controls and Ports of your MONITOR, including the on or off. 6. POWER: Turns the LCD-MONITOR on -screen menu. Front Panel Views Français Español English ... ─ Power On ORANGE LIGHT ─ Power Sleep OFF LIGHT ─ Power Off NOTE 1: These buttons control the basic features of the Panel A. To use advanced features, you must use as the left/right arrow button for reference only. 9 When OSD is for menu. 3. CHANNEL...

User Manual
Page 16
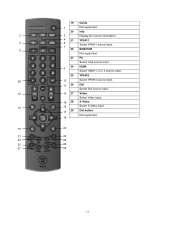
...çais Español English 2.5 Remote Control 1 Power 1 Switch MONITOR power On/Off. 2 Mute 2 3 Turn the sound On/Off. 4 3 Swap 5 6 7 Not supported. 8 4 PIP Not supported. 5 Backlight Adjust the LCD backlight level. 9 6 Sleep Press to root OSD menu 17 Enter Execute... a command. 18 OSD menu control(▲/▼:OSD Menu Up/Down Select;◄/►:Volume/Setting Up/Down) 13 Input source select. 21 22 14 Screen Fit 23 24 Adjust scaling 25 26 27 28 15 Menu Display...
...çais Español English 2.5 Remote Control 1 Power 1 Switch MONITOR power On/Off. 2 Mute 2 3 Turn the sound On/Off. 4 3 Swap 5 6 7 Not supported. 8 4 PIP Not supported. 5 Backlight Adjust the LCD backlight level. 9 6 Sleep Press to root OSD menu 17 Enter Execute... a command. 18 OSD menu control(▲/▼:OSD Menu Up/Down Select;◄/►:Volume/Setting Up/Down) 13 Input source select. 21 22 14 Screen Fit 23 24 Adjust scaling 25 26 27 28 15 Menu Display...
User Manual
Page 17
19 Guide 1 Not supported. 20 Info 2 3 Display the source information. 4 21 YPbPr1 5 6 Select YPbPr1 source input. 7 8 22 MONITOR Not supported. 23 PC Select VGA source input. 24 HDMI 9 Select HDMI 1, 2 or 3 source input. 25 YPbPr2 29 10 Select YPbPr2 source input. 11 26 DVI Select DVI source input. 12 13 27 Video Select Video input. 14 28 S-Video 15 16 Select S-Video input. 29 Dot button 17 Not supported. 18 19 20 21 22 23 24 25 26 27 28 14
19 Guide 1 Not supported. 20 Info 2 3 Display the source information. 4 21 YPbPr1 5 6 Select YPbPr1 source input. 7 8 22 MONITOR Not supported. 23 PC Select VGA source input. 24 HDMI 9 Select HDMI 1, 2 or 3 source input. 25 YPbPr2 29 10 Select YPbPr2 source input. 11 26 DVI Select DVI source input. 12 13 27 Video Select Video input. 14 28 S-Video 15 16 Select S-Video input. 29 Dot button 17 Not supported. 18 19 20 21 22 23 24 25 26 27 28 14

User Manual
Page 19
...VGA): For the best picture quality, set this timing. 16 z Select input source for MONITOR is 100 ~ 240Vac, before beginning; z Connect power cables Connect the power cord to the LCD MONITOR then to set the timing of the LCD MONITOR, or press the power (Red) button on the right side of your computer to ...a proper AC outlet. IMPORTANT: The power input voltage for the LCD MONITOR using the OSD menu or remote control direct select buttons z If connecting to 1920 x 1080 at 60Hz. z Turn Power On Press the power ...
...VGA): For the best picture quality, set this timing. 16 z Select input source for MONITOR is 100 ~ 240Vac, before beginning; z Connect power cables Connect the power cord to the LCD MONITOR then to set the timing of the LCD MONITOR, or press the power (Red) button on the right side of your computer to ...a proper AC outlet. IMPORTANT: The power input voltage for the LCD MONITOR using the OSD menu or remote control direct select buttons z If connecting to 1920 x 1080 at 60Hz. z Turn Power On Press the power ...

User Manual
Page 21
b. Remove the four screws underneath the BASE. (See picture below) c. Pull out the BASE from the MONITOR. 18 Carefully place the MONITOR face down on a soft clean surface. 3.3 How to remove the BASE a.
b. Remove the four screws underneath the BASE. (See picture below) c. Pull out the BASE from the MONITOR. 18 Carefully place the MONITOR face down on a soft clean surface. 3.3 How to remove the BASE a.
User Manual
Page 22
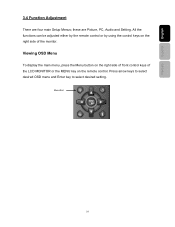
Menu/Exit 19 Press arrow keys to select desired OSD menu and Enter key to select desired setting. All the functions can be adjusted either by the remote control or by using the control keys on the right side of the LCD MONITOR or the MENU key on the right side of front control keys of the monitor. Français Español English 3.4 Function Adjustment There are Picture, PC, Audio and Setting. Viewing OSD Menu To display the main menu, press the Menu button on the remote control. these are four main Setup Menus;
Menu/Exit 19 Press arrow keys to select desired OSD menu and Enter key to select desired setting. All the functions can be adjusted either by the remote control or by using the control keys on the right side of the LCD MONITOR or the MENU key on the right side of front control keys of the monitor. Français Español English 3.4 Function Adjustment There are Picture, PC, Audio and Setting. Viewing OSD Menu To display the main menu, press the Menu button on the remote control. these are four main Setup Menus;

User Manual
Page 29
The picture is in the right mode (MONITOR / VCR / CBL / AUX) There are stripes on the screen or colors fade. ▪ There may be interference from other appliances. ▪ There may have reached ... the power and video cables are not touching. Picture is light or improperly tinted. ▪ Check the Hue, Saturation and Color adjustments. ▪ Reset the MONITOR to the factory default settings. Check the Hue, Saturation and Color adjustments 26
The picture is in the right mode (MONITOR / VCR / CBL / AUX) There are stripes on the screen or colors fade. ▪ There may be interference from other appliances. ▪ There may have reached ... the power and video cables are not touching. Picture is light or improperly tinted. ▪ Check the Hue, Saturation and Color adjustments. ▪ Reset the MONITOR to the factory default settings. Check the Hue, Saturation and Color adjustments 26
User Manual
Page 30
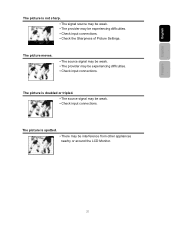
... weak. ▪ Check input connections. The picture is doubled or tripled. ▪ The source signal may be interference from other appliances nearby or around the LCD Monitor. 27 The picture moves. ▪ The source signal may be weak. ▪ The provider may be experiencing difficulties. ▪ Check input connections. ▪ Check the...
... weak. ▪ Check input connections. The picture is doubled or tripled. ▪ The source signal may be interference from other appliances nearby or around the LCD Monitor. 27 The picture moves. ▪ The source signal may be weak. ▪ The provider may be experiencing difficulties. ▪ Check input connections. ▪ Check the...


