User Manual
Page 2
... Contents 6 Front View of the LCD TV DVD combo 6 Rear View of the LCD TV DVD combo 6 Side View of the LCD TV DVD combo 7 Input connectors of the LCD TV DVD combo 8 Remote Control 9 Installation 11 Playing a Disc 14 OSD Functions DVD SETTINGS: Down Mix/Repeat/Demo Mode...Balance / MTS / Mute / Speaker / Audio Out / Reset 18 TV/HDTV SETTINGS: TV System / Auto Scan / Channel Edit / Local Time / Daylight SAV 19 PARENTAL CONTROLS: Password / TV PG Rating / MAPP Rating / DVD Rating / Password Edit 20 GENERAL SETTINGS: Transparency / Menu Position / ...
... Contents 6 Front View of the LCD TV DVD combo 6 Rear View of the LCD TV DVD combo 6 Side View of the LCD TV DVD combo 7 Input connectors of the LCD TV DVD combo 8 Remote Control 9 Installation 11 Playing a Disc 14 OSD Functions DVD SETTINGS: Down Mix/Repeat/Demo Mode...Balance / MTS / Mute / Speaker / Audio Out / Reset 18 TV/HDTV SETTINGS: TV System / Auto Scan / Channel Edit / Local Time / Daylight SAV 19 PARENTAL CONTROLS: Password / TV PG Rating / MAPP Rating / DVD Rating / Password Edit 20 GENERAL SETTINGS: Transparency / Menu Position / ...
User Manual
Page 3
... non-ammonia, non-alcohol abrasive detergent onto a clean, soft, lint-free cloth, then wipe the surface. Disclaimer Westinghouse Digital does not recommend the use of any ammonia or alcohol-based cleaners on the LCD TV DVD combo screen or case. Some chemical cleaners have been reported to the presence of _nies_ieted %ongerous voitoge" within...
... non-ammonia, non-alcohol abrasive detergent onto a clean, soft, lint-free cloth, then wipe the surface. Disclaimer Westinghouse Digital does not recommend the use of any ammonia or alcohol-based cleaners on the LCD TV DVD combo screen or case. Some chemical cleaners have been reported to the presence of _nies_ieted %ongerous voitoge" within...
User Manual
Page 4
... are not likely to be placed on or pinched by Westinghouse Digital. Ventilation Slots and openings on the LCD TV DVD combo. You may be readily accessible. don't place the LCD TV DVD combo in fire or electronic shock. Precautions • Avoid touching the screen. Orient your LCD TV DVD combo to direct sunlight or high temperatures. To Reduce The...
... are not likely to be placed on or pinched by Westinghouse Digital. Ventilation Slots and openings on the LCD TV DVD combo. You may be readily accessible. don't place the LCD TV DVD combo in fire or electronic shock. Precautions • Avoid touching the screen. Orient your LCD TV DVD combo to direct sunlight or high temperatures. To Reduce The...
User Manual
Page 5
... for long periods of overhead electric light or power circuits. type plug. If the provided plug does not fit into your LCD TV DVD combo and wait for the LCD TV DVD combo during a lightning storm, or when it is grounded to rain or moisture, it has been exposed to prevent voltage ...from being walked on proper grounding of the mast and supporting structure, grounding of the lead-in accordance with the LCD TV DVD combo. This will prevent damage to the LCD TV DVD combo due to improve. Install in wire to an antenna discharge unit, connection to keep from the wall outlet ...
... for long periods of overhead electric light or power circuits. type plug. If the provided plug does not fit into your LCD TV DVD combo and wait for the LCD TV DVD combo during a lightning storm, or when it is grounded to rain or moisture, it has been exposed to prevent voltage ...from being walked on proper grounding of the mast and supporting structure, grounding of the lead-in accordance with the LCD TV DVD combo. This will prevent damage to the LCD TV DVD combo due to improve. Install in wire to an antenna discharge unit, connection to keep from the wall outlet ...
User Manual
Page 6
...Canada In the United States and Canada the male plug is certified for the LCD TV DVD combo. However, there is not enclosed. Also, any unauthorized changes or modifications not expressly approved by Westinghouse Digital will not occur in the United States and Canada. CAUTION: The ...power supply outlet should be located near the LCD TV DVD combo and should look like Figure A1 below for the selection criteria ...
...Canada In the United States and Canada the male plug is certified for the LCD TV DVD combo. However, there is not enclosed. Also, any unauthorized changes or modifications not expressly approved by Westinghouse Digital will not occur in the United States and Canada. CAUTION: The ...power supply outlet should be located near the LCD TV DVD combo and should look like Figure A1 below for the selection criteria ...
User Manual
Page 7
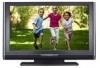
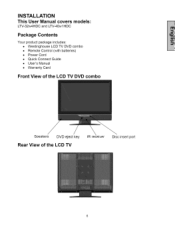
INSTALLATION This User Manual covers models: LTV-32w4HDC and LTV-40w1HDC Package Contents Your product package includes: • Westinghouse LCD TV DVD combo • Remote Control (with batteries) • Power Cord • Quick Connect Guide • User's Manual • Warranty Card Front View of the LCD TV DVD combo Speakers DVD eject key Rear View of the LOB TV IR receiver Disc insert port
INSTALLATION This User Manual covers models: LTV-32w4HDC and LTV-40w1HDC Package Contents Your product package includes: • Westinghouse LCD TV DVD combo • Remote Control (with batteries) • Power Cord • Quick Connect Guide • User's Manual • Warranty Card Front View of the LCD TV DVD combo Speakers DVD eject key Rear View of the LOB TV IR receiver Disc insert port
User Manual
Page 9
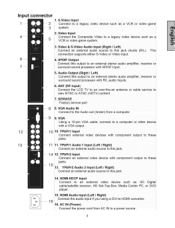
... to an external stereo audio amplifier, receiver or surround sound processor with component output to a computer or other device with SPDIF Input. or DVD 15. YPbPrl Audio 1 Input (Left/Right) Connect an external audio source to these !3 11 11. HDMI-HDCP Connect to the Audio ... Left) Connect an external audio source to an over-the-air view NTSC or ATSC (HDTV) content. 7. receiver or 5. ANT (RF-input) Connect the LCD TV to this output to -HDMI converter. 16. YPbPrl Connect jacks. AC IN (Power) Connect the power cord from a computer. 9 9. S-Video Input Connect ...
... to an external stereo audio amplifier, receiver or surround sound processor with component output to a computer or other device with SPDIF Input. or DVD 15. YPbPrl Audio 1 Input (Left/Right) Connect an external audio source to these !3 11 11. HDMI-HDCP Connect to the Audio ... Left) Connect an external audio source to an over-the-air view NTSC or ATSC (HDTV) content. 7. receiver or 5. ANT (RF-input) Connect the LCD TV to this output to -HDMI converter. 16. YPbPrl Connect jacks. AC IN (Power) Connect the power cord from a computer. 9 9. S-Video Input Connect ...
User Manual
Page 10
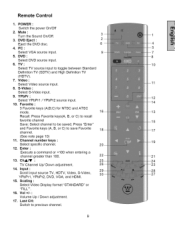
...: Select channel to toggle between Standard Definition TV (SDTV) and High Definition TV (HDTV). 7. ChAIr : TV Channel Up/Down adjustment. 14. Mute : 3 Turn the Sound On/Off. 3. DVD Eject : Eject the DVD disc. 6 4. DVD : Select DVD source input. 6. TV: Select TV source input to be saved; Video : ... mode. Enter : Execute a command or +100 when entering a channel greater than 100. 13. Input : Scroll input source TV, HDTV, Video, S-Video, YPbPrl, YPbPr2, DVD, VGA, and HDMI. 15. Remote Control 1. POWER : Switch the power On/Off 2. Press "Enter" and Favorite keys ...
...: Select channel to toggle between Standard Definition TV (SDTV) and High Definition TV (HDTV). 7. ChAIr : TV Channel Up/Down adjustment. 14. Mute : 3 Turn the Sound On/Off. 3. DVD Eject : Eject the DVD disc. 6 4. DVD : Select DVD source input. 6. TV: Select TV source input to be saved; Video : ... mode. Enter : Execute a command or +100 when entering a channel greater than 100. 13. Input : Scroll input source TV, HDTV, Video, S-Video, YPbPrl, YPbPr2, DVD, VGA, and HDMI. 15. Remote Control 1. POWER : Switch the power On/Off 2. Press "Enter" and Favorite keys ...
User Manual
Page 11
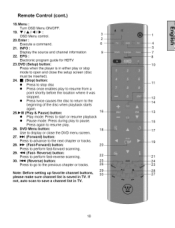
... to advance to the next chapter or tracks. 28. _ (Fast-Forward) button: Press to pause. INFO : Display the source and channel information 9 22. DVD Menu button: Use to display or close the setup screen (disc must be inserted). 24. • (Stop) button: • Press to stop disc •...guide for HDTV 23. Reverse) button: Press to perform fast-reverse scanning. 30. _ (Reverse) button: Press to go to save a channel list in TV. 10 Remote Control (cont.) 18.Menu : Turn OSD Menu ON/OFF. 19. Note: Before setting up favorite channel buttons, please make sure channel list...
... to advance to the next chapter or tracks. 28. _ (Fast-Forward) button: Press to pause. INFO : Display the source and channel information 9 22. DVD Menu button: Use to display or close the setup screen (disc must be inserted). 24. • (Stop) button: • Press to stop disc •...guide for HDTV 23. Reverse) button: Press to perform fast-reverse scanning. 30. _ (Reverse) button: Press to go to save a channel list in TV. 10 Remote Control (cont.) 18.Menu : Turn OSD Menu ON/OFF. 19. Note: Before setting up favorite channel buttons, please make sure channel list...
User Manual
Page 13
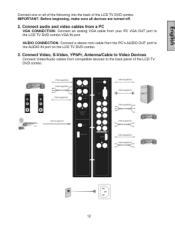
IMPORTANT: Before beginning, make sure all of the following into the back of the LCD TV DVD combo. ( No_ supplied ) ( NOI Supplied } Yi!iil ( NO[ supplied ( Not supp ied } 12 Connect one or all devices are turned off. 2. Connect Video, S-Video, YPbPr, ... Video Devices Connect Video/Audio cables from the PC's AUDIO OUT port to the AUDIO IN port on the LCD TV DVD combo. 3. AUDIO CONNECTION: Connect a stereo mini cable from compatible devices to the LCD TV DVD combo VGA IN port. Connect audio and video cables from a PC VGA CONNECTION: Connect an analog VGA cable from...
IMPORTANT: Before beginning, make sure all of the following into the back of the LCD TV DVD combo. ( No_ supplied ) ( NOI Supplied } Yi!iil ( NO[ supplied ( Not supp ied } 12 Connect one or all devices are turned off. 2. Connect Video, S-Video, YPbPr, ... Video Devices Connect Video/Audio cables from the PC's AUDIO OUT port to the AUDIO IN port on the LCD TV DVD combo. 3. AUDIO CONNECTION: Connect a stereo mini cable from compatible devices to the LCD TV DVD combo VGA IN port. Connect audio and video cables from a PC VGA CONNECTION: Connect an analog VGA cable from...
User Manual
Page 14
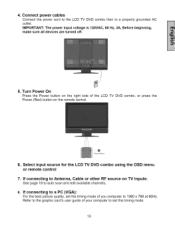
or press the 6. 4. Connect power cables Connect the power cord to the LCD TV DVD combo then to a PC (VGA): For the best picture quality, set this timing mode. 13 IMPORTANT: The power input voltage is 120VAC, 60 Hz, 3A, ... 1360 x 768 at 60Hz. If connecting to auto scan and edit available channels. 8. Refer to the graphic card's user guide of the LCD TV DVD combo, Power (Red) button on TV Inputs: See page 19 to Antenna, Cable or other RF source on the remote control. If connecting to a properly grounded AC outlet. Select...
or press the 6. 4. Connect power cables Connect the power cord to the LCD TV DVD combo then to a PC (VGA): For the best picture quality, set this timing mode. 13 IMPORTANT: The power input voltage is 120VAC, 60 Hz, 3A, ... 1360 x 768 at 60Hz. If connecting to auto scan and edit available channels. 8. Refer to the graphic card's user guide of the LCD TV DVD combo, Power (Red) button on TV Inputs: See page 19 to Antenna, Cable or other RF source on the remote control. If connecting to a properly grounded AC outlet. Select...

User Manual
Page 15
Note: This is an LCD TV DVD combo with Westinghouse Auto Wake feature. i, II PAUSE/PLAY Fast Reverse Fast Forward Chapter Forward I_N Chapter Reverse • STOP To play a disc. 1. To end playback. Each time ... into the disc slot with no region code label may differ depending on the remote or control panel. 14 Some DVDs with label side facing upward (If the disc has a label) then LCD TV will be changed to x2, x4, x8, x20 speeds, the actual playback speed may still be allowed by the...
Note: This is an LCD TV DVD combo with Westinghouse Auto Wake feature. i, II PAUSE/PLAY Fast Reverse Fast Forward Chapter Forward I_N Chapter Reverse • STOP To play a disc. 1. To end playback. Each time ... into the disc slot with no region code label may differ depending on the remote or control panel. 14 Some DVDs with label side facing upward (If the disc has a label) then LCD TV will be changed to x2, x4, x8, x20 speeds, the actual playback speed may still be allowed by the...
User Manual
Page 16
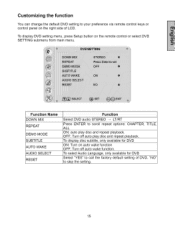
To display disc subtitle, only available for DVD Select "YES" to call the factory default setting of LCD. To display DVD setting menu, press Setup button on auto wake function OFF: Turn off auto play disc and repeat playback. Customizing the function You can change the default DVD setting to your preference via remote control...
To display disc subtitle, only available for DVD Select "YES" to call the factory default setting of LCD. To display DVD setting menu, press Setup button on auto wake function OFF: Turn off auto play disc and repeat playback. Customizing the function You can change the default DVD setting to your preference via remote control...
User Manual
Page 17
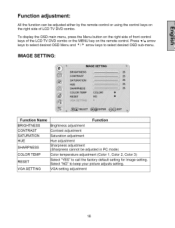
... adjustment (Sharpness cannot be adjusted either by the remote control or using the control keys on the right side of the LCD TV DVD combo or the MENU key on the right side of front control keys of LCD TV DVD combo. To display the OSD main menu, press the Menu button on the remote control.
... adjustment (Sharpness cannot be adjusted either by the remote control or using the control keys on the right side of the LCD TV DVD combo or the MENU key on the right side of front control keys of LCD TV DVD combo. To display the OSD main menu, press the Menu button on the remote control.
User Manual
Page 18
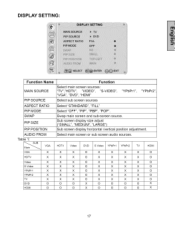
... 1: VGA VGA X HDTV X Video X S Video X YPbPrl X YPbPr2 X TV X DVD O HDMI O Function Select main screen sources: "TV","HDTV", "VIDEO", "VGA", "DVD", "HDMI" "S-VIDEO", Select sub screen sources "YPbPrl", "YPbPr2" Select "STAN DARD...adjust ("SMALL", "MEDIUM", "LARGE") Sub screen display horizontal/vertical position adjustment. Swap main screen and sub-screen source. HDTV Video DVD S Video YPbPrl YPbPr2 TV HDMI X X O X X X X O X X O X X X X O X X O X X X X O X X O X X X X O X X O X X X X O X X O X X X X O X X ...
... 1: VGA VGA X HDTV X Video X S Video X YPbPrl X YPbPr2 X TV X DVD O HDMI O Function Select main screen sources: "TV","HDTV", "VIDEO", "VGA", "DVD", "HDMI" "S-VIDEO", Select sub screen sources "YPbPrl", "YPbPr2" Select "STAN DARD...adjust ("SMALL", "MEDIUM", "LARGE") Sub screen display horizontal/vertical position adjustment. Swap main screen and sub-screen source. HDTV Video DVD S Video YPbPrl YPbPr2 TV HDMI X X O X X X X O X X O X X X X O X X O X X X X O X X O X X X X O X X O X X X X O X X O X X X X O X X ...

User Manual
Page 21
... parental controls sub-menu. Select "G", "PG-13", "R", "NC-17", "X", or "OFF" DVD RATING Select "KID SAFE", "ADULT ONLY", or "OFF" PASSWORD EDIT Enter new pass word TV PG Rating TV Y All children YTV Y7 For elder children TV G General audience TV PG TV 14 TV MA OFF Parental guidance suggested Parents strongly cautioned Mature audience only None...
... parental controls sub-menu. Select "G", "PG-13", "R", "NC-17", "X", or "OFF" DVD RATING Select "KID SAFE", "ADULT ONLY", or "OFF" PASSWORD EDIT Enter new pass word TV PG Rating TV Y All children YTV Y7 For elder children TV G General audience TV PG TV 14 TV MA OFF Parental guidance suggested Parents strongly cautioned Mature audience only None...
User Manual
Page 23
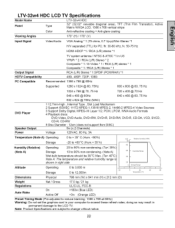
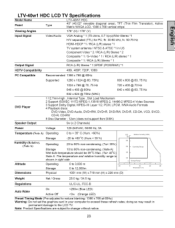
..., DVD-Audio, DVD+RW, DVD+R, DVD-RW, DVD-R, CD-DA, VCD, SVCD, CD-R, CD-RW 5 Disc Diameter 12cm (does not support 8cm DISC) 9w (x 2 Channels) Voltage 120VAC, 60 Hz, 3A Temperature (Note A) Operating 0 to + 35 ° C (Hum. 40°C _,_ Note A: The temperature and relative humidity range is shown ...kg Regulations UL/C-UL, FCC-B Auto Wake On Active Off LTV-32w4 Model Name Panel Viewing Angles HDC LCD TV Specifications LTV-32w4 HDC Type 32" (32.02" viewable diagonal area), TFT (Thin Film Transistor), Matrix WXGA LCD, 1366 x 768 vertical stripe Color Anti-reflective coating + ...
..., DVD-Audio, DVD+RW, DVD+R, DVD-RW, DVD-R, CD-DA, VCD, SVCD, CD-R, CD-RW 5 Disc Diameter 12cm (does not support 8cm DISC) 9w (x 2 Channels) Voltage 120VAC, 60 Hz, 3A Temperature (Note A) Operating 0 to + 35 ° C (Hum. 40°C _,_ Note A: The temperature and relative humidity range is shown ...kg Regulations UL/C-UL, FCC-B Auto Wake On Active Off LTV-32w4 Model Name Panel Viewing Angles HDC LCD TV Specifications LTV-32w4 HDC Type 32" (32.02" viewable diagonal area), TFT (Thin Film Transistor), Matrix WXGA LCD, 1366 x 768 vertical stripe Color Anti-reflective coating + ...
User Manual
Page 24
... Name Panel HDC LCD TV Specifications LTV-40W1 HDC Type 40" (40.02" viewable diagonal area), TFT (Thin Matrix WXGA LCD, 1366 x 768 vertical stripe Film Transistor), Active Viewing Angles 178 ° (H)/178 ° (V) Input Signal Video/Audio VGA Analog * 1 (75 ohms, ...IEC 11172 MPEG-1,13818 MPEG-2, 14496-2 MPEG-4 Video Sources 3 Support Dolby Digital, MPEG-I/II Layer 1/2, PCM, LPCM, WMAAudio Formats 4 Playback discs: DVD-Video, DVD-Audio, DVD+RW, DVD+R, DVD-RW, DVD-R, CD-DA, VCD, SVCD, CD-R, CD-RW 5 Disc Diameter : 12cm (does not support 8cm DISK) 9w (x 2 Channels) Power Voltage ...
... Name Panel HDC LCD TV Specifications LTV-40W1 HDC Type 40" (40.02" viewable diagonal area), TFT (Thin Matrix WXGA LCD, 1366 x 768 vertical stripe Film Transistor), Active Viewing Angles 178 ° (H)/178 ° (V) Input Signal Video/Audio VGA Analog * 1 (75 ohms, ...IEC 11172 MPEG-1,13818 MPEG-2, 14496-2 MPEG-4 Video Sources 3 Support Dolby Digital, MPEG-I/II Layer 1/2, PCM, LPCM, WMAAudio Formats 4 Playback discs: DVD-Video, DVD-Audio, DVD+RW, DVD+R, DVD-RW, DVD-R, CD-DA, VCD, SVCD, CD-R, CD-RW 5 Disc Diameter : 12cm (does not support 8cm DISK) 9w (x 2 Channels) Power Voltage ...

User Manual
Page 25
... • Press only one button at a time. Loose or broken pins in the cable connector could cause an improper connection. • Connect the LCD TV DVD combo to reset the Audio Interconnection Issues • Remember that S-Video and Composite (AV) share the same audio source. Wrong or Abnormal Colors •... cable to make sure it tightly. • . Power is ON but No Screen Image • Make sure the video cable connected to the LCD TV DVD combo is supplying the proper voltage. Troubleshooting No Power • Make sure power button is ON (Blue LED ). • Make sure AC power...
... • Press only one button at a time. Loose or broken pins in the cable connector could cause an improper connection. • Connect the LCD TV DVD combo to reset the Audio Interconnection Issues • Remember that S-Video and Composite (AV) share the same audio source. Wrong or Abnormal Colors •... cable to make sure it tightly. • . Power is ON but No Screen Image • Make sure the video cable connected to the LCD TV DVD combo is supplying the proper voltage. Troubleshooting No Power • Make sure power button is ON (Blue LED ). • Make sure AC power...
User Manual
Page 26
Remote Control Code Not Found in 4:3 format. DVD Player Does Not Work Disc Error messages "Incorrect Disc", "Region Code Error" Playback doesn't start • The disc is reversed. No picture / sound • TV source selector is not set correctly. • Some discs may not perform certain ... dirty. Load a playable disc. • The disc may not match your TV system. Clean the disc. How Can I Find More Help? • Log on to: www.westinghousedigital.com • Contact Westinghouse Customer Service [email protected] at (866) 287-5555 or write us at 25...
Remote Control Code Not Found in 4:3 format. DVD Player Does Not Work Disc Error messages "Incorrect Disc", "Region Code Error" Playback doesn't start • The disc is reversed. No picture / sound • TV source selector is not set correctly. • Some discs may not perform certain ... dirty. Load a playable disc. • The disc may not match your TV system. Clean the disc. How Can I Find More Help? • Log on to: www.westinghousedigital.com • Contact Westinghouse Customer Service [email protected] at (866) 287-5555 or write us at 25...


