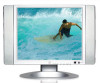
User Manual
Page 2
...THE PRODUCT ...11 REMOTE CONTROL...12 INPUT/ ...13 DISPLAY MODES ...13 AUTO ...13 OSD FUNCTIONS...14 MAIN TV MENU ...14 Audio Adjustment Menu ...15 OSD Language Menu...15 TV Channel Scanning Menu ...16 OSD Menu...16 Antenna/CATV Input Menu...17 V-Chip and Parental Control Menu 18 MOVIE...on screen ...26 No sound...26 Remote control does not work...26 Remote control code not found in "universal" remote 26 How do I mount the LCD TV on a wall 26 How do I find more help?...26 1 INSERT REMOTE CONTROL BATTERIES 6 2. Table of Contents IMPORTANT PRODUCT SAFETY INSTRUCTIONS 2 ANTENNA INSTALLATION...
...THE PRODUCT ...11 REMOTE CONTROL...12 INPUT/ ...13 DISPLAY MODES ...13 AUTO ...13 OSD FUNCTIONS...14 MAIN TV MENU ...14 Audio Adjustment Menu ...15 OSD Language Menu...15 TV Channel Scanning Menu ...16 OSD Menu...16 Antenna/CATV Input Menu...17 V-Chip and Parental Control Menu 18 MOVIE...on screen ...26 No sound...26 Remote control does not work...26 Remote control code not found in "universal" remote 26 How do I mount the LCD TV on a wall 26 How do I find more help?...26 1 INSERT REMOTE CONTROL BATTERIES 6 2. Table of Contents IMPORTANT PRODUCT SAFETY INSTRUCTIONS 2 ANTENNA INSTALLATION...
User Manual
Page 7
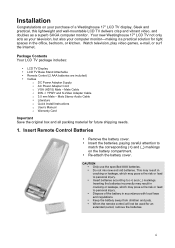
... may pose a fire risk or lead to personal injury. • Insert batteries according to personal injury. • Dispose of a Westinghouse 17" LCD TV display. Installation Congratulations on the battery compartment. • Re-attach the battery cover. Male Stereo Audio Cable • Literature o Quick... -> YPbPr and S-Video Adapter Cable o 3.5 mm Male - This may pose a fire risk or lead to (+) and (_) markings. Your new Westinghouse 17" LCD TV not only acts as a superb SXGA computer monitor. CAUTION • Only use the specified AAA batteries. • Do not mix new and old...
... may pose a fire risk or lead to personal injury. • Insert batteries according to personal injury. • Dispose of a Westinghouse 17" LCD TV display. Installation Congratulations on the battery compartment. • Re-attach the battery cover. Male Stereo Audio Cable • Literature o Quick... -> YPbPr and S-Video Adapter Cable o 3.5 mm Male - This may pose a fire risk or lead to (+) and (_) markings. Your new Westinghouse 17" LCD TV not only acts as a superb SXGA computer monitor. CAUTION • Only use the specified AAA batteries. • Do not mix new and old...

User Manual
Page 8
Attach Base Stand to LCD TV Attach the Base Stand to the LCD TV stand neck. 2. Align the holes and tabs, press in and snap into place. 7
Attach Base Stand to LCD TV Attach the Base Stand to the LCD TV stand neck. 2. Align the holes and tabs, press in and snap into place. 7
User Manual
Page 9
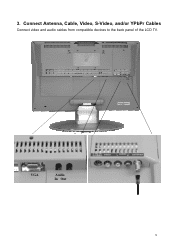
Connect Antenna, Cable, Video, S-Video, and/or YPbPr Cables Connect video and audio cables from compatible devices to the back panel of the LCD TV. VGA Audio In Out 8 3.
Connect Antenna, Cable, Video, S-Video, and/or YPbPr Cables Connect video and audio cables from compatible devices to the back panel of the LCD TV. VGA Audio In Out 8 3.
User Manual
Page 10
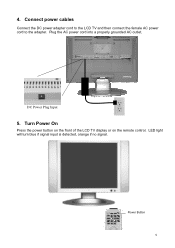
Turn Power On Press the power button on the front of the LCD TV display or on the remote control. Power Button 9 Plug the AC power cord into a properly grounded AC outlet. Connect power cables Connect the DC power adapter cord to the LCD TV and then connect the female AC power cord to the adapter. DC Power Plug Input 5. LED light will turn blue if signal input is detected, orange if no signal. 4.
Turn Power On Press the power button on the front of the LCD TV display or on the remote control. Power Button 9 Plug the AC power cord into a properly grounded AC outlet. Connect power cables Connect the DC power adapter cord to the LCD TV and then connect the female AC power cord to the adapter. DC Power Plug Input 5. LED light will turn blue if signal input is detected, orange if no signal. 4.
User Manual
Page 13
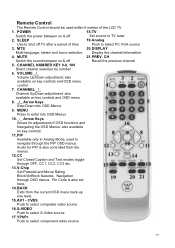
... 14.BACK Exits from the menus. 12.CC Set Closed Caption and Text modes toggle through the PIP OSD menus. Audio for adjustment of the LCD TV. 1. MENU Press to enter into OSD Menus 9. Remote Control The Remote Control should be used to navigate through OFF, CC1, CC2, CC3... Mode, used within 5 meters of OSD functions and Navigating the OSD Menus; CHANNEL _/_ Channel Up/Down adjustment; also available on & off TV after a period of time Push to select component video source 12 Navigation through OSD menus. Pin Code is also controlled from the current OSD ...
... 14.BACK Exits from the menus. 12.CC Set Closed Caption and Text modes toggle through the PIP OSD menus. Audio for adjustment of the LCD TV. 1. MENU Press to enter into OSD Menus 9. Remote Control The Remote Control should be used to navigate through OFF, CC1, CC2, CC3... Mode, used within 5 meters of OSD functions and Navigating the OSD Menus; CHANNEL _/_ Channel Up/Down adjustment; also available on & off TV after a period of time Push to select component video source 12 Navigation through OSD menus. Pin Code is also controlled from the current OSD ...
User Manual
Page 14
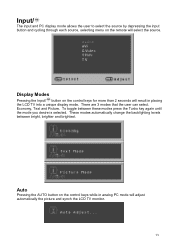
...than 2 seconds will result in analog PC mode will select the source. Auto Pressing the AUTO button on the control keys while in placing the LCD TV into a unique display mode. Display Modes Pressing the Input/ button on the remote will adjust automatically the picture and synch the... LCD TV monitor. 13 To toggle between bright, brighter and brightest. There are 3 modes that the user can select. These modes automatically change the backlighting levels ...
...than 2 seconds will result in analog PC mode will select the source. Auto Pressing the AUTO button on the control keys while in placing the LCD TV into a unique display mode. Display Modes Pressing the Input/ button on the remote will adjust automatically the picture and synch the... LCD TV monitor. 13 To toggle between bright, brighter and brightest. There are 3 modes that the user can select. These modes automatically change the backlighting levels ...
User Manual
Page 15
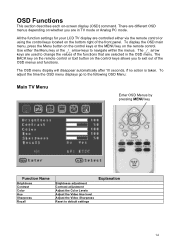
...are used to exit out of the front panel. To adjust the time the OSD menu displays go to the following OSD Menu: Main TV Menu Enter OSD Menus by pressing MENU key Function Name Brightness Contrast Color Hue Sharpness Recall Brightness adjustment Contrast adjustment Adjust the Color Levels Adjust... the Video Hue level Adjust the Video Sharpness Reset to navigate within the menus. All the function settings for your LCD TV display are different OSD menus depending on the bottom right of the OSD menus and functions. There are controlled either the Menu key or ...
...are used to exit out of the front panel. To adjust the time the OSD menu displays go to the following OSD Menu: Main TV Menu Enter OSD Menus by pressing MENU key Function Name Brightness Contrast Color Hue Sharpness Recall Brightness adjustment Contrast adjustment Adjust the Color Levels Adjust... the Video Hue level Adjust the Video Sharpness Reset to navigate within the menus. All the function settings for your LCD TV display are different OSD menus depending on the bottom right of the OSD menus and functions. There are controlled either the Menu key or ...
User Manual
Page 18
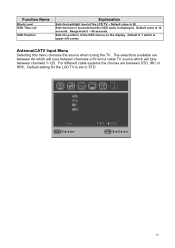
...that the OSD menu is set to STD. 17 Default is 1 which will tune between STD, IRC or HRC. Sets the position of the LCD TV - The selections available are between channels 1-125. Antenna/CATV Input Menu Selecting this menu chooses the source when tuning the... TV. For different cable systems the choices are between Air which will tune between channels 2-69 and a cable TV source which is 10 seconds. Function Name Black Level OSD Time-out OSD Position Explanation Sets...
...that the OSD menu is set to STD. 17 Default is 1 which will tune between STD, IRC or HRC. Sets the position of the LCD TV - The selections available are between channels 1-125. Antenna/CATV Input Menu Selecting this menu chooses the source when tuning the... TV. For different cable systems the choices are between Air which will tune between channels 2-69 and a cable TV source which is 10 seconds. Function Name Black Level OSD Time-out OSD Position Explanation Sets...
User Manual
Page 21
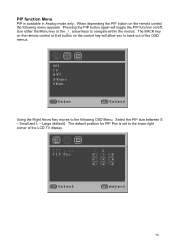
... the Menu key or the _/_ arrow keys to navigate within the menus. Pressing the PIP button again will allow you to back out of the LCD TV display. 20 Large (default). PIP function Menu PIP is set to the lower right corner of the OSD menus. The default position for PIP Pos...
... the Menu key or the _/_ arrow keys to navigate within the menus. Pressing the PIP button again will allow you to back out of the LCD TV display. 20 Large (default). PIP function Menu PIP is set to the lower right corner of the OSD menus. The default position for PIP Pos...

User Manual
Page 25
The following will be displayed: 24 Input Source not found or Out of the LCD TV/Monitor the following will be displayed: If in Analog mode and the Display settings are not compatible with or are out of range of Range If there is no source connected to the Input selected. Component) or Analog. TV, AV1, AV2(S-Video), AV-3 (YPbPr -
The following will be displayed: 24 Input Source not found or Out of the LCD TV/Monitor the following will be displayed: If in Analog mode and the Display settings are not compatible with or are out of range of Range If there is no source connected to the Input selected. Component) or Analog. TV, AV1, AV2(S-Video), AV-3 (YPbPr -
User Manual
Page 27
...Purchase a separate "learning" remote control How do I mount the LCD TV on a wall • Use the 75mm VESA hole pattern to secure mounting plate to the LCD TV • Use professional installation to reduce risk of Westinghouse Electric Corporation and are missing, check the video cable to change ...without notice. _, Westinghouse and You can be set to SAP or Dual • Press the...
...Purchase a separate "learning" remote control How do I mount the LCD TV on a wall • Use the 75mm VESA hole pattern to secure mounting plate to the LCD TV • Use professional installation to reduce risk of Westinghouse Electric Corporation and are missing, check the video cable to change ...without notice. _, Westinghouse and You can be set to SAP or Dual • Press the...

Quick Start Guide
Page 1
... Neck by using enclosed A/C power cable. REMOVABLE STAND FOR OPTIONAL WALL MOUNTING 3 GO! Connect A/C Power to the User's Manual. Insert smaller end of LCD. 17" LTV-17v1 LCD TV QUICK CONNECT GUIDE Westinghouse Digital Electronics CONNECTION PANEL CONGRATULATIONS on connection panel. For complete installation, usage instructions, and safety precautions please refer to power adapter kit by...
... Neck by using enclosed A/C power cable. REMOVABLE STAND FOR OPTIONAL WALL MOUNTING 3 GO! Connect A/C Power to the User's Manual. Insert smaller end of LCD. 17" LTV-17v1 LCD TV QUICK CONNECT GUIDE Westinghouse Digital Electronics CONNECTION PANEL CONGRATULATIONS on connection panel. For complete installation, usage instructions, and safety precautions please refer to power adapter kit by...

Quick Start Guide
Page 2
...or other devices, please refer to the User's Manual. © 2004 Westinghouse Digital Electronics, LLC. www.westinghousedigital.com Specifications subject to change without notice. , Westinghouse and You can attach your LCD TV to cycle between Video and S-Video. If you have trouble connecting these ...commonly used under license. MA-PS-0106-0401 TV Tuner VIDEO INPUTS Video S-Video YPbPr Digital Cable/...
...or other devices, please refer to the User's Manual. © 2004 Westinghouse Digital Electronics, LLC. www.westinghousedigital.com Specifications subject to change without notice. , Westinghouse and You can attach your LCD TV to cycle between Video and S-Video. If you have trouble connecting these ...commonly used under license. MA-PS-0106-0401 TV Tuner VIDEO INPUTS Video S-Video YPbPr Digital Cable/...


