User Guide
Page 1
ENGLISH CONTENTS IMPORTANT PRODUCT SAFETY INSTRUCTIONS 2 SAFETY GUIDELINES 3 FCC COMPLIANCE STATEMENT 3 CLEANING THE LCD MONITOR 4 FEATURES ...5 POWER SAVER 5 PLUG & PLAY 5 INSTALLATION 6 PACKAGE CONTENTS 6 CONTROL PANEL BUTTONS 7 INPUT CONNECTORS 8 1. TURN THE POWER ON 10 OSD MENU FUNCTIONS ... 13 MISCELLANEOUS MENU 13 INFORMATION MENU 15 QUICK BRIGHTNESS OR CONTRAST ADJUSTMENT 16 DISPLAY MODES 17 APPENDIX 18 SPECIFICATIONS 18 TROUBLESHOOTING 19 1 ATTACHING THE BASE STAND TO THE LCD MONITOR 9 2. CONNECT POWER CABLES 10 4. CONNECT VIDEO CABLES TO A COMPUTER 9 3.
ENGLISH CONTENTS IMPORTANT PRODUCT SAFETY INSTRUCTIONS 2 SAFETY GUIDELINES 3 FCC COMPLIANCE STATEMENT 3 CLEANING THE LCD MONITOR 4 FEATURES ...5 POWER SAVER 5 PLUG & PLAY 5 INSTALLATION 6 PACKAGE CONTENTS 6 CONTROL PANEL BUTTONS 7 INPUT CONNECTORS 8 1. TURN THE POWER ON 10 OSD MENU FUNCTIONS ... 13 MISCELLANEOUS MENU 13 INFORMATION MENU 15 QUICK BRIGHTNESS OR CONTRAST ADJUSTMENT 16 DISPLAY MODES 17 APPENDIX 18 SPECIFICATIONS 18 TROUBLESHOOTING 19 1 ATTACHING THE BASE STAND TO THE LCD MONITOR 9 2. CONNECT POWER CABLES 10 4. CONNECT VIDEO CABLES TO A COMPUTER 9 3.
User Guide
Page 2
...placed upon or against them . • Avoid exposing your LCD Monitor to be readily accessible. Your warranty does not cover repairs or attempted repairs by anyone not authorized by Westinghouse Digital. • If your LCD display with liquids, such as a bookcase or rack unless ... contact the Westinghouse Service Center. • WARNING - The LCD Monitor shall not be placed on or pinched by placing the LCD Monitor on a bed, sofa, rug or other similar surface. • Do not place the LCD Monitor in a built-in a well-ventilated area; For your LCD Monitor in installation such...
...placed upon or against them . • Avoid exposing your LCD Monitor to be readily accessible. Your warranty does not cover repairs or attempted repairs by anyone not authorized by Westinghouse Digital. • If your LCD display with liquids, such as a bookcase or rack unless ... contact the Westinghouse Service Center. • WARNING - The LCD Monitor shall not be placed on or pinched by placing the LCD Monitor on a bed, sofa, rug or other similar surface. • Do not place the LCD Monitor in a built-in a well-ventilated area; For your LCD Monitor in installation such...
User Guide
Page 3
... the United States and Canada In the United States and Canada the male plug is connected. • Consult the Westinghouse Service Center or an experienced radio/Monitor technician for this equipment does cause harmful interference to radio or television reception, which the receiver is a NEMA5-15 ... FCC compliance, the user must be easily accessible. ENGLISH Safety Guidelines CAUTION: The power supply outlet should be located near the LCD Monitor and should look like Figure A1 below for the selection criteria for your specific country. Cord Type SJT SVT Size of Conductors ...
... the United States and Canada In the United States and Canada the male plug is connected. • Consult the Westinghouse Service Center or an experienced radio/Monitor technician for this equipment does cause harmful interference to radio or television reception, which the receiver is a NEMA5-15 ... FCC compliance, the user must be easily accessible. ENGLISH Safety Guidelines CAUTION: The power supply outlet should be located near the LCD Monitor and should look like Figure A1 below for the selection criteria for your specific country. Cord Type SJT SVT Size of Conductors ...
User Guide
Page 4
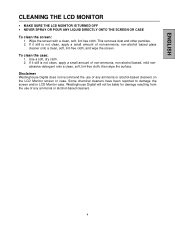
... a small amount of any ammonia or alcohol-based cleaners. 4 Some chemical cleaners have been reported to damage the screen and/or LCD Monitor case. Westinghouse Digital will not be liable for damage resulting from the use of non-ammonia, non-alcohol based, mild non- abrasive detergent onto ... a small amount of any ammonia or alcohol-based cleaners on the LCD Monitor screen or case. This removes dust and other particles. 2. To clean the case: 1. ENGLISH CLEANING THE LCD MONITOR • MAKE SURE THE LCD MONITOR IS TURNED OFF • NEVER SPRAY OR POUR ANY LIQUID DIRECTLY ONTO...
... a small amount of any ammonia or alcohol-based cleaners. 4 Some chemical cleaners have been reported to damage the screen and/or LCD Monitor case. Westinghouse Digital will not be liable for damage resulting from the use of non-ammonia, non-alcohol based, mild non- abrasive detergent onto ... a small amount of any ammonia or alcohol-based cleaners on the LCD Monitor screen or case. This removes dust and other particles. 2. To clean the case: 1. ENGLISH CLEANING THE LCD MONITOR • MAKE SURE THE LCD MONITOR IS TURNED OFF • NEVER SPRAY OR POUR ANY LIQUID DIRECTLY ONTO...
User Guide
Page 5
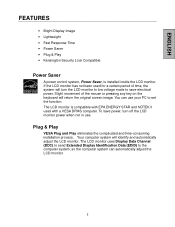
... movement of time, the system will return the original screen image. The LCD monitor is installed inside the LCD monitor. You can automatically adjust the LCD monitor. 5 To save power, turn the LCD monitor to low voltage mode to save electrical power. If the LCD monitor has not been used with a VESA DPMS computer. ENGLISH FEATURES •... NÜTEK if used for a certain period of the mouse or pressing any key on the keyboard will turn off the LCD monitor power when not in use your PC to set the function. Your computer system will identify and automatically adjust the...
... movement of time, the system will return the original screen image. The LCD monitor is installed inside the LCD monitor. You can automatically adjust the LCD monitor. 5 To save power, turn the LCD monitor to low voltage mode to save electrical power. If the LCD monitor has not been used with a VESA DPMS computer. ENGLISH FEATURES •... NÜTEK if used for a certain period of the mouse or pressing any key on the keyboard will turn off the LCD monitor power when not in use your PC to set the function. Your computer system will identify and automatically adjust the...
User Guide
Page 6
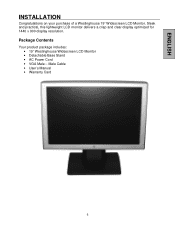
Package Contents Your product package includes: • 19" Westinghouse Widescreen LCD Monitor • Detachable Base Stand • AC Power Cord • VGA Male - Male Cable • User's Manual • Warranty Card 6 Sleek and practical, this lightweight LCD monitor delivers a crisp and clear display optimized for 1440 x 900 display resolution. ENGLISH INSTALLATION Congratulations on your purchase of a Westinghouse 19" Widescreen LCD Monitor.
Package Contents Your product package includes: • 19" Westinghouse Widescreen LCD Monitor • Detachable Base Stand • AC Power Cord • VGA Male - Male Cable • User's Manual • Warranty Card 6 Sleek and practical, this lightweight LCD monitor delivers a crisp and clear display optimized for 1440 x 900 display resolution. ENGLISH INSTALLATION Congratulations on your purchase of a Westinghouse 19" Widescreen LCD Monitor.
User Guide
Page 7
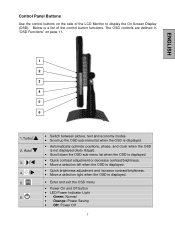
... left when the OSD is displayed. • Quick brightness adjustment and increase contrast/brightness. • Move a selection right when the OSD is a list of the LCD Monitor to display the On Screen Display (OSD). The OSD controls are defined in "OSD Functions" on the side of the control button functions. ENGLISH 1 2 3 4 5 6 1.Turbo...
... left when the OSD is displayed. • Quick brightness adjustment and increase contrast/brightness. • Move a selection right when the OSD is a list of the LCD Monitor to display the On Screen Display (OSD). The OSD controls are defined in "OSD Functions" on the side of the control button functions. ENGLISH 1 2 3 4 5 6 1.Turbo...
User Guide
Page 8
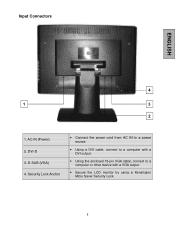
AC IN (Power) 2. DVI-D 3. Input Connectors ENGLISH 4 1 3 2 1. Security Lock Anchor • Connect the power cord from AC IN to a power source. • Using a DVI cable, connect to a computer with a DVI output. • Using the enclosed 15-pin VGA cable, connect to a computer or other device with a VGA output. • Secure the LCD monitor by using a Kensington Micro Saver Security Lock. 8 D-SUB (VGA) 4.
AC IN (Power) 2. DVI-D 3. Input Connectors ENGLISH 4 1 3 2 1. Security Lock Anchor • Connect the power cord from AC IN to a power source. • Using a DVI cable, connect to a computer with a DVI output. • Using the enclosed 15-pin VGA cable, connect to a computer or other device with a VGA output. • Secure the LCD monitor by using a Kensington Micro Saver Security Lock. 8 D-SUB (VGA) 4.
User Guide
Page 9
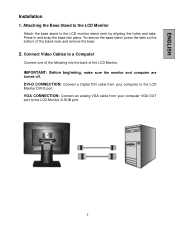
... CONNECTION: Connect an analog VGA cable from your computer VGA OUT port to the LCD Monitor DVI-D port. Connect Video Cables to the LCD monitor stand neck by aligning the holes and tabs. DVI-D CONNECTION: Connect a Digital DVI cable from your computer to the LCD Monitor D-SUB port. 9 Press in and snap the base into the back of the...
... CONNECTION: Connect an analog VGA cable from your computer VGA OUT port to the LCD Monitor DVI-D port. Connect Video Cables to the LCD monitor stand neck by aligning the holes and tabs. DVI-D CONNECTION: Connect a Digital DVI cable from your computer to the LCD Monitor D-SUB port. 9 Press in and snap the base into the back of the...
User Guide
Page 10
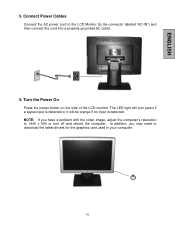
... the connector labeled "AC-IN") and then connect the cord into a properly grounded AC outlet. 4. Connect Power Cables Connect the AC power cord to the LCD Monitor (to 1440 x 900 or turn green if a signal input is detected or it will be orange if no input is detected. Turn the Power On...
... the connector labeled "AC-IN") and then connect the cord into a properly grounded AC outlet. 4. Connect Power Cables Connect the AC power cord to the LCD Monitor (to 1440 x 900 or turn green if a signal input is detected or it will be orange if no input is detected. Turn the Power On...
User Guide
Page 11
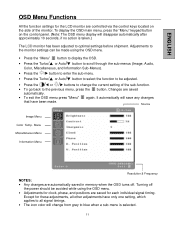
...OSD Menu Functions All the function settings for the LCD monitor are controlled via the control keys located on the...Press the / or / buttons to change from gray to blue when a sub-menu is taken.) The LCD monitor has been adjusted to optimal settings before shipment. Turning off . To display the OSD main menu, press ...previous menu, press the automatically. again. button. It automatically will change the current setting of the monitor. Adjustments to the monitor settings can be made . Except for each individual signal timing. Menu Miscellaneous Menu Information Menu Resolution...
...OSD Menu Functions All the function settings for the LCD monitor are controlled via the control keys located on the...Press the / or / buttons to change from gray to blue when a sub-menu is taken.) The LCD monitor has been adjusted to optimal settings before shipment. Turning off . To display the OSD main menu, press ...previous menu, press the automatically. again. button. It automatically will change the current setting of the monitor. Adjustments to the monitor settings can be made . Except for each individual signal timing. Menu Miscellaneous Menu Information Menu Resolution...
User Guide
Page 12
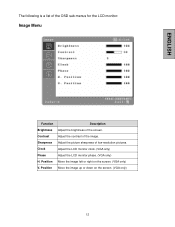
Position Description Adjust the brightness of low resolution pictures. Adjust the picture sharpness of the screen. Adjust the LCD monitor clock. (VGA only) Adjust the LCD monitor phase. (VGA only) Move the image left or right on the screen. (VGA only) Move the image up or down on the screen. (VGA only) 12 Adjust the contrast of the OSD sub-menus for the LCD monitor: Image Menu ENGLISH Function Brightness Contrast Sharpness Clock Phase H. Position V. The following is a list of the image.
Position Description Adjust the brightness of low resolution pictures. Adjust the picture sharpness of the screen. Adjust the LCD monitor clock. (VGA only) Adjust the LCD monitor phase. (VGA only) Move the image left or right on the screen. (VGA only) Move the image up or down on the screen. (VGA only) 12 Adjust the contrast of the OSD sub-menus for the LCD monitor: Image Menu ENGLISH Function Brightness Contrast Sharpness Clock Phase H. Position V. The following is a list of the image.

User Guide
Page 14
OSD position Move OSD display position to any one of the following 5 positions within the overall screen. 1 2 3 4 5 Reset Restore the LCD monitor to the factory settings. Miscellaneous Menu ENGLISH Function Language Description 日本語 English, Français, Deutsch, Español, Italiano, , OSD time-out Adjust OSD display time setting. Input Select Analog / Digital Auto setting Adjust clock, phase and positions automatically. (VGA only) CM Engine Color Management Engine. (VGA only) 14
OSD position Move OSD display position to any one of the following 5 positions within the overall screen. 1 2 3 4 5 Reset Restore the LCD monitor to the factory settings. Miscellaneous Menu ENGLISH Function Language Description 日本語 English, Français, Deutsch, Español, Italiano, , OSD time-out Adjust OSD display time setting. Input Select Analog / Digital Auto setting Adjust clock, phase and positions automatically. (VGA only) CM Engine Color Management Engine. (VGA only) 14
User Guide
Page 18
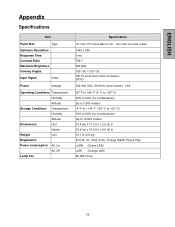
... Conditions Temperature Humidity Altitude Storage Conditions Temperature Humidity Altitude Dimensions Unit Carton Weight Unit Regulations Power consumption AC On AC Off Lamp Life Specification 19" Color TFT Active Matrix LCD. Anti-static and hard coated. 1440 x 900 5 ms 700:1 300 Nits 150°(H) / 130°(V) HD-15 pin D-Sub... (VGA connector) DVI-D 100-240 VAC, 50/60 Hz (auto switch), 1.5A 32°F to +95°F (0°C to +35°C) 20% to 90% (no ...
... Conditions Temperature Humidity Altitude Storage Conditions Temperature Humidity Altitude Dimensions Unit Carton Weight Unit Regulations Power consumption AC On AC Off Lamp Life Specification 19" Color TFT Active Matrix LCD. Anti-static and hard coated. 1440 x 900 5 ms 700:1 300 Nits 150°(H) / 130°(V) HD-15 pin D-Sub... (VGA connector) DVI-D 100-240 VAC, 50/60 Hz (auto switch), 1.5A 32°F to +95°F (0°C to +35°C) 20% to 90% (no ...
User Guide
Page 19
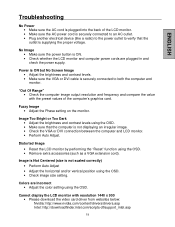
...driver from websites below: Nvidia: http://www.nvidia.com/content/drivers/drivers.asp Intel: http://downloadfinder.intel.com/scripts-df/support_intel.asp 19 Colors are plugged in and check the power supply. Image Too Bright or Too Dark • Adjust the brightness and contrast ...8226; Make sure the VGA or DVI cable is not scaled correctly) • Perform Auto Adjust • Adjust the horizontal and/or vertical position using the OSD. • Remove extra accessories (such as a VGA extension cord). Distorted Image • Reset the LCD monitor by performing the "Reset" function...
...driver from websites below: Nvidia: http://www.nvidia.com/content/drivers/drivers.asp Intel: http://downloadfinder.intel.com/scripts-df/support_intel.asp 19 Colors are plugged in and check the power supply. Image Too Bright or Too Dark • Adjust the brightness and contrast ...8226; Make sure the VGA or DVI cable is not scaled correctly) • Perform Auto Adjust • Adjust the horizontal and/or vertical position using the OSD. • Remove extra accessories (such as a VGA extension cord). Distorted Image • Reset the LCD monitor by performing the "Reset" function...


