

User Manual
Page 3
TABLE OF CONTENTS INSTALLATION / QUICK START 2 DIAGRAM OF THE DIGITAL PHOTO FRAME 3 KEYPAD BUTTON FUNCTIONS 4 OSD MENU FUNCTIONS 5 MOSAICVIEWTM AND ADDITIONAL FEATURES 6 DIGITAL PHOTO FRAME NAVIGATION 7 USING THE MINI-USB FOR FILE TRANSFER 8 SAVING AND DELETING FILE FROM INTERNAL MEMORY 9 TECHINICAL SPECIFICATIONS 10 FREQUENTLY ASKED QUESTIONS 11 IMPORTANT SAFETY INSTRUCTIONS 12 CLEANING THE DIGITAL PHOTO FRAME 14 PRODUCT WARRANTY 15 1
TABLE OF CONTENTS INSTALLATION / QUICK START 2 DIAGRAM OF THE DIGITAL PHOTO FRAME 3 KEYPAD BUTTON FUNCTIONS 4 OSD MENU FUNCTIONS 5 MOSAICVIEWTM AND ADDITIONAL FEATURES 6 DIGITAL PHOTO FRAME NAVIGATION 7 USING THE MINI-USB FOR FILE TRANSFER 8 SAVING AND DELETING FILE FROM INTERNAL MEMORY 9 TECHINICAL SPECIFICATIONS 10 FREQUENTLY ASKED QUESTIONS 11 IMPORTANT SAFETY INSTRUCTIONS 12 CLEANING THE DIGITAL PHOTO FRAME 14 PRODUCT WARRANTY 15 1
User Manual
Page 4
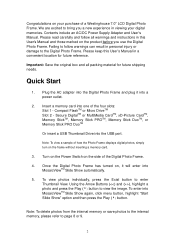
... Memory Stick PRO DuoTM Or insert a USB Thumbnail Drive into MosaicViewTM Slide Show again, click menu button, highlight "Start Slide Show" option and then press the Play (4) button. Note: To view a sample of the Digital Photo Frame. 4. Using the Arrow Buttons (), highlight a photo and press the Play (4) button to enter Thumbnail View. Contents include an AC/DC Power Supply Adapter and User's Manual. Quick Start 1. Important: Save the original box and all warnings and instructions in this User's Manual...
... Memory Stick PRO DuoTM Or insert a USB Thumbnail Drive into MosaicViewTM Slide Show again, click menu button, highlight "Start Slide Show" option and then press the Play (4) button. Note: To view a sample of the Digital Photo Frame. 4. Using the Arrow Buttons (), highlight a photo and press the Play (4) button to enter Thumbnail View. Contents include an AC/DC Power Supply Adapter and User's Manual. Quick Start 1. Important: Save the original box and all warnings and instructions in this User's Manual...

User Manual
Page 6
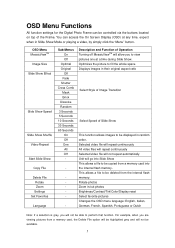
... to Previous Page Viewing Images Individually Button > Menu Exit Command Go to Previous Image Go to Next Image Open OSD menu Back to Thumbnail View Thumbnail View/ Select Mode Page / Card Select Page Button > Menu Exit Command Left Select Right Open OSD menu Back to one page Viewing Video Files Button > Menu Exit Command Go to Previous Video File Play / Pause Video File Go to Next Video File Open OSD menu Exit to Video Selection Page 4 Keypad Button Functions On Screen Display Functions Note...
... to Previous Page Viewing Images Individually Button > Menu Exit Command Go to Previous Image Go to Next Image Open OSD menu Back to Thumbnail View Thumbnail View/ Select Mode Page / Card Select Page Button > Menu Exit Command Left Select Right Open OSD menu Back to one page Viewing Video Files Button > Menu Exit Command Go to Previous Video File Play / Pause Video File Go to Next Video File Open OSD menu Exit to Video Selection Page 4 Keypad Button Functions On Screen Display Functions Note...
User Manual
Page 7
... the internal flash memory. For example, when you are viewing pictures from a memory card, the Delete File option will be highlighted grey and will not be displayed in Slide Show Mode or playing a video, by simply click the "Menu" button. Rotate photos Zoom in their original aspect ratio Select Style of Image Transition Select Speed of Slide Show This function allows images to be able to view pictures one at any time...
... the internal flash memory. For example, when you are viewing pictures from a memory card, the Delete File option will be highlighted grey and will not be displayed in Slide Show Mode or playing a video, by simply click the "Menu" button. Rotate photos Zoom in their original aspect ratio Select Style of Image Transition Select Speed of Slide Show This function allows images to be able to view pictures one at any time...

User Manual
Page 8
... detects different picture orientations and displays them randomly through Slide Show. MosaicViewTM What is inserted into the Digital Photo Frame, selecting "Start Slide Show" will run a Slide Show of images contained in the memory card.) Additional Features Setting Favorite Pictures Marking an image as a Favorite allows you wish to view the images in their native aspect ratio. Starting a Slide Show There are set to MosaicViewTM as the default setting.
... detects different picture orientations and displays them randomly through Slide Show. MosaicViewTM What is inserted into the Digital Photo Frame, selecting "Start Slide Show" will run a Slide Show of images contained in the memory card.) Additional Features Setting Favorite Pictures Marking an image as a Favorite allows you wish to view the images in their native aspect ratio. Starting a Slide Show There are set to MosaicViewTM as the default setting.
User Manual
Page 9
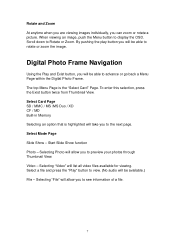
... Card" Page. Scroll down to display the OSD. Start Slide Show function Photo - Selecting "Video" will be available.) File - Select a file and press the "Play" button to view. (No audio will list all video files available for viewing. The top Menu Page is highlighted will take you can zoom or rotate a picture. To enter this selection, press the Exist button twice from Thumbnail View. Select Mode Page Slide Show - Selecting "File...
... Card" Page. Scroll down to display the OSD. Start Slide Show function Photo - Selecting "Video" will be available.) File - Select a file and press the "Play" button to view. (No audio will list all video files available for viewing. The top Menu Page is highlighted will take you can zoom or rotate a picture. To enter this selection, press the Exist button twice from Thumbnail View. Select Mode Page Slide Show - Selecting "File...
User Manual
Page 10
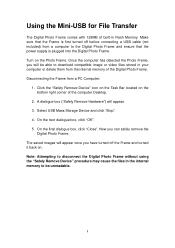
... you have turned off before connecting a USB cable (not included) from a computer to download compatible image or video files stored in your computer or delete them from a PC Computer: 1. Make sure that the power supply is first turned off the Frame and turned it back on. Disconnecting the Frame from the internal memory of the Digital Photo Frame. Note: Attempting to disconnect the Digital Photo Frame without using the "Safely Remove Device" procedure may cause the files in Flash Memory. Turn on...
... you have turned off before connecting a USB cable (not included) from a computer to download compatible image or video files stored in your computer or delete them from a PC Computer: 1. Make sure that the power supply is first turned off the Frame and turned it back on. Disconnecting the Frame from the internal memory of the Digital Photo Frame. Note: Attempting to disconnect the Digital Photo Frame without using the "Safely Remove Device" procedure may cause the files in Flash Memory. Turn on...
User Manual
Page 11
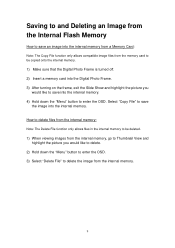
... Deleting an Image from the Internal Flash Memory How to save an image into the internal memory from a Memory Card: Note: The Copy File function only allows compatible image files from the memory card to be deleted. 1) When viewing images from the internal memory, go to Thumbnail View and highlight the picture you would like to save the image into the Digital Photo Frame. 3) After turning on the frame, exit the Slide Show and highlight the picture you would like to delete. 2) Hold down the "Menu" button...
... Deleting an Image from the Internal Flash Memory How to save an image into the internal memory from a Memory Card: Note: The Copy File function only allows compatible image files from the memory card to be deleted. 1) When viewing images from the internal memory, go to Thumbnail View and highlight the picture you would like to save the image into the Digital Photo Frame. 3) After turning on the frame, exit the Slide Show and highlight the picture you would like to delete. 2) Hold down the "Menu" button...
User Manual
Page 12
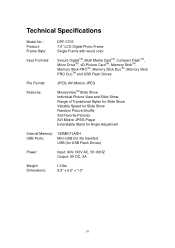
Technical Specifications Model No.: Product: Frame Style: Input Formats: DPF-0703 7.0" LCD Digital Photo Frame Single Frame with wood color Secure DigitalTM, Multi Media CardTM, Compact FlashTM, Micro DriveTM, xD-Picture CardTM, Memory StickTM, Memory Stick PROTM, Memory Stick DuoTM, Memory Stick PRO DuoTM and USB Flash Drives File Format: Features: JPEG, AVI Motion JPEG MosaicViewTM Slide Show Individual Picture View and Slide Show Range of Transitional Styles for Slide Show Variable Speed for Slide...
Technical Specifications Model No.: Product: Frame Style: Input Formats: DPF-0703 7.0" LCD Digital Photo Frame Single Frame with wood color Secure DigitalTM, Multi Media CardTM, Compact FlashTM, Micro DriveTM, xD-Picture CardTM, Memory StickTM, Memory Stick PROTM, Memory Stick DuoTM, Memory Stick PRO DuoTM and USB Flash Drives File Format: Features: JPEG, AVI Motion JPEG MosaicViewTM Slide Show Individual Picture View and Slide Show Range of Transitional Styles for Slide Show Variable Speed for Slide...

User Manual
Page 13
... a digital camera. What should I have a card inserted into the correct slot. To maximize the use of the internal flash memory, simply reduce the image size of the video formats downloaded from the Internet. A: First, make sure that you are not supported as a portrait picture. Note: Some digital cameras save images into Slide Show. A: Rotate the images by the Digital Photo Frame. A: Higher resolution pictures load slower. A; If the memory card is inserted all images or video files downloaded from the Internet are using a computer. Using a lower...
... a digital camera. What should I have a card inserted into the correct slot. To maximize the use of the internal flash memory, simply reduce the image size of the video formats downloaded from the Internet. A: First, make sure that you are not supported as a portrait picture. Note: Some digital cameras save images into Slide Show. A: Rotate the images by the Digital Photo Frame. A: Higher resolution pictures load slower. A; If the memory card is inserted all images or video files downloaded from the Internet are using a computer. Using a lower...

User Manual
Page 14
... level surface. Power Cord Protection Minimize wear on the power supply cord. Do not route the power cord under rugs or carpeting. Avoid touching the LCD screen. IMPORTANT PRODUCT SAFETY INSTRUCTIONS Proper Handling of the cord for wear or damage. Periodically inspect the power cord and each end of the Digital Photo Frame Always handle the Digital Photo Frame with water. Unstable surfaces can cause the Digital Photo Frame to direct sunlight or...
... level surface. Power Cord Protection Minimize wear on the power supply cord. Do not route the power cord under rugs or carpeting. Avoid touching the LCD screen. IMPORTANT PRODUCT SAFETY INSTRUCTIONS Proper Handling of the cord for wear or damage. Periodically inspect the power cord and each end of the Digital Photo Frame Always handle the Digital Photo Frame with water. Unstable surfaces can cause the Digital Photo Frame to direct sunlight or...
User Manual
Page 15
..., immediately turn it in a built-in installation, such as a bookcase or enclosed rack, unless proper ventilation is provided. Do not place it off and unplug the power cord. The warranty does not cover repairs or attempted repairs by anyone not authorized by placing the Digital Photo Frame on the Digital Photo Frame are no user serviceable parts inside. Other Notices and Precautions Caution: Never remove the...
..., immediately turn it in a built-in installation, such as a bookcase or enclosed rack, unless proper ventilation is provided. Do not place it off and unplug the power cord. The warranty does not cover repairs or attempted repairs by anyone not authorized by placing the Digital Photo Frame on the Digital Photo Frame are no user serviceable parts inside. Other Notices and Precautions Caution: Never remove the...

User Manual
Page 16
... the LCD screen or plastic casing. Use a soft, dry cloth. 2. Use a soft, dry cloth. Disclaimer Westinghouse Digital does not recommend the use of non-ammonia, non-alcohol based glass cleaner on a clean, soft, lint-free cloth to clean the surface. Westinghouse Digital will .... 14 Wipe the screen with a clean, soft, lint-free cloth. Cleaning the Digital Photo Frame • MAKE SURE THE DIGITAL PHOTO FRAME IS TURNED OFF • NEVER SPRAY OR POUR LIQUID DIRECTLY ONTO THE SCREEN OR PLASTIC CASING To Clean the Screen: 1. To Clean the Frame: 1. This removes dust and other particles...
... the LCD screen or plastic casing. Use a soft, dry cloth. 2. Use a soft, dry cloth. Disclaimer Westinghouse Digital does not recommend the use of non-ammonia, non-alcohol based glass cleaner on a clean, soft, lint-free cloth to clean the surface. Westinghouse Digital will .... 14 Wipe the screen with a clean, soft, lint-free cloth. Cleaning the Digital Photo Frame • MAKE SURE THE DIGITAL PHOTO FRAME IS TURNED OFF • NEVER SPRAY OR POUR LIQUID DIRECTLY ONTO THE SCREEN OR PLASTIC CASING To Clean the Screen: 1. To Clean the Frame: 1. This removes dust and other particles...

User Manual
Page 17
... installation, set-up adjustments, operation, or maintenance; (ii) power surges, connection to the Product are the responsibility of you, the purchaser. During the six (6) months warranty period, Westinghouse Digital Electronics will be presented within the six (6) months warranty period to the following terms and conditions: LABOR AND PARTS - Please call (866) 287-5555 or visit our website to register online...
... installation, set-up adjustments, operation, or maintenance; (ii) power surges, connection to the Product are the responsibility of you, the purchaser. During the six (6) months warranty period, Westinghouse Digital Electronics will be presented within the six (6) months warranty period to the following terms and conditions: LABOR AND PARTS - Please call (866) 287-5555 or visit our website to register online...


