
Quick Install Guide (pdf)
Page 1
Quick Install Guide WD Dual-option™ Media Center and Combo External Storage Products 1 System Requirements Windows® ! To register the software, launch the backup software from the Volume Format menu, and enter a name for your WD product is required for Hi-Speed USB 2.0 performance. Macintosh Important: Macintosh users must install ...installed, you assigned appears on your desktop and your drive. 3. Proceed to Section 3 to confirm drive initialization. Click Continue to connect the drive. Power off the external hard drive and disconnect all its cables. 2.
Quick Install Guide WD Dual-option™ Media Center and Combo External Storage Products 1 System Requirements Windows® ! To register the software, launch the backup software from the Volume Format menu, and enter a name for your WD product is required for Hi-Speed USB 2.0 performance. Macintosh Important: Macintosh users must install ...installed, you assigned appears on your desktop and your drive. 3. Proceed to Section 3 to confirm drive initialization. Click Continue to connect the drive. Power off the external hard drive and disconnect all its cables. 2.
Quick Install Guide (pdf)
Page 2
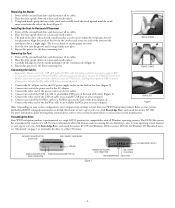
... file transfer of the foot into place. 5. REMOVE STANDS 1. Connect the other end of the USB 2.0 cable to the DC power supply socket on your WD Dual-option product. Connect the other end of the power cord to an available USB port on your operating system manual or visit support.wdc.com, click Knowledge Base, and...
... file transfer of the foot into place. 5. REMOVE STANDS 1. Connect the other end of the USB 2.0 cable to the DC power supply socket on your WD Dual-option product. Connect the other end of the power cord to an available USB port on your operating system manual or visit support.wdc.com, click Knowledge Base, and...
Quick Install Guide (pdf)
Page 3
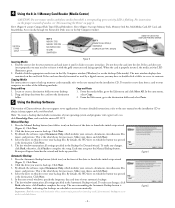
... slot for most users. If the card was directly formatted or used by a digital camera, you want to re-insert it from media slots while a corresponding green activity...ID 1270 Manual Backup 1. Figure 5 Important: Both the source and destination drives must remain powered on which the button was pressed is properly inserted, the media activity LED illuminates green. 2....not support server applications. Slot 1 (Figure 3) accepts CompactFlash Types I SHOWN) USING THE USB 2.0 HUB (USB FLASH PEN DRIVE SHOWN) Figure 3 Inserting Media 1. If the card does not insert properly...
... slot for most users. If the card was directly formatted or used by a digital camera, you want to re-insert it from media slots while a corresponding green activity...ID 1270 Manual Backup 1. Figure 5 Important: Both the source and destination drives must remain powered on which the button was pressed is properly inserted, the media activity LED illuminates green. 2....not support server applications. Slot 1 (Figure 3) accepts CompactFlash Types I SHOWN) USING THE USB 2.0 HUB (USB FLASH PEN DRIVE SHOWN) Figure 3 Inserting Media 1. If the card does not insert properly...
Quick Install Guide (pdf)
Page 4
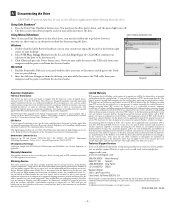
... Asia Pacific EMEA Western Digital 20511 Lake Forest Drive Lake Forest, California 92630 U.S.A. and WD, the WD logo, WD Dual-option, and Safe Shutdown are trademarks of the drive to be disconnected. 3. SAFELY REMOVE HARDWARE ICON Windows 1. Click Close and press the Power button once. Figure...installed and used Safe Shutdown as applicable. Technical Support Services If you may safely disconnect the USB cable from your return paperwork. You may hear the drive power down properly, and you may also have no guarantee that interference will not occur in ...
... Asia Pacific EMEA Western Digital 20511 Lake Forest Drive Lake Forest, California 92630 U.S.A. and WD, the WD logo, WD Dual-option, and Safe Shutdown are trademarks of the drive to be disconnected. 3. SAFELY REMOVE HARDWARE ICON Windows 1. Click Close and press the Power button once. Figure...installed and used Safe Shutdown as applicable. Technical Support Services If you may safely disconnect the USB cable from your return paperwork. You may hear the drive power down properly, and you may also have no guarantee that interference will not occur in ...
User Manual (pdf)
Page 3
... X v10.2.8 7 3 Connecting the Drive Installing the Stands for Vertical Placement 8 Removing the Stands 8 Installing the Feet for Horizontal Placement 8 Removing the Feet 8 Connecting the Cables 9 Powering Up the Drive 10 Formatting the Drive 10 WD Button Manager 10 4 Using the 8-in-1 Memory Card Reader (Media Center) Media Icons 11 Using the...
... X v10.2.8 7 3 Connecting the Drive Installing the Stands for Vertical Placement 8 Removing the Stands 8 Installing the Feet for Horizontal Placement 8 Removing the Feet 8 Connecting the Cables 9 Powering Up the Drive 10 Formatting the Drive 10 WD Button Manager 10 4 Using the 8-in-1 Memory Card Reader (Media Center) Media Icons 11 Using the...
User Manual (pdf)
Page 5
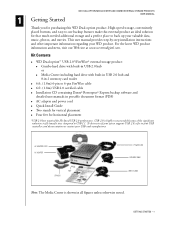
... or contact your WD product. AC adapter and power cord ! Two stands for Hi-Speed USB 2.0 performance. AC ADAPTER CORD AC ADAPTER FEET STANDS POWER CORD FIREWIRE CABLE USB 2.0 CABLE Note: The Media Center is highly recommended because of the significant reduction in USB 2.0 hub or ! WD Dual-option™ USB 2.0*/FireWire® external storage product: ! Quick Install...
... or contact your WD product. AC adapter and power cord ! Two stands for Hi-Speed USB 2.0 performance. AC ADAPTER CORD AC ADAPTER FEET STANDS POWER CORD FIREWIRE CABLE USB 2.0 CABLE Note: The Media Center is highly recommended because of the significant reduction in USB 2.0 hub or ! WD Dual-option™ USB 2.0*/FireWire® external storage product: ! Quick Install...

User Manual (pdf)
Page 12
... approximately 2-3 inches from the side of the foot into place. Power off the ventilation slot. 4. The back of the drive adjacent to the back. 3. Carefully dislodge the foot by firmly pushing it yourself; WD DUAL-OPTION MEDIA CENTER AND COMBO EXTERNAL STORAGE PRODUCTS USER MANUAL 3 Connecting the... side of the drive is keyed with the buttons on a clean and steady surface. 3. Installing the Feet for Vertical Placement 1. Power off the external storage product and disconnect all its cables. 2. Place the drive upside down on top for feet placement. INSTALL STANDS...
... approximately 2-3 inches from the side of the foot into place. Power off the ventilation slot. 4. The back of the drive adjacent to the back. 3. Carefully dislodge the foot by firmly pushing it yourself; WD DUAL-OPTION MEDIA CENTER AND COMBO EXTERNAL STORAGE PRODUCTS USER MANUAL 3 Connecting the... side of the drive is keyed with the buttons on a clean and steady surface. 3. Installing the Feet for Vertical Placement 1. Power off the external storage product and disconnect all its cables. 2. Place the drive upside down on top for feet placement. INSTALL STANDS...
User Manual (pdf)
Page 13
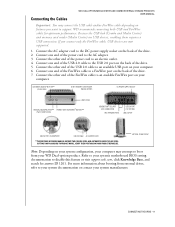
...8482; BUTTON** (TWO FOLDERS ICON) KENSINGTON® SECURITY LOCK CONNECTION TWO FIREWIRE PORTS USB 2.0 PORT (TO SYSTEM) USB 2.0 PORT USB 2.0 PORT ON COMPUTER USB 2.0 CABLE AC ADAPTER CORD **THE POSITIONS OF POWER, MANUAL BACKUP (TWO FOLDERS ICON), AND AUTOMATIC BACKUP (CLOCK ICON) BUTTONS VARY ACCORDING... system configuration, your computer may connect the USB cable and/or FireWire cable depending on the back of the drive. 7. For more information about booting from your WD Dual-option product. Connecting the Cables WD DUAL-OPTION MEDIA CENTER AND COMBO EXTERNAL STORAGE PRODUCTS USER...
...8482; BUTTON** (TWO FOLDERS ICON) KENSINGTON® SECURITY LOCK CONNECTION TWO FIREWIRE PORTS USB 2.0 PORT (TO SYSTEM) USB 2.0 PORT USB 2.0 PORT ON COMPUTER USB 2.0 CABLE AC ADAPTER CORD **THE POSITIONS OF POWER, MANUAL BACKUP (TWO FOLDERS ICON), AND AUTOMATIC BACKUP (CLOCK ICON) BUTTONS VARY ACCORDING... system configuration, your computer may connect the USB cable and/or FireWire cable depending on the back of the drive. 7. For more information about booting from your WD Dual-option product. Connecting the Cables WD DUAL-OPTION MEDIA CENTER AND COMBO EXTERNAL STORAGE PRODUCTS USER...
User Manual (pdf)
Page 14
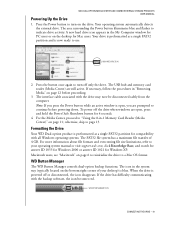
...USB hub and memory card reader (Media Center) are open , you press the Power button while an active window is blue. The interface cable associated with the backup software, the icon becomes red. To power off the drive when windows are still active. Formatting the Drive Your WD Dual-option product is powered... Base, and search for answer ID 1053 for Windows 2000 or answer ID 1021 for Mac users. WD DUAL-OPTION MEDIA CENTER AND COMBO EXTERNAL STORAGE PRODUCTS USER MANUAL Powering Up the Drive 1. Your drive is preformatted as a single FAT32 partition for PC users or on the bottom...
...USB hub and memory card reader (Media Center) are open , you press the Power button while an active window is blue. The interface cable associated with the backup software, the icon becomes red. To power off the drive when windows are still active. Formatting the Drive Your WD Dual-option product is powered... Base, and search for answer ID 1053 for Windows 2000 or answer ID 1021 for Mac users. WD DUAL-OPTION MEDIA CENTER AND COMBO EXTERNAL STORAGE PRODUCTS USER MANUAL Powering Up the Drive 1. Your drive is preformatted as a single FAT32 partition for PC users or on the bottom...

User Manual (pdf)
Page 22
...area surrounding the Automatic Backup button is illuminated blue, indicating that backups are scheduled to complete the setup. If necessary, modify the power management settings in the Automatic Backup wizard. If you chose Every day, specify the time for automatic backups to occur at their scheduled... times. To start your automatic backups and click Next. 7. Important: Both the source and destination drives must remain powered on (not sleep mode) for your first backup now, select Start the backup now. WD DUAL-OPTION MEDIA CENTER AND COMBO EXTERNAL STORAGE PRODUCTS USER MANUAL 6.
...area surrounding the Automatic Backup button is illuminated blue, indicating that backups are scheduled to complete the setup. If necessary, modify the power management settings in the Automatic Backup wizard. If you chose Every day, specify the time for automatic backups to occur at their scheduled... times. To start your automatic backups and click Next. 7. Important: Both the source and destination drives must remain powered on (not sleep mode) for your first backup now, select Start the backup now. WD DUAL-OPTION MEDIA CENTER AND COMBO EXTERNAL STORAGE PRODUCTS USER MANUAL 6.
User Manual (pdf)
Page 27
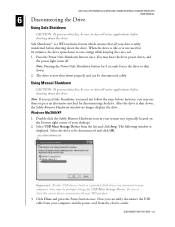
... sure to select the correct device associated with your desktop). 2. Note: Pressing the Power/Safe Shutdown button for disconnecting the drive. Select USB Mass Storage Device from the electric outlet. Press the Power/Safe Shutdown button once. Using Manual Shutdown CAUTION: To prevent data loss, be sure... shutting down , the Safely Remove Hardware window no longer displays the drive. Now you need not follow the steps below; WD DUAL-OPTION MEDIA CENTER AND COMBO EXTERNAL STORAGE PRODUCTS USER MANUAL 6 Disconnecting the Drive Using Safe Shutdown CAUTION: To prevent data loss, be ...
... sure to select the correct device associated with your desktop). 2. Note: Pressing the Power/Safe Shutdown button for disconnecting the drive. Select USB Mass Storage Device from the electric outlet. Press the Power/Safe Shutdown button once. Using Manual Shutdown CAUTION: To prevent data loss, be sure... shutting down , the Safely Remove Hardware window no longer displays the drive. Now you need not follow the steps below; WD DUAL-OPTION MEDIA CENTER AND COMBO EXTERNAL STORAGE PRODUCTS USER MANUAL 6 Disconnecting the Drive Using Safe Shutdown CAUTION: To prevent data loss, be ...
User Manual (pdf)
Page 28
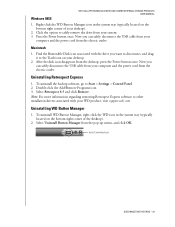
...MANAGER ICON DISCONNECTING THE DRIVE - 24 Windows 98SE WD DUAL-OPTION MEDIA CENTER AND COMBO EXTERNAL STORAGE PRODUCTS USER MANUAL 1. To uninstall the backup software, go to safely remove the drive from your desktop). 2. Now you can safely disconnect the USB cable from your desktop. 2. After the disk icon ... associated with the drive you want to disconnect, and drag it to the Trash icon on your computer and the power cord from the electric outlet. Press the Power button once. Double-click the Add/Remove Programs icon. 3. To uninstall WD Button Manager, right-click the WD...
...MANAGER ICON DISCONNECTING THE DRIVE - 24 Windows 98SE WD DUAL-OPTION MEDIA CENTER AND COMBO EXTERNAL STORAGE PRODUCTS USER MANUAL 1. To uninstall the backup software, go to safely remove the drive from your desktop). 2. Now you can safely disconnect the USB cable from your desktop. 2. After the disk icon ... associated with the drive you want to disconnect, and drag it to the Trash icon on your computer and the power cord from the electric outlet. Press the Power button once. Double-click the Add/Remove Programs icon. 3. To uninstall WD Button Manager, right-click the WD...
User Manual (pdf)
Page 30
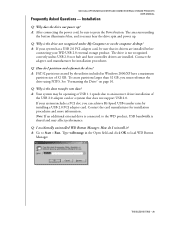
... - 26 A: After connecting the power cord, be sure that does not support USB 2.0. The drive is the data transfer rate slow? Contact the adapter card manufacturer for installation procedures and more information. WD DUAL-OPTION MEDIA CENTER AND COMBO EXTERNAL STORAGE PRODUCTS... USER MANUAL Frequently Asked Questions - Q: Why is not recognized correctly unless USB 2.0 root hub and host controller drivers are installed before connecting...
... - 26 A: After connecting the power cord, be sure that does not support USB 2.0. The drive is the data transfer rate slow? Contact the adapter card manufacturer for installation procedures and more information. WD DUAL-OPTION MEDIA CENTER AND COMBO EXTERNAL STORAGE PRODUCTS... USER MANUAL Frequently Asked Questions - Q: Why is not recognized correctly unless USB 2.0 root hub and host controller drivers are installed before connecting...
Product Specifications (pdf)
Page 1
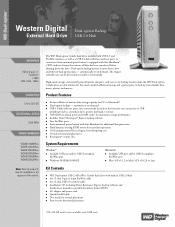
...back up your data - Dual-option backup - automatic or on -demand. Front-mounted power button with 2 MB cache. Available USB port and/or OHCI-compliant FireWire port ! WD Dual-option USB 2.0/FireWire Combo hard drive with built-in all regions of the world. USB 2.0 hub with two ports,...equipped with front and rear ports. Product Features ! Windows 98SE/Me/2000/XP Macintosh ! Available USB port and/or OHCI-compliant FireWire port ! Western Digital Dual-option Backup External Hard Drive USB 2.0 Hub USB 2.0 and 1.1 FireWire® i.LINK IEEE 1394, 1394a 120 to 320 GB 7200 RPM ...
...back up your data - Dual-option backup - automatic or on -demand. Front-mounted power button with 2 MB cache. Available USB port and/or OHCI-compliant FireWire port ! WD Dual-option USB 2.0/FireWire Combo hard drive with built-in all regions of the world. USB 2.0 hub with two ports,...equipped with front and rear ports. Product Features ! Windows 98SE/Me/2000/XP Macintosh ! Available USB port and/or OHCI-compliant FireWire port ! Western Digital Dual-option Backup External Hard Drive USB 2.0 Hub USB 2.0 and 1.1 FireWire® i.LINK IEEE 1394, 1394a 120 to 320 GB 7200 RPM ...
Product Specifications (pdf)
Page 2
..., California 92630 U.S.A. 2879-001094-A06 05/05 1Western Digital defines a megabyte (MB) as 1,000,000 bytes and a gigabyte (GB) as 1,000,000,000 bytes. Western Digital Dual-option Backup External Hard Drive USB 2.0 Hub Physical Specifications Formatted capacity1 Actuator type Actuator latch... FireWire ! All rights reserved. Two external 6-pin 1394 receptacles ! USB 2.0 and 1.1 compliant2 ! One external "B" 4-pin USB receptacle ! and WD, the WD logo, WD Dual-option, and Safe Shutdown are required to 65°C Power Requirements AC input voltage AC input frequency 100-240V 47-63 Hz...
..., California 92630 U.S.A. 2879-001094-A06 05/05 1Western Digital defines a megabyte (MB) as 1,000,000 bytes and a gigabyte (GB) as 1,000,000,000 bytes. Western Digital Dual-option Backup External Hard Drive USB 2.0 Hub Physical Specifications Formatted capacity1 Actuator type Actuator latch... FireWire ! All rights reserved. Two external 6-pin 1394 receptacles ! USB 2.0 and 1.1 compliant2 ! One external "B" 4-pin USB receptacle ! and WD, the WD logo, WD Dual-option, and Safe Shutdown are required to 65°C Power Requirements AC input voltage AC input frequency 100-240V 47-63 Hz...


