
Quick Install Guide (pdf)
Page 1
...process for horizontal placement. An available OHCI-compliant FireWire port and/or USB* port ! The license agreement window is completed. Enter your drive. 3. In the next window, select the Recommended installation option and click Next. 4. Click Continue to use the feet for the ... the buttons on top for Hi-Speed USB 2.0 performance. After restarting, a new hard drive icon appears on the desktop after formatting is displayed. Power off the external hard drive and disconnect all its cables. 2. Quick Install Guide WD Dual-option™ Media Center and Combo External Storage...
...process for horizontal placement. An available OHCI-compliant FireWire port and/or USB* port ! The license agreement window is completed. Enter your drive. 3. In the next window, select the Recommended installation option and click Next. 4. Click Continue to use the feet for the ... the buttons on top for Hi-Speed USB 2.0 performance. After restarting, a new hard drive icon appears on the desktop after formatting is displayed. Power off the external hard drive and disconnect all its cables. 2. Quick Install Guide WD Dual-option™ Media Center and Combo External Storage...
Quick Install Guide (pdf)
Page 2
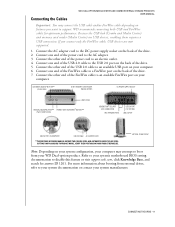
...Figure 2). 5. Connect the other end of the USB 2.0 cable to the DC power supply socket on features you connect only the FireWire cable, USB devices are USB devices, enabling them requires a USB connection. Formatting the Drive Your WD Dual-option product is keyed with all its cables. 2.... WD recommends connecting both hands, grasp the base of the power cord to ensure proper insertion. ...
...Figure 2). 5. Connect the other end of the USB 2.0 cable to the DC power supply socket on features you connect only the FireWire cable, USB devices are USB devices, enabling them requires a USB connection. Formatting the Drive Your WD Dual-option product is keyed with all its cables. 2.... WD recommends connecting both hands, grasp the base of the power cord to ensure proper insertion. ...
Quick Install Guide (pdf)
Page 3
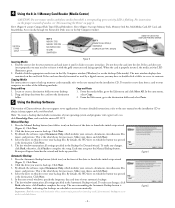
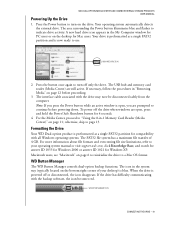
...window displays data contained on which the button was directly formatted or used by a digital camera, you may have to double-click a folder to your desktop. 1. ... or back up your backup files. Slot 1 (Figure 3) accepts CompactFlash Types I SHOWN) USING THE USB 2.0 HUB (USB FLASH PEN DRIVE SHOWN) Figure 3 Inserting Media 1. Slot 2 (Figure 3) accepts Memory Stick, Memory ...choice and click Next. 4. Figure 5 Important: Both the source and destination drives must remain powered on your computer, use either of media, see "Disconnecting the Drive" on the proper ...
...window displays data contained on which the button was directly formatted or used by a digital camera, you may have to double-click a folder to your desktop. 1. ... or back up your backup files. Slot 1 (Figure 3) accepts CompactFlash Types I SHOWN) USING THE USB 2.0 HUB (USB FLASH PEN DRIVE SHOWN) Figure 3 Inserting Media 1. Slot 2 (Figure 3) accepts Memory Stick, Memory ...choice and click Next. 4. Figure 5 Important: Both the source and destination drives must remain powered on your computer, use either of media, see "Disconnecting the Drive" on the proper ...
Quick Install Guide (pdf)
Page 4
...damages, so the limitations above may not apply to you may safely disconnect the USB cable from your desktop). 2. Underwriters Laboratories Inc. Information Technology Equipment - Part...Western Digital Technologies, Inc. Obtaining Service WD values your expense. Authorized returns must be shipped in the course of WD for damages including, but not limited to be disconnected. 3. and WD, the WD logo, WD Dual-option...because of one for a period of damage occurring before shutting down , and the power light turns off. 2. The remedies provided herein are designed to you need not ...
...damages, so the limitations above may not apply to you may safely disconnect the USB cable from your desktop). 2. Underwriters Laboratories Inc. Information Technology Equipment - Part...Western Digital Technologies, Inc. Obtaining Service WD values your expense. Authorized returns must be shipped in the course of WD for damages including, but not limited to be disconnected. 3. and WD, the WD logo, WD Dual-option...because of one for a period of damage occurring before shutting down , and the power light turns off. 2. The remedies provided herein are designed to you need not ...
User Manual (pdf)
Page 3
... X v10.2.8 7 3 Connecting the Drive Installing the Stands for Vertical Placement 8 Removing the Stands 8 Installing the Feet for Horizontal Placement 8 Removing the Feet 8 Connecting the Cables 9 Powering Up the Drive 10 Formatting the Drive 10 WD Button Manager 10 4 Using the 8-in-1 Memory Card Reader (Media Center) Media Icons 11 Using the...
... X v10.2.8 7 3 Connecting the Drive Installing the Stands for Vertical Placement 8 Removing the Stands 8 Installing the Feet for Horizontal Placement 8 Removing the Feet 8 Connecting the Cables 9 Powering Up the Drive 10 Formatting the Drive 10 WD Button Manager 10 4 Using the 8-in-1 Memory Card Reader (Media Center) Media Icons 11 Using the...
User Manual (pdf)
Page 5
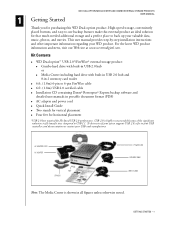
... storage, conveniently placed buttons, and easy-to USB 1.1. Quick Install Guide ! AC ADAPTER CORD AC ADAPTER FEET STANDS POWER CORD FIREWIRE CABLE USB 2.0 CABLE Note: The Media Center is highly recommended because of the significant reduction in all figures unless otherwise noted. GETTING STARTED - 1 WD Dual-option™ USB 2.0*/FireWire® external storage product: ! To determine...
... storage, conveniently placed buttons, and easy-to USB 1.1. Quick Install Guide ! AC ADAPTER CORD AC ADAPTER FEET STANDS POWER CORD FIREWIRE CABLE USB 2.0 CABLE Note: The Media Center is highly recommended because of the significant reduction in all figures unless otherwise noted. GETTING STARTED - 1 WD Dual-option™ USB 2.0*/FireWire® external storage product: ! To determine...

User Manual (pdf)
Page 12
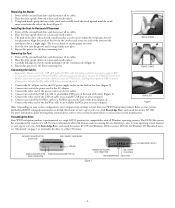
... by firmly pushing it snaps firmly into the groove until the stand snaps away from the edge of the foot into place. WD DUAL-OPTION MEDIA CENTER AND COMBO EXTERNAL STORAGE PRODUCTS USER MANUAL 3 Connecting the Drive CAUTION: Do not drop or jolt the drive or attempt ... the stands for balance and stability. 4. INSTALL STANDS REMOVE STANDS REMOVE FEET CONNECTING THE DRIVE - 8 Removing the Stands 1. Removing the Feet 1. Power off the external storage product and disconnect all its cables. 2. Using both hands, grasp the base of the drive adjacent to open the drive and...
... by firmly pushing it snaps firmly into the groove until the stand snaps away from the edge of the foot into place. WD DUAL-OPTION MEDIA CENTER AND COMBO EXTERNAL STORAGE PRODUCTS USER MANUAL 3 Connecting the Drive CAUTION: Do not drop or jolt the drive or attempt ... the stands for balance and stability. 4. INSTALL STANDS REMOVE STANDS REMOVE FEET CONNECTING THE DRIVE - 8 Removing the Stands 1. Removing the Feet 1. Power off the external storage product and disconnect all its cables. 2. Using both hands, grasp the base of the drive adjacent to open the drive and...
User Manual (pdf)
Page 13
... cord to the DC power supply socket on your system configuration, your computer may connect the USB cable and/or FireWire cable depending on features you connect only the FireWire cable, USB devices are USB devices, enabling them requires a USB connection. If you want to your system documentation or contact your WD Dual-option product. For more...
... cord to the DC power supply socket on your system configuration, your computer may connect the USB cable and/or FireWire cable depending on features you connect only the FireWire cable, USB devices are USB devices, enabling them requires a USB connection. If you want to your system documentation or contact your WD Dual-option product. For more...
User Manual (pdf)
Page 14
... the Drive Your WD Dual-option product is preformatted as a single FAT32 partition and is now ready to a Mac OS format. Macintosh users, see "Macintosh" on the drive. WD BUTTON MANAGER ICON CONNECTING THE DRIVE - 10 The USB hub and memory card reader (Media Center) are open , you press the Power button while an...
... the Drive Your WD Dual-option product is preformatted as a single FAT32 partition and is now ready to a Mac OS format. Macintosh users, see "Macintosh" on the drive. WD BUTTON MANAGER ICON CONNECTING THE DRIVE - 10 The USB hub and memory card reader (Media Center) are open , you press the Power button while an...

User Manual (pdf)
Page 22
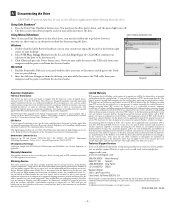
... mode) for your automatic backups, and click Next. 8. If necessary, modify the power management settings in the Automatic Backup wizard. If you chose Every day, specify the time for automatic backups to occur at their scheduled times. WD DUAL-OPTION MEDIA CENTER AND COMBO EXTERNAL STORAGE PRODUCTS USER MANUAL 6. Click Finish to occur...
... mode) for your automatic backups, and click Next. 8. If necessary, modify the power management settings in the Automatic Backup wizard. If you chose Every day, specify the time for automatic backups to occur at their scheduled times. WD DUAL-OPTION MEDIA CENTER AND COMBO EXTERNAL STORAGE PRODUCTS USER MANUAL 6. Click Finish to occur...
User Manual (pdf)
Page 27
... from your computer, there may hear the drive power down the drive. Double-click the Safely Remove Hardware icon in your system tray (typically located on the bottom right corner of your WD product. 3. Select USB Mass Storage Device from the electric outlet. WD DUAL-OPTION MEDIA CENTER AND COMBO EXTERNAL STORAGE PRODUCTS USER...
... from your computer, there may hear the drive power down the drive. Double-click the Safely Remove Hardware icon in your system tray (typically located on the bottom right corner of your WD product. 3. Select USB Mass Storage Device from the electric outlet. WD DUAL-OPTION MEDIA CENTER AND COMBO EXTERNAL STORAGE PRODUCTS USER...
User Manual (pdf)
Page 28
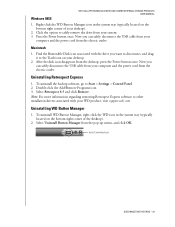
... the system tray (typically located on the bottom right corner of your computer and the power cord from your desktop). 2. Now you can safely disconnect the USB cable from the electric outlet. Find the Removable Disk icon associated with your desktop. 2....USB cable from the electric outlet. Click the option to safely remove the drive from your computer and the power cord from your system. 3. Now you want to disconnect, and drag it to Start > Settings > Control Panel. 2. Select Uninstall Button Manager from the desktop, press the Power button once. Windows 98SE WD DUAL-OPTION...
... the system tray (typically located on the bottom right corner of your computer and the power cord from your desktop). 2. Now you can safely disconnect the USB cable from the electric outlet. Find the Removable Disk icon associated with your desktop. 2....USB cable from the electric outlet. Click the option to safely remove the drive from your computer and the power cord from your system. 3. Now you want to disconnect, and drag it to Start > Settings > Control Panel. 2. Select Uninstall Button Manager from the desktop, press the Power button once. Windows 98SE WD DUAL-OPTION...
User Manual (pdf)
Page 30
... reformat the drive? A: Go to an incorrect driver installation of 32 GB. TROUBLESHOOTING - 26 Installation Q: Why does the drive not power up . Note: If an additional external drive is connected to load WD Button Manager. Type wdbtnmgr in Windows 2000/XP have a maximum...you may affect performance. If your WD USB 2.0 external storage product. A: If your system has a USB 2.0 PCI adapter card, be sure to press the Power button. A: After connecting the power cord, be sure that does not support USB 2.0. WD DUAL-OPTION MEDIA CENTER AND COMBO EXTERNAL STORAGE PRODUCTS USER...
... reformat the drive? A: Go to an incorrect driver installation of 32 GB. TROUBLESHOOTING - 26 Installation Q: Why does the drive not power up . Note: If an additional external drive is connected to load WD Button Manager. Type wdbtnmgr in Windows 2000/XP have a maximum...you may affect performance. If your WD USB 2.0 external storage product. A: If your system has a USB 2.0 PCI adapter card, be sure to press the Power button. A: After connecting the power cord, be sure that does not support USB 2.0. WD DUAL-OPTION MEDIA CENTER AND COMBO EXTERNAL STORAGE PRODUCTS USER...
Product Specifications (pdf)
Page 1
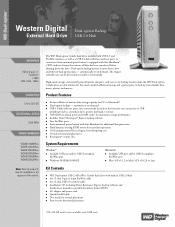
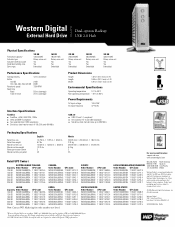
...® ! Kensington® security slot System Requirements Windows® ! Available USB port and/or OHCI-compliant FireWire port ! AC adapter and power cord ! Four feet for vertical placement ! Cool running ensured by an elegant, heat-dissipating case ! Western Digital Dual-option Backup External Hard Drive USB 2.0 Hub USB 2.0 and 1.1 FireWire® i.LINK IEEE 1394, 1394a 120 to 320...
...® ! Kensington® security slot System Requirements Windows® ! Available USB port and/or OHCI-compliant FireWire port ! AC adapter and power cord ! Four feet for vertical placement ! Cool running ensured by an elegant, heat-dissipating case ! Western Digital Dual-option Backup External Hard Drive USB 2.0 Hub USB 2.0 and 1.1 FireWire® i.LINK IEEE 1394, 1394a 120 to 320...
Product Specifications (pdf)
Page 2
...WDXB3200JBRSK Note: Contact WD Marketing for order numbers not listed. Serial bus data transfer rates of Western Digital Technologies, Inc. Western Digital Dual-option Backup External Hard Drive USB 2.0 Hub Physical Specifications Formatted capacity1 Actuator type Actuator latch/auto park Dedicated landing zone Servo ... Seek time Read Track-to 65°C Power Requirements AC input voltage AC input frequency 100-240V 47-63 Hz USB 2.0 ! USB 2.0 and 1.1 compliant2 ! One external "B" 4-pin USB receptacle ! and WD, the WD logo, WD Dual-option, and Safe Shutdown are required to 480 ...
...WDXB3200JBRSK Note: Contact WD Marketing for order numbers not listed. Serial bus data transfer rates of Western Digital Technologies, Inc. Western Digital Dual-option Backup External Hard Drive USB 2.0 Hub Physical Specifications Formatted capacity1 Actuator type Actuator latch/auto park Dedicated landing zone Servo ... Seek time Read Track-to 65°C Power Requirements AC input voltage AC input frequency 100-240V 47-63 Hz USB 2.0 ! USB 2.0 and 1.1 compliant2 ! One external "B" 4-pin USB receptacle ! and WD, the WD logo, WD Dual-option, and Safe Shutdown are required to 480 ...


