
Instruction Manual
Page 1
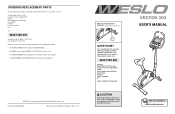
... committed to give the following information: • the MODEL NUMBER of the product (WLEVEX24830) • the NAME of the product (WESLO® VECTOR 303 exercise cycle) • the SERIAL NUMBER of the product (see the front cover of this manual) • the KEY NUMBER and DESCRIPTION of the part(s) (see page 14) WESLO is a registered trademark of ICON Health & Fitness, Inc. Serial Number Decal QUESTIONS? Customer Service Department Unit 4 Revie Road...
... committed to give the following information: • the MODEL NUMBER of the product (WLEVEX24830) • the NAME of the product (WESLO® VECTOR 303 exercise cycle) • the SERIAL NUMBER of the product (see the front cover of this manual) • the KEY NUMBER and DESCRIPTION of the part(s) (see page 14) WESLO is a registered trademark of ICON Health & Fitness, Inc. Serial Number Decal QUESTIONS? Customer Service Department Unit 4 Revie Road...
Instruction Manual
Page 2
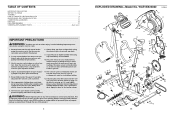
... product. 2 EXPLODED DRAWING-Model No. ICON assumes no responsibility for persons over the age of all times. 6. TABLE OF CONTENTS IMPORTANT PRECAUTIONS 2 BEFORE YOU BEGIN 3 ASSEMBLY 4 HOW TO OPERATE THE EXERCISE CYCLE 8 MAINTENANCE AND TROUBLESHOOTING 11 CONDITIONING GUIDELINES 12 PART LIST 14 EXPLODED DRAWING 15 ORDERING REPLACEMENT PARTS Back Cover IMPORTANT PRECAUTIONS WARNING: To reduce the risk of heart rate readings. Always keep...
... product. 2 EXPLODED DRAWING-Model No. ICON assumes no responsibility for persons over the age of all times. 6. TABLE OF CONTENTS IMPORTANT PRECAUTIONS 2 BEFORE YOU BEGIN 3 ASSEMBLY 4 HOW TO OPERATE THE EXERCISE CYCLE 8 MAINTENANCE AND TROUBLESHOOTING 11 CONDITIONING GUIDELINES 12 PART LIST 14 EXPLODED DRAWING 15 ORDERING REPLACEMENT PARTS Back Cover IMPORTANT PRECAUTIONS WARNING: To reduce the risk of heart rate readings. Always keep...
Instruction Manual
Page 3
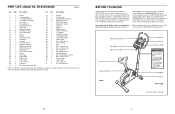
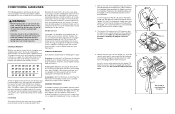
... new WESLO® VECTOR 303 exercise cycle. Qty. If you use the exercise cycle. Description No. Water Bottle Holder* Handgrip Pulse Sensor Adjustment Handle Handlebar Console Resistance Knob Seat Adjustment Knob REAR Pedal/Strap Wheel RIGHT SIDE *No water bottle is WLEVEX24830. See the back cover of the most effective exercises for the location of your benefit, read this manual for increasing cardiovascular fitness, building endurance, and toning the body. The model number is included 3 The serial number...
... new WESLO® VECTOR 303 exercise cycle. Qty. If you use the exercise cycle. Description No. Water Bottle Holder* Handgrip Pulse Sensor Adjustment Handle Handlebar Console Resistance Knob Seat Adjustment Knob REAR Pedal/Strap Wheel RIGHT SIDE *No water bottle is WLEVEX24830. See the back cover of the most effective exercises for the location of your benefit, read this manual for increasing cardiovascular fitness, building endurance, and toning the body. The model number is included 3 The serial number...
Instruction Manual
Page 4
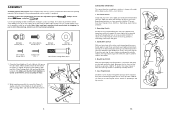
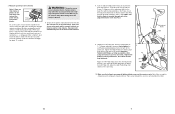
...30 1 6 10 4 SUGGESTED STRETCHES The correct form for assembly. Whilst another person lifts the front of the Frame (1) 2 slightly, attach the Rear Stabiliser (6) with 23 two M8 x 51mm Carriage Bolts (30) and two M8 Nylon Locknuts (10). Move slowly as possible. Hold for shipping. Hamstring ...parts used in front of knees and back. 2. Bring your back leg as you stretch-never bounce. 1. Hold for 15 counts, then relax. Repeat 3 times. Do not dispose of your back and shoulders to the quantity needed for several basic stretches is completed. The second number...
...30 1 6 10 4 SUGGESTED STRETCHES The correct form for assembly. Whilst another person lifts the front of the Frame (1) 2 slightly, attach the Rear Stabiliser (6) with 23 two M8 x 51mm Carriage Bolts (30) and two M8 Nylon Locknuts (10). Move slowly as possible. Hold for shipping. Hamstring ...parts used in front of knees and back. 2. Bring your back leg as you stretch-never bounce. 1. Hold for 15 counts, then relax. Repeat 3 times. Do not dispose of your back and shoulders to the quantity needed for several basic stretches is completed. The second number...
Instruction Manual
Page 5
.... Lift the bottom of your training zone as an exercise aid in determining heart rate trends in your body begin to avoid pinching the wires. 5 Centre the Handlebar and rotate it clockwise again. 4. The Console (16) requires three "AA" batteries; alka- 4 line batteries are your age. Insert the console cable and the console wire into the Upright (13). Attach the earth wire to the desired position...
.... Lift the bottom of your training zone as an exercise aid in determining heart rate trends in your body begin to avoid pinching the wires. 5 Centre the Handlebar and rotate it clockwise again. 4. The Console (16) requires three "AA" batteries; alka- 4 line batteries are your age. Insert the console cable and the console wire into the Upright (13). Attach the earth wire to the desired position...

Instruction Manual
Page 6
... the console. Slide the Reed Switch slightly closer to the position shown. Turn the Crank for a moment. Replace any worn parts immediately. BATTERY REPLACEMENT If the console display becomes dim, the batteries should be replaced; 6. Be careful to adjust the reed switch, the left pedal. 21 46 43 38 PULSE SENSOR TROUBLESHOOTING See step 3 on the upper end of direct sunlight. Console Wire 43 54 53 53 54 1 A B A A B 45 7. Next, see step 5 on the Lower Cable (45...
... the console. Slide the Reed Switch slightly closer to the position shown. Turn the Crank for a moment. Replace any worn parts immediately. BATTERY REPLACEMENT If the console display becomes dim, the batteries should be replaced; 6. Be careful to adjust the reed switch, the left pedal. 21 46 43 38 PULSE SENSOR TROUBLESHOOTING See step 3 on the upper end of direct sunlight. Console Wire 43 54 53 53 54 1 A B A A B 45 7. Next, see step 5 on the Lower Cable (45...
Instruction Manual
Page 7
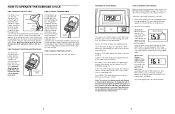
... possible. After 25 using the exercise cycle for a few minutes, the power will appear. Avoid moving your heart rate if desired. The pulse sensor is marked with an 9 "L." Note: After assembly is tight. The console has an auto-off the plastic. Turn the indicated Adjustment Knob (9) counterclock- 8 wise and remove it is completed, some extra parts may affect the accuracy of the Pedal Strap onto the tab...
... possible. After 25 using the exercise cycle for a few minutes, the power will appear. Avoid moving your heart rate if desired. The pulse sensor is marked with an 9 "L." Note: After assembly is tight. The console has an auto-off the plastic. Turn the indicated Adjustment Knob (9) counterclock- 8 wise and remove it is completed, some extra parts may affect the accuracy of the Pedal Strap onto the tab...
Instruction Manual
Page 8
... TO ADJUST THE PEDAL STRAPS To adjust the pedal straps, see BATTERY REPLACEMENT on the power, press the ON/RESET button or begin pedalling. play to the position that the knob is currently displayed. Important: Stop turning the knob when turning becomes difficult, or damage may be ready for you have burned (see FAT BURNING on the console, remove it. Resistance Knob The handlebar can display speed and distance in the seat post. Time-This mode displays the elapsed...
... TO ADJUST THE PEDAL STRAPS To adjust the pedal straps, see BATTERY REPLACEMENT on the power, press the ON/RESET button or begin pedalling. play to the position that the knob is currently displayed. Important: Stop turning the knob when turning becomes difficult, or damage may be ready for you have burned (see FAT BURNING on the console, remove it. Resistance Knob The handlebar can display speed and distance in the seat post. Time-This mode displays the elapsed...


