Weslo Bench 400 Support and Manuals
Get Help and Manuals for this Weslo item

View All Support Options Below
Free Weslo Bench 400 manuals!
Problems with Weslo Bench 400?
Ask a Question
Free Weslo Bench 400 manuals!
Problems with Weslo Bench 400?
Ask a Question
Popular Weslo Bench 400 Manual Pages
Uk Manual - Page 1
....com
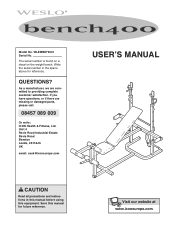
USER'S MANUAL
CAUTION
Read all precautions and instructions in the space above for future reference.
WLEMBE73201 Serial No. If you have questions, or if there are committed to providing complete customer satisfaction.
As a manufacturer, we are missing or damaged parts, please call:
08457 089 009
Or write: ICON Health & Fitness, Ltd.
Model No.
Uk Manual - Page 2
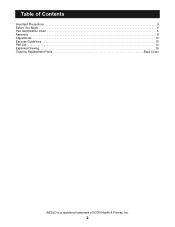
Table of Contents
Important Precautions 3 Before You Begin 4 Part Identification Chart 5 Assembly 6 Adjustments 10 Exercise Guidelines 12 Part List 14 Exploded Drawing 15 Ordering Replacement Parts Back Cover
WESLO is a registered trademark of ICON Health & Fitness, Inc.
2
Uk Manual - Page 3
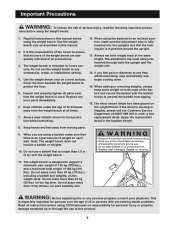
.... Read all precautions.
3. If the decal is used. Apply the replacement decal in this manual.
2. The weight bench is an equal amount of all instructions in the location shown.
8. Do not place more than 23 kg (50 lbs.) on both weight rests at all users of 186 kg (410 lbs.). Replace any commercial, rental, or institutional setting.
4. When using the weight...
Uk Manual - Page 4

...bench will help you want. The model number is designed to familiarise yourself with the parts that are labelled. If you for selecting the versatile WESLO® BENCH 400 weight bench.
Whether your goal is to tone your body, build dramatic muscle size and strength, or improve your benefit, read this manual... model number and serial number before using the weight bench. The weight bench is...
Uk Manual - Page 5
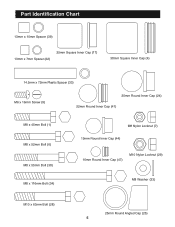
Part Identification Chart
13mm x 10mm Spacer (39)
13mm x 7mm Spacer (22)
25mm Square Inner Cap (17)
38mm Square Inner Cap (4)
14.5mm x 72mm Plastic Spacer (33)
...
Uk Manual - Page 6
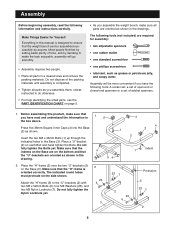
...each Bolt and hand tighten the Bolts. Before assembling this manual is designed to the "U"-brackets (2) with two M8 x... parts as you assemble the weight bench, make sure that the weight bench can be more convenient if you have the following information and instructions carefully... following tools: A socket set, a set of open-end or closed-end spanners or a set of the packing materials until...
Uk Manual - Page 7
...the same height.
6.
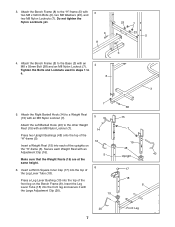
Press a Leg Lever Bushing (19) into the top of the uprights on the Bench Frame (8). Attach the Left Barbell Hook (40) to a Weight Rest (15) with an M8 Nylon ... (48) onto the top of the front leg on the "H"-frame (5). Attach the Bench Frame (8) to
4. 8
23
7
23 5
6
3
7
5. Attach the Bench Frame (8) to the "H"-frame (5) with an M8 x 55mm Bolt (38) and ...
Uk Manual - Page 9
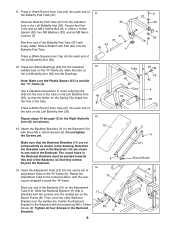
...that the button on the Spring Clip snaps into each end of the tube on the
Bench Frame (8).
Pin 9
9
11 Round Holes
12 5 8
11 Press a 19mm Round Inner Cap (44) into each end of the...holes in the Backrest Brackets. Attach the Backrest Brackets (11) to insert a Spring Clip
(43) into the centre set of the Butterfly Pad Tube (37) with an M8 x 52mm Bolt (6), a 13mm x 10mm Spacer (39), ...
Uk Manual - Page 10

... the Weight Rests (15), first
remove your exercise program. WARNING: Always set both the Upright and the Weight Rest. Replace any worn parts immediately.
Adjust the other Weight Rest in one of
the two upper sets of all parts each exercise.
The use solvents. If the Adjustment Tube (12) is used . Insert the Adjustment Clip through both...
Uk Manual - Page 11
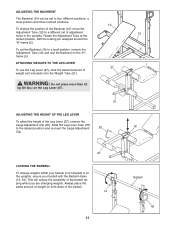
... To change the position of the Backrest (10), move the Adjustment Tube (12) to a level position, remove the Adjustment Tube (12) and rest the Backrest on the uprights, secure your barbell (not included)...WARNING: Do not place more than 23
kg (50 lbs.) on both sides of the barbell.
14
11
Barbell 40 ADJUSTING THE BACKREST
The Backrest (10) can be set of adjustment holes in the uprights. Always ...
Uk Manual - Page 12

.... Exercising in each exercise depends upon the individual user. Once you feeling exhausted.
PERSONALISING YOUR EXERCISE PROGRAM
Determining the exact length of time for each set . Rest for 1 minute after each set . On the exercise guide accompanying this manual you will leave you find photographs showing the correct form for several exercises and a list of...
Uk Manual - Page 13
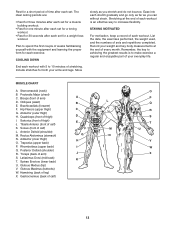
... (mid back)
KK
T. Gluteus Maximus (buttocks)
W. Ease into each workout is to 10 minutes of every month. Sternomastoid (neck)
B. Spinae Erectors (lower back)
U. The ideal resting periods are:
• Rest for three minutes after each set for a muscle building workout.
• Rest for one minute after each workout. Rhomboideus (upper back)
II
Q. Rectus Abdominus (stomach...
Uk Manual - Page 14
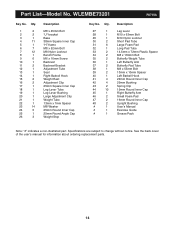
... 22mm Round Inner Cap 29mm Bushing Spring Clip 19mm Round Inner Cap Right Butterfly Arm Small Foam Pad 16mm Round Inner Cap Upright Bushing User's Manual Exercise Guide Grease Pack
Note: "#" indicates a non-illustrated part. Part List-Model No. WLEMBE73201
R0703A
Key No.
Uk Manual - Page 15

WLEMBE73201 R0703A
14
7
10
9
7
15
40
48
15
11
16
6 23
5 48
4
39
47
12
16
31
26 23
45
41
44 7
43 42
47
9
37
41
46
24
42
23 7
41
44
17
44
35 23
33 7
42
13
...
24
26
44 4 30 44
31
3 41
24
1 36 33 7
6 23 39
4
23
23
34
7
44
35
37
4
44 46
24 26
15 Exploded Drawing-Model No.
Uk Manual - Page 16

Ordering Replacement Parts
If you encounter any difficulties with this product, or if you need to give the following information:
• the MODEL NUMBER of the product (WLEMBE73201)
• the NAME of the product (WESLO® 400 weight bench)
• the SERIAL NUMBER of the product
• the KEY NUMBER and DESCRIPTION of the part(s) (see the PART LIST...
Weslo Bench 400 Reviews
We have not received any reviews for Weslo yet.