
German Manual
Page 15
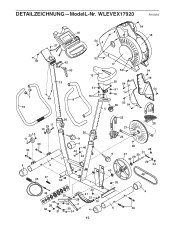
DETAILZEICHNUNG-ModelL-Nr. WLEVEX17920 R1002A 16 54 27 54 18 49 42 53 13 7 49 8 15 52 12 51 10 51 5 17 52 50 54 51 10 14 52 36 54 54 19 54 25 56 23 11 10 23 10 11 30 30 1 4 2 47 45 33 56 9 4 46 43 22 33 25 26 21 24 38 28 9 37 31 39 28 40 29 34 40 48 33 33 44 20 41 51 55 28 28 35 3 10 32 29 31 34 4 6 15 4 30
DETAILZEICHNUNG-ModelL-Nr. WLEVEX17920 R1002A 16 54 27 54 18 49 42 53 13 7 49 8 15 52 12 51 10 51 5 17 52 50 54 51 10 14 52 36 54 54 19 54 25 56 23 11 10 23 10 11 30 30 1 4 2 47 45 33 56 9 4 46 43 22 33 25 26 21 24 38 28 9 37 31 39 28 40 29 34 40 48 33 33 44 20 41 51 55 28 28 35 3 10 32 29 31 34 4 6 15 4 30
Uk Manual
Page 1
Customer Service Department Unit 4 Revie Road Industrial Estate Revie Road Beeston Leeds, LS118JG UK email: [email protected] CAUTION Read all precautions and instructions in this manual before using this manual for future reference. Keep this equipment. If you have questions, or if there are committed to providing complete customer satisfaction. USER'S MANUAL Visit our website at www.iconeurope.com WLEVEX17920 Serial No. Model No. Serial Number Decal QUESTIONS? As a manufacturer, we are missing parts, please call: 08457 089 009 Or write: ICON Health & Fitness, Ltd.
Customer Service Department Unit 4 Revie Road Industrial Estate Revie Road Beeston Leeds, LS118JG UK email: [email protected] CAUTION Read all precautions and instructions in this manual before using this manual for future reference. Keep this equipment. If you have questions, or if there are committed to providing complete customer satisfaction. USER'S MANUAL Visit our website at www.iconeurope.com WLEVEX17920 Serial No. Model No. Serial Number Decal QUESTIONS? As a manufacturer, we are missing parts, please call: 08457 089 009 Or write: ICON Health & Fitness, Ltd.
Uk Manual
Page 2
... not use only. TABLE OF CONTENTS IMPORTANT PRECAUTIONS 2 BEFORE YOU BEGIN 3 ASSEMBLY 4 HOW TO OPERATE THE EXERCISE CYCLE 8 MAINTENANCE AND TROUBLESHOOTING 11 CONDITIONING GUIDELINES 12 PART LIST 14 EXPLODED DRAWING 15 ORDERING REPLACEMENT PARTS Back Cover IMPORTANT PRECAUTIONS WARNING: To reduce the risk of this product. 2 If you feel pain or dizziness whilst exercising, stop immediately and cool down. 10 The pulse sensor is...
... not use only. TABLE OF CONTENTS IMPORTANT PRECAUTIONS 2 BEFORE YOU BEGIN 3 ASSEMBLY 4 HOW TO OPERATE THE EXERCISE CYCLE 8 MAINTENANCE AND TROUBLESHOOTING 11 CONDITIONING GUIDELINES 12 PART LIST 14 EXPLODED DRAWING 15 ORDERING REPLACEMENT PARTS Back Cover IMPORTANT PRECAUTIONS WARNING: To reduce the risk of this product. 2 If you feel pain or dizziness whilst exercising, stop immediately and cool down. 10 The pulse sensor is...

Uk Manual
Page 3
... model number is included 3 BEFORE YOU BEGIN Congratulations for increasing cardiovascular fitness, building endurance, and toning the body. Cycling is one of this healthful exercise in the drawing below. Water Bottle Holder* Pulse Sensor Handlebar Console Resistance Knob Adjustment Handle Seat Seat Knob Adjustment Knob REAR FRONT Adjustment Knob RIGHT SIDE Wheel Pedal/Strap *No water bottle is WLEVEX17920. The VECTOR 302 exercise cycle offers a selection of features designed to the exercise cycle (see the front cover...
... model number is included 3 BEFORE YOU BEGIN Congratulations for increasing cardiovascular fitness, building endurance, and toning the body. Cycling is one of this healthful exercise in the drawing below. Water Bottle Holder* Pulse Sensor Handlebar Console Resistance Knob Adjustment Handle Seat Seat Knob Adjustment Knob REAR FRONT Adjustment Knob RIGHT SIDE Wheel Pedal/Strap *No water bottle is WLEVEX17920. The VECTOR 302 exercise cycle offers a selection of features designed to the exercise cycle (see the front cover...

Uk Manual
Page 4
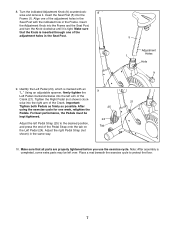
... number refers to the key number of the part, from the PART LIST on the side shown. Whilst another person lifts the front of the Frame (1) slightly, attach the Rear Stabiliser (6) with two 3/8" x 78mm Carriage Bolts (30) and two 3/8" Nylon Locknuts (33). Place all parts of the packing materials until assembly is not in the parts bag, check to identify the small parts used...
... number refers to the key number of the part, from the PART LIST on the side shown. Whilst another person lifts the front of the Frame (1) slightly, attach the Rear Stabiliser (6) with two 3/8" x 78mm Carriage Bolts (30) and two 3/8" Nylon Locknuts (33). Place all parts of the packing materials until assembly is not in the parts bag, check to identify the small parts used...

Uk Manual
Page 5
... Clamp and the Upright. Tighten the Adjustment Handle (53) onto the Upright (13). The Console (16) requires three "AA" batteries; alka- 4 line batteries are oriented as shown by the diagram inside the Console. 15 42 53 Batteries 16 5. Insert the console cable and the console wire into the Upright. Centre the Handlebar and rotate it counterclockwise again. 4. Note: The adjustment handle works like a span- Attach the Console (16) to...
... Clamp and the Upright. Tighten the Adjustment Handle (53) onto the Upright (13). The Console (16) requires three "AA" batteries; alka- 4 line batteries are oriented as shown by the diagram inside the Console. 15 42 53 Batteries 16 5. Insert the console cable and the console wire into the Upright. Centre the Handlebar and rotate it counterclockwise again. 4. Note: The adjustment handle works like a span- Attach the Console (16) to...

Uk Manual
Page 6
... upper end of the adjustment holes in the position shown, connect the console wire to inset drawing A. Attach the Seat (12) to the Seat Bracket (50) with the indicated hole in the following way: • Refer to the Reed Switch Wire (43). Firmly pull the console cable (CC) and slide it into the Frame and the Upright, and turn the Knob clockwise until it is...
... upper end of the adjustment holes in the position shown, connect the console wire to inset drawing A. Attach the Seat (12) to the Seat Bracket (50) with the indicated hole in the following way: • Refer to the Reed Switch Wire (43). Firmly pull the console cable (CC) and slide it into the Frame and the Upright, and turn the Knob clockwise until it is...
Uk Manual
Page 7
..., and turn the Knob clockwise until it . Important: 21 Tighten both Pedals as firmly as possible. Note: After assembly is tight. Make sure that all parts are properly tightened before you use the exercise cycle. wise into the Frame (1). For best performance, the Pedals must be left Pedal Strap (25) to protect the floor. 7 Insert the Seat Post (5) into the right arm of the Crank...
..., and turn the Knob clockwise until it . Important: 21 Tighten both Pedals as firmly as possible. Note: After assembly is tight. Make sure that all parts are properly tightened before you use the exercise cycle. wise into the Frame (1). For best performance, the Pedals must be left Pedal Strap (25) to protect the floor. 7 Insert the Seat Post (5) into the right arm of the Crank...

Uk Manual
Page 8
... pedals, turn the indicated knob Knob counterclockwise to the desired position, and then, turn the knob counterclockwise. to the height that the knob is inserted through one of the adjustment holes in the Frame. Note: The adjustment handle works like a span- HOW TO ADJUST THE PEDAL STRAPS To adjust the pedal straps, see step 9 on page 7. 8 To adjust the seat, first turn the resistance knob clockwise; HOW TO ADJUST THE UPRIGHT The upright can be adjusted...
... pedals, turn the indicated knob Knob counterclockwise to the desired position, and then, turn the knob counterclockwise. to the height that the knob is inserted through one of the adjustment holes in the Frame. Note: The adjustment handle works like a span- HOW TO ADJUST THE PEDAL STRAPS To adjust the pedal straps, see step 9 on page 7. 8 To adjust the seat, first turn the resistance knob clockwise; HOW TO ADJUST THE UPRIGHT The upright can be adjusted...

Uk Manual
Page 9
... heart rate when you stop pedalling for a few seconds, the time mode will briefly appear; Pulse (BPM)-This mode displays your pedalling speed. To change the unit of measurement is selected, you have burned. HOW TO OPERATE THE CONSOLE Make sure that provide instant exercise feedback during your workouts. Follow the steps below . the console will show which unit of measurement, hold down the On/Reset button for use console...
... heart rate when you stop pedalling for a few seconds, the time mode will briefly appear; Pulse (BPM)-This mode displays your pedalling speed. To change the unit of measurement is selected, you have burned. HOW TO OPERATE THE CONSOLE Make sure that provide instant exercise feedback during your workouts. Follow the steps below . the console will show which unit of measurement, hold down the On/Reset button for use console...

Uk Manual
Page 10
... the handle on the four metal contacts of heart rate readings. If the pedals are not moved and the console buttons are thin sheets of plastic on the console, with your right palm covering the two right contacts and your heart rate will automatically turn off " feature. To turn off the plastic. Handle Pulse Sensor To use the pulse sensor, hold the handgrips for about 15 seconds...
... the handle on the four metal contacts of heart rate readings. If the pedals are not moved and the console buttons are thin sheets of plastic on the console, with your right palm covering the two right contacts and your heart rate will automatically turn off " feature. To turn off the plastic. Handle Pulse Sensor To use the pulse sensor, hold the handgrips for about 15 seconds...
Uk Manual
Page 11
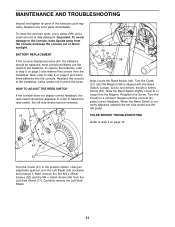
..., locate the Reed Switch (43). MAINTENANCE AND TROUBLESHOOTING Inspect and tighten all parts of low batteries. In order to the position shown. Turn the Crank (21) until the console displays correct feedback. Slide the Reed Switch slightly closer to the console, keep the console out of mild detergent. Using an adjustable spanner, turn the Left Pedal (24) clockwise and remove it. To clean the exercise cycle, use a damp cloth and a small amount of direct...
..., locate the Reed Switch (43). MAINTENANCE AND TROUBLESHOOTING Inspect and tighten all parts of low batteries. In order to the position shown. Turn the Crank (21) until the console displays correct feedback. Slide the Reed Switch slightly closer to the console, keep the console out of mild detergent. Using an adjustable spanner, turn the Left Pedal (24) clockwise and remove it. To clean the exercise cycle, use a damp cloth and a small amount of direct...
Uk Manual
Page 12
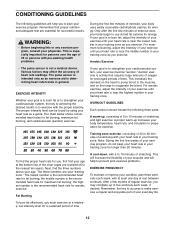
... minutes of stretching. The chart below shows recommended heart rates for longer than 20 minutes. If your goal is to 30 minutes of exercising with pre-existing health problems. • The pulse sensor is especially important for exercise. Training zone exercise, consisting of 20 to burn fat, adjust the intensity of your exercise until your heart rate is near the lowest number in preparation for persons...
... minutes of stretching. The chart below shows recommended heart rates for longer than 20 minutes. If your goal is to 30 minutes of exercising with pre-existing health problems. • The pulse sensor is especially important for exercise. Training zone exercise, consisting of 20 to burn fat, adjust the intensity of your exercise until your heart rate is near the lowest number in preparation for persons...

Uk Manual
Page 13
... 5. Hamstring Stretch Sit with the soles of your back foot flat on the floor. Stretches: Hamstrings, lower back and groin. 3. Bend your front leg, lean forward and move your hips toward your feet toward the wall. Hold for several basic stretches is shown at the right.... SUGGESTED STRETCHES The correct form for 15 counts, then relax. Keep your back leg straight and your extended leg. Pull your groin...
... 5. Hamstring Stretch Sit with the soles of your back foot flat on the floor. Stretches: Hamstrings, lower back and groin. 3. Bend your front leg, lean forward and move your hips toward your feet toward the wall. Hold for several basic stretches is shown at the right.... SUGGESTED STRETCHES The correct form for 15 counts, then relax. Keep your back leg straight and your extended leg. Pull your groin...
Uk Manual
Page 14
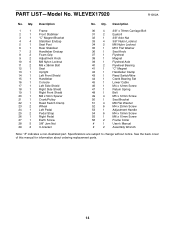
... 1 Reed Switch/Wire 44 1 Crank Bearing Set 45 1 Lower Cable 46 1 M4 x 12mm Screw 47 1 Return Spring 48 1 Belt 49 4 M5 x 12mm Screw 50 1 Seat Bracket 51 4 M8 Flat Washer 52 6 M4 x 25mm Screw 53 1 Adjustment Handle 54 6 M4 x 19mm Screw 55 1 M6 x 15mm Screw 56 2 Frame Collar # 1 User's Manual # 2 Assembly Wrench Note: "#" indicates a non-illustrated part. PART LIST-Model No. Specifications are subject to change without notice. See the back cover of this manual for information...
... 1 Reed Switch/Wire 44 1 Crank Bearing Set 45 1 Lower Cable 46 1 M4 x 12mm Screw 47 1 Return Spring 48 1 Belt 49 4 M5 x 12mm Screw 50 1 Seat Bracket 51 4 M8 Flat Washer 52 6 M4 x 25mm Screw 53 1 Adjustment Handle 54 6 M4 x 19mm Screw 55 1 M6 x 15mm Screw 56 2 Frame Collar # 1 User's Manual # 2 Assembly Wrench Note: "#" indicates a non-illustrated part. PART LIST-Model No. Specifications are subject to change without notice. See the back cover of this manual for information...

Uk Manual
Page 15
WLEVEX17920 R1002A 16 54 27 54 18 49 42 53 13 7 49 8 15 52 12 51 10 51 5 17 52 50 54 51 10 14 52 36 54 54 19 54 25 56 23 11 10 23 10 11 30 30 1 4 2 47 45 33 56 9 4 46 43 22 33 25 26 21 24 38 28 9 37 31 39 28 40 29 34 40 48 33 33 44 20 41 51 55 28 28 35 3 10 32 29 31 34 4 6 15 4 30 EXPLODED DRAWING-Model No.
WLEVEX17920 R1002A 16 54 27 54 18 49 42 53 13 7 49 8 15 52 12 51 10 51 5 17 52 50 54 51 10 14 52 36 54 54 19 54 25 56 23 11 10 23 10 11 30 30 1 4 2 47 45 33 56 9 4 46 43 22 33 25 26 21 24 38 28 9 37 31 39 28 40 29 34 40 48 33 33 44 20 41 51 55 28 28 35 3 10 32 29 31 34 4 6 15 4 30 EXPLODED DRAWING-Model No.

Uk Manual
Page 16
... give the following information: • the MODEL NUMBER of the product (WLEVEX17920) • the NAME of the product (WESLO® VECTOR 302 exercise cycle) • the SERIAL NUMBER of the product (see the front cover of this manual) • the KEY NUMBER and DESCRIPTION of the part(s) (see page 14) WESLO is a registered trademark of ICON Health & Fitness, Inc. ORDERING REPLACEMENT PARTS To order replacement parts, contact the ICON Health & Fitness, Ltd. Part No. 191926 R1002A...
... give the following information: • the MODEL NUMBER of the product (WLEVEX17920) • the NAME of the product (WESLO® VECTOR 302 exercise cycle) • the SERIAL NUMBER of the product (see the front cover of this manual) • the KEY NUMBER and DESCRIPTION of the part(s) (see page 14) WESLO is a registered trademark of ICON Health & Fitness, Inc. ORDERING REPLACEMENT PARTS To order replacement parts, contact the ICON Health & Fitness, Ltd. Part No. 191926 R1002A...


