

English Manual
Page 1
... or damaged parts, we are committed to you. Save this equipment. MST CAUTION! SUMMIT ST1OO INDEPENDENT STEPPING ACTION • CALORIE MONITOR WESLO® Model No. Serial Number 0 Decal QUESTIONS? Read all safety precautions and instructions in this manual carefully before using this manual for future reference. As a manufacturer, we will provide immediate assistance, free of charge to providing you complete satisfaction through direct assistance...
... or damaged parts, we are committed to you. Save this equipment. MST CAUTION! SUMMIT ST1OO INDEPENDENT STEPPING ACTION • CALORIE MONITOR WESLO® Model No. Serial Number 0 Decal QUESTIONS? Read all safety precautions and instructions in this manual carefully before using this manual for future reference. As a manufacturer, we will provide immediate assistance, free of charge to providing you complete satisfaction through direct assistance...
English Manual
Page 2
... pedals when stepping, or the pedals may be damaged. 2. Keep the console out of direct sunlight or the LCD display may become very hot during use. Allow the cylinders to cool before using the stepper. 1. TABLE OF CONTENTS IMPORTANT SAFETY PRECAUTIONS BEFORE YOU BEGIN ASSEMBLY OPERATION AND ADJUSTMENT CONSOLE OPERATION TROUBLE-SHOOTING AND MAINTENANCE CONDITIONING GUIDELINES PART LIST EXPLODED DRAWING ORDERING REPLACEMENT PARTS WARRANTY 2 3 4 6 7 8 9 10 11 Back Cover Back Cover...
... pedals when stepping, or the pedals may be damaged. 2. Keep the console out of direct sunlight or the LCD display may become very hot during use. Allow the cylinders to cool before using the stepper. 1. TABLE OF CONTENTS IMPORTANT SAFETY PRECAUTIONS BEFORE YOU BEGIN ASSEMBLY OPERATION AND ADJUSTMENT CONSOLE OPERATION TROUBLE-SHOOTING AND MAINTENANCE CONDITIONING GUIDELINES PART LIST EXPLODED DRAWING ORDERING REPLACEMENT PARTS WARRANTY 2 3 4 6 7 8 9 10 11 Back Cover Back Cover...
English Manual
Page 3
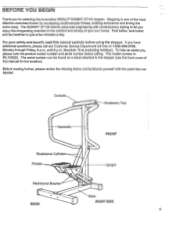
... Customer Service Department toll-free at 1-800-999-3756, Monday through Friday, 6 a.m. Console Accessory Tray Handrails FRONT Resistance Cylinders Pedals 0 Upright Resistance Bracket BACK Base RIGHT SIDE 3 The model number is one of the most effective exercises known for increasing cardiovascular fitness, building endurance and toning the entire body. If you enjoy this invigorating exercise in just a few minutes a day. For your own home. Stepping...
... Customer Service Department toll-free at 1-800-999-3756, Monday through Friday, 6 a.m. Console Accessory Tray Handrails FRONT Resistance Cylinders Pedals 0 Upright Resistance Bracket BACK Base RIGHT SIDE 3 The model number is one of the most effective exercises known for increasing cardiovascular fitness, building endurance and toning the entire body. If you enjoy this invigorating exercise in just a few minutes a day. For your own home. Stepping...
English Manual
Page 4
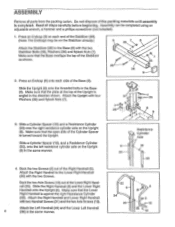
... the Cylinder Spacer is turned toward the Upright. Press an Endcap (9) on the Stabilizer already.) 9 36 7 8 Attach the Stabilizer (38) to the Lower Right Handrail (35) with two Handrail Screws (31) and the two Axle Screws (13). Attach the Upright with the two Stabilizer Bolts (39), Washers (36) and Nylock Nuts (7). Slide a Cylinder Spacer (19), and a Resistance Cylinder (20), onto the...
... the Cylinder Spacer is turned toward the Upright. Press an Endcap (9) on the Stabilizer already.) 9 36 7 8 Attach the Stabilizer (38) to the Lower Right Handrail (35) with two Handrail Screws (31) and the two Axle Screws (13). Attach the Upright with the two Stabilizer Bolts (39), Washers (36) and Nylock Nuts (7). Slide a Cylinder Spacer (19), and a Resistance Cylinder (20), onto the...
English Manual
Page 5
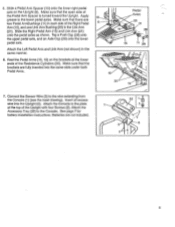
.... 6. Attach the Console to the Console. Rest the Pedal Arms (15, 16) on the Upright (6). See page 7 for battery installation instructions. Attach the Left Pedal Arm and Link Arm (not shown) in each side of the Resistance Cylinders (20). Make sure that the open side of the Upright with four Screws (2). Slide the Right Pedal Arm (15) and Link Arm (21) onto the pedal axles as shown. Insert all excess wire into...
.... 6. Attach the Console to the Console. Rest the Pedal Arms (15, 16) on the Upright (6). See page 7 for battery installation instructions. Attach the Left Pedal Arm and Link Arm (not shown) in each side of the Resistance Cylinders (20). Make sure that the open side of the Upright with four Screws (2). Slide the Right Pedal Arm (15) and Link Arm (21) onto the pedal axles as shown. Insert all excess wire into...
English Manual
Page 6
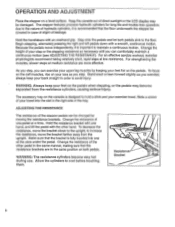
... both pedals sink to increase the resistance, move the bracket farther away from the resistance cylinders, causing serious injury. OPERATION AND ADJUSTMENT Place the stepper on the pedals when stepping, or the pedals may be covered in case of direct sunlight or the LCD display may become very hot during use. As you step, you exercise; WARNING: Always keep your exercise towel. Keep the console out...
... both pedals sink to increase the resistance, move the bracket farther away from the resistance cylinders, causing serious injury. OPERATION AND ADJUSTMENT Place the stepper on the pedals when stepping, or the pedals may be covered in case of direct sunlight or the LCD display may become very hot during use. As you step, you exercise; WARNING: Always keep your exercise towel. Keep the console out...
English Manual
Page 7
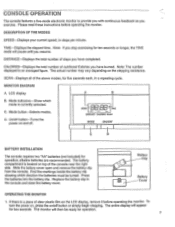
... console and close the battery cover. DISTANCE-Displays the total number of nutritional Calories you have burned. LCD display. C. On/off button-Turns the power on the stepping resistance. Press the batteries into the battery clip. The monitor will pause until you resume. Note: If you exercise. The actual number may vary depending on and off button or simply begin stepping. Mode button-Selects modes. TIME-Displays the elapsed time. Mode indicators-Show which direction the batteries...
... console and close the battery cover. DISTANCE-Displays the total number of nutritional Calories you have burned. LCD display. C. On/off button-Turns the power on the stepping resistance. Press the batteries into the battery clip. The monitor will pause until you resume. Note: If you exercise. The actual number may vary depending on and off button or simply begin stepping. Mode button-Selects modes. TIME-Displays the elapsed time. Mode indicators-Show which direction the batteries...
English Manual
Page 8
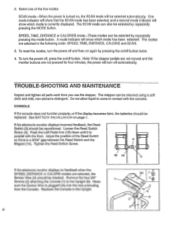
... AND MAINTENANCE Inspect and tighten all parts each time you use the stepper. Do not allow liquid to come in the following order: SPEED, TIME, DISTANCE, CALORIE and SCAN. 3. To reset the modes, turn the power off, press the on /off button. To turn the power off and then on again by repeatedly pressing the mode button. Tighten the Reed Switch Screw. 16 14 3 If the electronic monitor displays no feedback when the SPEED, DISTANCE...
... AND MAINTENANCE Inspect and tighten all parts each time you use the stepper. Do not allow liquid to come in the following order: SPEED, TIME, DISTANCE, CALORIE and SCAN. 3. To reset the modes, turn the power off, press the on /off button. To turn the power off and then on again by repeatedly pressing the mode button. Tighten the Reed Switch Screw. 16 14 3 If the electronic monitor displays no feedback when the SPEED, DISTANCE...
English Manual
Page 9
... any exercise program, consult your wrist. The key to age. You can be increased gradually until your heart rate is known as you exercise-never hold your training zone for both unconditioned and conditioned persons according to success is important to exercise with 5 to five workouts each workout with the proper intensity. To measure your heart rate, stop exercising.) Adjust the intensity of three basic parts...
... any exercise program, consult your wrist. The key to age. You can be increased gradually until your heart rate is known as you exercise-never hold your training zone for both unconditioned and conditioned persons according to success is important to exercise with 5 to five workouts each workout with the proper intensity. To measure your heart rate, stop exercising.) Adjust the intensity of three basic parts...
English Manual
Page 10
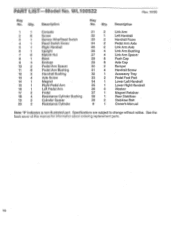
... Rear Stabilizer Stabilizer Bolt Owner's Manual Note: "#" indicates a non-illustrated part. See the back co= of this rrrnu-! Qty. 1 1 2 8 3 1 4 1 5 1 6 1 7 6 8 1 9 4 10 2 11 8 12 2 13 4 14 1 15 1 16 1 17 2 18 4 19 2 20 2 Description Console Screw Sensor Wire/Reed Switch Reed Switch Screw Right Handrail Upright Nylock Nut Base Endcap Pedal Arm Spacer Pedal Arm Bushing Handrail Bushing Axle Screw Magnet Right Pedal Arm Left Pedal Arm Pedal Resistance Cylinder Bushing Cylinder Spacer Resistance Cylinder Key No. Specifications are subject to change...
... Rear Stabilizer Stabilizer Bolt Owner's Manual Note: "#" indicates a non-illustrated part. See the back co= of this rrrnu-! Qty. 1 1 2 8 3 1 4 1 5 1 6 1 7 6 8 1 9 4 10 2 11 8 12 2 13 4 14 1 15 1 16 1 17 2 18 4 19 2 20 2 Description Console Screw Sensor Wire/Reed Switch Reed Switch Screw Right Handrail Upright Nylock Nut Base Endcap Pedal Arm Spacer Pedal Arm Bushing Handrail Bushing Axle Screw Magnet Right Pedal Arm Left Pedal Arm Pedal Resistance Cylinder Bushing Cylinder Spacer Resistance Cylinder Key No. Specifications are subject to change...
English Manual
Page 11
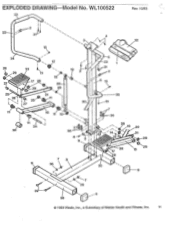
WL100522 23 Rev. 10/93 2 22 31 P 13 2 32 • 34 12 28 29 27 33 L\ 13 17 28 ti 18> 20/26 29 (27 21 11 19 2 20 16 11 30° 11 24 36 I • 9 7 8 9 36 5 23 31 2 13 35 13 7 36 26 .e 1( " 33 1.-4-....0 10 37 20 21 -43--28 28 7 29 29 15 30 9 7 36 39 9 38 © 1993 Weslo, Inc., a Subsidiary of Weider Health and Fitness, Inc. 11 EXPLODED DRAWING Model No.
WL100522 23 Rev. 10/93 2 22 31 P 13 2 32 • 34 12 28 29 27 33 L\ 13 17 28 ti 18> 20/26 29 (27 21 11 19 2 20 16 11 30° 11 24 36 I • 9 7 8 9 36 5 23 31 2 13 35 13 7 36 26 .e 1( " 33 1.-4-....0 10 37 20 21 -43--28 28 7 29 29 15 30 9 7 36 39 9 38 © 1993 Weslo, Inc., a Subsidiary of Weider Health and Fitness, Inc. 11 EXPLODED DRAWING Model No.
English Manual
Page 12
... order replacement parts, simply call our Customer Service Department toll-free at one of its authorized service centers. The SERIAL NUMBER of the product (see the front cover of purchase. LIMITED WARRANTY Weslo, Inc. ("WESLO"), warrants this product to be received by WESLO at one of its authorized service centers with all freight and other transportation charges prepaid, accompanied by sufficient proof of this manual...
... order replacement parts, simply call our Customer Service Department toll-free at one of its authorized service centers. The SERIAL NUMBER of the product (see the front cover of purchase. LIMITED WARRANTY Weslo, Inc. ("WESLO"), warrants this product to be received by WESLO at one of its authorized service centers with all freight and other transportation charges prepaid, accompanied by sufficient proof of this manual...


