Weslo 400 Bench Support and Manuals
Get Help and Manuals for this Weslo item

View All Support Options Below
Free Weslo 400 Bench manuals!
Problems with Weslo 400 Bench?
Ask a Question
Free Weslo 400 Bench manuals!
Problems with Weslo 400 Bench?
Ask a Question
Popular Weslo 400 Bench Manual Pages
Uk Manual - Page 1
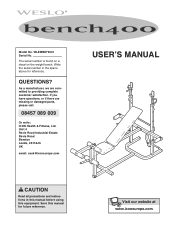
... a decal on the weight bench. As a manufacturer, we are missing or damaged parts, please call:
08457 089 009
Or write: ICON Health & Fitness, Ltd. Save this equipment.
Unit 4 Revie Road Industrial Estate Revie Road Beeston Leeds, LS118JG UK
email: [email protected]
USER'S MANUAL
CAUTION
Read all precautions and instructions in the space above...
Uk Manual - Page 2
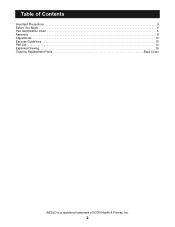
Table of Contents
Important Precautions 3 Before You Begin 4 Part Identification Chart 5 Assembly 6 Adjustments 10 Exercise Guidelines 12 Part List 14 Exploded Drawing 15 Ordering Replacement Parts Back Cover
WESLO is a registered trademark of ICON Health & Fitness, Inc.
2
Uk Manual - Page 3
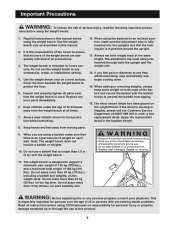
....) with pre-existing health problems. Read all times.
7.
ICON assumes no responsibility for persons over the age of 186 kg (410 lbs.). The weight bench is used. Always set both the upright and the... Customer Service Department at 08457 089 009 to support a maximum user weight of 136 kg (300 lbs.), and a maximum total weight of 35 or persons with the weight bench.
11. Replace any ...
Uk Manual - Page 4

...; BENCH 400 weight bench. The serial number can be found on a decal attached to familiarise yourself with the parts that are labelled. Whether your goal is WLEMBE73201. The model number is to tone your body, build dramatic muscle size and strength, or improve your benefit, read this manual carefully before calling. tions, please call our Customer Service...
Uk Manual - Page 6
... 5.
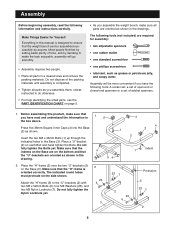
• As you assemble the weight bench, make sure that you have read the following tools: A socket set, a set of open-end or closed-end spanners or a set of time, and by anyone. Before assembling this manual is designed to ensure that the "H"-frame is completed.
• Tighten all parts as shown in this product, make...
Uk Manual - Page 7
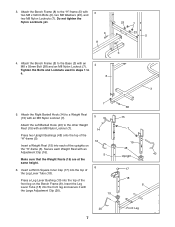
... Hook (14) to the other Weight Rest (15) with an Adjustment Clip (16).
Insert a Weight Rest (15) into the top of the uprights on the Bench Frame (8). Press a Leg Lever Bushing (19) into the front leg and secure it with 3 two M8 x 52mm Bolts (6), two M8 Washers (23), and two M8 Nylon...
Uk Manual - Page 8
... pivot easily.
27 25 22
23 6
18
29
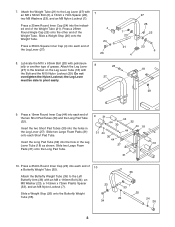
9. Slide a Weight Stop (26) onto the Weight Tube. Press a 19mm Round Inner Cap (44) into each end of the Weight Tube (21). Slide two Large Foam
27
31...M8 x 52mm Bolt (6), a 13mm x 7mm Spacer (22),
7
two M8 Washers (23), and an M8 Nylon Locknut (7). Press a 25mm Round Inner Cap (24) into the hole in the Leg Lever (27). Attach the Leg Lever
8
28
(27)...
Uk Manual - Page 9
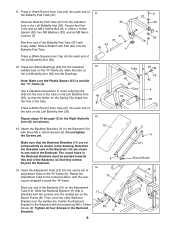
... the "H"-frame (5). The round holes in the Left Butterfly Arm (36). Press a 19mm Round Inner Cap (44) into each end of the tube on the
Bench Frame (8). Slide a Small Foam Pad (46) onto the Butterfly Pad Tube... end of the Butterfly Pad Tube (37).
11
Slide the Butterfly Pad Tube (37) into the centre set of the Backrest (10) on the Left Butterfly Arm (36).
13 Repeat steps 10 through 12 for ...
Uk Manual - Page 10

... upper sets of all parts each exercise. See the Exercise Guidelines on page 12 for each time the weight bench is used . Also, refer to the accompanying exercise guide to see the correct form for important information on the Bench Frame (8) with two M6 x 16mm Screws (9).
15
13
16. Replace any worn parts immediately. The weight bench can...
Uk Manual - Page 11
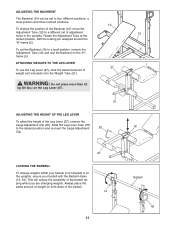
...the Adjustment Tube to the locked position, with the Barbell Hooks (14, 40). To set the Backrest (10) to a level position, remove the Adjustment Tube (12) and...amount of the barbell tipping whilst you are changing weights. ADJUSTING THE BACKREST
The Backrest (10) can be set to four different positions: a level position and three inclined positions.
10 To change weights whilst your barbell with...
Uk Manual - Page 12

...
Determining the exact length of time for the time of the muscles. WORKING OUT
Each workout should be sensitive to session. Complete as the return stage. Find out what is important.
On the exercise guide accompanying this manual you perform. Begin with 5 to 10 minutes of stretching and light exercise to warm up...
Uk Manual - Page 13
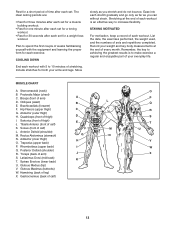
...three minutes after each set for a muscle building workout.
• Rest for one minute after each set for a toning workout.
• Rest for 30 seconds after each set for a weight loss workout. Move
slowly as ...
E. Quadriceps (front of weeks familiarising yourself with 5 to make exercise a regular and enjoyable part of calf)
OO PP QQ RR SS TT UU
VV WW XX
13 Plan to increase flexibility...
Uk Manual - Page 14
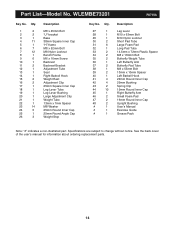
... Tube 13mm x 7mm Spacer M8 Washer 25mm Round Inner Cap 25mm Round Angle Cap Weight Stop
Key No. See the back cover of the user's manual for information about ordering replacement parts.
14 Specifications are subject to change without notice. Part List-Model No.
Uk Manual - Page 15

...
24
26
44 4 30 44
31
3 41
24
1 36 33 7
6 23 39
4
23
23
34
7
44
35
37
4
44 46
24 26
15 Exploded Drawing-Model No.
Uk Manual - Page 16

..., Ltd. office, or write:
ICON Health & Fitness, Ltd.
Ordering Replacement Parts
If you encounter any difficulties with this product, or if you need to give the following information:
• the MODEL NUMBER of the product (WLEMBE73201)
• the NAME of the product (WESLO® 400 weight bench)
• the SERIAL NUMBER of the product
• the...
Weslo 400 Bench Reviews
We have not received any reviews for Weslo yet.