
Uk Manual
Page 1
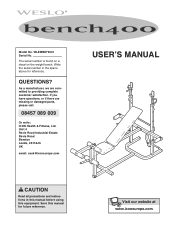
... and instructions in the space above for future reference. Model No. Visit our website at www.iconeurope.com As a manufacturer, we are missing or damaged parts, please call: 08457 089 009 Or write: ICON Health & Fitness, Ltd. Save this equipment. WLEMBE73201 Serial No. Write the serial number in this manual before using this manual for reference. The serial number is found on a decal on the weight bench.
... and instructions in the space above for future reference. Model No. Visit our website at www.iconeurope.com As a manufacturer, we are missing or damaged parts, please call: 08457 089 009 Or write: ICON Health & Fitness, Ltd. Save this equipment. WLEMBE73201 Serial No. Write the serial number in this manual before using this manual for reference. The serial number is found on a decal on the weight bench.
Uk Manual
Page 2
Table of Contents Important Precautions 3 Before You Begin 4 Part Identification Chart 5 Assembly 6 Adjustments 10 Exercise Guidelines 12 Part List 14 Exploded Drawing 15 Ordering Replacement Parts Back Cover WESLO is a registered trademark of ICON Health & Fitness, Inc. 2
Table of Contents Important Precautions 3 Before You Begin 4 Part Identification Chart 5 Assembly 6 Adjustments 10 Exercise Guidelines 12 Part List 14 Exploded Drawing 15 Ordering Replacement Parts Back Cover WESLO is a registered trademark of ICON Health & Fitness, Inc. 2
Uk Manual
Page 3
... pre-existing health problems. Read all users of the owner to protect the floor. 5. Note: The weight bench does not include a barbell or weights. 10. Cover the floor beneath the weight bench to ensure that is an equal amount of all instructions in any worn parts immediately. 6. Always wear athletic shoes for home use a barbell that all instructions before using the weight bench. 1. Do not use of serious injury...
... pre-existing health problems. Read all users of the owner to protect the floor. 5. Note: The weight bench does not include a barbell or weights. 10. Cover the floor beneath the weight bench to ensure that is an equal amount of all instructions in any worn parts immediately. 6. Always wear athletic shoes for home use a barbell that all instructions before using the weight bench. 1. Do not use of serious injury...

Uk Manual
Page 4
... the product model number and serial number before using the weight bench. The serial number can be found on a decal attached to familiarise yourself with the parts that are labelled. To help us assist you for selecting the versatile WESLO® BENCH 400 weight bench. The weight bench is WLEMBE73201. Weight Rest Upright Butterfly Arm Backrest Seat Leg Lever Barbell Hook Adjustment Clip Adjustment Tube Locking Pin Weight Tube Weight Tube 4 For your cardiovascular system, the weight bench will help...
... the product model number and serial number before using the weight bench. The serial number can be found on a decal attached to familiarise yourself with the parts that are labelled. To help us assist you for selecting the versatile WESLO® BENCH 400 weight bench. The weight bench is WLEMBE73201. Weight Rest Upright Butterfly Arm Backrest Seat Leg Lever Barbell Hook Adjustment Clip Adjustment Tube Locking Pin Weight Tube Weight Tube 4 For your cardiovascular system, the weight bench will help...
Uk Manual
Page 5
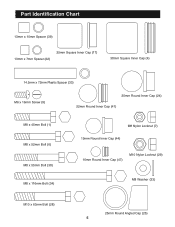
Part Identification Chart 13mm x 10mm Spacer (39) 13mm x 7mm Spacer (22) 25mm Square Inner Cap (17) 38mm Square Inner Cap (4) 14.5mm x 72mm Plastic Spacer (33) M6 x 16mm Screw (9) 25mm Round Inner Cap (24) 22mm Round Inner Cap (41) M8 x 45mm Bolt (1) M8 x 52mm Bolt (6) M8 x 55mm Bolt (38) M8 x 116mm Bolt (34) M8 Nylon Locknut (7) 19mm Round Inner Cap (44) 16mm Round Inner Cap (47) M10 Nylon Locknut (29) M8 Washer (23) M10 x 63mm Bolt (28) 25mm Round Angled Cap (25) 5
Part Identification Chart 13mm x 10mm Spacer (39) 13mm x 7mm Spacer (22) 25mm Square Inner Cap (17) 38mm Square Inner Cap (4) 14.5mm x 72mm Plastic Spacer (33) M6 x 16mm Screw (9) 25mm Round Inner Cap (24) 22mm Round Inner Cap (41) M8 x 45mm Bolt (1) M8 x 52mm Bolt (6) M8 x 55mm Bolt (38) M8 x 116mm Bolt (34) M8 Nylon Locknut (7) 19mm Round Inner Cap (44) 16mm Round Inner Cap (47) M10 Nylon Locknut (29) M8 Washer (23) M10 x 63mm Bolt (28) 25mm Round Angled Cap (25) 5
Uk Manual
Page 6
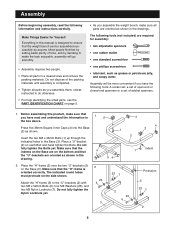
... 5. • As you assemble the weight bench, make sure all parts in the drawing. 4 34 4 4 2 3 Indent 1 2. Make Things Easier for assembly: • two adjustable spanners • one rubber mallet • one standard screwdriver • one phillips screwdriver • lubricant, such as shown in a cleared area and remove the packing materials. Assembly Before beginning assembly, read and understand the information in 1 2 the...
... 5. • As you assemble the weight bench, make sure all parts in the drawing. 4 34 4 4 2 3 Indent 1 2. Make Things Easier for assembly: • two adjustable spanners • one rubber mallet • one standard screwdriver • one phillips screwdriver • lubricant, such as shown in a cleared area and remove the packing materials. Assembly Before beginning assembly, read and understand the information in 1 2 the...
Uk Manual
Page 7
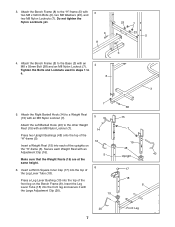
... an M8 Nylon Locknut (7). 4 Tighten the Bolts and Locknuts used in steps 1 to the Base (3) with an M8 Nylon Locknut (7). Insert a Weight Rest (15) into the top of the uprights on the Bench Frame (8). Secure each of the Leg Lever Tube (18). Make sure that the Weight Rests (15) are at the same height. 6. Press a Leg Lever Bushing (19) into the...
... an M8 Nylon Locknut (7). 4 Tighten the Bolts and Locknuts used in steps 1 to the Base (3) with an M8 Nylon Locknut (7). Insert a Weight Rest (15) into the top of the uprights on the Bench Frame (8). Secure each of the Leg Lever Tube (18). Make sure that the Weight Rests (15) are at the same height. 6. Press a Leg Lever Bushing (19) into the...
Uk Manual
Page 8
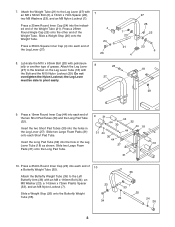
...into the indicated end of grease. Attach the Butterfly Weight Tube (35) to pivot easily. 27 25 22 23 6 18 29 9. Press a 25mm Round Angle Cap (25) onto the other end of the Leg Lever (27). 4 24 26 7 23 21 4 8. Lubricate the M10 x 63mm Bolt (28) with an M8 x 116mm Bolt (34), an M8 ...of the Weight Tube. Slide a Weight Stop (26) onto the Butterfly Weight Tube (35). 34 36 7 33 35 24 24 26 8 the Leg Lever 27 must be able to the Left Butterfly Arm (36) with petroleum jelly or another type of the Weight Tube (21). Slide a Weight Stop (26) onto the Weight Tube. Slide...
...into the indicated end of grease. Attach the Butterfly Weight Tube (35) to pivot easily. 27 25 22 23 6 18 29 9. Press a 25mm Round Angle Cap (25) onto the other end of the Leg Lever (27). 4 24 26 7 23 21 4 8. Lubricate the M10 x 63mm Bolt (28) with an M8 x 116mm Bolt (34), an M8 ...of the Weight Tube. Slide a Weight Stop (26) onto the Butterfly Weight Tube (35). 34 36 7 33 35 24 24 26 8 the Leg Lever 27 must be able to the Left Butterfly Arm (36) with petroleum jelly or another type of the Weight Tube (21). Slide a Weight Stop (26) onto the Weight Tube. Slide...
Uk Manual
Page 9
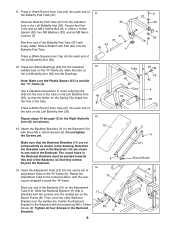
... Butterfly Arm (36). 13 Repeat steps 10 through 12 for the Right Butterfly Arm (45, not shown). 10 13. Tighten all four Screws in the tube. Secure the Pad Tube with two screws onto the welded pin on the Left Butterfly Arm 49 (36), so that is outside the "H"-frame (5). Rotate the Adjustment Tube ... with three M6 x 16mm Screws (9). Wet then end of the tube on the Bench Frame (8). Press two 29mm Bushings (42) into each end of the Left Butterfly Arm (36). 12. Slide the tube on the Left Butterfly Arm (36) into each end of the tube on the Adjustment Tube (12). Tube 42 ...
... Butterfly Arm (36). 13 Repeat steps 10 through 12 for the Right Butterfly Arm (45, not shown). 10 13. Tighten all four Screws in the tube. Secure the Pad Tube with two screws onto the welded pin on the Left Butterfly Arm 49 (36), so that is outside the "H"-frame (5). Rotate the Adjustment Tube ... with three M6 x 16mm Screws (9). Wet then end of the tube on the Bench Frame (8). Press two 29mm Bushings (42) into each end of the Left Butterfly Arm (36). 12. Slide the tube on the Left Butterfly Arm (36) into each end of the tube on the Adjustment Tube (12). Tube 42 ...

Uk Manual
Page 10
... sets of adjustment holes, you will be explained in the same manner. Also, refer to the accompanying exercise guide to see the correct form for important information on how to get the most benefit from your Barbell (not shown) from the upright. Inspect and tighten all parts are properly tightened before the weight bench is used . The use solvents. Replace any worn parts immediately. Slide the Weight...
... sets of adjustment holes, you will be explained in the same manner. Also, refer to the accompanying exercise guide to see the correct form for important information on how to get the most benefit from your Barbell (not shown) from the upright. Inspect and tighten all parts are properly tightened before the weight bench is used . The use solvents. Replace any worn parts immediately. Slide the Weight...
Uk Manual
Page 11
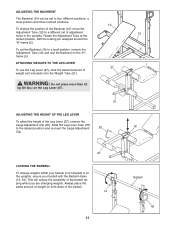
... be set of adjustment holes in the uprights. ATTACHING WEIGHTS TO THE LEG LEVER 27 To use the Leg Lever (27), slide the desired amount of the barbell. 14 11 Barbell 40 Always place the same amount of weight on the Leg Lever (27). 21 ADJUSTING THE HEIGHT OF THE LEG LEVER To adjust the height of the barbell tipping whilst you are changing weights...
... be set of adjustment holes in the uprights. ATTACHING WEIGHTS TO THE LEG LEVER 27 To use the Leg Lever (27), slide the desired amount of the barbell. 14 11 Barbell 40 Always place the same amount of weight on the Leg Lever (27). 21 ADJUSTING THE HEIGHT OF THE LEG LEVER To adjust the height of the barbell tipping whilst you are changing weights...

Uk Manual
Page 12
... weight. PERSONALISING YOUR EXERCISE PROGRAM Determining the exact length of time for 20 to warm up prepares your heart and lungs. Never hold your workouts for several exercises and a list of repetitions or sets per- Once you find photographs showing the correct form for the time of weight. You can complete 3 sets of 12 repetitions without discomfort. On the exercise guide accompanying this manual...
... weight. PERSONALISING YOUR EXERCISE PROGRAM Determining the exact length of time for 20 to warm up prepares your heart and lungs. Never hold your workouts for several exercises and a list of repetitions or sets per- Once you find photographs showing the correct form for the time of weight. You can complete 3 sets of 12 repetitions without discomfort. On the exercise guide accompanying this manual...
Uk Manual
Page 13
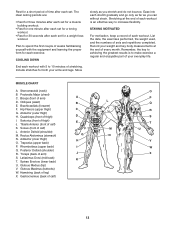
... after each set for a muscle building workout. • Rest for one minute after each set for a toning workout. • Rest for both your everyday life. Include stretches for 30 seconds after each exercise. Rhomboideus (upper back) II Q. Pectoralis Major (chest) C. List the date, the exercises performed, the weight used, and the numbers of stretching. Anterior Deltoid (shoulder) M. Remember, the key to achieving...
... after each set for a muscle building workout. • Rest for one minute after each set for a toning workout. • Rest for both your everyday life. Include stretches for 30 seconds after each exercise. Rhomboideus (upper back) II Q. Pectoralis Major (chest) C. List the date, the exercises performed, the weight used, and the numbers of stretching. Anterior Deltoid (shoulder) M. Remember, the key to achieving...
Uk Manual
Page 14
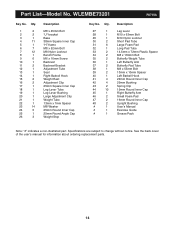
... x 52mm Bolt M8 Nylon Locknut Bench Frame M6 x 16mm Screw Backrest Backrest Bracket Adjustment Tube Seat Right Barbell Hook Weight Rest Adjustment Clip 25mm Square Inner Cap Leg Lever Tube Leg Lever Bushing Large Adjustment Clip Weight Tube 13mm x 7mm Spacer M8 Washer 25mm Round Inner Cap 25mm Round Angle Cap Weight Stop Key No. See the back cover of the user's manual for information about ordering replacement parts. 14
... x 52mm Bolt M8 Nylon Locknut Bench Frame M6 x 16mm Screw Backrest Backrest Bracket Adjustment Tube Seat Right Barbell Hook Weight Rest Adjustment Clip 25mm Square Inner Cap Leg Lever Tube Leg Lever Bushing Large Adjustment Clip Weight Tube 13mm x 7mm Spacer M8 Washer 25mm Round Inner Cap 25mm Round Angle Cap Weight Stop Key No. See the back cover of the user's manual for information about ordering replacement parts. 14

Uk Manual
Page 15
Exploded Drawing-Model No. WLEMBE73201 R0703A 14 7 10 9 7 15 40 48 15 11 16 6 23 5 48 4 39 47 12 16 31 26 23 45 41 44 7 43 42 47 9 37 41 46 24 42 23 7 41 44 17 44 35 23 33 7 42 13 24 32 44 6 34 4 43 28 6 7 42 8 18 29 31 23 6 7 19 2 4 6 23 20 9 1 2 4 4 31 27 7 7 4 4 38 23 4 21 44 25 22 23 6 44 30 24 26 44 4 30 44 31 3 41 24 1 36 33 7 6 23 39 4 23 23 34 7 44 35 37 4 44 46 24 26 15
Exploded Drawing-Model No. WLEMBE73201 R0703A 14 7 10 9 7 15 40 48 15 11 16 6 23 5 48 4 39 47 12 16 31 26 23 45 41 44 7 43 42 47 9 37 41 46 24 42 23 7 41 44 17 44 35 23 33 7 42 13 24 32 44 6 34 4 43 28 6 7 42 8 18 29 31 23 6 7 19 2 4 6 23 20 9 1 2 4 4 31 27 7 7 4 4 38 23 4 21 44 25 22 23 6 44 30 24 26 44 4 30 44 31 3 41 24 1 36 33 7 6 23 39 4 23 23 34 7 44 35 37 4 44 46 24 26 15

Uk Manual
Page 16
... China © 2003 ICON Health & Fitness, Inc. Ordering Replacement Parts If you encounter any difficulties with this product, or if you need to give the following information: • the MODEL NUMBER of the product (WLEMBE73201) • the NAME of the product (WESLO® 400 weight bench) • the SERIAL NUMBER of the product • the KEY NUMBER and DESCRIPTION of the part(s) (see the PART LIST and the EXPLODED DRAWING...
... China © 2003 ICON Health & Fitness, Inc. Ordering Replacement Parts If you encounter any difficulties with this product, or if you need to give the following information: • the MODEL NUMBER of the product (WLEMBE73201) • the NAME of the product (WESLO® 400 weight bench) • the SERIAL NUMBER of the product • the KEY NUMBER and DESCRIPTION of the part(s) (see the PART LIST and the EXPLODED DRAWING...


