
Instruction Manual
Page 1
... using this equipment. Customer Service Department Unit 4 Revie Road Industrial Estate Revie Road Beeston Leeds, LS118JG UK email: [email protected] CAUTION Read all precautions and instructions in China © 2004 ICON IP, Inc. ® Model No. USER'S MANUAL Visit our website at www.iconeurope.com Keep this manual) • the KEY NUMBER and DESCRIPTION of the part(s) (see the front cover...
... using this equipment. Customer Service Department Unit 4 Revie Road Industrial Estate Revie Road Beeston Leeds, LS118JG UK email: [email protected] CAUTION Read all precautions and instructions in China © 2004 ICON IP, Inc. ® Model No. USER'S MANUAL Visit our website at www.iconeurope.com Keep this manual) • the KEY NUMBER and DESCRIPTION of the part(s) (see the front cover...

Instruction Manual
Page 2
... weighing more than 115 kg (250 lbs.). 8. Do not use only. Apply the decal in the location shown. TABLE OF CONTENTS IMPORTANT PRECAUTIONS 2 BEFORE YOU BEGIN 3 ASSEMBLY 4 HOW TO OPERATE THE EXERCISE CYCLE 8 MAINTENANCE AND TROUBLESHOOTING 10 CONDITIONING GUIDELINES 11 PART LIST 14 EXPLODED DRAWING 15 ORDERING REPLACEMENT PARTS Back Cover IMPORTANT PRECAUTIONS WARNING: To reduce the risk of this product...
... weighing more than 115 kg (250 lbs.). 8. Do not use only. Apply the decal in the location shown. TABLE OF CONTENTS IMPORTANT PRECAUTIONS 2 BEFORE YOU BEGIN 3 ASSEMBLY 4 HOW TO OPERATE THE EXERCISE CYCLE 8 MAINTENANCE AND TROUBLESHOOTING 10 CONDITIONING GUIDELINES 11 PART LIST 14 EXPLODED DRAWING 15 ORDERING REPLACEMENT PARTS Back Cover IMPORTANT PRECAUTIONS WARNING: To reduce the risk of this product...
Instruction Manual
Page 3
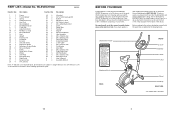
... note the product model number and serial number before you enjoy this manual for information about ordering replacement parts. The model number is included 14 3 See the back cover of this healthful exercise in the drawing below. PART LIST-Model No. Water Bottle Holder* Adjustment Knob REAR FRONT Console Handlebar Resistance Knob Seat Wheel Pedal/Strap RIGHT SIDE *No water bottle is WLEVEX17040. The serial number can be found on a decal attached to let you use the exercise cycle. Cycling...
... note the product model number and serial number before you enjoy this manual for information about ordering replacement parts. The model number is included 14 3 See the back cover of this healthful exercise in the drawing below. PART LIST-Model No. Water Bottle Holder* Adjustment Knob REAR FRONT Console Handlebar Resistance Knob Seat Wheel Pedal/Strap RIGHT SIDE *No water bottle is WLEVEX17040. The serial number can be found on a decal attached to let you use the exercise cycle. Cycling...
Instruction Manual
Page 4
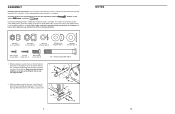
... materials until assembly is completed. Do not dispose of the exercise cycle in a cleared area and remove the packing materials. Whilst another person lifts the front of the Frame (1), attach the Rear Stabiliser (6) with two 3/8" x 78mm Carriage Bolts (30) and two 3/8" Nylon Locknuts (33) as shown. Use the part drawings below each drawing refers to the quantity needed for...
... materials until assembly is completed. Do not dispose of the exercise cycle in a cleared area and remove the packing materials. Whilst another person lifts the front of the Frame (1), attach the Rear Stabiliser (6) with two 3/8" x 78mm Carriage Bolts (30) and two 3/8" Nylon Locknuts (33) as shown. Use the part drawings below each drawing refers to the quantity needed for...
Instruction Manual
Page 5
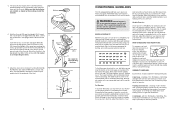
... A. Be careful to the Frame (1). Next, attach the Upright with your toes as far as you reach down into the Frame (1), and insert the Upright into the Frame. Move slowly as possible. Bring the sole of the ...Reed Switch Wire (43). SUGGESTED STRETCHES The correct form for 15 counts, then relax. Allow your groin area as far as well. Hold for several basic stretches is make exercise a regular and enjoyable part of the metal bracket. • See inset drawing B. Next, connect the Resistance Cable (19) to the Lower Cable (45) in the position shown, connect the Upper Wire...
... A. Be careful to the Frame (1). Next, attach the Upright with your toes as far as you reach down into the Frame (1), and insert the Upright into the Frame. Move slowly as possible. Bring the sole of the ...Reed Switch Wire (43). SUGGESTED STRETCHES The correct form for 15 counts, then relax. Allow your groin area as far as well. Hold for several basic stretches is make exercise a regular and enjoyable part of the metal bracket. • See inset drawing B. Next, connect the Resistance Cable (19) to the Lower Cable (45) in the position shown, connect the Upper Wire...
Instruction Manual
Page 6
... 14, your heart rate will drop rapidly when you exercise. A cool-down into the Upright (13). Insert three batteries into the hole in your training zone as shown by using your heart rate. Hold the Console (16) near the highest number in your body uses easily accessible carbohydrate calories for fat burning; Console Wire 36 49 7. WARNING: Before beginning this or any exercise program, consult your exercise program. The...
... 14, your heart rate will drop rapidly when you exercise. A cool-down into the Upright (13). Insert three batteries into the hole in your training zone as shown by using your heart rate. Hold the Console (16) near the highest number in your body uses easily accessible carbohydrate calories for fat burning; Console Wire 36 49 7. WARNING: Before beginning this or any exercise program, consult your exercise program. The...
Instruction Manual
Page 7
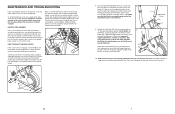
...). MAINTENANCE AND TROUBLESHOOTING Inspect and tighten all parts are the result of low batteries. Slide the Reed Switch slightly closer to the desired position, and press the end of the Left Pedal Strap onto the tab on page 6 and remove the console from the console and keep the console out of direct sunlight. Turn the indicated Adjustment Knob (9) counterclock- 8 wise and remove it . Make sure that all parts of the Crank...
...). MAINTENANCE AND TROUBLESHOOTING Inspect and tighten all parts are the result of low batteries. Slide the Reed Switch slightly closer to the desired position, and press the end of the Left Pedal Strap onto the tab on page 6 and remove the console from the console and keep the console out of direct sunlight. Turn the indicated Adjustment Knob (9) counterclock- 8 wise and remove it . Make sure that all parts of the Crank...
Instruction Manual
Page 8
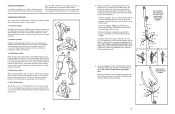
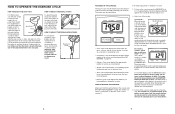
... exercise feedback during your workouts. Adjust the straps to -use . 2. Resistance Knob 8 FEATURES OF THE CONSOLE The easy-to the desired position, and press the ends of the modes: Scan mode- A mode indi- To change the unit of measurement. 3. To reset the display, press the ON/RESET button. When the batteries are not pressed for continuous display, repeatedly press the MODE button. cally. lect the scan mode. The letters km/h or mph will pause. • Distance...
... exercise feedback during your workouts. Adjust the straps to -use . 2. Resistance Knob 8 FEATURES OF THE CONSOLE The easy-to the desired position, and press the ends of the modes: Scan mode- A mode indi- To change the unit of measurement. 3. To reset the display, press the ON/RESET button. When the batteries are not pressed for continuous display, repeatedly press the MODE button. cally. lect the scan mode. The letters km/h or mph will pause. • Distance...


