
English Manual
Page 1
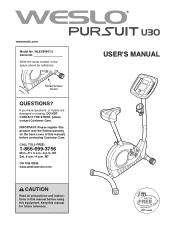
... product (see the limited warranty on the back cover of this manual) before using this equipment. MT Sat. 8 a.m.-4 p.m. USER'S MANUAL Write the serial number in this manual for reference. please contact Customer Care. Keep this manual before contacting Customer Care. Serial Number Decal QUESTIONS? If you have questions, or if parts are damaged or missing, DO NOT CONTACT THE STORE; CALL TOLL-FREE: 1-866-699...
... product (see the limited warranty on the back cover of this manual) before using this equipment. MT Sat. 8 a.m.-4 p.m. USER'S MANUAL Write the serial number in this manual for reference. please contact Customer Care. Keep this manual before contacting Customer Care. Serial Number Decal QUESTIONS? If you have questions, or if parts are damaged or missing, DO NOT CONTACT THE STORE; CALL TOLL-FREE: 1-866-699...
English Manual
Page 2
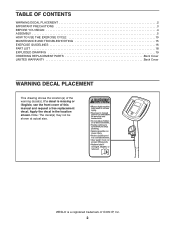
... USE THE EXERCISE CYCLE 10 MAINTENANCE AND TROUBLESHOOTING 15 EXERCISE GUIDELINES 16 PART LIST 18 EXPLODED DRAWING 19 ORDERING REPLACEMENT PARTS Back Cover LIMITED WARRANTY Back Cover WARNING DECAL PLACEMENT This drawing shows the location(s) of ICON IP, Inc. 2 Apply the decal in the location shown. Note: The decal(s) may not be shown at actual size. WESLO is missing or illegible, see the front cover of this manual and request a free replacement...
... USE THE EXERCISE CYCLE 10 MAINTENANCE AND TROUBLESHOOTING 15 EXERCISE GUIDELINES 16 PART LIST 18 EXPLODED DRAWING 19 ORDERING REPLACEMENT PARTS Back Cover LIMITED WARRANTY Back Cover WARNING DECAL PLACEMENT This drawing shows the location(s) of ICON IP, Inc. 2 Apply the decal in the location shown. Note: The decal(s) may not be shown at actual size. WESLO is missing or illegible, see the front cover of this manual and request a free replacement...
English Manual
Page 3
... in this manual. 3. caught on the exercise cycle. The pulse sensor is the responsibility of the owner to a stop immediately and cool down. 7. Always keep your back straight while using your exercise cycle. When you experience pain while exercising, stop . 8. The pulse sensor is at all times. 14. Over exercising may affect the accuracy of heart rate readings. Do not use of this product. 1. ICON assumes no...
... in this manual. 3. caught on the exercise cycle. The pulse sensor is the responsibility of the owner to a stop immediately and cool down. 7. Always keep your back straight while using your exercise cycle. When you experience pain while exercising, stop . 8. The pulse sensor is at all times. 14. Over exercising may affect the accuracy of heart rate readings. Do not use of this product. 1. ICON assumes no...
English Manual
Page 4
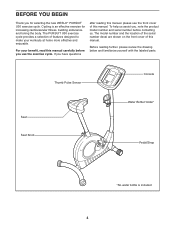
... this manual, please see the front cover of this manual. The model number and the location of the serial number decal are shown on the front cover of this manual carefully before contacting us. Cycling is included 4 For your workouts at home more effective and enjoyable. Thumb Pulse Sensor Console Seat Seat Knob Water Bottle Holder* Pedal/Strap *No water bottle is an effective exercise for selecting the new WESLO® PURSUIT U30 exercise cycle...
... this manual, please see the front cover of this manual. The model number and the location of the serial number decal are shown on the front cover of this manual carefully before contacting us. Cycling is included 4 For your workouts at home more effective and enjoyable. Thumb Pulse Sensor Console Seat Seat Knob Water Bottle Holder* Pedal/Strap *No water bottle is an effective exercise for selecting the new WESLO® PURSUIT U30 exercise cycle...

English Manual
Page 5
... below to assemble the exercise cycle, call 1-800-445-2480. Note: If a part is the key number of the part, from the PART LIST near the end of this manual. M4 x 15mm Screw (27)-4 M8 Locknut (10)-4 M8 Split Washer (42)-3 M8 Washer (47)-4 M4 x 25mm Self-tapping Screw (41)-3 M8 x 20mm Button Screw (34)-3 M8 x 55mm Button Screw (30)-4 M10 x 60mm Button Screw (33)-2 1. Attach the Rear Stabilizer...
... below to assemble the exercise cycle, call 1-800-445-2480. Note: If a part is the key number of the part, from the PART LIST near the end of this manual. M4 x 15mm Screw (27)-4 M8 Locknut (10)-4 M8 Split Washer (42)-3 M8 Washer (47)-4 M4 x 25mm Self-tapping Screw (41)-3 M8 x 20mm Button Screw (34)-3 M8 x 55mm Button Screw (30)-4 M10 x 60mm Button Screw (33)-2 1. Attach the Rear Stabilizer...
English Manual
Page 6
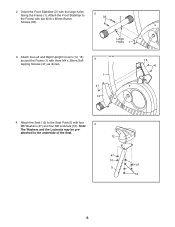
2. Attach the Left and Right Upright Covers (14, 15) around the Frame (1) with the large holes facing the Frame (1). Attach the Seat (12) to the underside of the Seat. 12 47 10 47 5 10 6 Orient the Front Stabilizer (2) with three M4 x 25mm Selftapping Screws (41) as shown. 3 1 41 14 15 41 4. Note: 4 The Washers and the Locknuts may be pre- Large Holes 1 3. attached to the Seat Post (5) with two M10 x 60mm Button 2 33 2 Screws (33). Attach the Front Stabilizer to the Frame with four M8 Washers (47) and four M8 Locknuts (10).
2. Attach the Left and Right Upright Covers (14, 15) around the Frame (1) with the large holes facing the Frame (1). Attach the Seat (12) to the underside of the Seat. 12 47 10 47 5 10 6 Orient the Front Stabilizer (2) with three M4 x 25mm Selftapping Screws (41) as shown. 3 1 41 14 15 41 4. Note: 4 The Washers and the Locknuts may be pre- Large Holes 1 3. attached to the Seat Post (5) with two M10 x 60mm Button 2 33 2 Screws (33). Attach the Front Stabilizer to the Frame with four M8 Washers (47) and four M8 Locknuts (10).
English Manual
Page 7
... pinching the Wires (46, 52) during this step. Turn the Seat Knob (9) counterclockwise and remove it is firmly engaged into one of the adjustment holes in the Seat Post. Then, insert the Seat 5 Post (5) into the Frame (1). Then, turn the Seat Knob clockwise until it from the Frame (1). 5. Then, insert the wires downward into one of the adjust- Attach the Upright with three M8 x 20mm Button Screws (34...
... pinching the Wires (46, 52) during this step. Turn the Seat Knob (9) counterclockwise and remove it is firmly engaged into one of the adjustment holes in the Seat Post. Then, insert the Seat 5 Post (5) into the Frame (1). Then, turn the Seat Knob clockwise until it from the Frame (1). 5. Then, insert the wires downward into one of the adjust- Attach the Upright with three M8 x 20mm Button Screws (34...
English Manual
Page 8
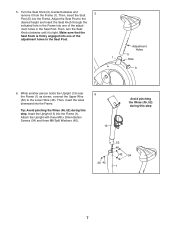
... this step 8 tery cover and remove it to warm to cold temperatures, allow it . Batteries Battery Cover 16 8. Then, insert the wires downward into the Console. Insert four batteries into the Console as shown by the diagram inside the battery compartment. Then, reattach the bat- ies are recommended. tery cover. While a second person holds the Console (16) near 8 the Upright (13), connect the console wire to the Upright (13...
... this step 8 tery cover and remove it to warm to cold temperatures, allow it . Batteries Battery Cover 16 8. Then, insert the wires downward into the Console. Insert four batteries into the Console as shown by the diagram inside the battery compartment. Then, reattach the bat- ies are recommended. tery cover. While a second person holds the Console (16) near 8 the Upright (13), connect the console wire to the Upright (13...
English Manual
Page 9
... 53 21 other Pedal Strap (not shown) in the same way. 24 10. Using an adjustable wrench, firmly tighten the Left Pedal counterclockwise into the right arm of the Crank. Make sure that all parts are properly tightened before you use the exercise cycle. Press the ends of the Crank (21). 9. After using the exercise cycle for one week, retighten the Pedals. IMPORTANT: Tighten both Pedals as firmly as...
... 53 21 other Pedal Strap (not shown) in the same way. 24 10. Using an adjustable wrench, firmly tighten the Left Pedal counterclockwise into the right arm of the Crank. Make sure that all parts are properly tightened before you use the exercise cycle. Press the ends of the Crank (21). 9. After using the exercise cycle for one week, retighten the Pedals. IMPORTANT: Tighten both Pedals as firmly as...
English Manual
Page 10
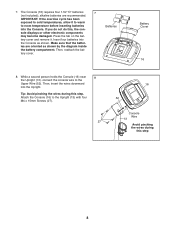
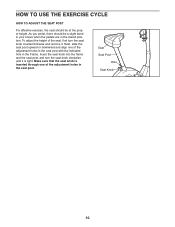
... adjust the height of the adjustment holes in the seat post with the indicated hole in the lowest position. HOW TO USE THE EXERCISE CYCLE HOW TO ADJUST THE SEAT POST For effective exercise, the seat should be at the proper height. Insert the seat knob into the frame and the seat post, and turn the seat knob counterclockwise and remove it is tight. Seat Seat Post Hole Seat Knob...
... adjust the height of the adjustment holes in the seat post with the indicated hole in the lowest position. HOW TO USE THE EXERCISE CYCLE HOW TO ADJUST THE SEAT POST For effective exercise, the seat should be at the proper height. Insert the seat knob into the frame and the seat post, and turn the seat knob counterclockwise and remove it is tight. Seat Seat Post Hole Seat Knob...
English Manual
Page 11
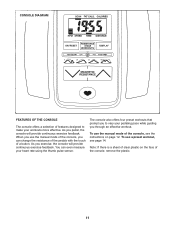
To use a preset workout, see the instructions on the face of the console, remove the plastic. 11 When you use the manual mode of the console, see page 14. You can change the resistance of the pedals with the touch of a button. The console also offers four preset workouts that prompt you to make your heart rate using the thumb pulse sensor. As you pedal, the console will provide continuous exercise feedback. Note: If...
To use a preset workout, see the instructions on the face of the console, remove the plastic. 11 When you use the manual mode of the console, see page 14. You can change the resistance of the pedals with the touch of a button. The console also offers four preset workouts that prompt you to make your heart rate using the thumb pulse sensor. As you pedal, the console will provide continuous exercise feedback. Note: If...
English Manual
Page 12
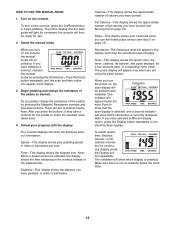
... display. 3. Begin pedaling and change the resistance of the pedals by pressing the Resistance / Pace Workouts button repeatedly until the scan and time indicators appear in miles or kilometers. Fat Calories-This display shows the approximate number of the pedals as desired. Scan-This display shows the speed, time, distance, calories, fat calories, and pulse displays, for the pedals to res- Note: After you have selected a workout, reselect the manual mode by pressing...
... display. 3. Begin pedaling and change the resistance of the pedals by pressing the Resistance / Pace Workouts button repeatedly until the scan and time indicators appear in miles or kilometers. Fat Calories-This display shows the approximate number of the pedals as desired. Scan-This display shows the speed, time, distance, calories, fat calories, and pulse displays, for the pedals to res- Note: After you have selected a workout, reselect the manual mode by pressing...
English Manual
Page 13
... the pulse sensor. If the pedals do not move for a few minutes, the console will turn off the pulse sensor for several times until the desired unit of pressure to remain still while measuring your heart rate if desired. Measure your heart rate. 6. To continue your thumb on the pulse sensor. Press the Magnetic Resistance increase button repeatedly until you become familiar with it. To measure your heart rate, stop pedaling...
... the pulse sensor. If the pedals do not move for a few minutes, the console will turn off the pulse sensor for several times until the desired unit of pressure to remain still while measuring your heart rate if desired. Measure your heart rate. 6. To continue your thumb on the pulse sensor. Press the Magnetic Resistance increase button repeatedly until you become familiar with it. To measure your heart rate, stop pedaling...

English Manual
Page 14
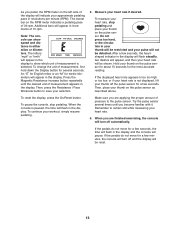
... program, the pace guide will show the time remaining in the display. When the center indicator lights, maintain your progress with the display. One resistance level and one target pace setting are finished exercising, the console will flash in the display. To select a preset program, press the Resistance / Pace Workouts button repeatedly until P1, P2, P3, or P4 appears in the workout. Make sure to pedal...
... program, the pace guide will show the time remaining in the display. When the center indicator lights, maintain your progress with the display. One resistance level and one target pace setting are finished exercising, the console will flash in the display. To select a preset program, press the Resistance / Pace Workouts button repeatedly until P1, P2, P3, or P4 appears in the workout. Make sure to pedal...
English Manual
Page 15
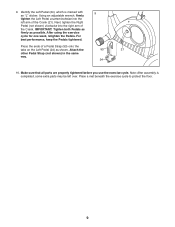
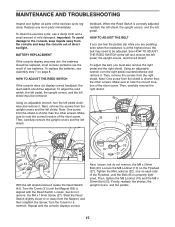
... upright covers and the left pedal clockwise and remove it . Then, remove the screws from the Magnet, and then retighten the Screw. To replace the batteries, see assembly step 7 on the Flywheel (37). Repeat until the console displays correct Next, loosen, but do not remove, the M8 x 20mm Bolt (23). HOW TO ADJUST THE REED SWITCH If the console does not display correct feedback, the reed switch should be removed. Replace any worn parts immediately. MAINTENANCE...
... upright covers and the left pedal clockwise and remove it . Then, remove the screws from the Magnet, and then retighten the Screw. To replace the batteries, see assembly step 7 on the Flywheel (37). Repeat until the console displays correct Next, loosen, but do not remove, the M8 x 20mm Bolt (23). HOW TO ADJUST THE REED SWITCH If the console does not display correct feedback, the reed switch should be removed. Replace any worn parts immediately. MAINTENANCE...
English Manual
Page 16
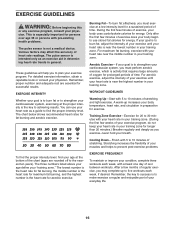
... heart rate in your exercise program. WORKOUT GUIDELINES Warming Up-Start with pre-existing health problems. The pulse sensor is activity that requires large amounts of the chart (ages are essential for fat burning and aerobic exercise. Burning Fat-To burn fat effectively, you must exercise at the bottom of oxygen for exercise. The lowest number is the heart rate for fat burning, the middle number is the heart rate...
... heart rate in your exercise program. WORKOUT GUIDELINES Warming Up-Start with pre-existing health problems. The pulse sensor is activity that requires large amounts of the chart (ages are essential for fat burning and aerobic exercise. Burning Fat-To burn fat effectively, you must exercise at the bottom of oxygen for exercise. The lowest number is the heart rate for fat burning, the middle number is the heart rate...
English Manual
Page 17
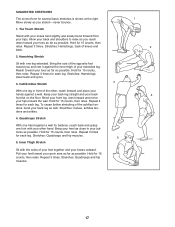
... possible. Bend your front leg, lean forward and move your hips. Repeat 3 times for each leg. Repeat 3 times. Hold for 15 counts, then...never bounce. 1. Toe Touch Stretch Stand with one leg in front of the other hand. Allow your back and shoulders to your back leg as possible. Stretches: Hamstrings, lower back and groin. 3. Hold for 15 counts,... 4 17 Hold for 15 counts, then relax. Pull your feet toward the wall. SUGGESTED STRETCHES The correct form for balance, reach back and grasp one foot with the soles of knees and back. 2. Reach toward your ...
... possible. Bend your front leg, lean forward and move your hips. Repeat 3 times for each leg. Repeat 3 times. Hold for 15 counts, then...never bounce. 1. Toe Touch Stretch Stand with one leg in front of the other hand. Allow your back and shoulders to your back leg as possible. Stretches: Hamstrings, lower back and groin. 3. Hold for 15 counts,... 4 17 Hold for 15 counts, then relax. Pull your feet toward the wall. SUGGESTED STRETCHES The correct form for balance, reach back and grasp one foot with the soles of knees and back. 2. Reach toward your ...
English Manual
Page 18
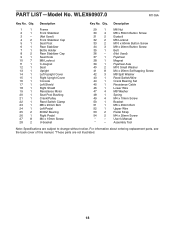
... Self-tapping Screw 42 3 M8 Split Washer 43 1 Reed Switch/Wire 44 1 Crank Bearing Set 45 1 Resistance Cable 46 1 Lower Wire 47 4 M8 Washer 48 1 Spring 49 4 M4 x 10mm Screw 50 1 Bracket 51 1 M6 x 45mm Bolt 52 1 Upper Wire 53 2 Pedal Strap 54 2 M4 x 20mm Screw * - Description Key No. For information about ordering replacement parts, see the back cover of this manual. *These parts are subject to change without notice. Assembly Tool Note: Specifications are not...
... Self-tapping Screw 42 3 M8 Split Washer 43 1 Reed Switch/Wire 44 1 Crank Bearing Set 45 1 Resistance Cable 46 1 Lower Wire 47 4 M8 Washer 48 1 Spring 49 4 M4 x 10mm Screw 50 1 Bracket 51 1 M6 x 45mm Bolt 52 1 Upper Wire 53 2 Pedal Strap 54 2 M4 x 20mm Screw * - Description Key No. For information about ordering replacement parts, see the back cover of this manual. *These parts are subject to change without notice. Assembly Tool Note: Specifications are not...
English Manual
Page 19
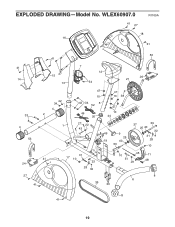
WLEX60907.0 R1109A 41 27 18 16 41 53 41 41 7 12 15 27 14 26 21 13 54 33 4 53 42 34 4 2 1 47 10 42 34 5 52 46 20 47 10 38 47 10 44 27 22 43 49 9 25 19 40 50 37 39 25 40 32 31 28 10 41 24 27 41 31 17 10 23 28 32 35 30 10 45 11 51 29 48 8 6 8 41 19 EXPLODED DRAWING-Model No.
WLEX60907.0 R1109A 41 27 18 16 41 53 41 41 7 12 15 27 14 26 21 13 54 33 4 53 42 34 4 2 1 47 10 42 34 5 52 46 20 47 10 38 47 10 44 27 22 43 49 9 25 19 40 50 37 39 25 40 32 31 28 10 41 24 27 41 31 17 10 23 28 32 35 30 10 45 11 51 29 48 8 6 8 41 19 EXPLODED DRAWING-Model No.
English Manual
Page 20
... ICON Health & Fitness, Inc. (ICON) warrants this manual) LIMITED WARRANTY IMPORTANT: You must be the customerʼs responsibility. Accordingly, the above limitation may not apply to be free from state to state. All repairs for which warranty claims are warranted for commercial or rental purposes or as store display models; Parts and labor are made must register this manual. ICON is limited to you specific legal rights. This warranty...
... ICON Health & Fitness, Inc. (ICON) warrants this manual) LIMITED WARRANTY IMPORTANT: You must be the customerʼs responsibility. Accordingly, the above limitation may not apply to be free from state to state. All repairs for which warranty claims are warranted for commercial or rental purposes or as store display models; Parts and labor are made must register this manual. ICON is limited to you specific legal rights. This warranty...


