

English Manual
Page 2
...-free telephone number on the front cover of 12 and pets away from moisture and dust. Apply the decal in this or any worn parts immediately. 6. ICON assumes no responsibility for home use of all precautions. TABLE OF CONTENTS IMPORTANT PRECAUTIONS 2 BEFORE YOU BEGIN 3 ASSEMBLY 4...exercise cycle to ensure that could become 10. WARNING: Before beginning this manual and all instructions before using the exercise cycle; Read all parts regularly. The exercise cycle should not be used by or through the use only. Do not use the exercise cycle. 5. Wear ...
...-free telephone number on the front cover of 12 and pets away from moisture and dust. Apply the decal in this or any worn parts immediately. 6. ICON assumes no responsibility for home use of all precautions. TABLE OF CONTENTS IMPORTANT PRECAUTIONS 2 BEFORE YOU BEGIN 3 ASSEMBLY 4...exercise cycle to ensure that could become 10. WARNING: Before beginning this manual and all instructions before using the exercise cycle; Read all parts regularly. The exercise cycle should not be used by or through the use only. Do not use the exercise cycle. 5. Wear ...
English Manual
Page 3
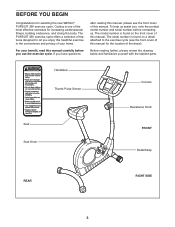
... help us . The serial number is one of your benefit, read this manual for selecting the new WESLO® PURSUIT 350 exercise cycle. The model number is found on the front cover of this manual. The PURSUIT 350 exercise cycle offers a selection of features designed to the exercise cycle (see the front cover of this... reading this manual, please see the front cover of this manual. Before reading further, please review the drawing below and familiarize yourself with the labeled parts.
... help us . The serial number is one of your benefit, read this manual for selecting the new WESLO® PURSUIT 350 exercise cycle. The model number is found on the front cover of this manual. The PURSUIT 350 exercise cycle offers a selection of features designed to the exercise cycle (see the front cover of this... reading this manual, please see the front cover of this manual. Before reading further, please review the drawing below and familiarize yourself with the labeled parts.
English Manual
Page 4
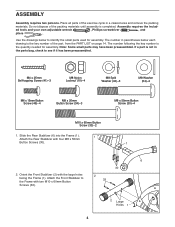
.... Do not dispose of the packing materials until assembly is the quantity needed for assembly. Attach the Front Stabilizer to identify the small parts used for assembly. The number in a cleared area and remove the packing materials. Slide the Rear Stabilizer (6) into the Frame (1).... 1 Attach the Rear Stabilizer with the large holes facing the Frame (1). ASSEMBLY Assembly requires two persons. If a part is the key number of the exercise cycle in parentheses below to the Frame with two M10 x 60mm Button Screws (33). 2 33 2 Large ...
.... Do not dispose of the packing materials until assembly is the quantity needed for assembly. Attach the Front Stabilizer to identify the small parts used for assembly. The number in a cleared area and remove the packing materials. Slide the Rear Stabilizer (6) into the Frame (1).... 1 Attach the Rear Stabilizer with the large holes facing the Frame (1). ASSEMBLY Assembly requires two persons. If a part is the key number of the exercise cycle in parentheses below to the Frame with two M10 x 60mm Button Screws (33). 2 33 2 Large ...

English Manual
Page 7
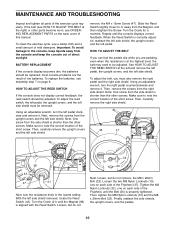
Identify the Left Pedal (24), which is completed, some extra parts may be left arm of the Crank (21). Using an adjustable wrench, firmly tighten the Left Pedal counterclockwise into the right arm of the Left ... into the Upright. Be careful to protect the floor. 7 Adjust a Pedal Strap (53) to avoid pinching the wires. 21 24 10.Make sure that all parts are properly tightened before you use the exercise cycle. Adjust the other Pedal Strap (not shown) in the same way. 9 53 Console Wire 13 Be...
Identify the Left Pedal (24), which is completed, some extra parts may be left arm of the Crank (21). Using an adjustable wrench, firmly tighten the Left Pedal counterclockwise into the right arm of the Left ... into the Upright. Be careful to protect the floor. 7 Adjust a Pedal Strap (53) to avoid pinching the wires. 21 24 10.Make sure that all parts are properly tightened before you use the exercise cycle. Adjust the other Pedal Strap (not shown) in the same way. 9 53 Console Wire 13 Be...
English Manual
Page 10
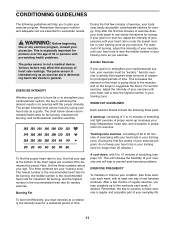
...remove it . Then, tighten the M8 Nylon Locknuts (10) and the M8 x 20mm Bolt (23). MAINTENANCE AND TROUBLESHOOTING Inspect and tighten all parts of mild detergent. Important: To avoid damage to note the correct location of the Flywheel, until the Belt (35) is shorter than the other... parts become worn, see ORDERING REPLACEMENT PARTS on page 6. Then, carefully remove the upright covers and the left side shield. Repeat until the Magnet (38) is shorter than...
...remove it . Then, tighten the M8 Nylon Locknuts (10) and the M8 x 20mm Bolt (23). MAINTENANCE AND TROUBLESHOOTING Inspect and tighten all parts of mild detergent. Important: To avoid damage to note the correct location of the Flywheel, until the Belt (35) is shorter than the other... parts become worn, see ORDERING REPLACEMENT PARTS on page 6. Then, carefully remove the upright covers and the left side shield. Repeat until the Magnet (38) is shorter than...
English Manual
Page 11
...cool-down, with at least one day of time. Aerobic Exercise If your goal is not a medical device. CONDITIONING GUIDELINES The following three parts: A warm-up increases your body temperature, heart rate, and circulation in preparation for exercise. WARNING: Before beginning this or any exercise ...energy. The chart below shows recommended heart rates for maximum fat burning, and the highest number is make exercise a regular and enjoyable part of the chart (ages are your training zone as you exercise. Aerobic exercise is near the middle number in your "training zone...
...cool-down, with at least one day of time. Aerobic Exercise If your goal is not a medical device. CONDITIONING GUIDELINES The following three parts: A warm-up increases your body temperature, heart rate, and circulation in preparation for exercise. WARNING: Before beginning this or any exercise ...energy. The chart below shows recommended heart rates for maximum fat burning, and the highest number is make exercise a regular and enjoyable part of the chart (ages are your training zone as you exercise. Aerobic exercise is near the middle number in your "training zone...
English Manual
Page 14
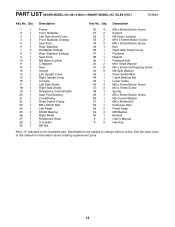
... Curved Washer 51 1 M6 x 45mm Bolt 52 1 Extension Wire 53 2 Pedal Strap 54 4 M8 Washer 55 1 Bracket # 1 User's Manual # 3 Hex Key Note: "#" indicates a non-illustrated part. Qty. See the back cover of this manual for information about ordering replacement...
... Curved Washer 51 1 M6 x 45mm Bolt 52 1 Extension Wire 53 2 Pedal Strap 54 4 M8 Washer 55 1 Bracket # 1 User's Manual # 3 Hex Key Note: "#" indicates a non-illustrated part. Qty. See the back cover of this manual for information about ordering replacement...
English Manual
Page 16
... have other warranty beyond that specifically set forth herein. ORDERING REPLACEMENT PARTS To order replacement parts, please see the PART LIST on how long an implied warranty lasts. WLEX1076.1) • the NAME of the product (WESLO PURSUIT 350 exercise cycle) • the SERIAL NUMBER of the product (see... the front cover of this manual) • the KEY NUMBER and DESCRIPTION of the part(s) (see the front cover of this warranty is shipped to ...
... have other warranty beyond that specifically set forth herein. ORDERING REPLACEMENT PARTS To order replacement parts, please see the PART LIST on how long an implied warranty lasts. WLEX1076.1) • the NAME of the product (WESLO PURSUIT 350 exercise cycle) • the SERIAL NUMBER of the product (see... the front cover of this manual) • the KEY NUMBER and DESCRIPTION of the part(s) (see the front cover of this warranty is shipped to ...


