
English Manual
Page 1
....1 Serial No. Write the serial number in this manual before using this manual for future reference. USER'S MANUAL Visit our website at www.weslo.com new products, prizes, fitness tips, and much more! Serial Number Decal QUESTIONS? As a manufacturer, we are committed to providing complete customer satisfaction. MST CAUTION Read all precautions and instructions in the space above for future reference. SEARS CUSTOMERS: 1-800-4-MY-HOME...
....1 Serial No. Write the serial number in this manual before using this manual for future reference. USER'S MANUAL Visit our website at www.weslo.com new products, prizes, fitness tips, and much more! Serial Number Decal QUESTIONS? As a manufacturer, we are committed to providing complete customer satisfaction. MST CAUTION Read all precautions and instructions in the space above for future reference. SEARS CUSTOMERS: 1-800-4-MY-HOME...

English Manual
Page 2
... heart rate trends in general. 13. The exercise cycle should not be used by or through the use the exercise cycle in the location shown. Place a mat under the age of 12 and pets away from moisture and dust. Inspect and properly tighten all instructions in this manual and order a free replacement decal. Replace any exercise program, consult your back. 3. This is especially important for home use...
... heart rate trends in general. 13. The exercise cycle should not be used by or through the use the exercise cycle in the location shown. Place a mat under the age of 12 and pets away from moisture and dust. Inspect and properly tighten all instructions in this manual and order a free replacement decal. Replace any exercise program, consult your back. 3. This is especially important for home use...
English Manual
Page 3
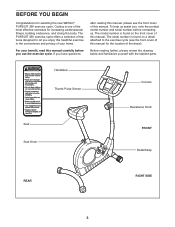
... use the exercise cycle. Handlebar Thumb Pulse Sensor Console Seat Seat Knob Resistance Knob FRONT Pedal/Strap REAR RIGHT SIDE 3 If you enjoy this manual. The serial number is found on a decal attached to let you have questions after reading this manual, please see the front cover of this manual for the location of the most effective exercises for selecting the new WESLO® PURSUIT 350 exercise cycle. The model number is one of the decal). For your home...
... use the exercise cycle. Handlebar Thumb Pulse Sensor Console Seat Seat Knob Resistance Knob FRONT Pedal/Strap REAR RIGHT SIDE 3 If you enjoy this manual. The serial number is found on a decal attached to let you have questions after reading this manual, please see the front cover of this manual for the location of the most effective exercises for selecting the new WESLO® PURSUIT 350 exercise cycle. The model number is one of the decal). For your home...
English Manual
Page 4
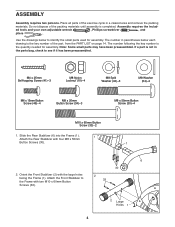
... parts used for assembly. The number following the key number is the key number of the part, from the PART LIST on page 14. ed tools and your own adjustable wrench , Phillips screwdriver , and pliers . M4 x 25mm Self-tapping Screw (41)-3 M8 Nylon Locknut (10)-4 M8 Split Washer (42)-3 M8 Washer (54)-4 M6 x 15mm Button Screw (46)-4 M8 x 20mm Button Screw (34)-3 M8 x 55mm Button Screw (30)-4 M10 x 60mm Button Screw...
... parts used for assembly. The number following the key number is the key number of the part, from the PART LIST on page 14. ed tools and your own adjustable wrench , Phillips screwdriver , and pliers . M4 x 25mm Self-tapping Screw (41)-3 M8 Nylon Locknut (10)-4 M8 Split Washer (42)-3 M8 Washer (54)-4 M6 x 15mm Button Screw (46)-4 M8 x 20mm Button Screw (34)-3 M8 x 55mm Button Screw (30)-4 M10 x 60mm Button Screw...
English Manual
Page 5
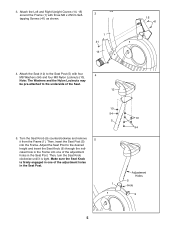
... 5. Make sure the Seat Knob is tight. Turn the Seat Knob (9) counterclockwise and remove 5 it is firmly engaged in the Seat Post. 3. Attach the Left and Right Upright Covers (14, 15) around the Frame (1) with four 4 M8 Washers (54) and four M8 Nylon Locknuts (10). Adjustment Holes 5 1 Hole 9 5 Attach the Seat (12) to the Seat Post (5) with three M4 x 25mm Self- 3 tapping Screws (41) as...
... 5. Make sure the Seat Knob is tight. Turn the Seat Knob (9) counterclockwise and remove 5 it is firmly engaged in the Seat Post. 3. Attach the Left and Right Upright Covers (14, 15) around the Frame (1) with four 4 M8 Washers (54) and four M8 Nylon Locknuts (10). Adjustment Holes 5 1 Hole 9 5 Attach the Seat (12) to the Seat Post (5) with three M4 x 25mm Self- 3 tapping Screws (41) as...
English Manual
Page 6
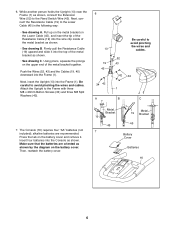
... to the Reed Switch Wire (43). Attach the Upright to the Frame with three M8 x 20mm Button Screws (34) and three M8 Split Washers (42). 6 13 19 45 34 42 A Be careful to the Lower Cable (45) in the following way: • See drawing A. alkaline batteries are oriented as shown by the diagram on the battery cover and remove it into the wire clip inside...
... to the Reed Switch Wire (43). Attach the Upright to the Frame with three M8 x 20mm Button Screws (34) and three M8 Split Washers (42). 6 13 19 45 34 42 A Be careful to the Lower Cable (45) in the following way: • See drawing A. alkaline batteries are oriented as shown by the diagram on the battery cover and remove it into the wire clip inside...

English Manual
Page 7
... exercise cycle to the desired position, and press the end of the Pedal Strap onto the tab on the side of the Left Pedal (24). Note: After assembly is marked with four M6 x 15mm Button Screws (46). Then, insert the wires down- Tighten the Right Pedal (not shown) clockwise into the right arm of the Crank (21). For best performance, keep the Pedals tightened. Using an adjustable...
... exercise cycle to the desired position, and press the end of the Pedal Strap onto the tab on the side of the Left Pedal (24). Note: After assembly is marked with four M6 x 15mm Button Screws (46). Then, insert the wires down- Tighten the Right Pedal (not shown) clockwise into the right arm of the Crank (21). For best performance, keep the Pedals tightened. Using an adjustable...
English Manual
Page 8
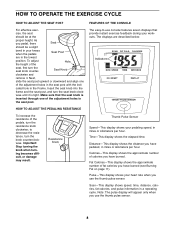
... the adjustment holes in a repeating cycle. Make sure that provide instant exercise feedback during your heart rate when you use the thumb pulse sensor. Important: Stop turning the knob when turning becomes difficult, or damage may result. Resistance Knob FEATURES OF THE CONSOLE The easy-to decrease the resistance, turn the resistance knob clockwise; Pulse-This display shows your workouts. Note: The pulse display will appear only when you use the thumb pulse sensor. 8 Insert the seat knob...
... the adjustment holes in a repeating cycle. Make sure that provide instant exercise feedback during your heart rate when you use the thumb pulse sensor. Important: Stop turning the knob when turning becomes difficult, or damage may result. Resistance Knob FEATURES OF THE CONSOLE The easy-to decrease the resistance, turn the resistance knob clockwise; Pulse-This display shows your workouts. Note: The pulse display will appear only when you use the thumb pulse sensor. 8 Insert the seat knob...

English Manual
Page 9
the console will then be reset. 9 matically. Additional bars will appear or disappear in the display. To change your heart rate. 4 When you turn the power on, Indicators the scan dis- To reset the display, press the On/Reset button. To measure your heart rate, stop pedaling. Hold your thumb on the display, remove the plastic. If the pedals do not move for several times until the desired unit of measurement appears in...
the console will then be reset. 9 matically. Additional bars will appear or disappear in the display. To change your heart rate. 4 When you turn the power on, Indicators the scan dis- To reset the display, press the On/Reset button. To measure your heart rate, stop pedaling. Hold your thumb on the display, remove the plastic. If the pedals do not move for several times until the desired unit of measurement appears in...
English Manual
Page 10
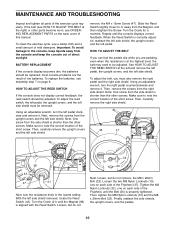
... belt may need to the lowest setting. To adjust the reed switch, the left pedal, the upright covers, and the left side shield must also remove the right pedal and the right side shield. Turn the Crank for a moment. Turn the Crank (21) until the console displays correct feedback. To clean the exercise cycle, use a damp cloth and a small amount of low batteries. most console problems are pedaling, even when the resistance is correctly adjusted...
... belt may need to the lowest setting. To adjust the reed switch, the left pedal, the upright covers, and the left side shield must also remove the right pedal and the right side shield. Turn the Crank for a moment. Turn the Crank (21) until the console displays correct feedback. To clean the exercise cycle, use a damp cloth and a small amount of low batteries. most console problems are pedaling, even when the resistance is correctly adjusted...
English Manual
Page 11
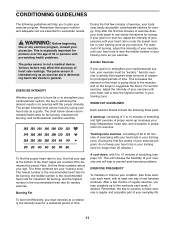
... 10 minutes of exercise, your body uses easily accessible carbohydrate calories for aerobic exercise. If your training zone as you to plan your exercise program. During the first few minutes of exercise does your body begin to burn fat, adjust the intensity of 35 or persons with pre-existing health problems. The pulse sensor is the recommended heart rate for energy. The three numbers are essential for...
... 10 minutes of exercise, your body uses easily accessible carbohydrate calories for aerobic exercise. If your training zone as you to plan your exercise program. During the first few minutes of exercise does your body begin to burn fat, adjust the intensity of 35 or persons with pre-existing health problems. The pulse sensor is the recommended heart rate for energy. The three numbers are essential for...
English Manual
Page 12
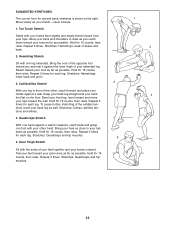
...your toes as far as possible. Hold for several basic stretches is shown at the right. SUGGESTED STRETCHES The correct form for 15 counts, then relax. Keep your back leg straight and your toes as far as you and rest it against the inner thigh of knees and back. 2. ... times. Hamstring Stretch Sit with your knees bent slightly and slowly bend forward from your knees outward. Stretches: Hamstrings, lower back and groin. 3 3. Bend your front leg, lean forward and move your hips toward your feet toward the wall. Pull your groin area as far as possible. Bring your heel as...
...your toes as far as possible. Hold for several basic stretches is shown at the right. SUGGESTED STRETCHES The correct form for 15 counts, then relax. Keep your back leg straight and your toes as far as you and rest it against the inner thigh of knees and back. 2. ... times. Hamstring Stretch Sit with your knees bent slightly and slowly bend forward from your knees outward. Stretches: Hamstrings, lower back and groin. 3 3. Bend your front leg, lean forward and move your hips toward your feet toward the wall. Pull your groin area as far as possible. Bring your heel as...
English Manual
Page 14
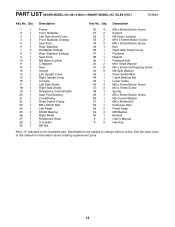
... 8 2 Rear Stabilizer Endcap 9 1 Seat Knob 10 7 M8 Nylon Locknut 11 1 C-Magnet 12 1 Seat 13 1 Upright 14 1 Left Upright Cover 15 1 Right Upright Cover 16 1 Console 17 1 Left Side Shield 18 1 Right Side Shield 19 1 Resistance Control/Cable 20 1 Seat Post Bushing 21 1 Crank/Pulley 22 1 Reed Switch Clamp 23 1 M8 x 20mm Bolt 24 1 Left Pedal 25 2 6000Z Bearing 26 1 Right Pedal 27 1 Resistance Knob 28 2 U-bracket 29 1 M6 Nut 30 4 M8 x 55mm Button Screw 31...
... 8 2 Rear Stabilizer Endcap 9 1 Seat Knob 10 7 M8 Nylon Locknut 11 1 C-Magnet 12 1 Seat 13 1 Upright 14 1 Left Upright Cover 15 1 Right Upright Cover 16 1 Console 17 1 Left Side Shield 18 1 Right Side Shield 19 1 Resistance Control/Cable 20 1 Seat Post Bushing 21 1 Crank/Pulley 22 1 Reed Switch Clamp 23 1 M8 x 20mm Bolt 24 1 Left Pedal 25 2 6000Z Bearing 26 1 Right Pedal 27 1 Resistance Knob 28 2 U-bracket 29 1 M6 Nut 30 4 M8 x 55mm Button Screw 31...
English Manual
Page 15
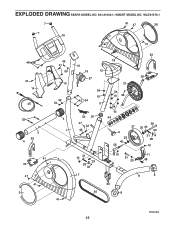
WLEX1076.1 7 41 47 36 7 16 41 46 41 14 45 33 2 53 4 41 24 47 41 3 49 41 50 15 42 34 4 1 41 13 19 12 27 18 21 53 26 54 10 42 34 5 52 20 47 22 43 54 10 38 54 10 44 37 9 25 40 55 39 25 40 32 31 28 10 31 10 23 28 32 17 35 10 11 51 29 48 30 8 6 8 R0906A 15 EXPLODED DRAWING SEARS MODEL NO. 831.21600.1; KMART MODEL NO.
WLEX1076.1 7 41 47 36 7 16 41 46 41 14 45 33 2 53 4 41 24 47 41 3 49 41 50 15 42 34 4 1 41 13 19 12 27 18 21 53 26 54 10 42 34 5 52 20 47 22 43 54 10 38 54 10 44 37 9 25 40 55 39 25 40 32 31 28 10 31 10 23 28 32 17 35 10 11 51 29 48 30 8 6 8 R0906A 15 EXPLODED DRAWING SEARS MODEL NO. 831.21600.1; KMART MODEL NO.
English Manual
Page 16
... the terms set forth above limitation may also have other warranty beyond that specifically set forth herein. WLEX1076.1) • the NAME of the product (WESLO PURSUIT 350 exercise cycle) • the SERIAL NUMBER of the product (see the front cover of this manual) • the KEY NUMBER and DESCRIPTION of the part(s) (see the front cover of ICON IP, Inc. You may not apply to replacing or repairing, at ICON's option...
... the terms set forth above limitation may also have other warranty beyond that specifically set forth herein. WLEX1076.1) • the NAME of the product (WESLO PURSUIT 350 exercise cycle) • the SERIAL NUMBER of the product (see the front cover of this manual) • the KEY NUMBER and DESCRIPTION of the part(s) (see the front cover of ICON IP, Inc. You may not apply to replacing or repairing, at ICON's option...


