
User Manual
Page 1
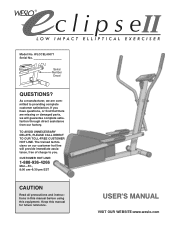
... missing or damaged parts, we will provide immediate assistance, free of charge to providing complete customer satisfaction. ® Model No. If you . CUSTOMER HOT LINE: 1-888-936-4266 Mon.-Fri., 8:00 am-6:30 pm EST CAUTION Read all precautions and instructions in this manual before using this manual for future reference. Serial Number Decal QUESTIONS? The trained technicians on our...
... missing or damaged parts, we will provide immediate assistance, free of charge to providing complete customer satisfaction. ® Model No. If you . CUSTOMER HOT LINE: 1-888-936-4266 Mon.-Fri., 8:00 am-6:30 pm EST CAUTION Read all precautions and instructions in this manual before using this manual for future reference. Serial Number Decal QUESTIONS? The trained technicians on our...
User Manual
Page 2
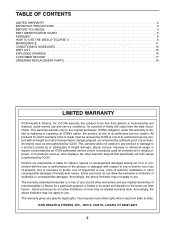
... original purchaser. Accordingly, the above is authorized by ICON. TABLE OF CONTENTS LIMITED WARRANTY 2 IMPORTANT PRECAUTIONS 3 BEFORE YOU BEGIN 4 PART IDENTIFICATION CHART 5 ASSEMBLY 6 HOW TO USE THE WESLO® ECLIPSE II 8 MAINTENANCE 11 CONDITIONING GUIDELINES 13 PART LIST 15 EXPLODED DRAWING 16 CUSTOMER RECORD 17 ORDERING REPLACEMENT PARTS 18 LIMITED WARRANTY ICON Health & Fitness, Inc. (ICON) warrants this warranty is limited to replacing or repairing, at ICON's option, the product at one of its authorized...
... original purchaser. Accordingly, the above is authorized by ICON. TABLE OF CONTENTS LIMITED WARRANTY 2 IMPORTANT PRECAUTIONS 3 BEFORE YOU BEGIN 4 PART IDENTIFICATION CHART 5 ASSEMBLY 6 HOW TO USE THE WESLO® ECLIPSE II 8 MAINTENANCE 11 CONDITIONING GUIDELINES 13 PART LIST 15 EXPLODED DRAWING 16 CUSTOMER RECORD 17 ORDERING REPLACEMENT PARTS 18 LIMITED WARRANTY ICON Health & Fitness, Inc. (ICON) warrants this warranty is limited to replacing or repairing, at ICON's option, the product at one of its authorized...
User Manual
Page 3
... use it to ensure that is especially important for foot protection. 8. Keep your back straight when using the WESLO® ECLIPSE II. 1. Do not use of all instructions in -home use only. The decal shown below is the responsibility of the owner to protect the floor or carpet. Step onto and off the pedal that all parts regularly. This is in the location...
... use it to ensure that is especially important for foot protection. 8. Keep your back straight when using the WESLO® ECLIPSE II. 1. Do not use of all instructions in -home use only. The decal shown below is the responsibility of the owner to protect the floor or carpet. Step onto and off the pedal that all parts regularly. This is in the location...
User Manual
Page 4
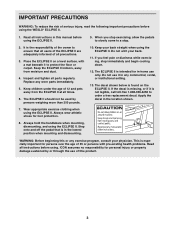
... ECLIPSE II features adjustable resistance and motivational electronics to a whole new world of the decal). For your benefit, read this manual for selecting the revolutionary WESLO® ECLIPSE II elliptical exerciser. Before reading further, please look at 1-888-936-4266, Monday-Friday, 8:00 am-6:30 pm EST (excluding holidays). The model number is not included) Console Resistance Knob Upright FRONT Handlebar Pedal Side Shield Lock Pin...
... ECLIPSE II features adjustable resistance and motivational electronics to a whole new world of the decal). For your benefit, read this manual for selecting the revolutionary WESLO® ECLIPSE II elliptical exerciser. Before reading further, please look at 1-888-936-4266, Monday-Friday, 8:00 am-6:30 pm EST (excluding holidays). The model number is not included) Console Resistance Knob Upright FRONT Handlebar Pedal Side Shield Lock Pin...

User Manual
Page 5
... Carriage Bolt (66)-4 M4 x 12mm Screw (28)-2 M10 x 68mm Bolt (67)-4 5 The number in parenthesis below to identify the small parts used in the parts bag, check to see if it has been pre-attached. Note: Some small parts may have been pre-attached for assembly. PART IDENTIFICATION CHART Use the chart below each part is not in assembly. If a part is the key number of the part, from the PART LIST on...
... Carriage Bolt (66)-4 M4 x 12mm Screw (28)-2 M10 x 68mm Bolt (67)-4 5 The number in parenthesis below to identify the small parts used in the parts bag, check to see if it has been pre-attached. Note: Some small parts may have been pre-attached for assembly. PART IDENTIFICATION CHART Use the chart below each part is not in assembly. If a part is the key number of the part, from the PART LIST on...
User Manual
Page 6
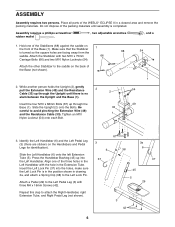
... Repeat this step to attach the Right Handlebar, right Extension Tube, and Right Pedal Leg (not shown). 3 42 6 Tighten an M10 Nylon Locknut (54) onto each Bolt. 2 33 1 1 54 49 67 3. Assembly requires a phillips screwdriver rubber mallet . , two adjustable wrenches , and a 1. Insert the Left Lock Pin (37) into 37 the Left Handlebar. Place all parts of the WESLO® ECLIPSE II in...
... Repeat this step to attach the Right Handlebar, right Extension Tube, and Right Pedal Leg (not shown). 3 42 6 Tighten an M10 Nylon Locknut (54) onto each Bolt. 2 33 1 1 54 49 67 3. Assembly requires a phillips screwdriver rubber mallet . , two adjustable wrenches , and a 1. Insert the Left Lock Pin (37) into 37 the Left Handlebar. Place all parts of the WESLO® ECLIPSE II in...
User Manual
Page 7
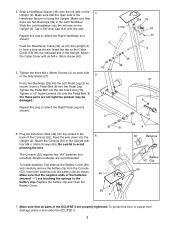
Tighten the three M4 x 38mm Screws (4) on the 4 Upright (2). Insert a Pedal Bolt (8) into the 6 Upright (2). Repeat this step to attach the Right Handlebar (not shown). 6 Feed the Resistance Cable (33) up the Battery Cover (60) and carefully remove the battery clip from damage, place a mat under the ECLIPSE II. 7 Feed the wire down into the Pedal Leg. 4. Tap a 5/8" Axle Cap (43) onto the axle. Press two Bushings (39) into the...
Tighten the three M4 x 38mm Screws (4) on the 4 Upright (2). Insert a Pedal Bolt (8) into the 6 Upright (2). Repeat this step to attach the Right Handlebar (not shown). 6 Feed the Resistance Cable (33) up the Battery Cover (60) and carefully remove the battery clip from damage, place a mat under the ECLIPSE II. 7 Feed the wire down into the Pedal Leg. 4. Tap a 5/8" Axle Cap (43) onto the axle. Press two Bushings (39) into the...
User Manual
Page 8
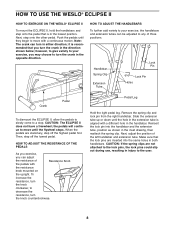
... pins could slip out during use, resulting in the opposite direction. Pedal Leg Hold the right pedal leg. Make sure that you turn the crank in injury to your exercise, the handlebars and extension tubes can adjust the resistance of Resistance Knob the pedals with a continuous motion. however, to give variety to the user. 8 Slide the extension tube up or down until the flywheel stops. Reinsert the lock pin...
... pins could slip out during use, resulting in the opposite direction. Pedal Leg Hold the right pedal leg. Make sure that you turn the crank in injury to your exercise, the handlebars and extension tubes can adjust the resistance of Resistance Knob the pedals with a continuous motion. however, to give variety to the user. 8 Slide the extension tube up or down until the flywheel stops. Reinsert the lock pin...

User Manual
Page 9
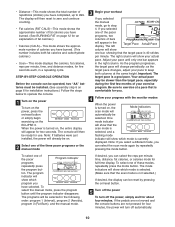
... you stop exercising for you. HOW THE PACER PROGRAMS OPERATE When you select the manual mode, this mode will be 40 repetitions (strides) per minute. • Time-If you have exercised. Important: The target pace is twenty minutes long. Each pacer program is a goal pace. If you use a pacer program, two columns of the console, remove it. as the target pace changes, simply adjust your...
... you stop exercising for you. HOW THE PACER PROGRAMS OPERATE When you select the manual mode, this mode will be 40 repetitions (strides) per minute. • Time-If you have exercised. Important: The target pace is twenty minutes long. Each pacer program is a goal pace. If you use a pacer program, two columns of the console, remove it. as the target pace changes, simply adjust your...
User Manual
Page 10
... number of repetitions (strides) you can select the reps per minute, time, distance, fat calories, or calories mode for full-time display. Be sure to 999. As the program progresses, the target pace will turn on the power, press the on/reset button or simply begin exercising on page 12 for four minutes, the power will change periodically; If the pedals are not moved and the console buttons...
... number of repetitions (strides) you can select the reps per minute, time, distance, fat calories, or calories mode for full-time display. Be sure to 999. As the program progresses, the target pace will turn on the power, press the on/reset button or simply begin exercising on page 12 for four minutes, the power will change periodically; If the pedals are not moved and the console buttons...
User Manual
Page 11
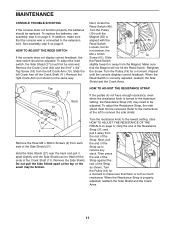
... Magnet. Turn the Pulley (19) for a moment. Slide the left Crank Arm (10). Turn the Pulley (19) until the Magnet (55) is connected to be adjusted. Refer to the instructions at the top or the seam may need to the extension wire. MAINTENANCE CONSOLE TROUBLE-SHOOTING If the console does not function properly, the batteries should be removed. Remove the Side Shield. Turn the resistance knob to the maximum setting, the Resistance Strap (31...
... Magnet. Turn the Pulley (19) for a moment. Slide the left Crank Arm (10). Turn the Pulley (19) until the Magnet (55) is connected to be adjusted. Refer to the instructions at the top or the seam may need to the extension wire. MAINTENANCE CONSOLE TROUBLE-SHOOTING If the console does not function properly, the batteries should be removed. Remove the Side Shield. Turn the resistance knob to the maximum setting, the Resistance Strap (31...
User Manual
Page 12
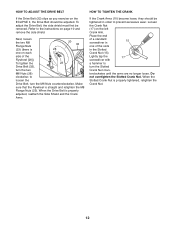
... Drive Belt, turn the M6 Nuts counterclockwise. HOW TO ADJUST THE DRIVE BELT HOW TO TIGHTEN THE CRANK If the Drive Belt (32) slips as you exercise on the ECLIPSE II, the Drive Belt should be tightened in the Slotted Crank Nut (15). Place the end of a standard 15 screwdriver in one on each side of the slots in order to the instructions on the left Crank Arm. To adjust the Drive Belt...
... Drive Belt, turn the M6 Nuts counterclockwise. HOW TO ADJUST THE DRIVE BELT HOW TO TIGHTEN THE CRANK If the Drive Belt (32) slips as you exercise on the ECLIPSE II, the Drive Belt should be tightened in the Slotted Crank Nut (15). Place the end of a standard 15 screwdriver in one on each side of the slots in order to the instructions on the left Crank Arm. To adjust the Drive Belt...
User Manual
Page 13
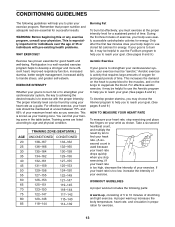
... multiply the result by using your training zone. This increases the demand on the heart to pump blood to the muscles, and on your body begin to find your physician. During the first few minutes does your wrist as a guide. Aerobic exercise is to burn fat, it may choose the Interval program to 10 minutes of stretching...
... multiply the result by using your training zone. This increases the demand on the heart to pump blood to the muscles, and on your body begin to find your physician. During the first few minutes does your wrist as a guide. Aerobic exercise is to burn fat, it may choose the Interval program to 10 minutes of stretching...

User Manual
Page 14
...5 14 After a few months of regular exercise, you stop exercising suddenly. Keep your back leg straight and your training zone. Hold for each leg. Repeat 3 times for increasing flexibility. Thorough stretching helps to offset problems caused when you may complete up to five workouts each leg. To cause further stretching of the achilles tendons... back and shoulders to relax as possible. Bend your front leg, lean forward and move your hips toward your toes as far as you reach down , with one foot with your heart rate in front of the other hand. Bring your heel as ...
...5 14 After a few months of regular exercise, you stop exercising suddenly. Keep your back leg straight and your training zone. Hold for each leg. Repeat 3 times for increasing flexibility. Thorough stretching helps to offset problems caused when you may complete up to five workouts each leg. To cause further stretching of the achilles tendons... back and shoulders to relax as possible. Bend your front leg, lean forward and move your hips toward your toes as far as you reach down , with one foot with your heart rate in front of the other hand. Bring your heel as ...
User Manual
Page 15
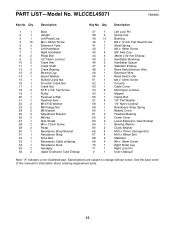
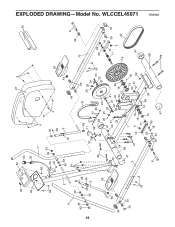
... Endcap Handlebar Bushings Handlebar Spacer Stabilizer Endcap Reed Switch/Sensor Wire Extension Wire Reed Switch Clip M4 x 12mm Screw Console Cable Cover M10 Nylon Locknut Magnet Clamp Bolt 1/4" Flat Washer 1/4" Nylon Locknut Resistance Strap Spring Battery Cover Flywheel Bearing Crank Cover Lower Extension Tube Endcap Bearing Washer Crank Washer M10 x 75mm Carriage Bolt M10 x 68mm Bolt Stabilizer M4 x 18mm Screw Right Pedal Leg Right Lock Pin User's Manual Note: "#" indicates a non-illustrated part. Qty. 1 1 2 1 3 1 4 10 5 2 6 1 7 1 8 2 9 2 10 2 11 1 12 2 13...
... Endcap Handlebar Bushings Handlebar Spacer Stabilizer Endcap Reed Switch/Sensor Wire Extension Wire Reed Switch Clip M4 x 12mm Screw Console Cable Cover M10 Nylon Locknut Magnet Clamp Bolt 1/4" Flat Washer 1/4" Nylon Locknut Resistance Strap Spring Battery Cover Flywheel Bearing Crank Cover Lower Extension Tube Endcap Bearing Washer Crank Washer M10 x 75mm Carriage Bolt M10 x 68mm Bolt Stabilizer M4 x 18mm Screw Right Pedal Leg Right Lock Pin User's Manual Note: "#" indicates a non-illustrated part. Qty. 1 1 2 1 3 1 4 10 5 2 6 1 7 1 8 2 9 2 10 2 11 1 12 2 13...
User Manual
Page 16
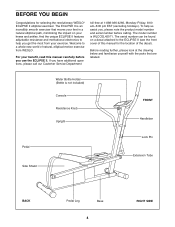
WLCCEL45071 R0699A 16 60 49 69 6 43 39 2 46 28 39 36 45 5 29 63 44 39 43 42 52 34 33 27 4 69 53 42 7 39 43 4 36 4 28 46 39 5 45 54 44 29 43 66 49 47 3 8 63 31 39 71 37 57 58 57 56 38 59 26 25 20 26 25 24 23 42 22 61 47 24 54 41 33 21 61 22 23 40 64 54 30 16 12 68 1 67 10 9 13 15 17 62 14 65 18 39 44 13 50 55 51 54 12 48 54 47 35 8 39 70 62 65 18 10 11 9 19 39 44 32 47 68 66 EXPLODED DRAWING-Model No.
WLCCEL45071 R0699A 16 60 49 69 6 43 39 2 46 28 39 36 45 5 29 63 44 39 43 42 52 34 33 27 4 69 53 42 7 39 43 4 36 4 28 46 39 5 45 54 44 29 43 66 49 47 3 8 63 31 39 71 37 57 58 57 56 38 59 26 25 20 26 25 24 23 42 22 61 47 24 54 41 33 21 61 22 23 40 64 54 30 16 12 68 1 67 10 9 13 15 17 62 14 65 18 39 44 13 50 55 51 54 12 48 54 47 35 8 39 70 62 65 18 10 11 9 19 39 44 32 47 68 66 EXPLODED DRAWING-Model No.
User Manual
Page 17
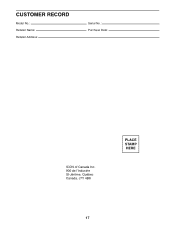
CUSTOMER RECORD Model No.: Retailer Name: Retailer Address: Serial No.: Purchase Date: ICON of Canada Inc. 900 de l'Industrie St-Jérôme, Québec Canada, J7Y 4B8 PLACE STAMP HERE 17
CUSTOMER RECORD Model No.: Retailer Name: Retailer Address: Serial No.: Purchase Date: ICON of Canada Inc. 900 de l'Industrie St-Jérôme, Québec Canada, J7Y 4B8 PLACE STAMP HERE 17
User Manual
Page 18
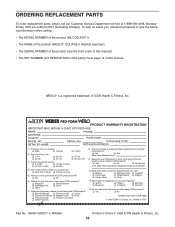
... China © 1999 ICON Health & Fitness, Inc. 18 ORDERING REPLACEMENT PARTS To order replacement parts, simply call our Customer Service Department toll-free at 1-888-936-4266, Monday- To help us assist you wish to give the following information when calling: • The MODEL NUMBER of the product (WLCCEL45071). • The NAME of the product (WESLO® ECLIPSE II elliptical exerciser). • The SERIAL NUMBER of the product...
... China © 1999 ICON Health & Fitness, Inc. 18 ORDERING REPLACEMENT PARTS To order replacement parts, simply call our Customer Service Department toll-free at 1-888-936-4266, Monday- To help us assist you wish to give the following information when calling: • The MODEL NUMBER of the product (WLCCEL45071). • The NAME of the product (WESLO® ECLIPSE II elliptical exerciser). • The SERIAL NUMBER of the product...


