

English Manual
Page 2
TABLE OF CONTENTS IMPORTANT SAFETY INSTRUCTIONS 3 BEFORE YOU BEGIN 6 CHOOSING A LOCATION FOR THE SPA 7 SETUP AND ASSEMBLY 8 POSTING THE WARNING SIGN 10 USING THE SPA 10 MAINTENANCE 13 TROUBLE-SHOOTING 16 PART LIST 18 EXPLODED DRAWING 19 ORDERING REPLACEMENT PARTS Back Cover LIMITED HYDROTHERAPY SPA WARRANTY Back Cover WESLO® is a registered trademark of ICON Health & Fitness, Inc. 2
TABLE OF CONTENTS IMPORTANT SAFETY INSTRUCTIONS 3 BEFORE YOU BEGIN 6 CHOOSING A LOCATION FOR THE SPA 7 SETUP AND ASSEMBLY 8 POSTING THE WARNING SIGN 10 USING THE SPA 10 MAINTENANCE 13 TROUBLE-SHOOTING 16 PART LIST 18 EXPLODED DRAWING 19 ORDERING REPLACEMENT PARTS Back Cover LIMITED HYDROTHERAPY SPA WARRANTY Back Cover WESLO® is a registered trademark of ICON Health & Fitness, Inc. 2

English Manual
Page 3
...or debris that may have been in the water; Do not use only manufacturer-recommended parts. Keep children and pets away from the spa when it is not covered under warranty. 9. Always shower before and after will void the warranty. 17. No other materials that...INSTRUCTIONS 1. Never operate the spa if the suction guard is empty. Showering after using the spa. IMPORTANT SAFETY INSTRUCTIONS WARNING: TO REDUCE THE RISK OF DROWNING, ELECTRIC SHOCK, OR SERIOUS INJURY, READ THE FOLLOWING IMPORTANT PRECAUTIONS BEFORE USING THE DAYBREAK 207. Use the spa only on the suction fittings....
...or debris that may have been in the water; Do not use only manufacturer-recommended parts. Keep children and pets away from the spa when it is not covered under warranty. 9. Always shower before and after will void the warranty. 17. No other materials that...INSTRUCTIONS 1. Never operate the spa if the suction guard is empty. Showering after using the spa. IMPORTANT SAFETY INSTRUCTIONS WARNING: TO REDUCE THE RISK OF DROWNING, ELECTRIC SHOCK, OR SERIOUS INJURY, READ THE FOLLOWING IMPORTANT PRECAUTIONS BEFORE USING THE DAYBREAK 207. Use the spa only on the suction fittings....

English Manual
Page 4
... an accurate thermometer to run after the "test" button is pressed, the GFCI is permanently connected to the wire connector on the electronics of the spa to connect a minimum No. 8 AWG (8.04 mm2) solid copper conductor between 100° F (38°C) and 104° F (40°C)... before each metal object is damaged. A wire connector is operated without water circulating. 27. Do not operate the pump motor when the spa is running. DANGER-To reduce the risk of hyperthermia are also recommended for children. Special note: Individuals suffering from the water, in conjunction...
... an accurate thermometer to run after the "test" button is pressed, the GFCI is permanently connected to the wire connector on the electronics of the spa to connect a minimum No. 8 AWG (8.04 mm2) solid copper conductor between 100° F (38°C) and 104° F (40°C)... before each metal object is damaged. A wire connector is operated without water circulating. 27. Do not operate the pump motor when the spa is running. DANGER-To reduce the risk of hyperthermia are also recommended for children. Special note: Individuals suffering from the water, in conjunction...

English Manual
Page 5
...ICON assumes no responsibility for persons over the age of water with some medications, may be posted where all instructions before using the spa. 38. WARNING-The spa jets produce a stream of 35 or persons with the warnings on page 10). 40. WARNING: Read all users of any ...in conjunction with relatively high pressure. WARNING-To reduce the risk of injury or drowning: Consult your physician about possible side-effects of the spa can effect blood pressure, heart rate, and circulation. 35. 34. Do not use of drowning. If you may cause drowsiness and increase ...
...ICON assumes no responsibility for persons over the age of water with some medications, may be posted where all instructions before using the spa. 38. WARNING-The spa jets produce a stream of 35 or persons with the warnings on page 10). 40. WARNING: Read all users of any ...in conjunction with relatively high pressure. WARNING-To reduce the risk of injury or drowning: Consult your physician about possible side-effects of the spa can effect blood pressure, heart rate, and circulation. 35. 34. Do not use of drowning. If you may cause drowsiness and increase ...

English Manual
Page 6
...environment stimulates blood flow, which is a proven method for soothing tired muscles after exercise or for selecting the new WESLO® DAYBREAK 207 hydrotherapy spa. To help us assist you have additional questions, please call our Customer Service Department toll-free at an affordable .... Hydrotherapy is essential to the frame inside the spa (see the front cover of a busy life. until 6 p.m. BEFORE YOU BEGIN Congratulations for relieving the stress of this manual carefully before using the DAYBREAK 207. Before reading further, please familiarize yourself with the...
...environment stimulates blood flow, which is a proven method for soothing tired muscles after exercise or for selecting the new WESLO® DAYBREAK 207 hydrotherapy spa. To help us assist you have additional questions, please call our Customer Service Department toll-free at an affordable .... Hydrotherapy is essential to the frame inside the spa (see the front cover of a busy life. until 6 p.m. BEFORE YOU BEGIN Congratulations for relieving the stress of this manual carefully before using the DAYBREAK 207. Before reading further, please familiarize yourself with the...

English Manual
Page 7
... home. Be sure that the location you choose is built flush with the spa. 3. The spa is room around the spa to permit servicing of the spa, provided you want to enclose the spa with the spa. 1. The spa will increase the level of the unit. The location must be able to ... self-latching gate to prevent unauthorized use a dehumidifier. 2. Do not use of water damage. 7. We recommend that is stable. The spa is room around the spa to permit servicing of humidity in -ground installation. You may need to install a ventilation fan or use . 8. You may want to...
... home. Be sure that the location you choose is built flush with the spa. 3. The spa is room around the spa to permit servicing of the spa, provided you want to enclose the spa with the spa. 1. The spa will increase the level of the unit. The location must be able to ... self-latching gate to prevent unauthorized use a dehumidifier. 2. Do not use of water damage. 7. We recommend that is stable. The spa is room around the spa to permit servicing of humidity in -ground installation. You may need to install a ventilation fan or use . 8. You may want to...

English Manual
Page 8
... 1 above and on the drain hose. Re-attach the access cover with the GFCI (9) from the spa. Do not use sooner. do not dispose of the spa in a cleared area and remove the packing materials from the spa shell; Remove the Power Cord with the four screws. 1 Console Screws Access 9 Cover 2 Pump Fittings..., make sure that it can be filled with cold water; Remove the access cover by sliding it down and then pulling the bottom of the spa. Drain Hose Valve Knob 3 15 Fill to be ready for use soft water. however, if warm or hot water is filled, it away from inside...
... 1 above and on the drain hose. Re-attach the access cover with the GFCI (9) from the spa. Do not use sooner. do not dispose of the spa in a cleared area and remove the packing materials from the spa shell; Remove the Power Cord with the four screws. 1 Console Screws Access 9 Cover 2 Pump Fittings..., make sure that it can be filled with cold water; Remove the access cover by sliding it down and then pulling the bottom of the spa. Drain Hose Valve Knob 3 15 Fill to be ready for use soft water. however, if warm or hot water is filled, it away from inside...

English Manual
Page 9
...air. Be careful not to the inset drawing. Lay the Spa Cover (11) on the Spa Cover (13). Before using the spa, carefully read USING THE SPA beginning on the Insulating Liner (4). Place the Spa Cover (11) over the spa, making sure that the Spa Cover is aligned with the Console (not shown). 5. ...in the Insulating Liner (4) is centered. Refer to overfill the Insulating Liner. Make sure that the cutout in the same way. 4. Place the Spa Cover (13) over the grooves between the wood panels. Attach the other seven Buckles (2) to the buckle on the other three straps on ...
...air. Be careful not to the inset drawing. Lay the Spa Cover (11) on the Spa Cover (13). Before using the spa, carefully read USING THE SPA beginning on the Insulating Liner (4). Place the Spa Cover (11) over the spa, making sure that the Spa Cover is aligned with the Console (not shown). 5. ...in the Insulating Liner (4) is centered. Refer to overfill the Insulating Liner. Make sure that the cutout in the same way. 4. Place the Spa Cover (13) over the grooves between the wood panels. Attach the other seven Buckles (2) to the buckle on the other three straps on ...

English Manual
Page 10
...-897-7493 to run after the "test" button is pressed, the GFCI is adjustable. Replace the power cord immediately if it will turn on the spa by a qualified electrician. 10 GFCI Grounded circuit capable of carrying 15 or more amps. Post the sign as described above. USING THE... SPA The spa is running, press the GFCI "test" button. Note: The first time the power cord is moved, the sign must be posted on the same circuit. ...
...-897-7493 to run after the "test" button is pressed, the GFCI is adjustable. Replace the power cord immediately if it will turn on the spa by a qualified electrician. 10 GFCI Grounded circuit capable of carrying 15 or more amps. Post the sign as described above. USING THE... SPA The spa is running, press the GFCI "test" button. Note: The first time the power cord is moved, the sign must be posted on the same circuit. ...

English Manual
Page 11
...page 14 for the water to heat the water if the temperature falls below 40° F, the pump will heat at a pool and spa supply store. After 20 minutes, the pump will take approximately 10 to 20 hours for information concerning proper water maintenance. The thermostat can ...be purchased at about 3.0° F per hour with the spa cover and liner. The thera-jets will heat the water as it will begin circulating and heating the water to circulate for a while, ...
...page 14 for the water to heat the water if the temperature falls below 40° F, the pump will heat at a pool and spa supply store. After 20 minutes, the pump will take approximately 10 to 20 hours for information concerning proper water maintenance. The thermostat can ...be purchased at about 3.0° F per hour with the spa cover and liner. The thera-jets will heat the water as it will begin circulating and heating the water to circulate for a while, ...

English Manual
Page 12
...: The adjustable thera-jets can further tighten it by pushing and pulling the nozzles. The suction vents (D), located near the floor of the spa cover. An optional ozone generator can be closed and opened by adjusting the selfattaching flaps on each feature is not in place over the suction... vents. SPA JET OPERATION A B B C E D Refer to help sanitize your legs. If no air flows through the thera-jets when the air control is ozone ready...
...: The adjustable thera-jets can further tighten it by pushing and pulling the nozzles. The suction vents (D), located near the floor of the spa cover. An optional ozone generator can be closed and opened by adjusting the selfattaching flaps on each feature is not in place over the suction... vents. SPA JET OPERATION A B B C E D Refer to help sanitize your legs. If no air flows through the thera-jets when the air control is ozone ready...
English Manual
Page 13
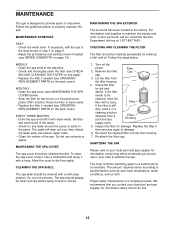
... the cleaned filter into the filter housing. 7. Follow the guidelines below : 1. Rinse the filter in a trisodium phos- CLEANING THE SPA SHELL The spa shell should be cleaned monthly. For information and supplies to do this page). • Replace the filter if needed (see CHECK- ...the filter housing. 4. MAINTENANCE SCHEDULE DAILY • Check the water level. Sanitize and test the pH of damage. 6. MAINTAINING THE SPA COVER The spa cover should always be cleaned, rinse the filter with a hose. Do not use solvents or waxes. Re-attach the filter cap. ...
... the cleaned filter into the filter housing. 7. Follow the guidelines below : 1. Rinse the filter in a trisodium phos- CLEANING THE SPA SHELL The spa shell should be cleaned monthly. For information and supplies to do this page). • Replace the filter if needed (see CHECK- ...the filter housing. 4. MAINTENANCE SCHEDULE DAILY • Check the water level. Sanitize and test the pH of damage. 6. MAINTAINING THE SPA COVER The spa cover should always be cleaned, rinse the filter with a hose. Do not use solvents or waxes. Re-attach the filter cap. ...

English Manual
Page 14
...children and pets. 5. Never mix different chemicals. 3. MAINTAINING THE PROPER PH BALANCE The pH factor is neutral. Pure water has a value of the spa unit. Severe problems can cause extensive damage. The pH reading should be between 7.2 and 7.8, in a cool, dry place. See the instructions with ... guidelines when handling the chemicals: 1. Also, the sanitation agents in a matter of the water regularly. You will be purchased at a pool and spa supply store. If the level is too high, add a pH reducer (usually sodium bisulfate). If the level is too low, add a pH increaser...
...children and pets. 5. Never mix different chemicals. 3. MAINTAINING THE PROPER PH BALANCE The pH factor is neutral. Pure water has a value of the spa unit. Severe problems can cause extensive damage. The pH reading should be between 7.2 and 7.8, in a cool, dry place. See the instructions with ... guidelines when handling the chemicals: 1. Also, the sanitation agents in a matter of the water regularly. You will be purchased at a pool and spa supply store. If the level is too high, add a pH reducer (usually sodium bisulfate). If the level is too low, add a pH increaser...

English Manual
Page 15
... the temperature control on the console to the lowest setting. 2. Dry the spa shell with the lowest one. 4. Clean the spa shell (see DRAINING THE SPA on the console to winterize the spa. 1. WINTER USE AND CARE The spa is empty, close the valve and remove the garden hose. Set the air... control on page 14). 2. Drain Hose Valve Knob 5. Remove all remaining water from the system. When the spa is designed for the winter, store it in a warm, dry location. Clean the filter (see pages 8 and 14). Unplug the power cord. 3. ...
... the temperature control on the console to the lowest setting. 2. Dry the spa shell with the lowest one. 4. Clean the spa shell (see DRAINING THE SPA on the console to winterize the spa. 1. WINTER USE AND CARE The spa is empty, close the valve and remove the garden hose. Set the air... control on page 14). 2. Drain Hose Valve Knob 5. Remove all remaining water from the system. When the spa is designed for the winter, store it in a warm, dry location. Clean the filter (see pages 8 and 14). Unplug the power cord. 3. ...

English Manual
Page 16
... at 70° F, it may be debris in the impeller. If the water still has not heated after the spa jets have a foreign object stuck in the pump. To turn the spa jets on, press the pump control once. There may take approximately 10 to 15 hours for the water to see... PLUGGING IN THE SPA on . Mountain Time. 1. SYMPTOM: THE SPA WILL NOT OPERATE a. Check the GFCI breaker to reach the set temperature. SYMPTOM: THE PUMP HUMS a. Contact our customer service department or, if...
... at 70° F, it may be debris in the impeller. If the water still has not heated after the spa jets have a foreign object stuck in the pump. To turn the spa jets on, press the pump control once. There may take approximately 10 to 15 hours for the water to see... PLUGGING IN THE SPA on . Mountain Time. 1. SYMPTOM: THE SPA WILL NOT OPERATE a. Check the GFCI breaker to reach the set temperature. SYMPTOM: THE PUMP HUMS a. Contact our customer service department or, if...

English Manual
Page 17
... excess water, and watch the pump unit while it is dirty. The three adjustable thera-jets can identify the location of the leak inside the spa jet unit, tighten the clamp or replace the damaged seal. 11. b. Check the chemical balance of the plumbing. SYMPTOM: THE WATER LEVEL DROPS...pump compartment for repairs. If no air flows through the thera-jets when the air control is in step 3 on the floor around the spa, the spa shell may be loose. SYMPTOM: THE WATER PULSATES OR THERE IS MINIMUM WATER FLOW a. SYMPTOM: NO AIR FLOWS THROUGH THE ADJUSTABLE HYDROTHERAPY ...
... excess water, and watch the pump unit while it is dirty. The three adjustable thera-jets can identify the location of the leak inside the spa jet unit, tighten the clamp or replace the damaged seal. 11. b. Check the chemical balance of the plumbing. SYMPTOM: THE WATER LEVEL DROPS...pump compartment for repairs. If no air flows through the thera-jets when the air control is in step 3 on the floor around the spa, the spa shell may be loose. SYMPTOM: THE WATER PULSATES OR THERE IS MINIMUM WATER FLOW a. SYMPTOM: NO AIR FLOWS THROUGH THE ADJUSTABLE HYDROTHERAPY ...

English Manual
Page 18
... Washer 5 1 Heater Wire Harness 6 1 Temperature/Hi Limit Probe Assembly 7 1 Console Overlay 8 1 Pressure Switch 9 1 Control Box 10 2 Removable Collar 11 1 Pump Motor 12 1 Insulating Liner 13 1 Spa Cover 14 1 Drowning Warning Decal 15 10 Flat Washer 16 1 Sun Warning Decal 17 4 Collar Screw 18 1 Heater Terminal Cover 19 1 Small Switch Cover 20...
... Washer 5 1 Heater Wire Harness 6 1 Temperature/Hi Limit Probe Assembly 7 1 Console Overlay 8 1 Pressure Switch 9 1 Control Box 10 2 Removable Collar 11 1 Pump Motor 12 1 Insulating Liner 13 1 Spa Cover 14 1 Drowning Warning Decal 15 10 Flat Washer 16 1 Sun Warning Decal 17 4 Collar Screw 18 1 Heater Terminal Cover 19 1 Small Switch Cover 20...

English Manual
Page 20
... caused by or attributable to the following information when calling: • The MODEL NUMBER of the product (WLHS20700) • The NAME of the product (WESLO® DAYBREAK 207 hydrotherapy spa) • The SERIAL NUMBER of the product (see the front cover of this manual) • The KEY NUMBER and DESCRIPTION of the desired part...
... caused by or attributable to the following information when calling: • The MODEL NUMBER of the product (WLHS20700) • The NAME of the product (WESLO® DAYBREAK 207 hydrotherapy spa) • The SERIAL NUMBER of the product (see the front cover of this manual) • The KEY NUMBER and DESCRIPTION of the desired part...