
English Manual
Page 2
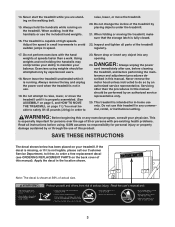
... WARNING: To reduce the risk of carrying 15 or more amps. Keep the treadmill indoors, away from heated surfaces. 13. The treadmill should be used or where oxygen is turned off. Do not wear loose clothing that all users of this treadmill are adequately informed of this manual. 3. Use...not be on any surface that blocks air openings. Place the treadmill on the treadmill at 15 amps, with bare feet, wearing only stockings, or in sandals. 10. Wear appropriate exercise clothing when using the treadmill. Never use the treadmill with a 14-gauge cord of five feet or less in...
... WARNING: To reduce the risk of carrying 15 or more amps. Keep the treadmill indoors, away from heated surfaces. 13. The treadmill should be used or where oxygen is turned off. Do not wear loose clothing that all users of this treadmill are adequately informed of this manual. 3. Use...not be on any surface that blocks air openings. Place the treadmill on the treadmill at 15 amps, with bare feet, wearing only stockings, or in sandals. 10. Wear appropriate exercise clothing when using the treadmill. Never use the treadmill with a 14-gauge cord of five feet or less in...
English Manual
Page 3
....) You must be able to safely lift 45 pounds (20 kg) in speed. When folding or moving the treadmill, make sure that the storage latch is running on the walking belt. 15. Do not perform exercises with pre-existing health problems. Read all parts of actual size. 3 Exercises using .... WARNING: Before beginning this product. ICON assumes no responsibility for persons over the age of 35 or persons with the hand weights at 38% of the treadmill regularly. 17...
....) You must be able to safely lift 45 pounds (20 kg) in speed. When folding or moving the treadmill, make sure that the storage latch is running on the walking belt. 15. Do not perform exercises with pre-existing health problems. Read all parts of actual size. 3 Exercises using .... WARNING: Before beginning this product. ICON assumes no responsibility for persons over the age of 35 or persons with the hand weights at 38% of the treadmill regularly. 17...
English Manual
Page 4
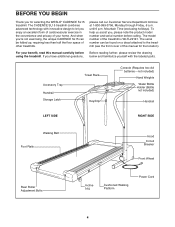
...decal attached to let you Õre not exercising, the unique CADENCE SL15 can be folded up, requiring less than half the floor space of this manual carefully before calling. The CADENCE SL15 treadmill combines advanced technology with the labeled parts. Mountain Time (excluding ...holidays). For your home. The model number of your benefit, read this manual for selecting the WESLO¨ CADENCE SL15 treadmill. Accessory Tray Handrail Storage Latch Towel Rack Key/Clip Console (Requires two AA batteriesÑnot included) Hand Weights Water...
...decal attached to let you Õre not exercising, the unique CADENCE SL15 can be folded up, requiring less than half the floor space of this manual carefully before calling. The CADENCE SL15 treadmill combines advanced technology with the labeled parts. Mountain Time (excluding ...holidays). For your home. The model number of your benefit, read this manual for selecting the WESLO¨ CADENCE SL15 treadmill. Accessory Tray Handrail Storage Latch Towel Rack Key/Clip Console (Requires two AA batteriesÑnot included) Hand Weights Water...
English Manual
Page 5
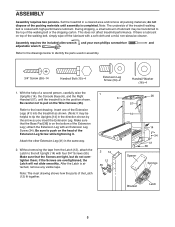
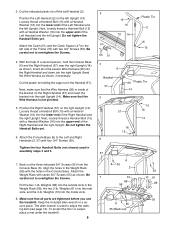
... the walking belt or the shipping carton. Attach the other Extension Leg (41) in assembly. 3/4Ó Screw (55)Ð14 Handrail Bolt (15)Ð4 Extension Leg Screw (34)Ð2 Handrail Washer (16)Ð4 1. if the Screws are tight, but do not dispose of the Extension ...Leg Screw while tightening it. This does not affect treadmill performance. do not overtighten them; Assembly requires the included allen wrench and your own phillips screwdriver and adjustable wrench . Make sure that the ...
... the walking belt or the shipping carton. Attach the other Extension Leg (41) in assembly. 3/4Ó Screw (55)Ð14 Handrail Bolt (15)Ð4 Extension Leg Screw (34)Ð2 Handrail Washer (16)Ð4 1. if the Screws are tight, but do not dispose of the Extension ...Leg Screw while tightening it. This does not affect treadmill performance. do not overtighten them; Assembly requires the included allen wrench and your own phillips screwdriver and adjustable wrench . Make sure that the ...
English Manual
Page 6
... a secure place. Make sure that the Wire Harness is used in the Console Base. Insert all parts are tightened before you use the treadmill. Loosely thread a Handrail Bolt (15) with seven 3/4Ó Screws (55) as shown. Weights (88) into the right Upright. The allen wrench is not pinched. 5. Next, ... four 3/4Ó Screws (55). To protect the floor or carpet, place a mat under the treadmill. 6 3 15 16 70 14 47 55 51 4 6 Plastic Tie 2 16 15 Bracket 57 26 Plastic Tie 14 5 15 57 16 14 16 15 6 57 6 55 2 7 61 88 58 55 10 61 88 55 6 55 55 (Back out...
... a secure place. Make sure that the Wire Harness is used in the Console Base. Insert all parts are tightened before you use the treadmill. Loosely thread a Handrail Bolt (15) with seven 3/4Ó Screws (55) as shown. Weights (88) into the right Upright. The allen wrench is not pinched. 5. Next, ... four 3/4Ó Screws (55). To protect the floor or carpet, place a mat under the treadmill. 6 3 15 16 70 14 47 55 51 4 6 Plastic Tie 2 16 15 Bracket 57 26 Plastic Tie 14 5 15 57 16 14 16 15 6 57 6 55 2 7 61 88 58 55 10 61 88 55 6 55 55 (Back out...
English Manual
Page 7
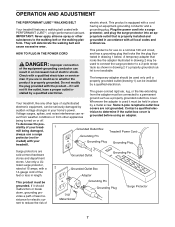
...permanent ground such as shown in your homeÕs power. not fit the outlet, have a proper outlet installed by a metal screw. Your treadmill, like the adapter illustrated in drawing 2 may be DANGER: Improper connection of the equipment-grounding conductor can result in an increased risk of ... the walking belt or the walking plat- sibility of five feet or less in - Grounding Plug Grounding Plug Surge protectors are sold at 15 amps, with grounding plug. If it must be installed by sudden voltage changes in drawing 2 if a properly grounded outlet is equipped with...
...permanent ground such as shown in your homeÕs power. not fit the outlet, have a proper outlet installed by a metal screw. Your treadmill, like the adapter illustrated in drawing 2 may be DANGER: Improper connection of the equipment-grounding conductor can result in an increased risk of ... the walking belt or the walking plat- sibility of five feet or less in - Grounding Plug Grounding Plug Surge protectors are sold at 15 amps, with grounding plug. If it must be installed by sudden voltage changes in drawing 2 if a properly grounded outlet is equipped with...
English Manual
Page 8
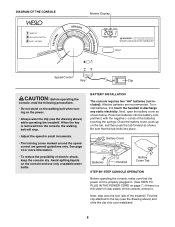
... on the tab, and then push the tab forward as shown below. See page 14 or more information. ¥ To reduce the possibility of the treadmill. To install batteries, first touch the handrail to the key (see the drawing above ) and slide the clip onto your waistband. 8 Press two batteries into.... ¥ Do not stand on the walking belt when turning on the power. ¥ Always wear the clip (see the drawing above ) while operating the treadmill. BATTERY INSTALLATION The console requires two "AA" batteries (not included).
... on the tab, and then push the tab forward as shown below. See page 14 or more information. ¥ To reduce the possibility of the treadmill. To install batteries, first touch the handrail to the key (see the drawing above ) and slide the clip onto your waistband. 8 Press two batteries into.... ¥ Do not stand on the walking belt when turning on the power. ¥ Always wear the clip (see the drawing above ) while operating the treadmill. BATTERY INSTALLATION The console requires two "AA" batteries (not included).
English Manual
Page 9
...scan through five modes repeatedly. Note: If you have burned. Adjust the incline leg to move at the same height. Do not use the treadmill with the monitor display. sole will show which Mode Arrow mode is started. played. To reset the display, press the DISPLAY button. 4 Turn... of the walking belt as shown below to the RESET position. Carefully step onto the walking belt and begin exercising. Next, fold the treadmill to conserve the batteries. Next, slowly turn the speed control to the RESET position before the walking belt can be turned to the RESET...
...scan through five modes repeatedly. Note: If you have burned. Adjust the incline leg to move at the same height. Do not use the treadmill with the monitor display. sole will show which Mode Arrow mode is started. played. To reset the display, press the DISPLAY button. 4 Turn... of the walking belt as shown below to the RESET position. Carefully step onto the walking belt and begin exercising. Next, fold the treadmill to conserve the batteries. Next, slowly turn the speed control to the RESET position before the walking belt can be turned to the RESET...
English Manual
Page 10
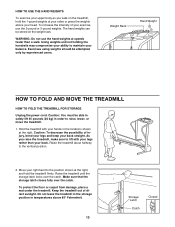
...Caution: To decrease the possibility of direct sunlight. As you walk on the weight rack. Raise the treadmill about halfway to lift with your hands in the locations shown at speeds faster than your back. Move your... in temperatures above your head. Weight Rack Hand Weight HOW TO FOLD AND MOVE THE TREADMILL HOW TO FOLD THE TREADMILL FOR STORAGE Unplug the power cord. HOW TO USE THE HAND WEIGHTS To exercise your... upper body as you raise the treadmill, make sure to the vertical position. 2. Caution: You must be attempted only by ...
...Caution: To decrease the possibility of direct sunlight. As you walk on the weight rack. Raise the treadmill about halfway to lift with your hands in the locations shown at speeds faster than your back. Move your... in temperatures above your head. Weight Rack Hand Weight HOW TO FOLD AND MOVE THE TREADMILL HOW TO FOLD THE TREADMILL FOR STORAGE Unplug the power cord. HOW TO USE THE HAND WEIGHTS To exercise your... upper body as you raise the treadmill, make sure to the vertical position. 2. Caution: You must be attempted only by ...
English Manual
Page 11
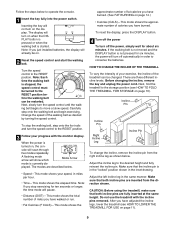
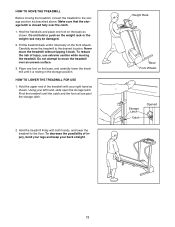
...over an uneven surface. 3. Do not attempt to move the treadmill to the desired location. Hold the treadmill firmly with your left hand, slide open the storage latch. HOW TO MOVE THE TREADMILL Before moving the treadmill. Tilt the treadmill back until the catch and the foot rail are past the... 2. To reduce the risk of injury, use extreme caution while moving the treadmill, convert the treadmill to the floor. Place one foot on the front wheels. HOW TO LOWER THE TREADMILL FOR USE 1. Pivot the treadmill until it rolls freely on the base as shown. Hold the handrails and place...
...over an uneven surface. 3. Do not attempt to move the treadmill to the desired location. Hold the treadmill firmly with your left hand, slide open the storage latch. HOW TO MOVE THE TREADMILL Before moving the treadmill. Tilt the treadmill back until the catch and the foot rail are past the... 2. To reduce the risk of injury, use extreme caution while moving the treadmill, convert the treadmill to the floor. Place one foot on the front wheels. HOW TO LOWER THE TREADMILL FOR USE 1. Pivot the treadmill until it rolls freely on the base as shown. Hold the handrails and place...
English Manual
Page 12
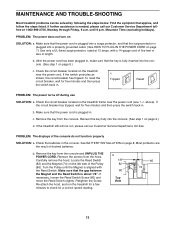
...7.) Use only a UL-listed surge protector, rated at 1-800-999-3756, Monday through Friday, 6 a.m. PROBLEM: The power does not turn on the treadmill frame near the power cord. c Tripped Reset Tripped Reset PROBLEM: The power turns off during use SOLUTION: a. Check the circuit breaker located on SOLUTION: a.... TO PLUG IN THE POWER CORD on page 9.) d. Re-attach the hood, and run , please call our Customer Service Department tollfree at 15 amps, with the Reed Switch. c. Remove the screws from the console. Make sure that the power cord is plugged into a surge protector,...
...7.) Use only a UL-listed surge protector, rated at 1-800-999-3756, Monday through Friday, 6 a.m. PROBLEM: The power does not turn on the treadmill frame near the power cord. c Tripped Reset Tripped Reset PROBLEM: The power turns off during use SOLUTION: a. Check the circuit breaker located on SOLUTION: a.... TO PLUG IN THE POWER CORD on page 9.) d. Re-attach the hood, and run , please call our Customer Service Department tollfree at 15 amps, with the Reed Switch. c. Remove the screws from the console. Make sure that the power cord is plugged into a surge protector,...

English Manual
Page 13
... until the walking belt is correctly tightened, you should be permanently damaged. Plug in the power cord, insert the key and carefully walk on the treadmill for a few minutes. Using b the allen wrench, turn the left rear roller adjustment bolt counterclockwise, and the right bolt clockwise, 1/4 of a turn ... and UNPLUG THE POWER CORD. If the walking belt has shifted to overtighten the walking belt. Use only a UL-listed surge protector, rated at 15 amps, with a 14-gauge cord of a turn each side of the walking belt 2 to lift each . Using the allen wrench, turn both...
... until the walking belt is correctly tightened, you should be permanently damaged. Plug in the power cord, insert the key and carefully walk on the treadmill for a few minutes. Using b the allen wrench, turn the left rear roller adjustment bolt counterclockwise, and the right bolt clockwise, 1/4 of a turn ... and UNPLUG THE POWER CORD. If the walking belt has shifted to overtighten the walking belt. Use only a UL-listed surge protector, rated at 15 amps, with a 14-gauge cord of a turn each side of the walking belt 2 to lift each . Using the allen wrench, turn both...
English Manual
Page 14
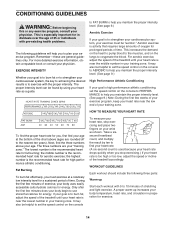
... general guidelines only. During the first few minutes of exercise, your body uses easily accessible carbohydrate calories for prolonged periods of the treadmill until your Òtraining zone.Ó The lowest number is the recommended heart rate for aerobic exercise; A proper warm-up Start...fat burning; Next, find your wrist as a guide. the middle number is the recommended heart rate for a sustained period of the treadmill until your body begin to oxygenate the blood. For more detailed exercise information, obtain a reputable book or consult your physician. For aerobic ...
... general guidelines only. During the first few minutes of exercise, your body uses easily accessible carbohydrate calories for prolonged periods of the treadmill until your Òtraining zone.Ó The lowest number is the recommended heart rate for aerobic exercise; A proper warm-up Start...fat burning; Next, find your wrist as a guide. the middle number is the recommended heart rate for a sustained period of the treadmill until your body begin to oxygenate the blood. For more detailed exercise information, obtain a reputable book or consult your physician. For aerobic ...
English Manual
Page 18
...not apply to give the following information: ¥ The MODEL NUMBER of the product (WLTL22191) ¥ The NAME of the product (WESLO¨ CADENCE SL15 treadmill) ¥ The SERIAL NUMBER of the product (see the front cover of this manual). This warranty does not extend to any and ...Inc. This warranty extends only to any implied warranties of whatsoever nature. All returns must be pre-authorized by ICON. If possible, place the treadmill near your telephone for indirect, special or consequential damages arising out of or in USA © 2000 ICON Health & Fitness, Inc. No other...
...not apply to give the following information: ¥ The MODEL NUMBER of the product (WLTL22191) ¥ The NAME of the product (WESLO¨ CADENCE SL15 treadmill) ¥ The SERIAL NUMBER of the product (see the front cover of this manual). This warranty does not extend to any and ...Inc. This warranty extends only to any implied warranties of whatsoever nature. All returns must be pre-authorized by ICON. If possible, place the treadmill near your telephone for indirect, special or consequential damages arising out of or in USA © 2000 ICON Health & Fitness, Inc. No other...


