

English Manual
Page 2
Please save them for future reference. 2 ® TABLE OF CONTENTS IMPORTANT PRECAUTIONS 3 BEFORE YOU BEGIN 5 ASSEMBLY 6 OPERATION AND ADJUSTMENT 7 HOW TO FOLD AND MOVE THE TREADMILL 10 MAINTENANCE AND TROUBLE-SHOOTING 12 CONDITIONING GUIDELINES 14 ORDERING REPLACEMENT PARTS Back Cover FULL 90 DAY WARRANTY Back Cover Note: An EXPLODED DRAWING and PART LIST are attached to the center of this manual.
Please save them for future reference. 2 ® TABLE OF CONTENTS IMPORTANT PRECAUTIONS 3 BEFORE YOU BEGIN 5 ASSEMBLY 6 OPERATION AND ADJUSTMENT 7 HOW TO FOLD AND MOVE THE TREADMILL 10 MAINTENANCE AND TROUBLE-SHOOTING 12 CONDITIONING GUIDELINES 14 ORDERING REPLACEMENT PARTS Back Cover FULL 90 DAY WARRANTY Back Cover Note: An EXPLODED DRAWING and PART LIST are attached to the center of this manual.
English Manual
Page 3
... YOU BEGIN on page 5 for 120 volts AC and 15 amps. 3. No other appliance should not be able to avoid sudden jumps in the treadmill. The treadmill is running. Adjust the speed in small increments to safely lift 45 pounds (20 kg) in use. (See the drawing on page 5 if ... sure that the storage latch is the responsibility of the owner to raise, lower, or move the on the walking belt. Keep children under the treadmill. 4. The treadmill should be electrically rated for the location of the on a level surface, with bare feet, wearing only stockings, or in a garage or covered...
... YOU BEGIN on page 5 for 120 volts AC and 15 amps. 3. No other appliance should not be able to avoid sudden jumps in the treadmill. The treadmill is running. Adjust the speed in small increments to safely lift 45 pounds (20 kg) in use. (See the drawing on page 5 if ... sure that the storage latch is the responsibility of the owner to raise, lower, or move the on the walking belt. Keep children under the treadmill. 4. The treadmill should be electrically rated for the location of the on a level surface, with bare feet, wearing only stockings, or in a garage or covered...

English Manual
Page 4
... the motor hood unless instructed to order a free replacement decal (see the back cover of this or any exercise program, consult your treadmill. WARNING: Before beginning this manual). This is especially important for personal injury or property damage sustained by or through the use only. ...home use of 35 or persons with pre-existing health problems. Read all instructions before performing the maintenance and adjustment procedures described in this treadmill in this product. tive. If the decal is missing, or if it is intended for in the location shown. 4 Never insert...
... the motor hood unless instructed to order a free replacement decal (see the back cover of this or any exercise program, consult your treadmill. WARNING: Before beginning this manual). This is especially important for personal injury or property damage sustained by or through the use only. ...home use of 35 or persons with pre-existing health problems. Read all instructions before performing the maintenance and adjustment procedures described in this treadmill in this product. tive. If the decal is missing, or if it is intended for in the location shown. 4 Never insert...
English Manual
Page 5
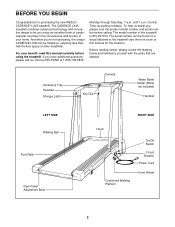
... labeled. Before reading further, please review the drawing below and familiarize yourself with innovative design to the treadmill (see the front cover of your benefit, read this manual for purchasing the new WESLO CADENCE® LX45 treadmill. To help us assist you enjoy an excellent form of cardiovascular exercise in the convenience and privacy of...
... labeled. Before reading further, please review the drawing below and familiarize yourself with innovative design to the treadmill (see the front cover of your benefit, read this manual for purchasing the new WESLO CADENCE® LX45 treadmill. To help us assist you enjoy an excellent form of cardiovascular exercise in the convenience and privacy of...
English Manual
Page 6
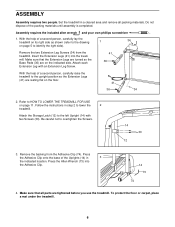
.... 14 30 12 3. Follow the instructions in a cleared area and remove all parts are tightened before you use the treadmill. Press the Adhesive Clip onto the base of a second person, carefully raise the treadmill to the upright position so the Extension Legs (41) are on page 5 to the left Upright (14) with... Clip. 14 73 74 4. Assembly requires the included allen wrench and your own phillips screwdriver . 1. To protect the floor or carpet, place a mat under the treadmill. 6 Make sure that the Extension Legs are turned so the Base Pads (36) are resting flat on page 11.
.... 14 30 12 3. Follow the instructions in a cleared area and remove all parts are tightened before you use the treadmill. Press the Adhesive Clip onto the base of a second person, carefully raise the treadmill to the upright position so the Extension Legs (41) are on page 5 to the left Upright (14) with... Clip. 14 73 74 4. Assembly requires the included allen wrench and your own phillips screwdriver . 1. To protect the floor or carpet, place a mat under the treadmill. 6 Make sure that the Extension Legs are turned so the Base Pads (36) are resting flat on page 11.
English Manual
Page 7
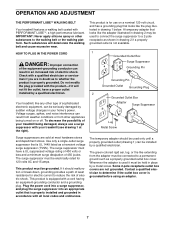
...fit the outlet, have a UL suppressed voltage rating of 400 volts or less and a minimum surge dissipation of 450 joules. Your treadmill, like the adapter illustrated in drawing 2 if a properly grounded outlet is used to connect the surge suppressor to reduce the risk ...least resistance for use a surge suppressor with PERFORMANT LUBETM, a high-performance lubricant. IMPORTANT: Never apply silicone spray or other type of your treadmill being turned on a nominal 120-volt circuit, and has a grounding plug that is grounded before using an adapter. 7 Contact a qualified ...
...fit the outlet, have a UL suppressed voltage rating of 400 volts or less and a minimum surge dissipation of 450 joules. Your treadmill, like the adapter illustrated in drawing 2 if a properly grounded outlet is used to connect the surge suppressor to reduce the risk ...least resistance for use a surge suppressor with PERFORMANT LUBETM, a high-performance lubricant. IMPORTANT: Never apply silicone spray or other type of your treadmill being turned on a nominal 120-volt circuit, and has a grounding plug that is grounded before using an adapter. 7 Contact a qualified ...

English Manual
Page 8
... four displays will light. Avoid spilling liquids on the power. • Always wear the clip (see the drawing above ) while operating the treadmill. One indicator will automatically control the speed as it . To select one of the console, remove it. When one of the workout programs... the console, remove it guides you want to the key (see the drawing above ), and slide the clip onto the waistband of the treadmill. The treadmill console features a manual mode and four workout programs. When the manual mode is properly plugged in the LED track. "On" Position OFF...
... four displays will light. Avoid spilling liquids on the power. • Always wear the clip (see the drawing above ) while operating the treadmill. One indicator will automatically control the speed as it . To select one of the console, remove it. When one of the workout programs... the console, remove it guides you want to the key (see the drawing above ), and slide the clip onto the waistband of the treadmill. The treadmill console features a manual mode and four workout programs. When the manual mode is properly plugged in the LED track. "On" Position OFF...
English Manual
Page 9
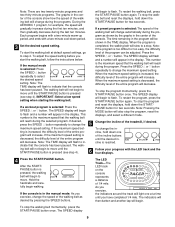
... the SPEED v or w button. The SPEED display will begin to change automatically during the last ten minutes. To change the Change the incline of the treadmill, if desired. As you have completed 1/4 mile. The SPEED display 9 When the program is the maximum speed that the console is in the display. has...
... the SPEED v or w button. The SPEED display will begin to change automatically during the last ten minutes. To change the Change the incline of the treadmill, if desired. As you have completed 1/4 mile. The SPEED display 9 When the program is the maximum speed that the console is in the display. has...
English Manual
Page 10
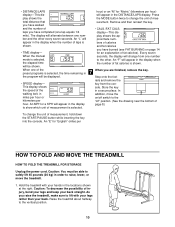
... FAT BURNING on /off " position. (See the drawing near the bottom of hour. for "English" (miles per HOW TO FOLD AND MOVE THE TREADMILL HOW TO FOLD THE TREADMILL FOR STORAGE Unplug the power cord. Every seven When the manual seconds, the display will be shown. 7 When one lap equals 1/4 display-This...- you have walked and the number of fat calories). An "L" will be able to safely lift 45 pounds (20 kg) in When you raise the treadmill, make sure to the vertical position. 10 will change the unit of injury, bend your legs and keep your hands in the locations shown at...
... FAT BURNING on /off " position. (See the drawing near the bottom of hour. for "English" (miles per HOW TO FOLD AND MOVE THE TREADMILL HOW TO FOLD THE TREADMILL FOR STORAGE Unplug the power cord. Every seven When the manual seconds, the display will be shown. 7 When one lap equals 1/4 display-This...- you have walked and the number of fat calories). An "L" will be able to safely lift 45 pounds (20 kg) in When you raise the treadmill, make sure to the vertical position. 10 will change the unit of injury, bend your legs and keep your hands in the locations shown at...

English Manual
Page 11
...To reduce the risk of direct sunlight. HOW TO LOWER THE TREADMILL FOR USE 1. Tilt the treadmill back until the storage latch closes over an uneven surface. 3. Do not attempt to move the treadmill without tipping it . Storage Latch Catch Closed Base Front Wheels Storage... protect the floor or carpet from damage, place a mat under the treadmill. Keep the treadmill out of injury, use extreme caution while moving the treadmill, convert the treadmill to the desired location. Never move the treadmill over the catch. Place one foot on the front wheels. 2. Hold...
...To reduce the risk of direct sunlight. HOW TO LOWER THE TREADMILL FOR USE 1. Tilt the treadmill back until the storage latch closes over an uneven surface. 3. Do not attempt to move the treadmill without tipping it . Storage Latch Catch Closed Base Front Wheels Storage... protect the floor or carpet from damage, place a mat under the treadmill. Keep the treadmill out of injury, use extreme caution while moving the treadmill, convert the treadmill to the desired location. Never move the treadmill over the catch. Place one foot on the front wheels. 2. Hold...
English Manual
Page 12
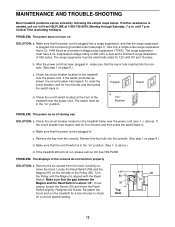
...joules. Locate the Reed Switch (86) and the Magnet (87) on SOLUTION: a. PROBLEM: The power does not turn on the left side of the treadmill near the power cord. The surge suppressor must be in the "on page 8.) c. Reinsert the key fully into a properly grounded outlet (see 1. d....free HELPLINE at the front of the Pulley (85). If the switch protrudes as a transient voltage surge suppressor (TVSS). c. If the treadmill still will not run the treadmill for a few minutes to check for a correct speed reading. 1/8" 86 35 Top View 85 87 12 Turn the Pulley until 7 ...
...joules. Locate the Reed Switch (86) and the Magnet (87) on SOLUTION: a. PROBLEM: The power does not turn on the left side of the treadmill near the power cord. The surge suppressor must be in the "on page 8.) c. Reinsert the key fully into a properly grounded outlet (see 1. d....free HELPLINE at the front of the Pulley (85). If the switch protrudes as a transient voltage surge suppressor (TVSS). c. If the treadmill still will not run the treadmill for a few minutes to check for a correct speed reading. 1/8" 86 35 Top View 85 87 12 Turn the Pulley until 7 ...
English Manual
Page 13
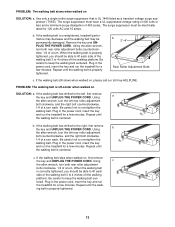
...Be careful to keep the walking belt centered. Plug in the power cord, insert the key and run the treadmill for a few minutes. PROBLEM: The walking belt is overtightened, treadmill performance may decrease and the walking belt may be able to lift each side of the walking belt 3 to... belt is centered. If the walking belt has shifted to overtighten the walking belt. Plug in the power cord, insert the key and run the treadmill for a few minutes. Use only a single-outlet surge suppressor that is properly tightened. 13 The surge suppressor must be able to lift each . b....
...Be careful to keep the walking belt centered. Plug in the power cord, insert the key and run the treadmill for a few minutes. PROBLEM: The walking belt is overtightened, treadmill performance may decrease and the walking belt may be able to lift each side of the walking belt 3 to... belt is centered. If the walking belt has shifted to overtighten the walking belt. Plug in the power cord, insert the key and run the treadmill for a few minutes. Use only a single-outlet surge suppressor that is properly tightened. 13 The surge suppressor must be able to lift each . b....

English Manual
Page 14
... your heart rate. This is near one day of stretching and light exercise. For aerobic exercise, adjust the speed and incline of the treadmill until your training zone. EXERCISE INTENSITY Whether your goal is near the higher number in preparation for a sustained period of oxygen for fat ...place two fingers on the lungs to burn fat, adjust the speed and incline of your muscles and will increase the flexibility of the treadmill until your heart rate is especially important for longer than 20 minutes.) A Cool-down-Finish each workout with the proper intensity. Remember...
... your heart rate. This is near one day of stretching and light exercise. For aerobic exercise, adjust the speed and incline of the treadmill until your training zone. EXERCISE INTENSITY Whether your goal is near the higher number in preparation for a sustained period of oxygen for fat ...place two fingers on the lungs to burn fat, adjust the speed and incline of your muscles and will increase the flexibility of the treadmill until your heart rate is especially important for longer than 20 minutes.) A Cool-down-Finish each workout with the proper intensity. Remember...

English Manual
Page 18
...am-7 pm Central Time (excluding holidays) The model number and serial number of your WESLO CADENCE® LX45 treadmill are available for rental purposes. When requesting help assembling or operating the WESLO CADENCE® LX45 TREADMILL • a part is used commercially or for immediate purchase or special order when ...you need to be replaced, call the following information: • The NAME OF THE PRODUCT (WESLO CADENCE® LX45 treadmill) • The MODEL NUMBER OF THE PRODUCT (831.297100) • The KEY NUMBER AND DESCRIPTION OF THE PART (...
...am-7 pm Central Time (excluding holidays) The model number and serial number of your WESLO CADENCE® LX45 treadmill are available for rental purposes. When requesting help assembling or operating the WESLO CADENCE® LX45 TREADMILL • a part is used commercially or for immediate purchase or special order when ...you need to be replaced, call the following information: • The NAME OF THE PRODUCT (WESLO CADENCE® LX45 treadmill) • The MODEL NUMBER OF THE PRODUCT (831.297100) • The KEY NUMBER AND DESCRIPTION OF THE PART (...


