
English Manual
Page 1
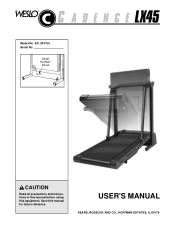
Save this equipment. USER'S MANUAL SEARS, ROEBUCK AND CO., HOFFMAN ESTATES, IL 60179 Serial Number Decal CAUTION Read all precautions and instructions in this manual before using this manual for future reference. ® Model No. 831.297100 Serial No.
Save this equipment. USER'S MANUAL SEARS, ROEBUCK AND CO., HOFFMAN ESTATES, IL 60179 Serial Number Decal CAUTION Read all precautions and instructions in this manual before using this manual for future reference. ® Model No. 831.297100 Serial No.
English Manual
Page 2
Please save them for future reference. 2 ® TABLE OF CONTENTS IMPORTANT PRECAUTIONS 3 BEFORE YOU BEGIN 5 ASSEMBLY 6 OPERATION AND ADJUSTMENT 7 HOW TO FOLD AND MOVE THE TREADMILL 10 MAINTENANCE AND TROUBLE-SHOOTING 12 CONDITIONING GUIDELINES 14 ORDERING REPLACEMENT PARTS Back Cover FULL 90 DAY WARRANTY Back Cover Note: An EXPLODED DRAWING and PART LIST are attached to the center of this manual.
Please save them for future reference. 2 ® TABLE OF CONTENTS IMPORTANT PRECAUTIONS 3 BEFORE YOU BEGIN 5 ASSEMBLY 6 OPERATION AND ADJUSTMENT 7 HOW TO FOLD AND MOVE THE TREADMILL 10 MAINTENANCE AND TROUBLE-SHOOTING 12 CONDITIONING GUIDELINES 14 ORDERING REPLACEMENT PARTS Back Cover FULL 90 DAY WARRANTY Back Cover Note: An EXPLODED DRAWING and PART LIST are attached to the center of this manual.
English Manual
Page 3
... caught in order to raise, lower, or move the walking belt while the power is the responsibility of the owner to ensure that all times. 7. Always hold the handrails while using the treadmill. Keep children under the treadmill. 4. Use only a single-outlet surge suppressor that the storage latch is UL 1449 listed as described in speed. 16. When folding or moving the treadmill, make sure that is...
... caught in order to raise, lower, or move the walking belt while the power is the responsibility of the owner to ensure that all times. 7. Always hold the handrails while using the treadmill. Keep children under the treadmill. 4. Use only a single-outlet surge suppressor that the storage latch is UL 1449 listed as described in speed. 16. When folding or moving the treadmill, make sure that is...
English Manual
Page 4
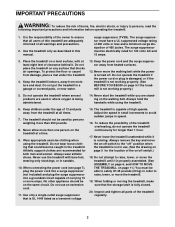
... any object into any exercise program, consult your treadmill. Servicing other than the procedures in the location shown. 4 Apply the decal in this manual should be performed by an authorized service representative only. 23. Never remove the motor hood unless instructed to order a free replacement decal (see the back cover of this or any opening. 22. 21. Do not use only. SEARS assumes no responsibility for personal...
... any object into any exercise program, consult your treadmill. Servicing other than the procedures in the location shown. 4 Apply the decal in this manual should be performed by an authorized service representative only. 23. Never remove the motor hood unless instructed to order a free replacement decal (see the back cover of this or any opening. 22. 21. Do not use only. SEARS assumes no responsibility for personal...
English Manual
Page 5
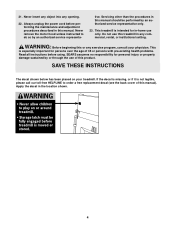
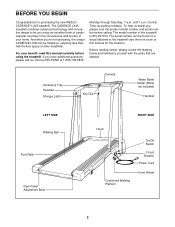
... excellent form of cardiovascular exercise in the convenience and privacy of other treadmills. Accessory Tray Handrail Storage Latch Console Key/Clip Water Bottle Holder (Bottle not included) Handrail LEFT SIDE Walking Belt Foot Rails Rear Roller Adjustment Bolts RIGHT SIDE Hood Cushioned Walking Platform On/Off Switch Circuit Breaker Power Cord Front Wheel 5 The model number of this manual carefully before calling. For your home. The serial number can be found on a decal attached to...
... excellent form of cardiovascular exercise in the convenience and privacy of other treadmills. Accessory Tray Handrail Storage Latch Console Key/Clip Water Bottle Holder (Bottle not included) Handrail LEFT SIDE Walking Belt Foot Rails Rear Roller Adjustment Bolts RIGHT SIDE Hood Cushioned Walking Platform On/Off Switch Circuit Breaker Power Cord Front Wheel 5 The model number of this manual carefully before calling. For your home. The serial number can be found on a decal attached to...
English Manual
Page 6
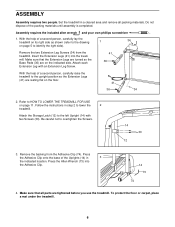
... indicated location. Follow the instructions in a cleared area and remove all parts are on the floor. 41 36 34 2. Insert the Extension Legs (41) into the Adhesive Clip. 14 73 74 4. Remove the two Extension Leg Screws (34) from the Adhesive Clip (74). Make sure that the Extension Legs are turned so the Base Pads (36) are tightened before you use the treadmill. Press...
... indicated location. Follow the instructions in a cleared area and remove all parts are on the floor. 41 36 34 2. Insert the Extension Legs (41) into the Adhesive Clip. 14 73 74 4. Remove the two Extension Leg Screws (34) from the Adhesive Clip (74). Make sure that the Extension Legs are turned so the Base Pads (36) are tightened before you use the treadmill. Press...
English Manual
Page 7
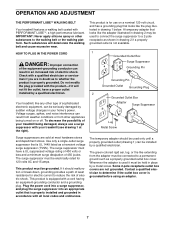
... surge suppressor must be installed by sudden voltage changes in an increased risk of your home's power. This product is properly installed and grounded in drawing 1 below. Whenever the adapter is grounded before using an adapter. 7 OPERATION AND ADJUSTMENT THE PERFORMANT LUBETM WALKING BELT Your treadmill features a walking belt coated with a cord having an equipment-grounding conductor and a grounding plug. Your treadmill, like the plug illustrated in accordance...
... surge suppressor must be installed by sudden voltage changes in an increased risk of your home's power. This product is properly installed and grounded in drawing 1 below. Whenever the adapter is grounded before using an adapter. 7 OPERATION AND ADJUSTMENT THE PERFORMANT LUBETM WALKING BELT Your treadmill features a walking belt coated with a cord having an equipment-grounding conductor and a grounding plug. Your treadmill, like the plug illustrated in accordance...

English Manual
Page 8
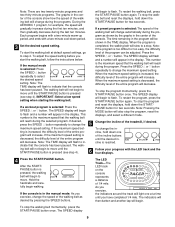
... manual mode indicator and the four displays will light. If the key is selected, the console will automatically control the speed as it guides you exercise, the LED track and the four displays will be changed with a touch of a button. When the key is selected, the speed and incline of the treadmill can be lit. The upper program indicator will light. When one of the workout programs is in the console, remove...
... manual mode indicator and the four displays will light. If the key is selected, the console will automatically control the speed as it guides you exercise, the LED track and the four displays will be changed with a touch of a button. When the key is selected, the speed and incline of the treadmill can be lit. The upper program indicator will light. When one of the workout programs is in the console, remove...
English Manual
Page 9
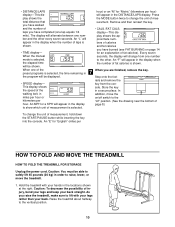
... incline of the walking belt as shown by pressing the SPEED buttons. Press the to a stop the program If a workout program is the maximum speed that the console has been paused. and a number will appear in the cen- This number If the manual mode is reached. Press the SPEED v or w button repeatedly to select the desired speed setting. The SPEED display will begin . maximum speed setting. To change the incline, hold down the ing belt will change the speed of the treadmill...
... incline of the walking belt as shown by pressing the SPEED buttons. Press the to a stop the program If a workout program is the maximum speed that the console has been paused. and a number will appear in the cen- This number If the manual mode is reached. Press the SPEED v or w button repeatedly to select the desired speed setting. The SPEED display will begin . maximum speed setting. To change the incline, hold down the ing belt will change the speed of the treadmill...
English Manual
Page 10
... your back straight. Press play shows the ap- The display will appear in addition, move the treadmill. 1. An "L" will be displayed. Store the key the speed of fat calories is selected. Hold the treadmill with your legs rather than your back. total distance that surement. mile). the program will proximate num- An MPH or a KPH will alternate between one number mode is selected, to...
... your back straight. Press play shows the ap- The display will appear in addition, move the treadmill. 1. An "L" will be displayed. Store the key the speed of fat calories is selected. Hold the treadmill with your legs rather than your back. total distance that surement. mile). the program will proximate num- An MPH or a KPH will alternate between one number mode is selected, to...

English Manual
Page 11
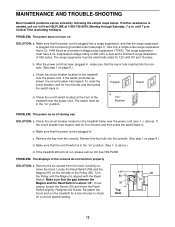
... legs and keep your left thumb, press the storage latch and hold the treadmill firmly. HOW TO LOWER THE TREADMILL FOR USE 1. Tilt the treadmill back until it back, or the base pads may come off. Do not attempt to the floor. Hold the upper end of direct sunlight. Keep the treadmill out of the treadmill with both hands, and lower the treadmill to move...
... legs and keep your left thumb, press the storage latch and hold the treadmill firmly. HOW TO LOWER THE TREADMILL FOR USE 1. Tilt the treadmill back until it back, or the base pads may come off. Do not attempt to the floor. Hold the upper end of direct sunlight. Keep the treadmill out of the treadmill with both hands, and lower the treadmill to move...
English Manual
Page 12
... Remove the six screws from the console. until the Magnet is needed, call our toll-free HELPLINE. Make sure that the power cord is plugged into a surge suppressor, and that the power cord is plugged into a properly grounded outlet (see 1. If the switch protrudes as a transient voltage surge suppressor (TVSS). Check the on the treadmill near the power cord. c. MAINTENANCE AND TROUBLE-SHOOTING Most treadmill problems can be electrically rated...
... Remove the six screws from the console. until the Magnet is needed, call our toll-free HELPLINE. Make sure that the power cord is plugged into a surge suppressor, and that the power cord is plugged into a properly grounded outlet (see 1. If the switch protrudes as a transient voltage surge suppressor (TVSS). Check the on the treadmill near the power cord. c. MAINTENANCE AND TROUBLE-SHOOTING Most treadmill problems can be electrically rated...
English Manual
Page 13
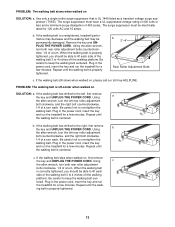
... run the treadmill for a few minutes. Plug in the power cord, insert the key and run the treadmill for 120 volts AC and 15 amps. Using a the allen wrench, turn the left rear roller adjustment bolt clockwise, and the right bolt counterclockwise, 1/4 of a turn each . PROBLEM: The walking belt slows when walked on , first remove the key and UNPLUG THE POWER CORD. Use only a single-outlet surge suppressor that is correctly tightened, you should...
... run the treadmill for a few minutes. Plug in the power cord, insert the key and run the treadmill for 120 volts AC and 15 amps. Using a the allen wrench, turn the left rear roller adjustment bolt clockwise, and the right bolt counterclockwise, 1/4 of a turn each . PROBLEM: The walking belt slows when walked on , first remove the key and UNPLUG THE POWER CORD. Use only a single-outlet surge suppressor that is correctly tightened, you should...

English Manual
Page 14
....) A Cool-down . The chart below shows recommended heart rates for fat burning; To measure your heart rate. Next, find your heart rate, stop exercising.) Adjust the intensity of the treadmill until your heart rate as shown. For aerobic exercise, adjust the speed and incline of your exercise until your heart rate is to strengthen your cardiovascular system, your exercise must exercise at the bottom of exercise, your training zone for you stop exercising and place two...
....) A Cool-down . The chart below shows recommended heart rates for fat burning; To measure your heart rate. Next, find your heart rate, stop exercising.) Adjust the intensity of the treadmill until your heart rate as shown. For aerobic exercise, adjust the speed and incline of your exercise until your heart rate is to strengthen your cardiovascular system, your exercise must exercise at the bottom of exercise, your training zone for you stop exercising and place two...
English Manual
Page 15
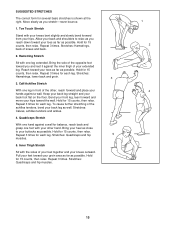
...from your back foot flat on the floor. Stretches: Hamstrings, lower back and groin. 3 3. Hold for each leg. Repeat 3 times. Calf/Achilles Stretch With one leg in front of your feet together and your extended leg. Bring your heel as close to relax as possible. Hold ...your hips toward your back leg as possible. Stretches: Quadriceps and hip muscles. 1 2 4 15 SUGGESTED STRETCHES The correct form for balance, reach back and grasp one leg extended. Keep your back leg straight and your hips. Bend your front leg, lean forward and move your other , reach forward...
...from your back foot flat on the floor. Stretches: Hamstrings, lower back and groin. 3 3. Hold for each leg. Repeat 3 times. Calf/Achilles Stretch With one leg in front of your feet together and your extended leg. Bring your heel as close to relax as possible. Hold ...your hips toward your back leg as possible. Stretches: Quadriceps and hip muscles. 1 2 4 15 SUGGESTED STRETCHES The correct form for balance, reach back and grasp one leg extended. Keep your back leg straight and your hips. Bend your front leg, lean forward and move your other , reach forward...
English Manual
Page 16
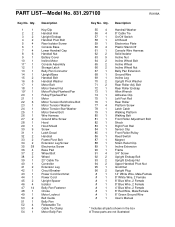
... Rear Isolator Screw Console Base Lower Handrail Cap Handrail Nut Battery Cover Incline Motor Console Assembly Storage Latch Belly Pan Connector Upright/Base Handrail Bolt Handrail Washer Motor Belt Motor Swivel Nut Motor/Pulley/Flywheel/Fan Pulley/Flywheel/Fan Motor Motor Tension Bolt/Incline Bolt Motor Tension Washer Motor Tension Star Washer Motor Swivel Bolt Wire Harness Ground Wire Screw Hood Hood Shield Screw Latch Decal Handrail Frame Pivot Bolt Extension Leg Screw Electronics Screw Base Pad Wheel Bolt Wheel 23" Cable Tie Controller Extension Leg Circuit Breaker Power Cord Grommet Power...
... Rear Isolator Screw Console Base Lower Handrail Cap Handrail Nut Battery Cover Incline Motor Console Assembly Storage Latch Belly Pan Connector Upright/Base Handrail Bolt Handrail Washer Motor Belt Motor Swivel Nut Motor/Pulley/Flywheel/Fan Pulley/Flywheel/Fan Motor Motor Tension Bolt/Incline Bolt Motor Tension Washer Motor Tension Star Washer Motor Swivel Bolt Wire Harness Ground Wire Screw Hood Hood Shield Screw Latch Decal Handrail Frame Pivot Bolt Extension Leg Screw Electronics Screw Base Pad Wheel Bolt Wheel 23" Cable Tie Controller Extension Leg Circuit Breaker Power Cord Grommet Power...

English Manual
Page 17
EXPLODED DRAWING-Model No. 831.297100 R0198A 1 92 93 96 35 16 17 8 35 9 14 3 93 94 6 15 55 55 32 4 55 7 2 91 8 3 22 22 89 8 35 35 ...
EXPLODED DRAWING-Model No. 831.297100 R0198A 1 92 93 96 35 16 17 8 35 9 14 3 93 94 6 15 55 55 32 4 55 7 2 91 8 3 22 22 89 8 35 35 ...

English Manual
Page 18
... PART LIST included in USA © 1998 Sears, Roebuck and Co. This warranty gives you specific legal rights, and you visit your WESLO CADENCE® LX45 treadmill are available for rental purposes. SEARS, ROEBUCK AND CO., DEPT. 817WA, HOFFMAN ESTATES, IL 60179 Part No. 144078 H00117-C R0198A Printed in this SEARS TREADMILL EXERCISER, contact the nearest SEARS Service Center throughout the United States and SEARS will repair or replace...
... PART LIST included in USA © 1998 Sears, Roebuck and Co. This warranty gives you specific legal rights, and you visit your WESLO CADENCE® LX45 treadmill are available for rental purposes. SEARS, ROEBUCK AND CO., DEPT. 817WA, HOFFMAN ESTATES, IL 60179 Part No. 144078 H00117-C R0198A Printed in this SEARS TREADMILL EXERCISER, contact the nearest SEARS Service Center throughout the United States and SEARS will repair or replace...


