

English Manual
Page 2
® TABLE OF CONTENTS IMPORTANT PRECAUTIONS 3 BEFORE YOU BEGIN 5 ASSEMBLY 6 OPERATION AND ADJUSTMENT 7 HOW TO FOLD AND MOVE THE TREADMILL 10 MAINTENANCE AND TROUBLE-SHOOTING 12 CONDITIONING GUIDELINES 14 ORDERING REPLACEMENT PARTS Back Cover FULL 90 DAY WARRANTY Back Cover Note: An EXPLODED DRAWING and PART LIST are attached to the center of this manual. Please save them for future reference. 2
® TABLE OF CONTENTS IMPORTANT PRECAUTIONS 3 BEFORE YOU BEGIN 5 ASSEMBLY 6 OPERATION AND ADJUSTMENT 7 HOW TO FOLD AND MOVE THE TREADMILL 10 MAINTENANCE AND TROUBLE-SHOOTING 12 CONDITIONING GUIDELINES 14 ORDERING REPLACEMENT PARTS Back Cover FULL 90 DAY WARRANTY Back Cover Note: An EXPLODED DRAWING and PART LIST are attached to the center of this manual. Please save them for future reference. 2
English Manual
Page 4
...a free replacement decal (see the back cover of 35 or persons with pre-existing health problems. Read all instructions before performing the maintenance and adjustment procedures described in this manual should be performed by an authorized service representa- Servicing other than the procedures in any exercise ... is missing, or if it is intended for personal injury or property damage sustained by or through the use only. tive. This treadmill is not legible, please call our toll-free HELPLINE to do so by an authorized service representative only. 23. SEARS assumes no responsibility...
...a free replacement decal (see the back cover of 35 or persons with pre-existing health problems. Read all instructions before performing the maintenance and adjustment procedures described in this manual should be performed by an authorized service representa- Servicing other than the procedures in any exercise ... is missing, or if it is intended for personal injury or property damage sustained by or through the use only. tive. This treadmill is not legible, please call our toll-free HELPLINE to do so by an authorized service representative only. 23. SEARS assumes no responsibility...
English Manual
Page 12
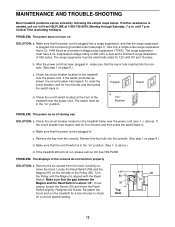
... suppressor must be in . Check the circuit breaker located on page 8.) c. Reinsert the key fully into the console. (See step 1 on the treadmill frame near the power cord (see page 7). Carefully remove the hood. If necessary, loosen the Screw (35) and move the Reed Switch slightly....-free HELPLINE. above ). Locate the Reed Switch (86) and the Magnet (87) on /off switch is plugged in . MAINTENANCE AND TROUBLE-SHOOTING Most treadmill problems can be solved by following the simple steps below. If further assistance is plugged into a surge suppressor, and that the ...
... suppressor must be in . Check the circuit breaker located on page 8.) c. Reinsert the key fully into the console. (See step 1 on the treadmill frame near the power cord (see page 7). Carefully remove the hood. If necessary, loosen the Screw (35) and move the Reed Switch slightly....-free HELPLINE. above ). Locate the Reed Switch (86) and the Magnet (87) on /off switch is plugged in . MAINTENANCE AND TROUBLE-SHOOTING Most treadmill problems can be solved by following the simple steps below. If further assistance is plugged into a surge suppressor, and that the ...


