

English Manual
Page 1
... missing or damaged parts, we will provide immediate assistance, free of charge to providing complete customer satisfaction. Save this equipment. The trained technicians on our customer hot line will guarantee complete satisfaction through direct assistance from our factory. MST CAUTION Read all precautions and instructions in the space above for future reference. USER'S MANUAL ¨ Model No. CUSTOMER HOT...
... missing or damaged parts, we will provide immediate assistance, free of charge to providing complete customer satisfaction. Save this equipment. The trained technicians on our customer hot line will guarantee complete satisfaction through direct assistance from our factory. MST CAUTION Read all precautions and instructions in the space above for future reference. USER'S MANUAL ¨ Model No. CUSTOMER HOT...
English Manual
Page 2
... using the treadmill. TABLE OF CONTENTS IMPORTANT PRECAUTIONS 2 BEFORE YOU BEGIN 4 ASSEMBLY 5 OPERATION AND ADJUSTMENT 7 HOW TO FOLD AND MOVE THE TREADMILL 10 MAINTENANCE AND TROUBLE-SHOOTING 12 CONDITIONING GUIDELINES 14 ORDERING REPLACEMENT PARTS Back Cover LIMITED WARRANTY Back Cover Note: A PART LIST and an EXPLODED DRAWING are attached in the center of this treadmill are adequately informed of all warnings and precautions. 2. Do not operate the treadmill if the power cord or plug...
... using the treadmill. TABLE OF CONTENTS IMPORTANT PRECAUTIONS 2 BEFORE YOU BEGIN 4 ASSEMBLY 5 OPERATION AND ADJUSTMENT 7 HOW TO FOLD AND MOVE THE TREADMILL 10 MAINTENANCE AND TROUBLE-SHOOTING 12 CONDITIONING GUIDELINES 14 ORDERING REPLACEMENT PARTS Back Cover LIMITED WARRANTY Back Cover Note: A PART LIST and an EXPLODED DRAWING are attached in the center of this treadmill are adequately informed of all warnings and precautions. 2. Do not operate the treadmill if the power cord or plug...
English Manual
Page 3
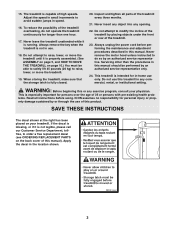
... rear of the treadmill. 23. Always unplug the power cord before using. Apply the decal in -home use of this or any exercise program, consult your treadmill. Never leave the treadmill unattended while it is intended for in the location shown. 3 When storing the treadmill, make sure that the storage latch is not in speed. 16. Never insert any object into any commercial, rental, or institutional setting. Servicing...
... rear of the treadmill. 23. Always unplug the power cord before using. Apply the decal in -home use of this or any exercise program, consult your treadmill. Never leave the treadmill unattended while it is intended for in the location shown. 3 When storing the treadmill, make sure that the storage latch is not in speed. 16. Never insert any object into any commercial, rental, or institutional setting. Servicing...
English Manual
Page 4
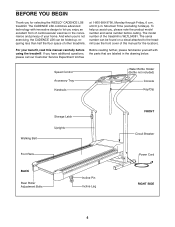
..., read this manual for selecting the WESLO¨ CADENCE LS6 treadmill. The model number of other treadmills. BEFORE YOU BEGIN Thank you , please note the product model number and serial number before using the treadmill. For your home. until 6 p.m. To help us assist you for the location). Speed Control Accessory Tray Handrails Water Bottle Holder (Bottle not included) Console Key/Clip Walking Belt Foot Rails Storage Latch Uprights BACK Rear Roller Adjustment Bolts Incline Pin Incline Leg FRONT Circuit Breaker Power Cord RIGHT SIDE...
..., read this manual for selecting the WESLO¨ CADENCE LS6 treadmill. The model number of other treadmills. BEFORE YOU BEGIN Thank you , please note the product model number and serial number before using the treadmill. For your home. until 6 p.m. To help us assist you for the location). Speed Control Accessory Tray Handrails Water Bottle Holder (Bottle not included) Console Key/Clip Walking Belt Foot Rails Storage Latch Uprights BACK Rear Roller Adjustment Bolts Incline Pin Incline Leg FRONT Circuit Breaker Power Cord RIGHT SIDE...
English Manual
Page 5
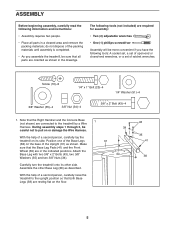
..., or a set of a second person, carefully raise the treadmill to the treadmill by a Wire Harness. Assemble the other side. Note that the Right Handrail and the Console Base 1 (not shown) are connected to the upright position so that both Base Legs (38) are resting flat on or damage the Wire Harness. Make sure that all parts in a cleared area and remove the...
..., or a set of a second person, carefully raise the treadmill to the treadmill by a Wire Harness. Assemble the other side. Note that the Right Handrail and the Console Base 1 (not shown) are connected to the upright position so that both Base Legs (38) are resting flat on or damage the Wire Harness. Make sure that all parts in a cleared area and remove the...
English Manual
Page 6
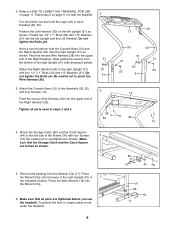
...). Press the Wrench Clip onto the base of the right Upright (31) (see drawing 5 below). Cut the plastic ties that the Storage Catch and the Catch Spacer are tightened before you use the treadmill. Thread two 1/4Ó x 1Ó Bolts (23) with four Screws 4 (10). Do not tighten the Bolts yet. Remove the backing from the bottom of the right Upright (31) in steps...
...). Press the Wrench Clip onto the base of the right Upright (31) (see drawing 5 below). Cut the plastic ties that the Storage Catch and the Catch Spacer are tightened before you use the treadmill. Thread two 1/4Ó x 1Ó Bolts (23) with four Screws 4 (10). Do not tighten the Bolts yet. Remove the backing from the bottom of the right Upright (31) in steps...
English Manual
Page 7
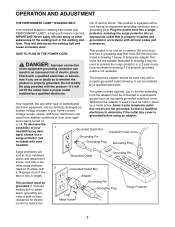
... of least resistance for use a surge protector (not Grounded Outlet Box Grounding Pin Treadmill Power Cord included) with all local codes and form. Do not modify the plug provided with grounding plug. This product is used it will deteriorate the walking belt and ordinances. cause excessive wear. Check with a 14-gauge cord of electric shock. ances being dam- Use only a ULlisted surge protector, rated at most...
... of least resistance for use a surge protector (not Grounded Outlet Box Grounding Pin Treadmill Power Cord included) with all local codes and form. Do not modify the plug provided with grounding plug. This product is used it will deteriorate the walking belt and ordinances. cause excessive wear. Check with a 14-gauge cord of electric shock. ances being dam- Use only a ULlisted surge protector, rated at most...

English Manual
Page 8
... treadmill. Be sure that the power cord is properly plugged in small increments. ¥ The training zones marked around the speed control are recommended. Find the clip attached to operate the console. 8 To install batteries, open the battery cover as shown. Close the battery cover, push up on the console and use only a sealable water bottle. Follow the steps on page 7.) If there is removed from the console, the walking belt will stop. ¥ Adjust...
... treadmill. Be sure that the power cord is properly plugged in small increments. ¥ The training zones marked around the speed control are recommended. Find the clip attached to operate the console. 8 To install batteries, open the battery cover as shown. Close the battery cover, push up on the console and use only a sealable water bottle. Follow the steps on page 7.) If there is removed from the console, the walking belt will stop. ¥ Adjust...
English Manual
Page 9
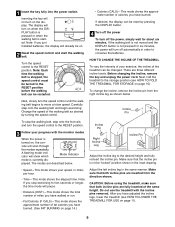
.... A flashing mode indicator will not turn on . 2 Reset the speed control and start the walking belt. 1 Insert the key fully into the power switch. To change the incline, remove the incline pin from the direction shown. Change the speed of the treadmill can be restarted. ¥ Calories (CALS)ÑThis mode shows the approximate number of fat calories you have adjusted the incline legs, lower the treadmill (see HOW TO FOLD THE TREADMILL FOR STORAGE on page 11). 9 Incline Pin To stop exercising for...
.... A flashing mode indicator will not turn on . 2 Reset the speed control and start the walking belt. 1 Insert the key fully into the power switch. To change the incline, remove the incline pin from the direction shown. Change the speed of the treadmill can be restarted. ¥ Calories (CALS)ÑThis mode shows the approximate number of fat calories you have adjusted the incline legs, lower the treadmill (see HOW TO FOLD THE TREADMILL FOR STORAGE on page 11). 9 Incline Pin To stop exercising for...
English Manual
Page 10
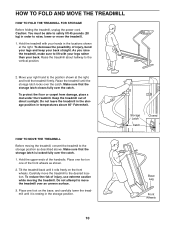
... that the storage latch is resting in order to the vertical position. 2. Do not leave the treadmill in the storage position in the locations shown at the right, and hold the treadmill firmly. Hold the upper ends of direct sunlight. HOW TO FOLD AND MOVE THE TREADMILL HOW TO FOLD THE TREADMILL FOR STORAGE Before folding the treadmill, unplug the power cord. Hold the treadmill with your legs rather...
... that the storage latch is resting in order to the vertical position. 2. Do not leave the treadmill in the storage position in the locations shown at the right, and hold the treadmill firmly. Hold the upper ends of direct sunlight. HOW TO FOLD AND MOVE THE TREADMILL HOW TO FOLD THE TREADMILL FOR STORAGE Before folding the treadmill, unplug the power cord. Hold the treadmill with your legs rather...
English Manual
Page 11
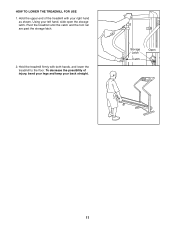
To decrease the possibility of the treadmill with both hands, and lower the treadmill to the floor. Hold the upper end of injury, bend your legs and keep your back straight. HOW TO LOWER THE TREADMILL FOR USE 1. Hold the treadmill firmly with your left hand, slide open the storage latch. Using your right hand as shown. Pivot the treadmill until the catch and the foot rail are past the storage latch. 2. Storage Latch Catch Open 11
To decrease the possibility of the treadmill with both hands, and lower the treadmill to the floor. Hold the upper end of injury, bend your legs and keep your back straight. HOW TO LOWER THE TREADMILL FOR USE 1. Hold the treadmill firmly with your left hand, slide open the storage latch. Using your right hand as shown. Pivot the treadmill until the catch and the foot rail are past the storage latch. 2. Storage Latch Catch Open 11
English Manual
Page 12
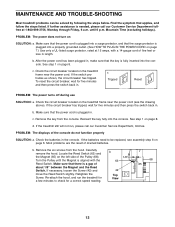
... treadmill problems can be replaced, see the drawing above). Find the symptom that there is fully inserted into the console. PROBLEM: The power does not turn on page 8. Check the circuit breaker located on the treadmill frame near the power cord (see assembly step 6 on page 6. c Tripped Tripped Reset Reset PROBLEM: The power turns off during use SOLUTION: a. Check the circuit breaker located on the left side of drained batteries. Locate the Reed Switch...
... treadmill problems can be replaced, see the drawing above). Find the symptom that there is fully inserted into the console. PROBLEM: The power does not turn on page 8. Check the circuit breaker located on the treadmill frame near the power cord (see assembly step 6 on page 6. c Tripped Tripped Reset Reset PROBLEM: The power turns off during use SOLUTION: a. Check the circuit breaker located on the left side of drained batteries. Locate the Reed Switch...
English Manual
Page 13
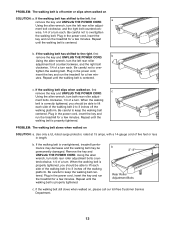
... toll-free Customer Service Department. 13 Repeat until the walking belt is properly tightened. b 2ÓÐ3Ó Rear Roller Adjustment Bolts c. If the walking belt slips when walked on SOLUTION: a. Using the allen wrench, turn each . Be careful to keep the walking belt centered. Repeat until the walking belt is properly tightened. Be careful to keep the walking belt centered. Plug in the power cord, insert the key and run the treadmill for a few minutes. Plug in the power cord...
... toll-free Customer Service Department. 13 Repeat until the walking belt is properly tightened. b 2ÓÐ3Ó Rear Roller Adjustment Bolts c. If the walking belt slips when walked on SOLUTION: a. Using the allen wrench, turn each . Be careful to keep the walking belt centered. Repeat until the walking belt is properly tightened. Be careful to keep the walking belt centered. Plug in the power cord, insert the key and run the treadmill for a few minutes. Plug in the power cord...
English Manual
Page 14
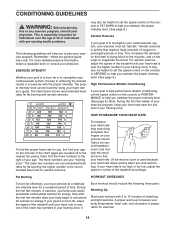
... the lower two numbers in preparation for prolonged periods of the treadmill until your heart rate is too high or too low, adjust the speed or incline of your training zone. To measure your heart rate, stop exercising.) If your heart rate is near the higher number in your training zone. During the first few minutes does your heart rate near the low end of the treadmill accordingly. It Each workout...
... the lower two numbers in preparation for prolonged periods of the treadmill until your heart rate is too high or too low, adjust the speed or incline of your training zone. To measure your heart rate, stop exercising.) If your heart rate is near the higher number in your training zone. During the first few minutes does your heart rate near the low end of the treadmill accordingly. It Each workout...
English Manual
Page 15
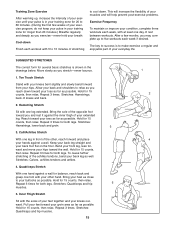
...workouts each workout with one day of rest between workouts. After a few weeks of your exercise program, do not keep your pulse in your training zone for several basic stretches is shown in front of the other hand. The key to success is to make exercise a regular and enjoyable part of your back foot flat on the floor. Move... stretching of the achilles tendons, bend your hands against a wall. Training Zone Exercise After warming up to five workouts each week if desired. SUGGESTED STRETCHES The correct form for longer than 20 minutes.) Breathe regularly and deeply as close to...
...workouts each workout with one day of rest between workouts. After a few weeks of your exercise program, do not keep your pulse in your training zone for several basic stretches is shown in front of the other hand. The key to success is to make exercise a regular and enjoyable part of your back foot flat on the floor. Move... stretching of the achilles tendons, bend your hands against a wall. Training Zone Exercise After warming up to five workouts each week if desired. SUGGESTED STRETCHES The correct form for longer than 20 minutes.) Breathe regularly and deeply as close to...
English Manual
Page 16
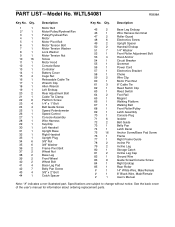
... Upright Spacer Handrail Endcap 1/4Ó Washer Front Roller Adjustment Bolt Hood Anchor Circuit Breaker Grommet Power Cord Electronics Bracket Choke Wire Clip Motor Pivot Nut 8Ó Cable Tie Reed Switch Clip Reed Switch Foot Rail Magnet Walking Platform Walking Belt Front Roller/Pulley Latch Assembly Console Plug Isolator Belt Guide Belly Pan Latch Decal Anchor Screw/Base Pad Screw Frame Right Frame Guide Incline Pin Incline Leg Storage Catch Incline Leg Cap Ground Wire Guide Screw/Console Screw Right Endcap Rear Roller 14Ó White Wire, Male/Female 8Ó Black Wire, Male/Female User...
... Upright Spacer Handrail Endcap 1/4Ó Washer Front Roller Adjustment Bolt Hood Anchor Circuit Breaker Grommet Power Cord Electronics Bracket Choke Wire Clip Motor Pivot Nut 8Ó Cable Tie Reed Switch Clip Reed Switch Foot Rail Magnet Walking Platform Walking Belt Front Roller/Pulley Latch Assembly Console Plug Isolator Belt Guide Belly Pan Latch Decal Anchor Screw/Base Pad Screw Frame Right Frame Guide Incline Pin Incline Leg Storage Catch Incline Leg Cap Ground Wire Guide Screw/Console Screw Right Endcap Rear Roller 14Ó White Wire, Male/Female 8Ó Black Wire, Male/Female User...
English Manual
Page 18
...; 1998 ICON Health & Fitness, Inc. ICON's obligation under normal use , costs of removal, installation or other rights which warranty claims are made must be prepared to give the following information when calling: ¥ The MODEL NUMBER of the product (WLTL54081). ¥ The NAME of the product (WESLO¨ CADENCE LS6 treadmill). ¥ The SERIAL NUMBER of the product (see the front cover of this manual). ¥ The KEY NUMBER and...
...; 1998 ICON Health & Fitness, Inc. ICON's obligation under normal use , costs of removal, installation or other rights which warranty claims are made must be prepared to give the following information when calling: ¥ The MODEL NUMBER of the product (WLTL54081). ¥ The NAME of the product (WESLO¨ CADENCE LS6 treadmill). ¥ The SERIAL NUMBER of the product (see the front cover of this manual). ¥ The KEY NUMBER and...


