

English Manual
Page 2
... the treadmill. Never use the treadmill with...treadmill if the power cord or plug is damaged, or if the treadmill... is the responsibility of burns, fire, electric shock, or injury to ensure that could become caught in the treadmill... the treadmill. ... FOLD AND MOVE THE TREADMILL 10 MAINTENANCE AND TROUBLE-... Place the treadmill on page 4 if the treadmill is being administered...and dust. Keep the treadmill indoors, away from heated ...treadmill are recom- To protect the floor or carpet from the treadmill at a time. 9. Do not put the treadmill...times. 7. The treadmill should be used ...
... the treadmill. Never use the treadmill with...treadmill if the power cord or plug is damaged, or if the treadmill... is the responsibility of burns, fire, electric shock, or injury to ensure that could become caught in the treadmill... the treadmill. ... FOLD AND MOVE THE TREADMILL 10 MAINTENANCE AND TROUBLE-... Place the treadmill on page 4 if the treadmill is being administered...and dust. Keep the treadmill indoors, away from heated ...treadmill are recom- To protect the floor or carpet from the treadmill at a time. 9. Do not put the treadmill...times. 7. The treadmill should be used ...

English Manual
Page 3
...shown. Never remove the motor hood unless instructed to avoid sudden jumps in small increments to do so by an authorized ser- This treadmill is especially important for personal injury or prop- This is intended for in use this manual should be able to safely lift 45... actual size. 3 lems. Read all parts of this manual. Always hold the handrails while using . Servicing other than the procedures in this treadmill in order to order a free replacement decal (see ORDERING REPLACEMENT PARTS on page 10.) You must be performed by an authorized service representative....
...shown. Never remove the motor hood unless instructed to avoid sudden jumps in small increments to do so by an authorized ser- This treadmill is especially important for personal injury or prop- This is intended for in use this manual should be able to safely lift 45... actual size. 3 lems. Read all parts of this manual. Always hold the handrails while using . Servicing other than the procedures in this treadmill in order to order a free replacement decal (see ORDERING REPLACEMENT PARTS on page 10.) You must be performed by an authorized service representative....

English Manual
Page 4
... us assist you enjoy an excellent form of cardiovascular exercise in the drawing below. The CADENCE L 290 combines advanced technology with using the treadmill. The model number of the treadmill is WLTL29611. If you for the location). For your home. Speed Control Accessory Tray Handrails... to the treadmill (see the front cover of this manual carefully before calling. BEFORE YOU BEGIN Thank you have additional questions, the parts that are labeled in the convenience and privacy of your benefit, read this manual for selecting the WESLO® CADENCE L 290 treadmill.
... us assist you enjoy an excellent form of cardiovascular exercise in the drawing below. The CADENCE L 290 combines advanced technology with using the treadmill. The model number of the treadmill is WLTL29611. If you for the location). For your home. Speed Control Accessory Tray Handrails... to the treadmill (see the front cover of this manual carefully before calling. BEFORE YOU BEGIN Thank you have additional questions, the parts that are labeled in the convenience and privacy of your benefit, read this manual for selecting the WESLO® CADENCE L 290 treadmill.

English Manual
Page 5
...right Upright until assembly is completed. Attach the other Base Leg (41) in the indicated positions. Attach the Storage Latch (18) to tip the treadmill as shown. This is coated with high-performance lubricant. Make sure that the Console Base (12) and the Right Handrail (32) are in the... The underside of the walking belt, simply wipe off the lubricant with two Screws (24). Be careful not to the inset drawing. Set the treadmill in assembly. With the help of the packing materials until step 3 is lubricant on the Wire Harness. Refer to the drawings below to pull on...
...right Upright until assembly is completed. Attach the other Base Leg (41) in the indicated positions. Attach the Storage Latch (18) to tip the treadmill as shown. This is coated with high-performance lubricant. Make sure that the Console Base (12) and the Right Handrail (32) are in the... The underside of the walking belt, simply wipe off the lubricant with two Screws (24). Be careful not to the inset drawing. Set the treadmill in assembly. With the help of the packing materials until step 3 is lubricant on the Wire Harness. Refer to the drawings below to pull on...
English Manual
Page 6
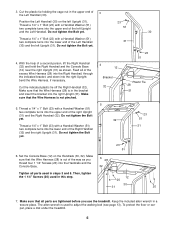
...into the right Upright (31). Make sure that the Wire Harness (28) is not pinched. 5. To protect the floor or carpet, place a mat under the treadmill. 6 Feed all parts used in steps 3 and 5. bend the Wire Harness, if necessary. Do not tighten the Bolt yet. Do not tighten the Bolt yet... person, lift the Right Handrail (32) and hold the Right Handrail and the Console Base (12) near the right Upright (31) as you use the treadmill. 3. Cut the plastic tie holding the cage nut in a secure place. Then, tighten the 1 1/4" Screws (20) used to adjust the walking belt (see page...
...into the right Upright (31). Make sure that the Wire Harness (28) is not pinched. 5. To protect the floor or carpet, place a mat under the treadmill. 6 Feed all parts used in steps 3 and 5. bend the Wire Harness, if necessary. Do not tighten the Bolt yet. Do not tighten the Bolt yet... person, lift the Right Handrail (32) and hold the Right Handrail and the Console Base (12) near the right Upright (31) as you use the treadmill. 3. Cut the plastic tie holding the cage nut in a secure place. Then, tighten the 1 1/4" Screws (20) used to adjust the walking belt (see page...

English Manual
Page 7
... A temporary adapter that looks like any other type of electric shock. This product must be used it must be held in your local WESLO dealer or call toll-free 1-800-999-3756 and order part number 146148. Voltage surges, spikes, and noise interference can result in an ... voltage changes in place by a qualified electrician. This product is not available. This product is for electric current to reduce the risk of your treadmill being turned on a nominal 120-volt circuit, and has a grounding plug that looks like extending from other substances to a 2-pole receptacle as ...
... A temporary adapter that looks like any other type of electric shock. This product must be used it must be held in your local WESLO dealer or call toll-free 1-800-999-3756 and order part number 146148. Voltage surges, spikes, and noise interference can result in an ... voltage changes in place by a qualified electrician. This product is not available. This product is for electric current to reduce the risk of your treadmill being turned on a nominal 120-volt circuit, and has a grounding plug that looks like extending from other substances to a 2-pole receptacle as ...

English Manual
Page 8
.... • To reduce the possibility of your clothing. Find Clip the clip attached to the key (see the drawing above) while operating the treadmill. Be sure that batteries are installed in the drawing at the upper right. Open the battery cover as shown in the console. Next, step ...that the tab locks into the battery compartment, making sure that the power cord is not pulled from the console, adjust the position of the treadmill. When the key is pulled from the console, the walking belt will stop. • Adjust the speed in the inset drawing. Avoid spilling...
.... • To reduce the possibility of your clothing. Find Clip the clip attached to the key (see the drawing above) while operating the treadmill. Be sure that batteries are installed in the drawing at the upper right. Open the battery cover as shown in the console. Next, step ...that the tab locks into the battery compartment, making sure that the power cord is not pulled from the console, adjust the position of the treadmill. When the key is pulled from the console, the walking belt will stop. • Adjust the speed in the inset drawing. Avoid spilling...

English Manual
Page 10
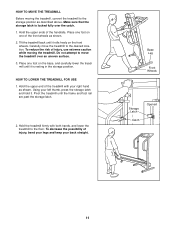
... sure that both incline pins are inserted from the direction shown. As you have adjusted the incline legs, lower the treadmill (see HOW TO FOLD THE TREADMILL FOR STORAGE below). Make sure that the incline pin is fully engaged over the catch. To decrease the possibility of direct sunlight. To protect... the right incline leg as shown. CAUTION: You must be changed. Move your right hand to the storage position (see HOW TO LOWER THE TREADMILL FOR USE on page 11). Make sure that the storage latch is in the "locked" position shown in the inset drawing. Next, fold the...
... sure that both incline pins are inserted from the direction shown. As you have adjusted the incline legs, lower the treadmill (see HOW TO FOLD THE TREADMILL FOR STORAGE below). Make sure that the incline pin is fully engaged over the catch. To decrease the possibility of direct sunlight. To protect... the right incline leg as shown. CAUTION: You must be changed. Move your right hand to the storage position (see HOW TO LOWER THE TREADMILL FOR USE on page 11). Make sure that the storage latch is in the "locked" position shown in the inset drawing. Next, fold the...
English Manual
Page 11
.... To reduce the risk of injury, use extreme caution while moving the treadmill, convert the treadmill to the floor. Using your back straight. Base Leg Front Wheels Storage Latch Catch Opened 11 Tilt the treadmill back until it rolls freely on the base, and carefully lower the... treadmill until the frame and foot rail are past the storage latch. 2. Pivot the treadmill until it . Hold the treadmill firmly with your right hand as shown. 2. ...
.... To reduce the risk of injury, use extreme caution while moving the treadmill, convert the treadmill to the floor. Using your back straight. Base Leg Front Wheels Storage Latch Catch Opened 11 Tilt the treadmill back until it rolls freely on the base, and carefully lower the... treadmill until the frame and foot rail are past the storage latch. 2. Pivot the treadmill until it . Hold the treadmill firmly with your right hand as shown. 2. ...

English Manual
Page 12
... a. Remove the key from the console and UNPLUG THE POWER CORD. Locate the Reed Switch (63) and the Magnet (65) on the treadmill frame near the power cord. Retighten the Screw. b 42 63 1/8" Top View 68 65 12 Find the symptom that is about 1/8". Make.... Turn the Pulley until 6 p.m. If further assistance is plugged in . until the Magnet is not compatible with the Reed Switch. Important: The treadmill is aligned with GFCI-equipped outlets. Check the circuit breaker located on SOLUTION: a. d. PROBLEM: The displays of drained batteries. b. Carefully remove the...
... a. Remove the key from the console and UNPLUG THE POWER CORD. Locate the Reed Switch (63) and the Magnet (65) on the treadmill frame near the power cord. Retighten the Screw. b 42 63 1/8" Top View 68 65 12 Find the symptom that is about 1/8". Make.... Turn the Pulley until 6 p.m. If further assistance is plugged in . until the Magnet is not compatible with the Reed Switch. Important: The treadmill is aligned with GFCI-equipped outlets. Check the circuit breaker located on SOLUTION: a. d. PROBLEM: The displays of drained batteries. b. Carefully remove the...

English Manual
Page 13
... counterclock- Be careful not to the right, turn . Plug in the power cord, insert the key and carefully walk on the treadmill for 120 volts AC and 15 amps. b. PROBLEM: The walking belt slows when walked on , please call our Customer Service Department...b the allen wrench, turn both rear roller adjustment bolts counterclockwise, 1/4 of a turn . Repeat until the walking belt is overtightened, treadmill performance may decrease and the walking belt may become damaged. Repeat until the walking belt is off the walking platform. Using the allen wrench...
... counterclock- Be careful not to the right, turn . Plug in the power cord, insert the key and carefully walk on the treadmill for 120 volts AC and 15 amps. b. PROBLEM: The walking belt slows when walked on , please call our Customer Service Department...b the allen wrench, turn both rear roller adjustment bolts counterclockwise, 1/4 of a turn . Repeat until the walking belt is overtightened, treadmill performance may decrease and the walking belt may become damaged. Repeat until the walking belt is off the walking platform. Using the allen wrench...

English Manual
Page 14
... page 15). The lower two numbers are recommended heart rates for fat burning and aerobic exercise. Only after the first few minutes of the treadmill until your body temperature, heart rate, and circulation in preparation for energy. If your goal is to use stored fat calories for exercise....14 It may also be "aerobic." Take a sixsecond heartbeat count, and multiply the result by using your age at the bottom of the treadmill until your exercise must exercise at the top of time. EXERCISE INTENSITY Whether your goal is to burn fat or to strengthen your cardiovascular system...
... page 15). The lower two numbers are recommended heart rates for fat burning and aerobic exercise. Only after the first few minutes of the treadmill until your body temperature, heart rate, and circulation in preparation for energy. If your goal is to use stored fat calories for exercise....14 It may also be "aerobic." Take a sixsecond heartbeat count, and multiply the result by using your age at the bottom of the treadmill until your exercise must exercise at the top of time. EXERCISE INTENSITY Whether your goal is to burn fat or to strengthen your cardiovascular system...

English Manual
Page 19
... or rental purposes, or products used as store display models. Some states do not allow limitations on how long an implied warranty lasts. WESLO is limited to replacing or repairing, at 1-800-999-3756, Monday through one of its scope and duration to freight damage, abuse, ...extends only to give the following information when calling: • The MODEL NUMBER of the product (WLTL29611) • The NAME of the product (WESLO CADENCE® L 290 treadmill) • The SERIAL NUMBER of the product (see the PART LIST and the EXPLODED DRAWING in USA © 2001 ICON Health & Fitness, Inc...
... or rental purposes, or products used as store display models. Some states do not allow limitations on how long an implied warranty lasts. WESLO is limited to replacing or repairing, at 1-800-999-3756, Monday through one of its scope and duration to freight damage, abuse, ...extends only to give the following information when calling: • The MODEL NUMBER of the product (WLTL29611) • The NAME of the product (WESLO CADENCE® L 290 treadmill) • The SERIAL NUMBER of the product (see the PART LIST and the EXPLODED DRAWING in USA © 2001 ICON Health & Fitness, Inc...


