

English Manual
Page 1
..., or if there are missing or damaged parts, we will provide immediate assistance, free of charge to you. Serial Number Decal QUESTIONS? USER'S MANUAL Visit our website at www.weslo.com new products, prizes, fitness tips, and much more! ® Model No. MST CAUTION Read all precautions and instructions in the space above for future reference. WLTL29611 Serial No. Save this equipment.
..., or if there are missing or damaged parts, we will provide immediate assistance, free of charge to you. Serial Number Decal QUESTIONS? USER'S MANUAL Visit our website at www.weslo.com new products, prizes, fitness tips, and much more! ® Model No. MST CAUTION Read all precautions and instructions in the space above for future reference. WLTL29611 Serial No. Save this equipment.

English Manual
Page 2
... order part number 146148. 12. Do not operate the treadmill if the power cord or plug is damaged, or if the treadmill is not working properly.) 2 TABLE OF CONTENTS IMPORTANT PRECAUTIONS 2 BEFORE YOU BEGIN 4 ASSEMBLY 5 OPERATION AND ADJUSTMENT 7 HOW TO FOLD AND MOVE THE TREADMILL 10 MAINTENANCE AND TROUBLE-SHOOTING 12 CONDITIONING GUIDELINES 14 ORDERING REPLACEMENT PARTS Back Cover LIMITED WARRANTY Back Cover Note: An EXPLODED DRAWING and a PART LIST are adequately informed of...
... order part number 146148. 12. Do not operate the treadmill if the power cord or plug is damaged, or if the treadmill is not working properly.) 2 TABLE OF CONTENTS IMPORTANT PRECAUTIONS 2 BEFORE YOU BEGIN 4 ASSEMBLY 5 OPERATION AND ADJUSTMENT 7 HOW TO FOLD AND MOVE THE TREADMILL 10 MAINTENANCE AND TROUBLE-SHOOTING 12 CONDITIONING GUIDELINES 14 ORDERING REPLACEMENT PARTS Back Cover LIMITED WARRANTY Back Cover Note: An EXPLODED DRAWING and a PART LIST are adequately informed of...

English Manual
Page 3
... so by placing objects under the treadmill. 23. vice representative only. 18. This is capable of the treadmill by an authorized service representative. 14. The treadmill is especially important for personal injury or prop- Never remove the motor hood unless instructed to order a free replacement decal (see ORDERING REPLACEMENT PARTS on the walking belt. lems. Read all parts of actual size. 3 Note: The decal is shown...
... so by placing objects under the treadmill. 23. vice representative only. 18. This is capable of the treadmill by an authorized service representative. 14. The treadmill is especially important for personal injury or prop- Never remove the motor hood unless instructed to order a free replacement decal (see ORDERING REPLACEMENT PARTS on the walking belt. lems. Read all parts of actual size. 3 Note: The decal is shown...

English Manual
Page 4
... treadmills. please call our Customer Service Department toll-free at 1-800-999-3756, Monday through Friday, 6 a.m. For your home. And when you're not exercising, the CADENCE L 290 can be folded up, requiring less than half the floor space of the treadmill is WLTL29611. Speed Control Accessory Tray Handrails Storage Latch Water Bottle Holder (Bottle not included) Console Key/Clip Uprights Walking Belt Foot Rails BACK Rear Roller Adjustment Bolts FRONT Circuit Breaker Power Cord Incline Pin Incline Leg...
... treadmills. please call our Customer Service Department toll-free at 1-800-999-3756, Monday through Friday, 6 a.m. For your home. And when you're not exercising, the CADENCE L 290 can be folded up, requiring less than half the floor space of the treadmill is WLTL29611. Speed Control Accessory Tray Handrails Storage Latch Water Bottle Holder (Bottle not included) Console Key/Clip Uprights Walking Belt Foot Rails BACK Rear Roller Adjustment Bolts FRONT Circuit Breaker Power Cord Incline Pin Incline Leg...

English Manual
Page 5
... the Console Base (12) and the Right Handrail (32) are in assembly. Attach the Base Leg with a soft cloth and a mild, non-abrasive cleaner. 3/8" Nut (34)-4 1/4" x 1" Bolt (23)-4 Screw (24)-2 1 1/4" Screw (20)-4 Handrail Washer (51)-4 3/8" Washer (35)-4 3/8" x 2" Bolt (43)-4 1. Attach the Storage Latch (18) to pull on the Wire Harness. If there is lubricant on the right Upright until assembly is coated with two Screws (24). Set...
... the Console Base (12) and the Right Handrail (32) are in assembly. Attach the Base Leg with a soft cloth and a mild, non-abrasive cleaner. 3/8" Nut (34)-4 1/4" x 1" Bolt (23)-4 Screw (24)-2 1 1/4" Screw (20)-4 Handrail Washer (51)-4 3/8" Washer (35)-4 3/8" x 2" Bolt (43)-4 1. Attach the Storage Latch (18) to pull on the Wire Harness. If there is lubricant on the right Upright until assembly is coated with two Screws (24). Set...
English Manual
Page 6
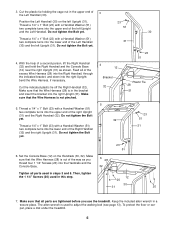
...parts used in steps 3 and 5. Do not tighten the Bolt yet. Do not tighten the Bolt yet. Do not tighten the Bolt yet. 4. Cut the indicated plastic tie off the Right Handrail (32). Make sure that the Wire Harness (28) is used in the bracket and insert the bracket into the lower end of the left Upright (31). Then, tighten the 1 1/4" Screws (20) used to adjust the walking belt...Right Handrail and the Console Base (12) near the right Upright (31) as you use the treadmill. With the help of the right Upright (31) and the Right Handrail (32). Do not tighten the Bolt yet. 3 23 51...
...parts used in steps 3 and 5. Do not tighten the Bolt yet. Do not tighten the Bolt yet. Do not tighten the Bolt yet. 4. Cut the indicated plastic tie off the Right Handrail (32). Make sure that the Wire Harness (28) is used in the bracket and insert the bracket into the lower end of the left Upright (31). Then, tighten the 1 1/4" Screws (20) used to adjust the walking belt...Right Handrail and the Console Base (12) near the right Upright (31) as you use the treadmill. With the help of the right Upright (31) and the Right Handrail (32). Do not tighten the Bolt yet. 3 23 51...

English Manual
Page 7
... AND ADJUSTMENT THE PERFORMANT LUBETM WALKING BELT Your treadmill features a walking belt coated with your local WESLO dealer or call toll-free 1-800-999-3756 and order part number 146148. The green-colored rigid ear, lug, or the like the plug illustrated in drawing 2 if a properly grounded outlet is properly installed and Grounded Outlet Grounding Plug 2 Grounded Outlet Box Adapter Surge Suppressor Lug Metal Screw...
... AND ADJUSTMENT THE PERFORMANT LUBETM WALKING BELT Your treadmill features a walking belt coated with your local WESLO dealer or call toll-free 1-800-999-3756 and order part number 146148. The green-colored rigid ear, lug, or the like the plug illustrated in drawing 2 if a properly grounded outlet is properly installed and Grounded Outlet Grounding Plug 2 Grounded Outlet Box Adapter Surge Suppressor Lug Metal Screw...

English Manual
Page 8
... on the walking belt when turning on the battery cover tab, and then push the tab forward as shown in the battery compartment. Find Clip the clip attached to the key (see the drawing above the speed control are recommended. Test the clip by carefully taking a few steps backward until the key is removed from the console. See page 14 or more information. • To...
... on the walking belt when turning on the battery cover tab, and then push the tab forward as shown in the battery compartment. Find Clip the clip attached to the key (see the drawing above the speed control are recommended. Test the clip by carefully taking a few steps backward until the key is removed from the console. See page 14 or more information. • To...

English Manual
Page 9
... into the power switch. tors. To stop the walking belt and remove the key. If you are finished exercising, stop the walking belt, step onto the foot rails and move the speed control to the RESET position. 3 Follow your progress with the two displays. Move the speed control to the RESET position, and remove the key from the console. Carefully step onto the walking belt and begin exercising. Note: Any time that you Mode Indicator have walked or Mode Indicator run...
... into the power switch. tors. To stop the walking belt and remove the key. If you are finished exercising, stop the walking belt, step onto the foot rails and move the speed control to the RESET position. 3 Follow your progress with the two displays. Move the speed control to the RESET position, and remove the key from the console. Carefully step onto the walking belt and begin exercising. Note: Any time that you Mode Indicator have walked or Mode Indicator run...

English Manual
Page 10
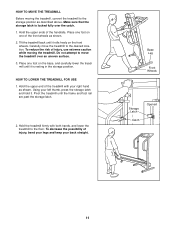
... right. As you have adjusted the incline legs, lower the treadmill (see HOW TO FOLD THE TREADMILL FOR STORAGE below). Raise the treadmill until the storage latch closes over the catch. Do not leave the treadmill in the storage position in the same manner. Right Incline Leg Incline Pin HOW TO FOLD AND MOVE THE TREADMILL HOW TO FOLD THE TREADMILL FOR STORAGE Before folding the treadmill, unplug the power cord. Keep the treadmill out of injury, bend...
... right. As you have adjusted the incline legs, lower the treadmill (see HOW TO FOLD THE TREADMILL FOR STORAGE below). Raise the treadmill until the storage latch closes over the catch. Do not leave the treadmill in the storage position in the same manner. Right Incline Leg Incline Pin HOW TO FOLD AND MOVE THE TREADMILL HOW TO FOLD THE TREADMILL FOR STORAGE Before folding the treadmill, unplug the power cord. Keep the treadmill out of injury, bend...
English Manual
Page 11
... desired location. HOW TO LOWER THE TREADMILL FOR USE 1. Carefully move the treadmill over the catch. 1. Hold the treadmill firmly with your right hand as shown. Base Leg Front Wheels Storage Latch Catch Opened 11 Tilt the treadmill back until it is locked fully over an uneven surface. 3. Hold the upper end of injury, bend your legs and keep your left thumb, press the storage latch...
... desired location. HOW TO LOWER THE TREADMILL FOR USE 1. Carefully move the treadmill over the catch. 1. Hold the treadmill firmly with your right hand as shown. Base Leg Front Wheels Storage Latch Catch Opened 11 Tilt the treadmill back until it is locked fully over an uneven surface. 3. Hold the upper end of injury, bend your legs and keep your left thumb, press the storage latch...

English Manual
Page 12
... and the Reed Switch is fully inserted into the console. c Tripped Tripped Reset Reset PROBLEM: The power turns off during use SOLUTION: a. Reinsert the key fully into the console. If the batteries need to check for a correct speed reading. b. Remove the screws from the console and UNPLUG THE POWER CORD. c. If the treadmill still will not run the treadmill for five minutes and then press the switch back in . Re-attach the hood, and run...
... and the Reed Switch is fully inserted into the console. c Tripped Tripped Reset Reset PROBLEM: The power turns off during use SOLUTION: a. Reinsert the key fully into the console. If the batteries need to check for a correct speed reading. b. Remove the screws from the console and UNPLUG THE POWER CORD. c. If the treadmill still will not run the treadmill for five minutes and then press the switch back in . Re-attach the hood, and run...

English Manual
Page 13
... rated for a few minutes. Be careful to 3 inches off the walking platform. Plug in the power cord, insert the key and run the treadmill for a few minutes. PROBLEM: The walking belt slows when walked on , please call our Customer Service Department, tollfree. Using the allen wrench, turn both rear roller bolts clockwise, 1/4 of 450 joules. If the walking belt has shifted to overtighten the walking belt. When the walking belt is off the walking...
... rated for a few minutes. Be careful to 3 inches off the walking platform. Plug in the power cord, insert the key and run the treadmill for a few minutes. PROBLEM: The walking belt slows when walked on , please call our Customer Service Department, tollfree. Using the allen wrench, turn both rear roller bolts clockwise, 1/4 of 450 joules. If the walking belt has shifted to overtighten the walking belt. When the walking belt is off the walking...

English Manual
Page 14
... age. If your goal is near the highest number in your "training zone." For aerobic exercise, adjust the speed and incline of the treadmill until your heart rate is near the low end of the treadmill until your heart rate is to set the speed control on your exercise program. It may also be helpful to set the speed control on the console to AEROBIC to help you maintain the proper...
... age. If your goal is near the highest number in your "training zone." For aerobic exercise, adjust the speed and incline of the treadmill until your heart rate is near the low end of the treadmill until your heart rate is to set the speed control on your exercise program. It may also be helpful to set the speed control on the console to AEROBIC to help you maintain the proper...
English Manual
Page 15
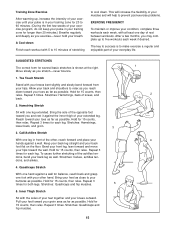
.... Move slowly as possible. Stretches: Quadriceps and hip muscles. 15 1 2 4 Repeat 3 times for 15 counts, then relax. SUGGESTED STRETCHES The correct form for balance, reach back and grasp one day of rest between workouts. Stretches: Hamstrings, lower back, and groin. 3 3. Stretches: Quadriceps and hip muscles. 5 5. Training Zone Exercise After warming up to make exercise a regular and enjoyable part...
.... Move slowly as possible. Stretches: Quadriceps and hip muscles. 15 1 2 4 Repeat 3 times for 15 counts, then relax. SUGGESTED STRETCHES The correct form for balance, reach back and grasp one day of rest between workouts. Stretches: Hamstrings, lower back, and groin. 3 3. Stretches: Quadriceps and hip muscles. 5 5. Training Zone Exercise After warming up to make exercise a regular and enjoyable part...

English Manual
Page 16
For information about ordering replacement parts, see the back cover of the User's Manual. 34 REMOVE THIS EXPLODED DRAWING AND PART LIST FROM THE MANUAL Save this EXPLODED DRAWING and PART LIST for future reference. Note: Specifications are subject to change without notice.
For information about ordering replacement parts, see the back cover of the User's Manual. 34 REMOVE THIS EXPLODED DRAWING AND PART LIST FROM THE MANUAL Save this EXPLODED DRAWING and PART LIST for future reference. Note: Specifications are subject to change without notice.

English Manual
Page 17
... Latch Rear Endcap (Right) 1 1/4" Screw Cable Tie Clamp Latch Decal 1/4" x 1" Bolt Belt Guide Screw Speed Potentiometer Speed Control Console Assembly Wire Harness Key/Clip Left Handrail Upright Right Handrail Upright Plug 3/8" Nut 3/8" Washer Frame Pivot Bolt Base Leg Assembly Base Leg Front Wheel Wheel Bolt Base Leg Pad Anchor Screw/Base Leg Screw 3/8" x 2" Bolt Isolator Screw Base Leg Endcap Wire Harness Grommet Roller Guard Frame Guide Screw Key No. Washer/Handrail Washer Front Roller Adjustment Bolt Hood Anchor Circuit Breaker Grommet Power Cord Electronics Bracket Choke Wire Clip Motor...
... Latch Rear Endcap (Right) 1 1/4" Screw Cable Tie Clamp Latch Decal 1/4" x 1" Bolt Belt Guide Screw Speed Potentiometer Speed Control Console Assembly Wire Harness Key/Clip Left Handrail Upright Right Handrail Upright Plug 3/8" Nut 3/8" Washer Frame Pivot Bolt Base Leg Assembly Base Leg Front Wheel Wheel Bolt Base Leg Pad Anchor Screw/Base Leg Screw 3/8" x 2" Bolt Isolator Screw Base Leg Endcap Wire Harness Grommet Roller Guard Frame Guide Screw Key No. Washer/Handrail Washer Front Roller Adjustment Bolt Hood Anchor Circuit Breaker Grommet Power Cord Electronics Bracket Choke Wire Clip Motor...

English Manual
Page 18
6 7 9 10 8 1 75 5 10 11 16 61 42 21 64 17 3 2* 4 63 65 50 60 71 62 53 74 17 71 44 66 50 44 67 87 47 75 86 51 83 42 85 79 80 81 51 83 69 75 47 19 42 75 82 76 78 79 80 81 68 60 70 77 48 44 17 13 59 88 88 58 75 71 53 55 56 54 71 53 57 30 15 18 52 51 73 44 72 24 22 53 17 43 71 49 23 51 71 35 41 37* 45 38 71 40 39 41 89 34 71 10 20 24 12 42 14 42 51 23 42 28 46 29 36 32 35 71 33 34 34 88 49 51 23 28 46 34 34 89 39 40 26 25 27* 42 20 23 51 31 35 36 34 37* 45 38 41 71 35 41 43 71 R0901A EXPLODED DRAWING-Model No. WLTL29611
6 7 9 10 8 1 75 5 10 11 16 61 42 21 64 17 3 2* 4 63 65 50 60 71 62 53 74 17 71 44 66 50 44 67 87 47 75 86 51 83 42 85 79 80 81 51 83 69 75 47 19 42 75 82 76 78 79 80 81 68 60 70 77 48 44 17 13 59 88 88 58 75 71 53 55 56 54 71 53 57 30 15 18 52 51 73 44 72 24 22 53 17 43 71 49 23 51 71 35 41 37* 45 38 71 40 39 41 89 34 71 10 20 24 12 42 14 42 51 23 42 28 46 29 36 32 35 71 33 34 34 88 49 51 23 28 46 34 34 89 39 40 26 25 27* 42 20 23 51 31 35 36 34 37* 45 38 41 71 35 41 43 71 R0901A EXPLODED DRAWING-Model No. WLTL29611

English Manual
Page 19
... information when calling: • The MODEL NUMBER of the product (WLTL29611) • The NAME of the product (WESLO CADENCE® L 290 treadmill) • The SERIAL NUMBER of the product (see the front cover of this manual) • The KEY NUMBER and DESCRIPTION of the desired part(s) (see the PART LIST and the EXPLODED DRAWING in lieu of any and all other warranty beyond that specifically set forth herein. This warranty...
... information when calling: • The MODEL NUMBER of the product (WLTL29611) • The NAME of the product (WESLO CADENCE® L 290 treadmill) • The SERIAL NUMBER of the product (see the front cover of this manual) • The KEY NUMBER and DESCRIPTION of the desired part(s) (see the PART LIST and the EXPLODED DRAWING in lieu of any and all other warranty beyond that specifically set forth herein. This warranty...


