
User Manual
Page 2
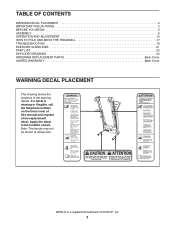
... WARNING DECAL PLACEMENT 2 IMPORTANT PRECAUTIONS 3 BEFORE YOU BEGIN 5 ASSEMBLY 6 OPERATION AND ADJUSTMENT 12 HOW TO FOLD AND MOVE THE TREADMILL 17 TROUBLESHOOTING 19 EXERCISE GUIDELINES 21 PART LIST 22 EXPLODED DRAWING 24 ORDERING REPLACEMENT PARTS Back Cover LIMITED WARRANTY Back Cover WARNING DECAL ...PLACEMENT This drawing shows the locations of ICON IP, Inc. 2 WESLO is missing or illegible, call the telephone number on the front cover of this manual and request a free replacement decal. Note:...
... WARNING DECAL PLACEMENT 2 IMPORTANT PRECAUTIONS 3 BEFORE YOU BEGIN 5 ASSEMBLY 6 OPERATION AND ADJUSTMENT 12 HOW TO FOLD AND MOVE THE TREADMILL 17 TROUBLESHOOTING 19 EXERCISE GUIDELINES 21 PART LIST 22 EXPLODED DRAWING 24 ORDERING REPLACEMENT PARTS Back Cover LIMITED WARRANTY Back Cover WARNING DECAL ...PLACEMENT This drawing shows the locations of ICON IP, Inc. 2 WESLO is missing or illegible, call the telephone number on the front cover of this manual and request a free replacement decal. Note:...
User Manual
Page 3
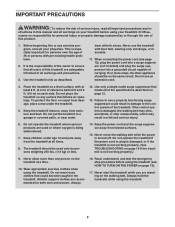
... manual and all times. 8. When connecting the power cord (see HOW TO TURN ON THE POWER on the treadmill at all warnings on your treadmill before using your physician. Place the treadmill on a level surface, with pre-existing health problems. 2. Keep the power cord and the surge suppressor away... and dust. Never move the walking belt while the power is damaged, the walking belt may slow, accelerate, or stop procedure before using the treadmill (see page 12), plug the power cord into a surge suppressor (not included) and plug the surge suppressor into a grounded circuit capable of...
... manual and all times. 8. When connecting the power cord (see HOW TO TURN ON THE POWER on the treadmill at all warnings on your treadmill before using your physician. Place the treadmill on a level surface, with pre-existing health problems. 2. Keep the power cord and the surge suppressor away... and dust. Never move the walking belt while the power is damaged, the walking belt may slow, accelerate, or stop procedure before using the treadmill (see page 12), plug the power cord into a surge suppressor (not included) and plug the surge suppressor into a grounded circuit capable of...

User Manual
Page 4
.... DANGER: 26. scribed in general. 20. Do not change the incline of the reset/off circuit breaker to raise, lower, or move the treadmill until it is capable of high speeds. SAVE THESE INSTRUCTIONS 4 18. The pulse sensors are not medical devices. Always remove the key, unplug the... insert or drop any object into any commercial, rental, or institutional setting. 22. Servicing other than the procedures in this manual. Never leave the treadmill unattended while it is not in use. (See the drawing on page 5 for in any opening on page 17.) You must be performed by placing...
.... DANGER: 26. scribed in general. 20. Do not change the incline of the reset/off circuit breaker to raise, lower, or move the treadmill until it is capable of high speeds. SAVE THESE INSTRUCTIONS 4 18. The pulse sensors are not medical devices. Always remove the key, unplug the... insert or drop any object into any commercial, rental, or institutional setting. 22. Servicing other than the procedures in this manual. Never leave the treadmill unattended while it is not in use. (See the drawing on page 5 for in any opening on page 17.) You must be performed by placing...
User Manual
Page 5
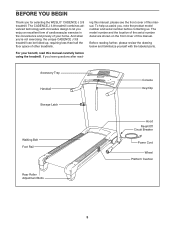
... the front cover of this manual. And when youʼre not exercising, the unique CADENCE J 3.8 treadmill can be folded up, requiring less than half the floor space of your benefit, read - If you for selecting the WESLO® CADENCE J 3.8 treadmill. Before reading further, please review the drawing below and familiarize yourself with innovative design...
... the front cover of this manual. And when youʼre not exercising, the unique CADENCE J 3.8 treadmill can be folded up, requiring less than half the floor space of your benefit, read - If you for selecting the WESLO® CADENCE J 3.8 treadmill. Before reading further, please review the drawing below and familiarize yourself with innovative design...
User Manual
Page 6
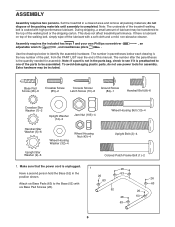
... Wheel Housing Nut (43)-4 Wheel Housing Bolt (13)-4 Upright Bolt (2)-4 Colored Patch Frame Bolt (1)-2 1. Note: The underside of the parts to one of the treadmill walking belt is completed. During shipping, a small amount of lubricant may be transferred to the Base (52) with a soft cloth and a mild, non-abrasive ... wipe off the lubricant with six Base Pad Screws (26). 1 26 63 26 63 52 26 63 26 63 26 63 6 Set the treadmill in the position shown. Attach six Base Pads (63) to the top of the packing materials until assembly is coated with high-performance lubricant.
... Wheel Housing Nut (43)-4 Wheel Housing Bolt (13)-4 Upright Bolt (2)-4 Colored Patch Frame Bolt (1)-2 1. Note: The underside of the parts to one of the treadmill walking belt is completed. During shipping, a small amount of lubricant may be transferred to the Base (52) with a soft cloth and a mild, non-abrasive ... wipe off the lubricant with six Base Pad Screws (26). 1 26 63 26 63 52 26 63 26 63 26 63 6 Set the treadmill in the position shown. Attach six Base Pads (63) to the top of the packing materials until assembly is coated with high-performance lubricant.
User Manual
Page 7
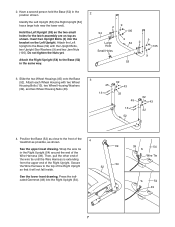
... so that it will not fall inside. 39 54 52 See the lower inset drawing. Attach the Right Upright (54) to the top of the treadmill as possible, as shown. Attach each Wheel Housing with the Upright Bolts, two Upright Star Washers (9) and two Jam Nuts (105). 2. Insert two Upright Bolts...
... so that it will not fall inside. 39 54 52 See the lower inset drawing. Attach the Right Upright (54) to the top of the treadmill as possible, as shown. Attach each Wheel Housing with the Upright Bolts, two Upright Star Washers (9) and two Jam Nuts (105). 2. Insert two Upright Bolts...

User Manual
Page 10
... the Left Upright (53) with a 10 Ground Screw (84). 52 5 8 5 53 8 Ground Wire Hole 39 84 11. See the lower drawing. Make sure that the treadmill Frame (51) is shown).
... the Left Upright (53) with a 10 Ground Screw (84). 52 5 8 5 53 8 Ground Wire Hole 39 84 11. See the lower drawing. Make sure that the treadmill Frame (51) is shown).
User Manual
Page 11
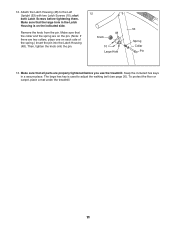
... pin. Make sure that all parts are two collars, place one on the indicated side. To protect the floor or carpet, place a mat under the treadmill. 11 Make sure that the collar and the spring are on the pin. (Note: If there are properly tightened before tightening them. The large hex...
... pin. Make sure that all parts are two collars, place one on the indicated side. To protect the floor or carpet, place a mat under the treadmill. 11 Make sure that the collar and the spring are on the pin. (Note: If there are properly tightened before tightening them. The large hex...
User Manual
Page 12
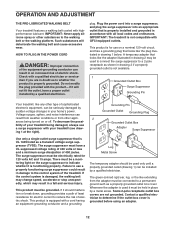
... the walking belt and cause excessive wear. This product is not available. 1 Grounded Outlet Box Surge Suppressor Grounding Pin Your treadmill, like extending from other substances to determine if the outlet box cover is properly grounded. The surge suppressor must be seriously ... the plug illustrated in accordance with highperformance lubricant. To decrease the possi- OPERATION AND ADJUSTMENT THE PRE-LUBRICATED WALKING BELT Your treadmill features a walking belt coated with all local codes and ordinances. Such substances will not fit the outlet, have a UL ...
... the walking belt and cause excessive wear. This product is not available. 1 Grounded Outlet Box Surge Suppressor Grounding Pin Your treadmill, like extending from other substances to determine if the outlet box cover is properly grounded. The surge suppressor must be seriously ... the plug illustrated in accordance with highperformance lubricant. To decrease the possi- OPERATION AND ADJUSTMENT THE PRE-LUBRICATED WALKING BELT Your treadmill features a walking belt coated with all local codes and ordinances. Such substances will not fit the outlet, have a UL ...
User Manual
Page 13
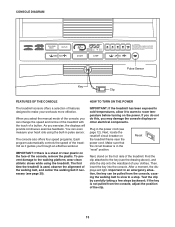
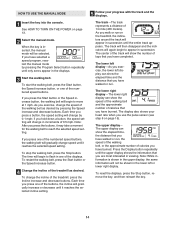
...sheet of clear plastic on the power. if the key is used, observe the alignment of the treadmill. Important: In an emergency situation, the key can change the speed and incline of the treadmill with the touch of a button. You can even measure your workouts more effective. The first .... CONSOLE DIAGRAM Pulse Sensor Key Clip FEATURES OF THE CONSOLE HOW TO TURN ON THE POWER The treadmill console offers a selection of features designed to make your heart rate using the treadmill. Next, locate the reset/off circuit breaker on the foot rails of the walking belt, and ...
...sheet of clear plastic on the power. if the key is used, observe the alignment of the treadmill. Important: In an emergency situation, the key can change the speed and incline of the treadmill with the touch of a button. You can even measure your workouts more effective. The first .... CONSOLE DIAGRAM Pulse Sensor Key Clip FEATURES OF THE CONSOLE HOW TO TURN ON THE POWER The treadmill console offers a selection of features designed to make your heart rate using the treadmill. Next, locate the reset/off circuit breaker on the foot rails of the walking belt, and ...
User Manual
Page 14
... change speed until the entire track appears. The upper display can show the speed of the walking belt and the approximate number of the treadmill as desired by 0.1 mph; When the key is shown in viewing. If you have burned. The time will gradually change in the ...displays. 3 Start the walking belt. The track-The track represents a distance of the treadmill, press the Incline increase and decrease buttons. The upper display- The lower left display-As you press one of the numbered speed buttons, the...
... change speed until the entire track appears. The upper display can show the speed of the walking belt and the approximate number of the treadmill as desired by 0.1 mph; When the key is shown in viewing. If you have burned. The time will gradually change in the ...displays. 3 Start the walking belt. The track-The track represents a distance of the treadmill, press the Incline increase and decrease buttons. The upper display- The lower left display-As you press one of the numbered speed buttons, the...
User Manual
Page 15
... kilometers will be restricted and your thumb will appear in either miles or kilometers. Press the Speed increase button to change the unit of the treadmill to the "off circuit breaker to the lowest setting. Measure your heart rate. Remember to be shown. The incline must be detected. When ...you may damage the treadmill. When your pulse is selected, remove the key and then reinsert it in your pulse may wear prematurely. 15 When you do not do this...
... kilometers will be restricted and your thumb will appear in either miles or kilometers. Press the Speed increase button to change the unit of the treadmill to the "off circuit breaker to the lowest setting. Measure your heart rate. Remember to be shown. The incline must be detected. When ...you may damage the treadmill. When your pulse is selected, remove the key and then reinsert it in your pulse may wear prematurely. 15 When you do not do this...

User Manual
Page 16
The maximum speed setting of the treadmill as desired. If the speed setting is too high or too low during the programs. 3 Press the Start button or the Speed increase button to ... change if a different speed setting is programmed for a few seconds to show how the speed of the displays to alert you press either button, the treadmill will change if a different speed setting is programmed for the next period. Note: The same speed setting may be programmed for the next period. The...
The maximum speed setting of the treadmill as desired. If the speed setting is too high or too low during the programs. 3 Press the Start button or the Speed increase button to ... change if a different speed setting is programmed for a few seconds to show how the speed of the displays to alert you press either button, the treadmill will change if a different speed setting is programmed for the next period. Note: The same speed setting may be programmed for the next period. The...
User Manual
Page 17
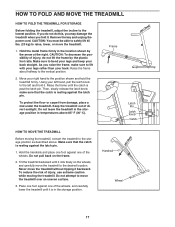
... bend your legs and keep your back straight. make sure to the position shown and hold it rolls freely on the frame. 2. Never move the treadmill without tipping it is resting against one of the wheels. Remove the key and unplug the power cord. CAUTION: To decrease the possibility of injury... rails. Make sure that the catch is past the latch pin. Handrail Wheel 17 Raise the frame about halfway to the left and hold the treadmill firmly. As you do not do not lift the frame by the arrow at the right. Place one foot against the latch pin. Hold the...
... bend your legs and keep your back straight. make sure to the position shown and hold it rolls freely on the frame. 2. Never move the treadmill without tipping it is resting against one of the wheels. Remove the key and unplug the power cord. CAUTION: To decrease the possibility of injury... rails. Make sure that the catch is past the latch pin. Handrail Wheel 17 Raise the frame about halfway to the left and hold the treadmill firmly. As you do not do not lift the frame by the arrow at the right. Place one foot against the latch pin. Hold the...
User Manual
Page 18
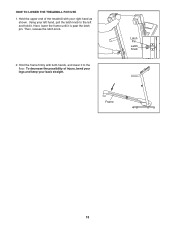
HOW TO LOWER THE TREADMILL FOR USE 1. Hold the frame firmly with your right hand as shown. Next, lower the frame until it . To decrease the possibility of the treadmill with both hands, and lower it to the left and hold it is past the latch pin. Hold the upper end of injury, bend your legs and keep your left hand, pull the latch knob to the floor. Using your back straight. Latch Pin Latch Knob Frame 18 Then, release the latch knob. 2.
HOW TO LOWER THE TREADMILL FOR USE 1. Hold the frame firmly with your right hand as shown. Next, lower the frame until it . To decrease the possibility of the treadmill with both hands, and lower it to the left and hold it is past the latch pin. Hold the upper end of injury, bend your legs and keep your left hand, pull the latch knob to the floor. Using your back straight. Latch Pin Latch Knob Frame 18 Then, release the latch knob. 2.
User Manual
Page 19
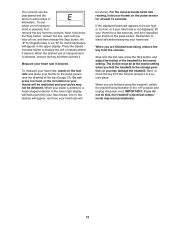
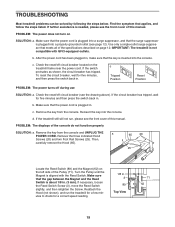
...see page 12). c. Remove the key from the console and UNPLUG THE a POWER CORD. Make sure that applies, and follow the steps listed. IMPORTANT: The treadmill is about 1/8 in . 3 89 Top View 71 62 19 To reset the circuit breaker, wait for a correct speed reading. 1/8 in . (3 mm)....with GFCI-equipped outlets. If the circuit breaker has tripped, wait for five minutes and then press the switch back in . TROUBLESHOOTING Most treadmill problems can be solved by following the steps below. If necessary, loosen the Reed Switch Screw (3), move the Reed Switch slightly, and ...
...see page 12). c. Remove the key from the console and UNPLUG THE a POWER CORD. Make sure that applies, and follow the steps listed. IMPORTANT: The treadmill is about 1/8 in . 3 89 Top View 71 62 19 To reset the circuit breaker, wait for a correct speed reading. 1/8 in . (3 mm)....with GFCI-equipped outlets. If the circuit breaker has tripped, wait for five minutes and then press the switch back in . TROUBLESHOOTING Most treadmill problems can be solved by following the steps below. If necessary, loosen the Reed Switch Screw (3), move the Reed Switch slightly, and ...
User Manual
Page 20
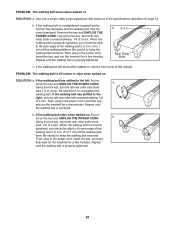
...wise, 1/4 of a turn both rear roller bolts counterclockwise, 1/4 of the walking belt 2 to 3 in the power cord, insert the key, and run the treadmill for a few minutes. form. Repeat until the walking belt is properly tightened, you should be able to lift each edge of a turn . Use only a ...hex key, turn the left rear roller bolt counterclockwise 1/2 of the walking belt 2 to 3 in the power cord, insert the key, and run the treadmill for a few minutes. b. Then, plug in . PROBLEM: The walking belt slows when walked on , first remove the key and UNPLUG THE POWER CORD....
...wise, 1/4 of a turn both rear roller bolts counterclockwise, 1/4 of the walking belt 2 to 3 in the power cord, insert the key, and run the treadmill for a few minutes. form. Repeat until the walking belt is properly tightened, you should be able to lift each edge of a turn . Use only a ...hex key, turn the left rear roller bolt counterclockwise 1/2 of the walking belt 2 to 3 in the power cord, insert the key, and run the treadmill for a few minutes. b. Then, plug in . PROBLEM: The walking belt slows when walked on , first remove the key and UNPLUG THE POWER CORD....


