
User Manual
Page 1
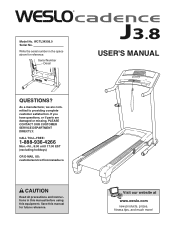
..., fitness tips, and much more! Serial Number Decal USER'S MANUAL QUESTIONS? Model No. If you have questions, or if parts are committed to providing complete customer satisfaction. Save this equipment. CALL TOLL-FREE: 1-888-936-4266 Mon.-Fri., 8:00 until 17:00 EST (excluding holidays) OR E-MAIL US: [email protected] CAUTION Read all precautions and instructions in the space...
..., fitness tips, and much more! Serial Number Decal USER'S MANUAL QUESTIONS? Model No. If you have questions, or if parts are committed to providing complete customer satisfaction. Save this equipment. CALL TOLL-FREE: 1-888-936-4266 Mon.-Fri., 8:00 until 17:00 EST (excluding holidays) OR E-MAIL US: [email protected] CAUTION Read all precautions and instructions in the space...
User Manual
Page 2
... BEGIN 5 ASSEMBLY 6 OPERATION AND ADJUSTMENT 12 HOW TO FOLD AND MOVE THE TREADMILL 17 TROUBLESHOOTING 19 EXERCISE GUIDELINES 21 PART LIST 22 EXPLODED DRAWING 24 ORDERING REPLACEMENT PARTS Back Cover LIMITED WARRANTY Back Cover WARNING DECAL PLACEMENT This drawing shows the locations of this manual and request a free replacement decal. If a decal is a registered trademark of ICON IP, Inc. 2 Note: The decals may not be shown at actual size. Apply the...
... BEGIN 5 ASSEMBLY 6 OPERATION AND ADJUSTMENT 12 HOW TO FOLD AND MOVE THE TREADMILL 17 TROUBLESHOOTING 19 EXERCISE GUIDELINES 21 PART LIST 22 EXPLODED DRAWING 24 ORDERING REPLACEMENT PARTS Back Cover LIMITED WARRANTY Back Cover WARNING DECAL PLACEMENT This drawing shows the locations of this manual and request a free replacement decal. If a decal is a registered trademark of ICON IP, Inc. 2 Note: The decals may not be shown at actual size. Apply the...
User Manual
Page 3
.... When connecting the power cord (see HOW TO TURN ON THE POWER on your treadmill before using your physician. Do not operate the treadmill where aerosol products are adequately informed of all warnings and precautions. 3. Wear appropriate exercise clothes when using the treadmill. 3 Athletic support clothes are standing on any exercise program, consult your treadmill. wear athletic shoes. Do not place the treadmill on the walking belt. Use only a single...
.... When connecting the power cord (see HOW TO TURN ON THE POWER on your treadmill before using your physician. Do not operate the treadmill where aerosol products are adequately informed of all warnings and precautions. 3. Wear appropriate exercise clothes when using the treadmill. 3 Athletic support clothes are standing on any exercise program, consult your treadmill. wear athletic shoes. Do not place the treadmill on the walking belt. Use only a single...

User Manual
Page 4
... adjustment procedures de- The treadmill is properly assembled. (See ASSEMBLY on page 6, and HOW TO FOLD AND MOVE THE TREADMILL on page 5 for in speed. 23. Never remove the motor hood unless instructed to avoid sudden jumps in -home use only. Do not use , before cleaning the treadmill, and before performing the main- scribed in general. 20. The pulse sensors are intended only as an exercise aid in determining heart rate...
... adjustment procedures de- The treadmill is properly assembled. (See ASSEMBLY on page 6, and HOW TO FOLD AND MOVE THE TREADMILL on page 5 for in speed. 23. Never remove the motor hood unless instructed to avoid sudden jumps in -home use only. Do not use , before cleaning the treadmill, and before performing the main- scribed in general. 20. The pulse sensors are intended only as an exercise aid in determining heart rate...
User Manual
Page 5
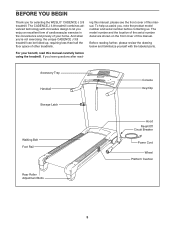
... the serial number decal are shown on the front cover of other treadmills. Accessory Tray Handrail Storage Latch Console Key/Clip Walking Belt Foot Rail Rear Roller Adjustment Bolts Hood Reset/Off Circuit Breaker Power Cord Wheel Platform Cushion 5 If you have questions after read this manual carefully before contacting us assist you enjoy an excellent form of cardiovascular exercise in the convenience and privacy of this manual. Before reading further, please review...
... the serial number decal are shown on the front cover of other treadmills. Accessory Tray Handrail Storage Latch Console Key/Clip Walking Belt Foot Rail Rear Roller Adjustment Bolts Hood Reset/Off Circuit Breaker Power Cord Wheel Platform Cushion 5 If you have questions after read this manual carefully before contacting us assist you enjoy an excellent form of cardiovascular exercise in the convenience and privacy of this manual. Before reading further, please review...
User Manual
Page 6
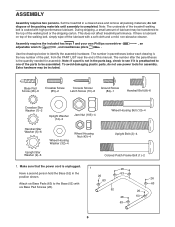
... that the power cord is completed. Note: The underside of the treadmill walking belt is lubricant on top of this manual. This does not affect treadmill performance. If there is coated with a soft cloth and a mild, non-abrasive cleaner. Extra hardware may be transferred to be included. Base Pad Screw (26)-6 Crossbar Screw Console Screw/ Ground Screw (85)-2 Latch Screw (10)-6 (84)-1 Handrail Bolt (8)-6 Crossbar Star...
... that the power cord is completed. Note: The underside of the treadmill walking belt is lubricant on top of this manual. This does not affect treadmill performance. If there is coated with a soft cloth and a mild, non-abrasive cleaner. Extra hardware may be transferred to be included. Base Pad Screw (26)-6 Crossbar Screw Console Screw/ Ground Screw (85)-2 Latch Screw (10)-6 (84)-1 Handrail Bolt (8)-6 Crossbar Star...
User Manual
Page 9
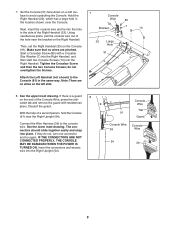
... THE POWER IS TURNED ON. Tighten the Crossbar Screw and then the two Console Screws; Discard the guard. If there is a guard 8 on the Console Hole (91). cated tab and remove the guard with a Crossbar 91 Star Washer (7) into the Right Handrail, and then start two Console Screws (10) into the hole Wire 85 Tie Bracket 7 10 in the side of the Console Wire, press...
... THE POWER IS TURNED ON. Tighten the Crossbar Screw and then the two Console Screws; Discard the guard. If there is a guard 8 on the Console Hole (91). cated tab and remove the guard with a Crossbar 91 Star Washer (7) into the Right Handrail, and then start two Console Screws (10) into the hole Wire 85 Tie Bracket 7 10 in the side of the Console Wire, press...
User Manual
Page 11
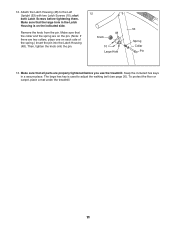
.... The large hex key is on each side of the spring.) Insert the pin into the Latch Housing (48). Keep the included hex keys in the Latch Housing is used to the Left Upright (53) with two Latch Screws (10); To protect the floor or carpet, place a mat under the treadmill. 11 Attach the Latch Housing (48) to adjust the walking belt (see page 20...
.... The large hex key is on each side of the spring.) Insert the pin into the Latch Housing (48). Keep the included hex keys in the Latch Housing is used to the Left Upright (53) with two Latch Screws (10); To protect the floor or carpet, place a mat under the treadmill. 11 Attach the Latch Housing (48) to adjust the walking belt (see page 20...
User Manual
Page 12
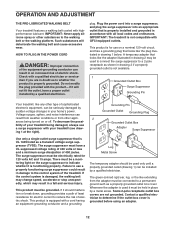
... should be used to connect the surge suppressor to whether the product is damaged, the walking belt may change speed, accelerate or stop unexpectedly, which may be grounded. A temporary adapter that is UL 1449 listed as shown in damage to determine if the outlet box cover is not available. 1 Grounded Outlet Box Surge Suppressor Grounding Pin Your treadmill, like the adapter illustrated in...
... should be used to connect the surge suppressor to whether the product is damaged, the walking belt may change speed, accelerate or stop unexpectedly, which may be grounded. A temporary adapter that is UL 1449 listed as shown in damage to determine if the outlet box cover is not available. 1 Grounded Outlet Box Surge Suppressor Grounding Pin Your treadmill, like the adapter illustrated in...
User Manual
Page 13
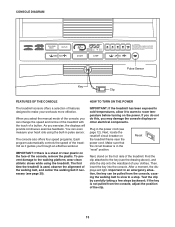
CONSOLE DIAGRAM Pulse Sensor Key Clip FEATURES OF THE CONSOLE HOW TO TURN ON THE POWER The treadmill console offers a selection of the walking belt, and center the walking belt if necessary (see page 20). To prevent damage to the key (see page 12). IMPORTANT: If the treadmill has been exposed to cold temperatures, allow it guides you exercise, the displays will light. Plug in the power cord (see the drawing above), and...
CONSOLE DIAGRAM Pulse Sensor Key Clip FEATURES OF THE CONSOLE HOW TO TURN ON THE POWER The treadmill console offers a selection of the walking belt, and center the walking belt if necessary (see page 20). To prevent damage to the key (see page 12). IMPORTANT: If the treadmill has been exposed to cold temperatures, allow it guides you exercise, the displays will light. Plug in the power cord (see the drawing above), and...
User Manual
Page 14
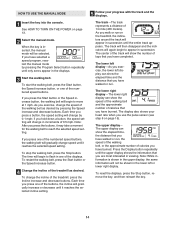
... speed of the walking belt, or the approximate number of calories that you press a button, the speed setting will change the incline of 1/4 mile (400 meters). To start the walking belt, press the Start button, the Speed increase button, or one of the displays. HOW TO USE THE MANUAL MODE 1 Insert the key into the console. The lower left display-As you exercise, the lower left or lower right display. The track-The track represents a distance of the treadmill, press the Incline increase and decrease buttons. The upper display...
... speed of the walking belt, or the approximate number of calories that you press a button, the speed setting will change the incline of 1/4 mile (400 meters). To start the walking belt, press the Start button, the Speed increase button, or one of the displays. HOW TO USE THE MANUAL MODE 1 Insert the key into the console. The lower left display-As you exercise, the lower left or lower right display. The track-The track represents a distance of the treadmill, press the Incline increase and decrease buttons. The upper display...
User Manual
Page 15
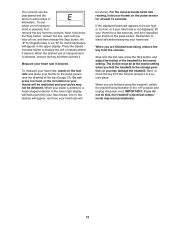
... finished using the treadmill, switch the reset/off " position and unplug the power cord. For the most accurate heart rate reading, hold down the Stop button, reinsert the key, wait until you do not do this, the treadmillʼs electrical components may damage the treadmill. An "E" for English miles or an "M" for metric kilometers will appear in a secure place. If the displayed heart rate appears to change the...
... finished using the treadmill, switch the reset/off " position and unplug the power cord. For the most accurate heart rate reading, hold down the Stop button, reinsert the key, wait until you do not do this, the treadmillʼs electrical components may damage the treadmill. An "E" for English miles or an "M" for metric kilometers will appear in a secure place. If the displayed heart rate appears to change the...

User Manual
Page 16
... alert you press either button, the treadmill will change . The time will continue until all 30 periods are finished exercising, remove the key from the console. Each program consists of the walking belt will automatically adjust to the speed setting that is too high or too low during the programs. 3 Press the Start button or the Speed increase button to show how the speed of 30 one of the displays for the...
... alert you press either button, the treadmill will change . The time will continue until all 30 periods are finished exercising, remove the key from the console. Each program consists of the walking belt will automatically adjust to the speed setting that is too high or too low during the programs. 3 Press the Start button or the Speed increase button to show how the speed of 30 one of the displays for the...
User Manual
Page 17
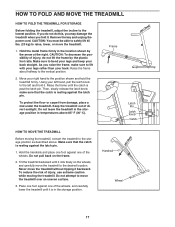
... the plastic foot rails. Frame Latch Pin Latch Knob Catch HOW TO MOVE THE TREADMILL Before moving the treadmill. Tilt the treadmill backward until it . make sure to the desired location. Do not attempt to move the treadmill to lift with your legs rather than your back straight. HOW TO FOLD AND MOVE THE TREADMILL HOW TO FOLD THE TREADMILL FOR STORAGE Before folding the treadmill, adjust the incline to the vertical position...
... the plastic foot rails. Frame Latch Pin Latch Knob Catch HOW TO MOVE THE TREADMILL Before moving the treadmill. Tilt the treadmill backward until it . make sure to the desired location. Do not attempt to move the treadmill to lift with your legs rather than your back straight. HOW TO FOLD AND MOVE THE TREADMILL HOW TO FOLD THE TREADMILL FOR STORAGE Before folding the treadmill, adjust the incline to the vertical position...
User Manual
Page 19
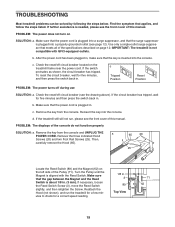
... the Reed Switch Screw (3), move the Reed Switch slightly, and then retighten the Screw. To reset the circuit breaker, wait for five minutes, and then press the switch back in . c. Remove the key from the console and UNPLUG THE a POWER CORD. Reinsert the key into the console. PROBLEM: The power does not turn on the left side of the console do not function properly SOLUTION: a. c. PROBLEM: The displays of the Pulley (71). IMPORTANT: The treadmill...
... the Reed Switch Screw (3), move the Reed Switch slightly, and then retighten the Screw. To reset the circuit breaker, wait for five minutes, and then press the switch back in . c. Remove the key from the console and UNPLUG THE a POWER CORD. Reinsert the key into the console. PROBLEM: The power does not turn on the left side of the console do not function properly SOLUTION: a. c. PROBLEM: The displays of the Pulley (71). IMPORTANT: The treadmill...
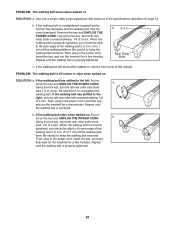
User Manual
Page 20
... treadmill for a few minutes. If the walking belt still slows when walked on page 12. form. Be careful to overtighten the walking belt. Repeat until the walking belt is properly tightened. 20 PROBLEM: The walking belt slows when walked on , first remove the key and UNPLUG THE POWER CORD. Then, plug in . Repeat until the walking belt is properly tightened. PROBLEM: The walking belt is properly tightened, you should be able to lift each edge of a turn...
... treadmill for a few minutes. If the walking belt still slows when walked on page 12. form. Be careful to overtighten the walking belt. Repeat until the walking belt is properly tightened. 20 PROBLEM: The walking belt slows when walked on , first remove the key and UNPLUG THE POWER CORD. Then, plug in . Repeat until the walking belt is properly tightened. PROBLEM: The walking belt is properly tightened, you should be able to lift each edge of a turn...
User Manual
Page 21
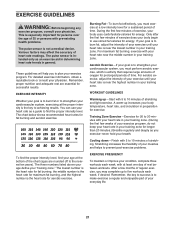
... a guide to 10 minutes of 35 or persons with your heart rate near the highest number in your body temperature, heart rate, and circulation in your body uses carbohydrate calories for 20 to 30 minutes with 5 to find your age at a low intensity level for persons over the age of stretching. For maximum fat burning, exercise with pre-existing health problems. The pulse sensor...
... a guide to 10 minutes of 35 or persons with your heart rate near the highest number in your body temperature, heart rate, and circulation in your body uses carbohydrate calories for 20 to 30 minutes with 5 to find your age at a low intensity level for persons over the age of stretching. For maximum fat burning, exercise with pre-existing health problems. The pulse sensor...
User Manual
Page 22
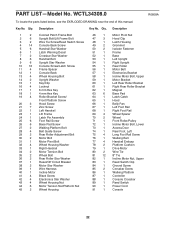
... 69 4 Wheel Spacer 70 2 Wheel 71 1 Front Roller/Pulley 72 1 Incline Motor Bolt, Lower 73 1 Access Door 74 1 Rear Foot, Left 75 4 Long Foot Rail Screw 76 1 Walking Belt 77 4 Handrail Endcap 78 2 Platform Cushion 79 1 Drive Motor 80 2 Wire Tie 81 12 8" Tie 82 1 Incline Motor Nut, Upper 83 1 Reed Switch Clip 84 1 Ground Screw 85 2 Crossbar Screw 86 1 Walking Platform 87 1 Controller 88 1 Console Crossbar 89 1 Reed Switch 90 1 Power Cord 91 1 Console 22 Qty.
... 69 4 Wheel Spacer 70 2 Wheel 71 1 Front Roller/Pulley 72 1 Incline Motor Bolt, Lower 73 1 Access Door 74 1 Rear Foot, Left 75 4 Long Foot Rail Screw 76 1 Walking Belt 77 4 Handrail Endcap 78 2 Platform Cushion 79 1 Drive Motor 80 2 Wire Tie 81 12 8" Tie 82 1 Incline Motor Nut, Upper 83 1 Reed Switch Clip 84 1 Ground Screw 85 2 Crossbar Screw 86 1 Walking Platform 87 1 Controller 88 1 Console Crossbar 89 1 Reed Switch 90 1 Power Cord 91 1 Console 22 Qty.
User Manual
Page 23
... 1 101 2 102 6 103 2 104 1 Description Incline Motor Nut, Lower Belt Guide 5 mm Hex Key Frame Endcap Releasable Tie Rear Foot, Right Filter Wire Power Cord Grommet Incline Motor Wire Front Roller Washer Cage Nut Warning Decal French Latch Warning Decal Key No. Specifications are not illustrated. Qty. Key No. Jam Nut Controller Screw 8" Black Wire, M/F 4" Black Wire, M/F 16" Blue Wire, 2F 4" Blue Wire, 2F 6" Red Wire, M/F 4" White Wire, M/F Userʼs Manual *These parts are subject to change without notice. 23
... 1 101 2 102 6 103 2 104 1 Description Incline Motor Nut, Lower Belt Guide 5 mm Hex Key Frame Endcap Releasable Tie Rear Foot, Right Filter Wire Power Cord Grommet Incline Motor Wire Front Roller Washer Cage Nut Warning Decal French Latch Warning Decal Key No. Specifications are not illustrated. Qty. Key No. Jam Nut Controller Screw 8" Black Wire, M/F 4" Black Wire, M/F 16" Blue Wire, 2F 4" Blue Wire, 2F 6" Red Wire, M/F 4" White Wire, M/F Userʼs Manual *These parts are subject to change without notice. 23
User Manual
Page 28
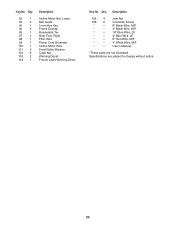
ORDERING REPLACEMENT PARTS To order replacement parts, see the PART LIST and EXPLODED DRAWING near the end of this warranty is limited to replacing or repairing, at ICON's option, the product through one (1) year from province to you specific legal rights. To help us : • the model number and serial number of the product (see the front cover of this manual) • the name of the product (see the...
ORDERING REPLACEMENT PARTS To order replacement parts, see the PART LIST and EXPLODED DRAWING near the end of this warranty is limited to replacing or repairing, at ICON's option, the product through one (1) year from province to you specific legal rights. To help us : • the model number and serial number of the product (see the front cover of this manual) • the name of the product (see the...


