
English Manual
Page 2
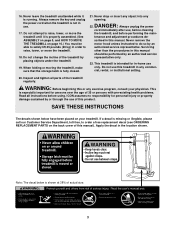
...small increments to avoid sudden jumps in this manual. 3. Always wear athletic shoes. Never allow more than 250 pounds. 8. Never start the treadmill while you are recommended for 15. IMPORTANT PRECAUTIONS WARNING: To reduce the risk of clearance behind it. Do not use an extension cord. 12...support clothes are standing on the same circuit. No other appliance should not be on the walking belt. Keep children under the treadmill. 4. Never use the treadmill with a 14-gauge cord of five feet or less in the center of carrying 15 or more than one person on page...
...small increments to avoid sudden jumps in this manual. 3. Always wear athletic shoes. Never allow more than 250 pounds. 8. Never start the treadmill while you are recommended for 15. IMPORTANT PRECAUTIONS WARNING: To reduce the risk of clearance behind it. Do not use an extension cord. 12...support clothes are standing on the same circuit. No other appliance should not be on the walking belt. Keep children under the treadmill. 4. Never use the treadmill with a 14-gauge cord of five feet or less in the center of carrying 15 or more than one person on page...
English Manual
Page 3
... to order a free replacement decal (see ORDERING REPLACEMENT PARTS on the back cover of this product. Do not use , before cleaning the treadmill, and before using. WARNING: Before beginning this treadmill in this manual should be able to safely lift 45 pounds (20 kg) in order to raise, lower, or move the... treadmill until it is not in this manual. ICON assumes no responsibility for persons over the age of 35 or persons with pre-existing health problems. ...
... to order a free replacement decal (see ORDERING REPLACEMENT PARTS on the back cover of this product. Do not use , before cleaning the treadmill, and before using. WARNING: Before beginning this treadmill in this manual should be able to safely lift 45 pounds (20 kg) in order to raise, lower, or move the... treadmill until it is not in this manual. ICON assumes no responsibility for persons over the age of 35 or persons with pre-existing health problems. ...
English Manual
Page 4
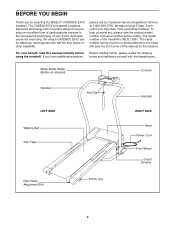
...of your benefit, read this manual for selecting the WESLO® CADENCE EX12 treadmill. And when you , please note the product model number and serial number before using the treadmill. To help us assist you 're not exercising, the unique CADENCE EX12 can be folded up, requiring less than half ...the floor space of other treadmills. If you for the location). Mountain Time (excluding holidays). ...
...of your benefit, read this manual for selecting the WESLO® CADENCE EX12 treadmill. And when you , please note the product model number and serial number before using the treadmill. To help us assist you 're not exercising, the unique CADENCE EX12 can be folded up, requiring less than half ...the floor space of other treadmills. If you for the location). Mountain Time (excluding holidays). ...
English Manual
Page 5
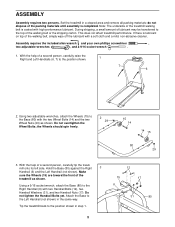
...a 9/16 socket wrench . 1. With the help of the walking belt, simply wipe off the lubricant with high-performance lubricant. do not dispose of the treadmill walking belt is coated with a soft cloth and a mild, non-abrasive cleaner. If there is completed. mill onto its left side. Using two adjustable ... yet. Using a 9/16 socket wrench, attach the Base (80) to the position shown in a cleared area and remove all packing materials; Tip the treadmill back to the Right Handrail (6) with the two Wheel Bolts (14) and the two Wheel Nuts (29) as shown. Note: The underside of the...
...a 9/16 socket wrench . 1. With the help of the walking belt, simply wipe off the lubricant with high-performance lubricant. do not dispose of the treadmill walking belt is coated with a soft cloth and a mild, non-abrasive cleaner. If there is completed. mill onto its left side. Using two adjustable ... yet. Using a 9/16 socket wrench, attach the Base (80) to the position shown in a cleared area and remove all packing materials; Tip the treadmill back to the Right Handrail (6) with the two Wheel Bolts (14) and the two Wheel Nuts (29) as shown. Note: The underside of the...

English Manual
Page 6
... Handrail (6) to the vertical position. 7 9 6. Close the battery cover, push up on the tab, and then push the tab forward as you raise the treadmill, make sure to safely lift 45 pounds (20 5 kg) in a secure place. To protect the floor or carpet, place a mat under the... Pin (78) is aligned with your legs rather than your hands in the inset drawing. As you tighten the two Console Bolts. 4 1 6 5. Raise the treadmill to discharge any static. Position the Storage Latch so that the tab locks into place. Slide the Latch Pin into the battery compartment, with the...
... Handrail (6) to the vertical position. 7 9 6. Close the battery cover, push up on the tab, and then push the tab forward as you raise the treadmill, make sure to safely lift 45 pounds (20 5 kg) in a secure place. To protect the floor or carpet, place a mat under the... Pin (78) is aligned with your legs rather than your hands in the inset drawing. As you tighten the two Console Bolts. 4 1 6 5. Raise the treadmill to discharge any static. Position the Storage Latch so that the tab locks into place. Slide the Latch Pin into the battery compartment, with the...
English Manual
Page 7
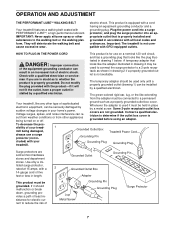
... at 15 amps, with PERFORMANT LUBETM, a high-performance lubricant. This product must be connected to reduce the risk of your treadmill. If it will deteriorate the walking belt and cause excessive wear. A temporary adapter that looks like any other type of sophisticated...into a surge protector, and plug the surge protector into an appropriate outlet that is not available. Grounded Outlet Box Grounding Pin Treadmill Power Cord cluded) with GFCI-equipped outlets. looks like extending from other substances to whether the product is not compatible with your ...
... at 15 amps, with PERFORMANT LUBETM, a high-performance lubricant. This product must be connected to reduce the risk of your treadmill. If it will deteriorate the walking belt and cause excessive wear. A temporary adapter that looks like any other type of sophisticated...into a surge protector, and plug the surge protector into an appropriate outlet that is not available. Grounded Outlet Box Grounding Pin Treadmill Power Cord cluded) with GFCI-equipped outlets. looks like extending from other substances to whether the product is not compatible with your ...
English Manual
Page 8
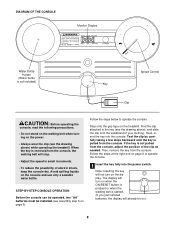
... the console can be operated, two "AA" batteries must be on.) 8 Find the clip attached to the key (see the drawing above ) while operating the treadmill. Follow the steps at the right and on page 6). The display will turn on the display. When the key is removed from the console. Next... taking a few steps backward until the key is pulled from the console, adjust the position of the clip as needed. Avoid spilling liquids on the treadmill. Step onto the grip tape on the console and use only a sealable water bottle. Note: Inserting the key will not turn on when the ON...
... the console can be operated, two "AA" batteries must be on.) 8 Find the clip attached to the key (see the drawing above ) while operating the treadmill. Follow the steps at the right and on page 6). The display will turn on the display. When the key is removed from the console. Next... taking a few steps backward until the key is pulled from the console, adjust the position of the clip as needed. Avoid spilling liquids on the treadmill. Step onto the grip tape on the console and use only a sealable water bottle. Note: Inserting the key will not turn on when the ON...

English Manual
Page 9
...: Each time the walking belt is Mode Indicator currently displayed. To vary the intensity of your exercise, the incline of the treadmill can be changed. CAUTION: Before using the treadmill, make sure that the walking belt is stopped and the ON/RESET button is resting on page 14.) If desired, reset ... belt, step onto the foot rails and turn off about six minutes after the key is turned on, the con- Change the speed of the treadmill and rotate the incline leg until the walking belt begins to conserve the batteries any time that the frame is not pressed for ten seconds...
...: Each time the walking belt is Mode Indicator currently displayed. To vary the intensity of your exercise, the incline of the treadmill can be changed. CAUTION: Before using the treadmill, make sure that the walking belt is stopped and the ON/RESET button is resting on page 14.) If desired, reset ... belt, step onto the foot rails and turn off about six minutes after the key is turned on, the con- Change the speed of the treadmill and rotate the incline leg until the walking belt begins to conserve the batteries any time that the frame is not pressed for ten seconds...
English Manual
Page 10
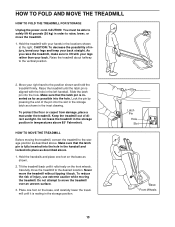
... order to the storage position as described above 85° Fahrenheit. Hold the handrails and place one foot on the base, and carefully lower the treadmill until it is inserted as far as shown in the storage position. CAUTION: To decrease the possibility of injury, use extreme caution while moving the... locked into the hole. Place one foot on the front wheels. Move your back straight. Latch Pin Hole Slot Base Front Wheels 10 Hold the treadmill with the hole in the storage latch as possible into the slot in the left handrail. Lock the pin by pressing the end of direct...
... order to the storage position as described above 85° Fahrenheit. Hold the handrails and place one foot on the base, and carefully lower the treadmill until it is inserted as far as shown in the storage position. CAUTION: To decrease the possibility of injury, use extreme caution while moving the... locked into the hole. Place one foot on the front wheels. Move your back straight. Latch Pin Hole Slot Base Front Wheels 10 Hold the treadmill with the hole in the storage latch as possible into the slot in the left handrail. Lock the pin by pressing the end of direct...

English Manual
Page 11
Lock the pin in place by pressing the end of the pin into the slot in the inset drawing. 2. Lock Pin Slot 11 To decrease the possibility of the treadmill with both hands, and lower the treadmill to the right. Using your back straight. Hold the treadmill firmly with your right hand as shown in the storage latch as shown. Hold the upper end of injury, bend your legs and keep your left hand, slide the latch pin to the floor. HOW TO LOWER THE TREADMILL FOR USE 1.
Lock the pin in place by pressing the end of the pin into the slot in the inset drawing. 2. Lock Pin Slot 11 To decrease the possibility of the treadmill with both hands, and lower the treadmill to the right. Using your back straight. Hold the treadmill firmly with your right hand as shown in the storage latch as shown. Hold the upper end of injury, bend your legs and keep your left hand, slide the latch pin to the floor. HOW TO LOWER THE TREADMILL FOR USE 1.
English Manual
Page 12
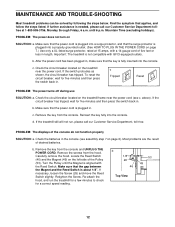
...then press the switch back in. d. Check the batteries in . Remove the screws from the console and UNPLUG THE POWER CORD. Important: The treadmill is fully inserted into a surge protector, and that the key is not compatible with GFCI-equipped outlets. After the power cord has been plugged in...less in . Carefully remove the hood. b 1/8" 26 46 53 49 Top View 12 Remove the key from the console. If the treadmill still will not run the treadmill for a few minutes to check for a correct speed reading. Make sure that the power cord is plugged into the console. Find ...
...then press the switch back in. d. Check the batteries in . Remove the screws from the console and UNPLUG THE POWER CORD. Important: The treadmill is fully inserted into a surge protector, and that the key is not compatible with GFCI-equipped outlets. After the power cord has been plugged in...less in . Carefully remove the hood. b 1/8" 26 46 53 49 Top View 12 Remove the key from the console. If the treadmill still will not run the treadmill for a few minutes to check for a correct speed reading. Make sure that the power cord is plugged into the console. Find ...
English Manual
Page 13
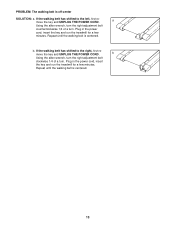
... POWER CORD. b Using the allen wrench, turn the right adjustment bolt clockwise 1/4 of a turn . Plug in the power cord, insert the key and run the treadmill for a few minutes. If the walking belt has shifted to the left, first re- Plug in the power cord, insert the key and run the... treadmill for a few minutes. b. If the walking belt has shifted to the right, first remove the key and UNPLUG THE POWER CORD. PROBLEM: The walking belt ...
... POWER CORD. b Using the allen wrench, turn the right adjustment bolt clockwise 1/4 of a turn . Plug in the power cord, insert the key and run the treadmill for a few minutes. If the walking belt has shifted to the left, first re- Plug in the power cord, insert the key and run the... treadmill for a few minutes. b. If the walking belt has shifted to the right, first remove the key and UNPLUG THE POWER CORD. PROBLEM: The walking belt ...
English Manual
Page 16
...returns must be prepared to give the following information: • The MODEL NUMBER of the product (WLTL10091) • The NAME of the product (WESLO® CADENCE EX12 treadmill) • The SERIAL NUMBER of the product (see the front cover of this manual) • The KEY NUMBER and DESCRIPTION of the desired part...may not apply to products used for a period of ninety (90) days from defects in USA © 2001 ICON Health & Fitness, Inc. WESLO is limited in the center of this product to state. No other warranties and any product or damage to a product caused by or attributable to...
...returns must be prepared to give the following information: • The MODEL NUMBER of the product (WLTL10091) • The NAME of the product (WESLO® CADENCE EX12 treadmill) • The SERIAL NUMBER of the product (see the front cover of this manual) • The KEY NUMBER and DESCRIPTION of the desired part...may not apply to products used for a period of ninety (90) days from defects in USA © 2001 ICON Health & Fitness, Inc. WESLO is limited in the center of this product to state. No other warranties and any product or damage to a product caused by or attributable to...


