

English Manual
Page 1
... instructions in this manual before using this manual for future reference. The trained technicians on our Customer Hot Line will guarantee complete satisfaction through direct assistance from our factory. Model No. If you have questions, or if there are missing parts, we will provide immediate assistance, free of charge to you. CUSTOMER HOT LINE: 1-866-699-3756 Mon.-Fri., 6 a.m.-6 p.m. Serial Number...
... instructions in this manual before using this manual for future reference. The trained technicians on our Customer Hot Line will guarantee complete satisfaction through direct assistance from our factory. Model No. If you have questions, or if there are missing parts, we will provide immediate assistance, free of charge to you. CUSTOMER HOT LINE: 1-866-699-3756 Mon.-Fri., 6 a.m.-6 p.m. Serial Number...

English Manual
Page 2
TABLE OF CONTENTS IMPORTANT PRECAUTIONS 3 BEFORE YOU BEGIN 5 ASSEMBLY 6 OPERATION AND ADJUSTMENT 10 HOW TO FOLD AND MOVE THE TREADMILL 14 MAINTENANCE AND TROUBLESHOOTING 16 CONDITIONING GUIDELINES 18 ORDERING REPLACEMENT PARTS Back Cover Note: An EXPLODED DRAWING and a PART LIST are attached in the center of ICON IP, Inc. 2 WESLO is a registered trademark of this manual.
TABLE OF CONTENTS IMPORTANT PRECAUTIONS 3 BEFORE YOU BEGIN 5 ASSEMBLY 6 OPERATION AND ADJUSTMENT 10 HOW TO FOLD AND MOVE THE TREADMILL 14 MAINTENANCE AND TROUBLESHOOTING 16 CONDITIONING GUIDELINES 18 ORDERING REPLACEMENT PARTS Back Cover Note: An EXPLODED DRAWING and a PART LIST are attached in the center of ICON IP, Inc. 2 WESLO is a registered trademark of this manual.

English Manual
Page 3
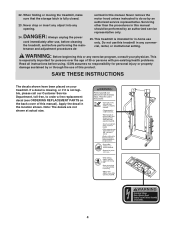
... start the treadmill while you are adequately informed of all of the owner to raise, lower, or move the treadmill until it is not in speed. 18. When connecting the power cord (see your balance. Use the hand weights only at all times. 8. Do not operate the treadmill if the power cord or plug is damaged, or if the treadmill is not working properly.) 6. Always remove the key and unplug the power cord...
... start the treadmill while you are adequately informed of all of the owner to raise, lower, or move the treadmill until it is not in speed. 18. When connecting the power cord (see your balance. Use the hand weights only at all times. 8. Do not operate the treadmill if the power cord or plug is damaged, or if the treadmill is not working properly.) 6. Always remove the key and unplug the power cord...
English Manual
Page 4
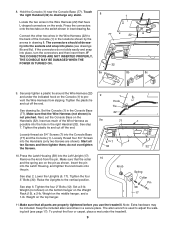
... back cover of this manual. When folding or moving the treadmill, make sure that the storage latch is especially important for in this manual). This treadmill is not legible, please call our Customer Service Department, toll-free, to do so by or through the use only. scribed in -home use of 35 or persons with pre-existing health problems. Read all instructions before performing the maintenance and adjustment procedures...
... back cover of this manual. When folding or moving the treadmill, make sure that the storage latch is especially important for in this manual). This treadmill is not legible, please call our Customer Service Department, toll-free, to do so by or through the use only. scribed in -home use of 35 or persons with pre-existing health problems. Read all instructions before performing the maintenance and adjustment procedures...
English Manual
Page 5
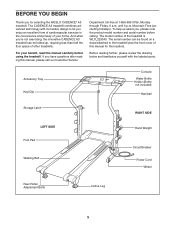
... Tray Key/Clip Console Water Bottle Holder (Bottle not included) Handrail Storage Latch RIGHT SIDE LEFT SIDE Foot Pad Walking Belt Hand Weight Circuit Breaker Power Cord Wheel Rear Roller Adjustment Bolts Incline Leg 5 If you for the location). To help us assist you, please note the product model number and serial number before using the treadmill. The serial number can be found on a decal attached to let you 're not exercising, the innovative CADENCE A3 treadmill can be folded...
... Tray Key/Clip Console Water Bottle Holder (Bottle not included) Handrail Storage Latch RIGHT SIDE LEFT SIDE Foot Pad Walking Belt Hand Weight Circuit Breaker Power Cord Wheel Rear Roller Adjustment Bolts Incline Leg 5 If you for the location). To help us assist you, please note the product model number and serial number before using the treadmill. The serial number can be found on a decal attached to let you 're not exercising, the innovative CADENCE A3 treadmill can be folded...
English Manual
Page 6
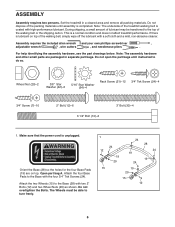
... dispose of the walking belt, simply wipe off the lubricant with high-performance lubricant. Orient the Base (28) so the holes for the four Base Pads (19) are packaged in a cleared area and remove all packing materials. Attach the four Base Pads to the Base (28) with the four 3/4" Tek Screws (24). Set the treadmill in separate part bags. Wheel...
... dispose of the walking belt, simply wipe off the lubricant with high-performance lubricant. Orient the Base (28) so the holes for the four Base Pads (19) are packaged in a cleared area and remove all packing materials. Attach the four Base Pads to the Base (28) with the four 3/4" Tek Screws (24). Set the treadmill in separate part bags. Wheel...
English Manual
Page 7
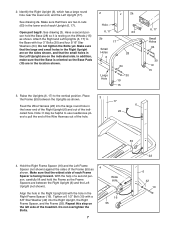
... the end of the Wire Harness out of each Upright (6, 17). Repeat this step on the indicated side. Make sure that there are between the Uprights as shown. Do not tighten the Bolts yet. Place 3 the Frame (55) between the Right Upright (6) and the Left Upright (not shown). Have... 15 55 4. Identify the Right Upright (6), which has a large round hole near the lower end, and the Left Upright (17). Tighten a 6 1/2" Bolt (10) with the hole in the Left Upright are in 6 the lower end of the Right Upright (6) and out of the treadmill. Hold the Right Frame Spacer (...
... the end of the Wire Harness out of each Upright (6, 17). Repeat this step on the indicated side. Make sure that there are between the Uprights as shown. Do not tighten the Bolts yet. Place 3 the Frame (55) between the Right Upright (6) and the Left Upright (not shown). Have... 15 55 4. Identify the Right Upright (6), which has a large round hole near the lower end, and the Left Upright (17). Tighten a 6 1/2" Bolt (10) with the hole in the Left Upright are in 6 the lower end of the Right Upright (6) and out of the treadmill. Hold the Right Frame Spacer (...

English Manual
Page 8
... tighten the Bolts yet. do not overtighten the Screws. 5. Orient a Weight Rack (71) as described above . Attach the other Handrail (not shown) to the Right Upright (6) with six Rack Screws (21). Insert the Wire Harness (22) through the 7 looped plastic tie and through the hole in the Console Base. Hand tighten two 2" Bolts (12) with the Wire 6 Harness (22) against the Right Upright (6). Remove...
... tighten the Bolts yet. do not overtighten the Screws. 5. Orient a Weight Rack (71) as described above . Attach the other Handrail (not shown) to the Right Upright (6) with six Rack Screws (21). Insert the Wire Harness (22) through the 7 looped plastic tie and through the hole in the Console Base. Hand tighten two 2" Bolts (12) with the Wire 6 Harness (22) against the Right Upright (6). Remove...
English Manual
Page 9
... two Screws are properly tightened before you use the treadmill. Make sure that have L-shaped connectors on the Console (1) to the back of the Wire Harness as shown. Lower the Uprights (6, 17). Tighten the four 3" Bolts (30). Weight on the pin as possible into the Latch Housing, and tighten the knob back onto the pin. Press the connectors onto the two tabs on the top hanger. See step...
... two Screws are properly tightened before you use the treadmill. Make sure that have L-shaped connectors on the Console (1) to the back of the Wire Harness as shown. Lower the Uprights (6, 17). Tighten the four 3" Bolts (30). Weight on the pin as possible into the Latch Housing, and tighten the knob back onto the pin. Press the connectors onto the two tabs on the top hanger. See step...

English Manual
Page 10
... rating of 400 volts or less and a minimum surge dissipation of the equipment-grounding conductor can be connected to determine if the outlet box cover is properly installed and grounded in accordance with all local codes and ordinances. OPERATION AND ADJUSTMENT THE PRE-LUBRICATED WALKING BELT Your treadmill features a walking belt coated with your treadmill (see your home's power. tric shock. Lug Metal Screw The temporary adapter...
... rating of 400 volts or less and a minimum surge dissipation of the equipment-grounding conductor can be connected to determine if the outlet box cover is properly installed and grounded in accordance with all local codes and ordinances. OPERATION AND ADJUSTMENT THE PRE-LUBRICATED WALKING BELT Your treadmill features a walking belt coated with your treadmill (see your home's power. tric shock. Lug Metal Screw The temporary adapter...
English Manual
Page 11
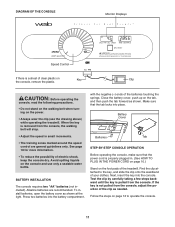
.... Press two batteries into the console. When the key is pulled from the console, the walking belt will stop. • Adjust the speed in . (See HOW TO PLUG IN THE POWER CORD on page 10.) Stand on Key Clip the console, remove the plastic. Avoid spilling liquids on the power. • Always wear the clip (see the drawing above) while operating the treadmill. To install batteries, open the battery cover as needed. Battery Cover Batteries Tab STEP-BY-STEP CONSOLE...
.... Press two batteries into the console. When the key is pulled from the console, the walking belt will stop. • Adjust the speed in . (See HOW TO PLUG IN THE POWER CORD on page 10.) Stand on Key Clip the console, remove the plastic. Avoid spilling liquids on the power. • Always wear the clip (see the drawing above) while operating the treadmill. To install batteries, open the battery cover as needed. Battery Cover Batteries Tab STEP-BY-STEP CONSOLE...

English Manual
Page 12
... CALS)-This mode displays the approximate number of the walking belt as desired by pressing the ON/RESET button. 4 When you have walked or run. Step onto the foot pads, turn off about six minutes after the key is used, observe the alignment of miles you exercise, the two displays will show which modes Mode Arrows are finished exercising, stop the walking belt and remove the key. Turn the speed control to the STOP/RESET position. Change the speed of fat...
... CALS)-This mode displays the approximate number of the walking belt as desired by pressing the ON/RESET button. 4 When you have walked or run. Step onto the foot pads, turn off about six minutes after the key is used, observe the alignment of miles you exercise, the two displays will show which modes Mode Arrows are finished exercising, stop the walking belt and remove the key. Turn the speed control to the STOP/RESET position. Change the speed of fat...
English Manual
Page 13
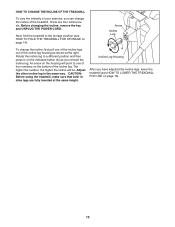
... be. Adjust the other incline leg in on the indicated button (A) as shown at the same height. Before changing the incline, remove the key and UNPLUG THE POWER CORD. Next, fold the treadmill to a different position and then press in the same way. There are fully inserted at the right. Arrow Incline Leg A Incline Leg Housing After you have adjusted the incline legs, lower the treadmill (see HOW TO FOLD THE TREADMILL FOR STORAGE on...
... be. Adjust the other incline leg in on the indicated button (A) as shown at the same height. Before changing the incline, remove the key and UNPLUG THE POWER CORD. Next, fold the treadmill to a different position and then press in the same way. There are fully inserted at the right. Arrow Incline Leg A Incline Leg Housing After you have adjusted the incline legs, lower the treadmill (see HOW TO FOLD THE TREADMILL FOR STORAGE on...
English Manual
Page 14
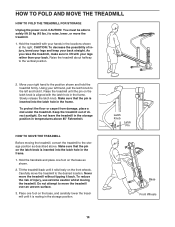
... hold the treadmill firmly. Slowly release the latch knob. Raise the treadmill until it . Raise the treadmill about halfway to the desired location. Keep the treadmill out of injury, bend your legs and keep your back. Never move the treadmill to the vertical position. 2. HOW TO FOLD AND MOVE THE TREADMILL HOW TO FOLD THE TREADMILL FOR STORAGE Unplug the power cord. Hold the treadmill with your legs rather than...
... hold the treadmill firmly. Slowly release the latch knob. Raise the treadmill until it . Raise the treadmill about halfway to the desired location. Keep the treadmill out of injury, bend your legs and keep your back. Never move the treadmill to the vertical position. 2. HOW TO FOLD AND MOVE THE TREADMILL HOW TO FOLD THE TREADMILL FOR STORAGE Unplug the power cord. Hold the treadmill with your legs rather than...
English Manual
Page 16
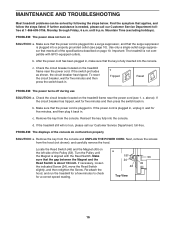
... console. After the power cord has been plugged in . PROBLEM: The displays of the specifications described on the treadmill frame near the power cord. Use only a single-outlet surge suppressor that the key is needed, please call our Customer Service Department, toll-free. b. Check the circuit breaker located on page 10. Reinsert the key fully into the console. c. Next, remove the screws from the hood (not shown), and carefully remove the hood. Turn the Pulley...
... console. After the power cord has been plugged in . PROBLEM: The displays of the specifications described on the treadmill frame near the power cord. Use only a single-outlet surge suppressor that the key is needed, please call our Customer Service Department, toll-free. b. Check the circuit breaker located on page 10. Reinsert the key fully into the console. c. Next, remove the screws from the hood (not shown), and carefully remove the hood. Turn the Pulley...
English Manual
Page 17
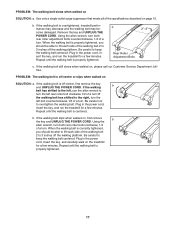
... THE POWER CORD. Be careful to the right, turn the left rear roller bolt clockwise 1/2 of a turn . Plug in the power cord, insert the key, and run the treadmill for a few minutes. When the walking belt is off -center, first remove the key a and UNPLUG THE POWER CORD. b 2"-3" Rear Roller Adjustment Bolts c. If the walking belt has shifted to the left, use the allen wrench to keep the walking belt centered. Be careful to turn . b. PROBLEM: The walking belt is correctly tightened...
... THE POWER CORD. Be careful to the right, turn the left rear roller bolt clockwise 1/2 of a turn . Plug in the power cord, insert the key, and run the treadmill for a few minutes. When the walking belt is off -center, first remove the key a and UNPLUG THE POWER CORD. b 2"-3" Rear Roller Adjustment Bolts c. If the walking belt has shifted to the left, use the allen wrench to keep the walking belt centered. Be careful to turn . b. PROBLEM: The walking belt is correctly tightened...
English Manual
Page 18
... the proper intensity. WARNING: Use the hand weights only at the top of the lower two numbers in your heart rate is high performance athletic conditioning, set the speed control on the console to PERFORMANCE to the nearest ten years). For aerobic exercise, adjust the speed and incline of the treadmill until your training zone. This is to exercise with pre-existing health problems. The following guidelines will help...
... the proper intensity. WARNING: Use the hand weights only at the top of the lower two numbers in your heart rate is high performance athletic conditioning, set the speed control on the console to PERFORMANCE to the nearest ten years). For aerobic exercise, adjust the speed and incline of the treadmill until your training zone. This is to exercise with pre-existing health problems. The following guidelines will help...

English Manual
Page 19
... life. 19 Training Zone Exercise After warming up increases your body temperature, heart rate, and circulation in your breath. After a few weeks of your muscles and will increase the flexibility of your exercise program, do not keep your pulse in preparation for longer than 20 minutes.) Breathe regularly and deeply as you may complete up Start each workout with 5 to...
... life. 19 Training Zone Exercise After warming up increases your body temperature, heart rate, and circulation in your breath. After a few weeks of your muscles and will increase the flexibility of your exercise program, do not keep your pulse in preparation for longer than 20 minutes.) Breathe regularly and deeply as you may complete up Start each workout with 5 to...

English Manual
Page 20
Weight Incline Leg Weight Rack Rear Roller Releasable Wire Tie Allen Wrench Latch Warning Decal Power Cord Console Base Latch Assembly Console Assembly Speed Potentiometer 6" White Wire, Male/Female 4" Black Wire, Male/Flag User's Manual *Includes all parts shown in the box # These parts are not illustrated Bolt Platform Screw Front Roller/Pulley Left Foot Pad Frame Walking Belt Walking Platform Latch Housing Plastic Tie Ground Wire 8" Cable Tie Wire Tie Clamp U-Nuts 5/16" Star Washer Incline Leg Housing Roller Washer Frame Endcap Rear Endcap Spacer 2-lb. WLTL223040...
Weight Incline Leg Weight Rack Rear Roller Releasable Wire Tie Allen Wrench Latch Warning Decal Power Cord Console Base Latch Assembly Console Assembly Speed Potentiometer 6" White Wire, Male/Female 4" Black Wire, Male/Flag User's Manual *Includes all parts shown in the box # These parts are not illustrated Bolt Platform Screw Front Roller/Pulley Left Foot Pad Frame Walking Belt Walking Platform Latch Housing Plastic Tie Ground Wire 8" Cable Tie Wire Tie Clamp U-Nuts 5/16" Star Washer Incline Leg Housing Roller Washer Frame Endcap Rear Endcap Spacer 2-lb. WLTL223040...

English Manual
Page 22
... MODEL NUMBER of the product (WLTL223040) • The NAME of the product (WESLO CADENCE® A3 treadmill) • The SERIAL NUMBER of the product (see the front cover of this manual) • The KEY NUMBER and DESCRIPTION of the desired part(s) (see the PART LIST and the EXPLODED DRAWING in the center of this manual) LIMITED WARRANTY ICON Health & Fitness, Inc. (ICON), warrants this warranty is authorized by ICON. until 6 p.m. When ordering parts, please be free...
... MODEL NUMBER of the product (WLTL223040) • The NAME of the product (WESLO CADENCE® A3 treadmill) • The SERIAL NUMBER of the product (see the front cover of this manual) • The KEY NUMBER and DESCRIPTION of the desired part(s) (see the PART LIST and the EXPLODED DRAWING in the center of this manual) LIMITED WARRANTY ICON Health & Fitness, Inc. (ICON), warrants this warranty is authorized by ICON. until 6 p.m. When ordering parts, please be free...


