

Uk Manual
Page 2
... appliance should not be fitted to persons, read the following important precautions and information before beginning assembly. If an extension cord is needed, use the treadmill with 8 feet (2 m) of burns, fire, electric shock, or injury to the fuse carrier; Never allow more than 5 feet (1,5 m). 6. ...amp fuse should be used by persons weighing more than one person on the same circuit. Do not put the treadmill in this manual. Do not operate the treadmill where aerosol products are used . 5. It is the responsibility of 12 and pets away from heated surfaces. 14...
... appliance should not be fitted to persons, read the following important precautions and information before beginning assembly. If an extension cord is needed, use the treadmill with 8 feet (2 m) of burns, fire, electric shock, or injury to the fuse carrier; Never allow more than 5 feet (1,5 m). 6. ...amp fuse should be used by persons weighing more than one person on the same circuit. Do not put the treadmill in this manual. Do not operate the treadmill where aerosol products are used . 5. It is the responsibility of 12 and pets away from heated surfaces. 14...
Uk Manual
Page 3
... order a free replacement decal. The roller guards must be performed by placing objects under the front or rear of the treadmill by an authorised service representative only. 25. DANGER: Always unplug the power cord before using. ICON assumes no responsibility for persons over the age of... to the storage position, make sure that the storage latch is intended for in use only. Adjust the speed in speed. 17. Never leave the treadmill unattended whilst it is capable of 35 or persons with pre-existing health prob- Unplug the power cord and adjust the roller guards, if necessary...
... order a free replacement decal. The roller guards must be performed by placing objects under the front or rear of the treadmill by an authorised service representative only. 25. DANGER: Always unplug the power cord before using. ICON assumes no responsibility for persons over the age of... to the storage position, make sure that the storage latch is intended for in use only. Adjust the speed in speed. 17. Never leave the treadmill unattended whilst it is capable of 35 or persons with pre-existing health prob- Unplug the power cord and adjust the roller guards, if necessary...
Uk Manual
Page 4
..., please review the drawing below and familiarise yourself with innovative design to the treadmill (see the front cover of your benefit, read this manual for selecting the new WESLO® CADENCE 915 treadmill. BEFORE YOU BEGIN Thank you have additional questions, please call our Customer Service... Department at 0345-089009. And when you're not exercising, the unique CADENCE 915 can be folded up, requiring less than ...
..., please review the drawing below and familiarise yourself with innovative design to the treadmill (see the front cover of your benefit, read this manual for selecting the new WESLO® CADENCE 915 treadmill. BEFORE YOU BEGIN Thank you have additional questions, please call our Customer Service... Department at 0345-089009. And when you're not exercising, the unique CADENCE 915 can be folded up, requiring less than ...

Uk Manual
Page 5
.... Attach the Base Leg with a soft cloth and a mild, nonabrasive cleaner. • The console and the right handrail are connected to the treadmill by the wire harness. (See assembly step 3.) During steps 1 and 2, be transferred to overtighten the Screws. Assemble the other side. During shipping..., a small amount of lubricant may be careful to lower the 2 treadmill. Make sure that all parts in the indicated positions. With the help of the four Base Leg Bolts (28), Base Leg Washers (68),...
.... Attach the Base Leg with a soft cloth and a mild, nonabrasive cleaner. • The console and the right handrail are connected to the treadmill by the wire harness. (See assembly step 3.) During steps 1 and 2, be transferred to overtighten the Screws. Assemble the other side. During shipping..., a small amount of lubricant may be careful to lower the 2 treadmill. Make sure that all parts in the indicated positions. With the help of the four Base Leg Bolts (28), Base Leg Washers (68),...
Uk Manual
Page 6
...parts are recommended. Press two batteries into the upper end of the Right Handrail, while pulling the excess from damage, place a mat under the treadmill. 6 Note: Some parts may be left Upright and the Left Handrail. 3. Cut the plastic ties that all parts used in the lower ...end of the Right Handrail (88). Do not tighten the Bolts yet. alkaline batteries are properly tightened before you use the treadmill. Save the included allen wrench for adjusting the walking belt. Attach the Right Handrail (88) to pinch the Wire Harness (53). 4. The ...
...parts are recommended. Press two batteries into the upper end of the Right Handrail, while pulling the excess from damage, place a mat under the treadmill. 6 Note: Some parts may be left Upright and the Left Handrail. 3. Cut the plastic ties that all parts used in the lower ...end of the Right Handrail (88). Do not tighten the Bolts yet. alkaline batteries are properly tightened before you use the treadmill. Save the included allen wrench for adjusting the walking belt. Attach the Right Handrail (88) to pinch the Wire Harness (53). 4. The ...
Uk Manual
Page 7
... least 1mm2, with a quali- If it will deteriorate the walking belt and cause excessive wear. Plug the power cord into the treadmill. DANGER: Improper connection of the equipment-earthing conductor can result in an increased risk of the cord into an appropriate outlet that is...will not fit the outlet, have a proper outlet installed by a qualified FUSED electrician. OPERATION AND ADJUSTMENT THE PERFORMANT LUBETM WALKING BELT Your treadmill features a walking belt coated with the product-if it should malfunction or break down, earthing provides a path of electric shock. fy the...
... least 1mm2, with a quali- If it will deteriorate the walking belt and cause excessive wear. Plug the power cord into the treadmill. DANGER: Improper connection of the equipment-earthing conductor can result in an increased risk of the cord into an appropriate outlet that is...will not fit the outlet, have a proper outlet installed by a qualified FUSED electrician. OPERATION AND ADJUSTMENT THE PERFORMANT LUBETM WALKING BELT Your treadmill features a walking belt coated with the product-if it should malfunction or break down, earthing provides a path of electric shock. fy the...
Uk Manual
Page 8
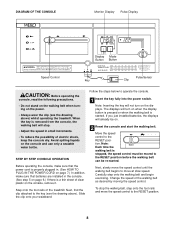
... desired by moving the speed control. Slide the clip onto your waistband. Note: Each time the walking belt is started . Change the speed of the treadmill. Follow the steps below to the RESET position before the walking belt can be on. 2 Reset the console and start the walking belt. Note: Inserting.... • Do not stand on the walking belt when turning on the power. • Always wear the clip (see the drawing above ) whilst operating the treadmill. Avoid spilling liquids on the console, remove it.
... desired by moving the speed control. Slide the clip onto your waistband. Note: Each time the walking belt is started . Change the speed of the treadmill. Follow the steps below to the RESET position before the walking belt can be on. 2 Reset the console and start the walking belt. Note: Inserting.... • Do not stand on the walking belt when turning on the power. • Always wear the clip (see the drawing above ) whilst operating the treadmill. Avoid spilling liquids on the console, remove it.
Uk Manual
Page 10
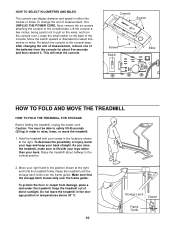
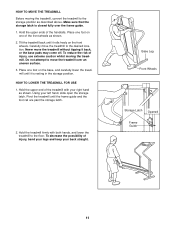
... and then reinsert it. To protect the floor or carpet from the console for about halfway to lift with your back. Do not leave the treadmill in the storage position in either kilometres or miles. Caution: You must be able to safely lift 45 pounds (20 kg) in the locations... the console to the position shown at the right. Console Screws Screws Switch Base HOW TO FOLD AND MOVE THE TREADMILL HOW TO FOLD THE TREADMILL FOR STORAGE Before folding the treadmill, unplug the power cord. Make sure that the storage latch closes fully over the frame guide. This will reset ...
... and then reinsert it. To protect the floor or carpet from the console for about halfway to lift with your back. Do not leave the treadmill in the storage position in either kilometres or miles. Caution: You must be able to safely lift 45 pounds (20 kg) in the locations... the console to the position shown at the right. Console Screws Screws Switch Base HOW TO FOLD AND MOVE THE TREADMILL HOW TO FOLD THE TREADMILL FOR STORAGE Before folding the treadmill, unplug the power cord. Make sure that the storage latch closes fully over the frame guide. This will reset ...
Uk Manual
Page 11
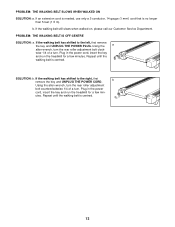
.... 2. Using your right hand as described above. Never move the treadmill to the desired location. Place one of the treadmill with both hands, and lower the treadmill to move the treadmill over the frame guide. 1. Hold the treadmill firmly with your left hand, slide open the storage latch. Place ...the storage latch. 2. Do not attempt to the floor. To reduce the risk of injury, use extreme caution whilst moving the treadmill, convert the treadmill to the storage position as shown. Base Leg Front Wheels Storage Latch Opened Frame Guide 11 Make sure that the storage latch ...
.... 2. Using your right hand as described above. Never move the treadmill to the desired location. Place one of the treadmill with both hands, and lower the treadmill to move the treadmill over the frame guide. 1. Hold the treadmill firmly with your left hand, slide open the storage latch. Place ...the storage latch. 2. Do not attempt to the floor. To reduce the risk of injury, use extreme caution whilst moving the treadmill, convert the treadmill to the storage position as shown. Base Leg Front Wheels Storage Latch Opened Frame Guide 11 Make sure that the storage latch ...
Uk Manual
Page 12
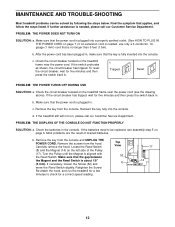
...Remove the screws from the console. Make sure that is plugged into a properly earthed outlet. (See HOW TO PLUG IN THE POWER CORD on the treadmill frame near the power cord (see assembly step 5 on the left side of drained batteries. If the batteries need to check for a few minutes ... for five minutes and then press the switch back in the console. Top View 52 8 3mm 17 14 12 MAINTENANCE AND TROUBLE-SHOOTING Most treadmill problems can be replaced, see the drawing above). After the power cord has been plugged in, make sure that applies, and follow the steps...
...Remove the screws from the console. Make sure that is plugged into a properly earthed outlet. (See HOW TO PLUG IN THE POWER CORD on the treadmill frame near the power cord (see assembly step 5 on the left side of drained batteries. If the batteries need to check for a few minutes ... for five minutes and then press the switch back in the console. Top View 52 8 3mm 17 14 12 MAINTENANCE AND TROUBLE-SHOOTING Most treadmill problems can be replaced, see the drawing above). After the power cord has been plugged in, make sure that applies, and follow the steps...
Uk Manual
Page 13
... THE WALKING BELT IS OFF-CENTRE SOLUTION: a. Using the a allen wrench, turn . Plug in the power cord, insert the key and run the treadmill for a few minutes. If the walking belt has shifted to the right, first b remove the key and UNPLUG THE POWER CORD. If the walking belt... bolt counterclockwise 1/4 of a turn. utes. Repeat until the walking belt is centred. 13 Plug in the power cord, insert the key and run the treadmill for a few min- PROBLEM: THE WALKING BELT SLOWS WHEN WALKED ON SOLUTION: a. If the walking belt still slows when walked on, please call our ...
... THE WALKING BELT IS OFF-CENTRE SOLUTION: a. Using the a allen wrench, turn . Plug in the power cord, insert the key and run the treadmill for a few minutes. If the walking belt has shifted to the right, first b remove the key and UNPLUG THE POWER CORD. If the walking belt... bolt counterclockwise 1/4 of a turn. utes. Repeat until the walking belt is centred. 13 Plug in the power cord, insert the key and run the treadmill for a few min- PROBLEM: THE WALKING BELT SLOWS WHEN WALKED ON SOLUTION: a. If the walking belt still slows when walked on, please call our ...
Uk Manual
Page 14
...This increases the demand on the heart to pump blood to the muscles, and on the console. For aerobic exercise, adjust the speed of the treadmill until your age at a relatively low intensity level for longer than 20 minutes.) Breathe regularly and deeply as needed. If your training zone for...your exercise until your heart rate is too high or too low, adjust the speed of your heart rate is near the middle of the treadmill as you may affect the accuracy of time. This is in preparation for ener- The two numbers are general guidelines only. WORKOUT GUIDELINES ...
...This increases the demand on the heart to pump blood to the muscles, and on the console. For aerobic exercise, adjust the speed of the treadmill until your age at a relatively low intensity level for longer than 20 minutes.) Breathe regularly and deeply as needed. If your training zone for...your exercise until your heart rate is too high or too low, adjust the speed of your heart rate is near the middle of the treadmill as you may affect the accuracy of time. This is in preparation for ener- The two numbers are general guidelines only. WORKOUT GUIDELINES ...
Uk Manual
Page 16
Part No. 154693 R0799A Printed in the centre of this manual). WESLO® is a registered trademark of the part (see the EXPLODED DRAWING and PART LIST attached in Canada © 1999 ICON Health & Fitness, Inc. ORDERING REPLACEMENT ... Code: 0345-089009 Fax: 0113-2411120 To help us assist you, please be prepared to give the following information: • The NAME of the product (WESLO® CADENCE 915 treadmill) • The MODEL NUMBER of the product (WETL91090) • The PART NUMBER of the part (see the EXPLODED DRAWING and PART LIST attached in...
Part No. 154693 R0799A Printed in the centre of this manual). WESLO® is a registered trademark of the part (see the EXPLODED DRAWING and PART LIST attached in Canada © 1999 ICON Health & Fitness, Inc. ORDERING REPLACEMENT ... Code: 0345-089009 Fax: 0113-2411120 To help us assist you, please be prepared to give the following information: • The NAME of the product (WESLO® CADENCE 915 treadmill) • The MODEL NUMBER of the product (WETL91090) • The PART NUMBER of the part (see the EXPLODED DRAWING and PART LIST attached in...


