
Uk Manual
Page 1
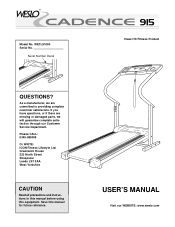
... damaged parts, we will guarantee complete satisfaction through our Customer Service Department. Greenwich House 223 North Street Sheepscar Leeds LS7 2AA West Yorkshire CAUTION Read all precautions and instructions in this manual before using this manual for future reference. Serial Number Decal Class HC Fitness Product QUESTIONS? Save this equipment. ® Model No. Please CALL: 0345-089009 Or WRITE: ICON Fitness Lifestyle...
... damaged parts, we will guarantee complete satisfaction through our Customer Service Department. Greenwich House 223 North Street Sheepscar Leeds LS7 2AA West Yorkshire CAUTION Read all precautions and instructions in this manual before using this manual for future reference. Serial Number Decal Class HC Fitness Product QUESTIONS? Save this equipment. ® Model No. Please CALL: 0345-089009 Or WRITE: ICON Fitness Lifestyle...

Uk Manual
Page 2
... manual. 3. Remove the PART LIST and EXPLODED DRAWING before operating the treadmill. 1. Do not wear loose clothing that the location and position permit access to the fuse carrier; Always wear athletic shoes. When connecting the power cord (see HOW TO PLUG IN THE POWER CORD on the treadmill at all users of the owner to persons, read the following important precautions and information before beginning assembly. When replacing...
... manual. 3. Remove the PART LIST and EXPLODED DRAWING before operating the treadmill. 1. Do not wear loose clothing that the location and position permit access to the fuse carrier; Always wear athletic shoes. When connecting the power cord (see HOW TO PLUG IN THE POWER CORD on the treadmill at all users of the owner to persons, read the following important precautions and information before beginning assembly. When replacing...
Uk Manual
Page 3
... Customer Service Department to the storage position, make sure that the storage latch is capable of heart rate readings. Always remove the key when the treadmill is intended for in any commercial, rental, or institutional setting. 26. Inspect and tighten all instructions before performing the maintenance and adjustment procedures described in general. Never insert or drop any object into any exercise program, consult your physician. Servicing other...
... Customer Service Department to the storage position, make sure that the storage latch is capable of heart rate readings. Always remove the key when the treadmill is intended for in any commercial, rental, or institutional setting. 26. Inspect and tighten all instructions before performing the maintenance and adjustment procedures described in general. Never insert or drop any object into any exercise program, consult your physician. Servicing other...
Uk Manual
Page 4
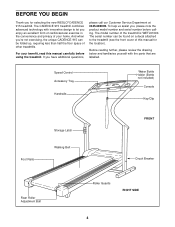
... your home. The CADENCE 915 treadmill combines advanced technology with the parts that are labelled. The model number of this manual carefully before calling. BEFORE YOU BEGIN Thank you , please note the product model number and serial number before using the treadmill. To help us assist you for the location). Speed Control Accessory Tray Handrails Water Bottle Holder (Bottle not included) Console Key/Clip Foot Rails Storage Latch Walking Belt FRONT Circuit Breaker Rear Roller Adjustment Bolt Roller...
... your home. The CADENCE 915 treadmill combines advanced technology with the parts that are labelled. The model number of this manual carefully before calling. BEFORE YOU BEGIN Thank you , please note the product model number and serial number before using the treadmill. To help us assist you for the location). Speed Control Accessory Tray Handrails Water Bottle Holder (Bottle not included) Console Key/Clip Foot Rails Storage Latch Walking Belt FRONT Circuit Breaker Rear Roller Adjustment Bolt Roller...

Uk Manual
Page 5
.... Attach the Base Leg with a soft cloth and a mild, nonabrasive cleaner. • The console and the right handrail are connected to the treadmill by the wire harness. (See assembly step 3.) During steps 1 and 2, be careful to avoid damaging the wire harness. • As you assemble the treadmill, be transferred to lower the 2 treadmill. Follow step 2 on top of the walking belt, wipe off the lubricant with two of lubricant...
.... Attach the Base Leg with a soft cloth and a mild, nonabrasive cleaner. • The console and the right handrail are connected to the treadmill by the wire harness. (See assembly step 3.) During steps 1 and 2, be careful to avoid damaging the wire harness. • As you assemble the treadmill, be transferred to lower the 2 treadmill. Follow step 2 on top of the walking belt, wipe off the lubricant with two of lubricant...
Uk Manual
Page 6
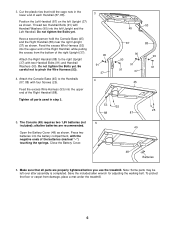
... four Screws (25). The Console (49) requires two 1,5V batteries (not 5 included); Feed the excess Wire Harness (53) into the upper end of the Right Handrail, while pulling the excess from damage, place a mat under the treadmill. 6 Note: Some parts may be left Upright (37) as shown. Save the included allen wrench for adjusting the walking belt. Do not tighten the Bolts...
... four Screws (25). The Console (49) requires two 1,5V batteries (not 5 included); Feed the excess Wire Harness (53) into the upper end of the Right Handrail, while pulling the excess from damage, place a mat under the treadmill. 6 Note: Some parts may be left Upright (37) as shown. Save the included allen wrench for adjusting the walking belt. Do not tighten the Bolts...
Uk Manual
Page 7
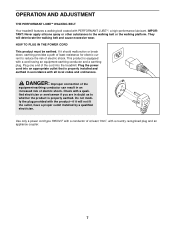
... that is properly installed and earthed in accordance with a cord having an equipment-earthing conductor and a earthing plug. Use only a power cord type H05VV-F with a conductor of at least 1mm2, with a quali- fied electrician or serviceman if you are in an increased risk of electric shock. OPERATION AND ADJUSTMENT THE PERFORMANT LUBETM WALKING BELT Your treadmill features a walking belt coated with the...
... that is properly installed and earthed in accordance with a cord having an equipment-earthing conductor and a earthing plug. Use only a power cord type H05VV-F with a conductor of at least 1mm2, with a quali- fied electrician or serviceman if you are in an increased risk of electric shock. OPERATION AND ADJUSTMENT THE PERFORMANT LUBETM WALKING BELT Your treadmill features a walking belt coated with the...
Uk Manual
Page 8
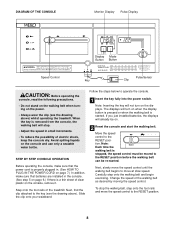
... key fully into the power switch. Step onto the foot rails of the walking belt as desired by moving the speed control. Slide the clip onto your waistband. Next, slowly move at slow speed. Avoid spilling liquids on the console, remove it. If you just installed batteries, the displays will turn on when the display button is pressed or when the walking belt is stopped, the speed control must be moved to the RESET position. 8 To stop . • Adjust...
... key fully into the power switch. Step onto the foot rails of the walking belt as desired by moving the speed control. Slide the clip onto your waistband. Next, slowly move at slow speed. Avoid spilling liquids on the console, remove it. If you just installed batteries, the displays will turn on when the display button is pressed or when the walking belt is stopped, the speed control must be moved to the RESET position. 8 To stop . • Adjust...
Uk Manual
Page 9
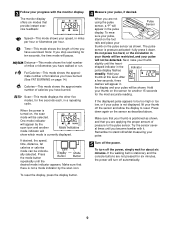
..., distance, fat calories or calories mode can be selected. To reset the display, press the display button. 4 Measure your thumb at this level. Press down . Hold your pulse, if desired. The monitor display offers six modes that there is currently displayed. When you have exercised. Remember to stand still whilst measuring your pulse will be detected. If the walking belt is stationary and the console buttons are not using the pulse sensor...
..., distance, fat calories or calories mode can be selected. To reset the display, press the display button. 4 Measure your thumb at this level. Press down . Hold your pulse, if desired. The monitor display offers six modes that there is currently displayed. When you have exercised. Remember to stand still whilst measuring your pulse will be detected. If the walking belt is stationary and the console buttons are not using the pulse sensor...
Uk Manual
Page 10
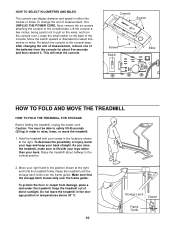
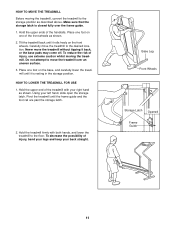
... storage latch locks over the frame guide. After changing the unit of measurement, remove one of direct sunlight. Do not leave the treadmill in the storage position in the locations shown at the right, and hold the treadmill firmly. Lift the console a few inches, being careful not to pull on the back of measurement, first UNPLUG THE POWER CORD. Console Screws Screws Switch Base HOW TO FOLD AND MOVE...
... storage latch locks over the frame guide. After changing the unit of measurement, remove one of direct sunlight. Do not leave the treadmill in the storage position in the locations shown at the right, and hold the treadmill firmly. Lift the console a few inches, being careful not to pull on the back of measurement, first UNPLUG THE POWER CORD. Console Screws Screws Switch Base HOW TO FOLD AND MOVE...
Uk Manual
Page 11
... the treadmill with both hands, and lower the treadmill to move the treadmill over the frame guide. 1. Place one of injury, bend your legs and keep your left hand, slide open the storage latch. Place one foot on one foot on the base, and carefully lower the treadmill until it is closed fully over an uneven surface. 3. Base Leg Front Wheels Storage Latch Opened Frame Guide 11...
... the treadmill with both hands, and lower the treadmill to move the treadmill over the frame guide. 1. Place one of injury, bend your legs and keep your left hand, slide open the storage latch. Place one foot on one foot on the base, and carefully lower the treadmill until it is closed fully over an uneven surface. 3. Base Leg Front Wheels Storage Latch Opened Frame Guide 11...
Uk Manual
Page 12
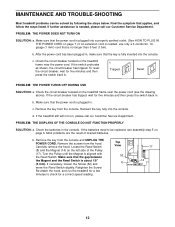
... treadmill frame near the power cord. c Tripped Tripped Reset Reset PROBLEM: THE POWER TURNS OFF DURING USE SOLUTION: a. Check the circuit breaker located on the treadmill frame near the power cord (see assembly step 5 on the left side of drained batteries. Make sure that the power cord is aligned with the Reed Switch. Reinsert the key fully into the console. d. Check the batteries in , make sure that applies, and follow the steps listed. If the batteries need...
... treadmill frame near the power cord. c Tripped Tripped Reset Reset PROBLEM: THE POWER TURNS OFF DURING USE SOLUTION: a. Check the circuit breaker located on the treadmill frame near the power cord (see assembly step 5 on the left side of drained batteries. Make sure that the power cord is aligned with the Reed Switch. Reinsert the key fully into the console. d. Check the batteries in , make sure that applies, and follow the steps listed. If the batteries need...
Uk Manual
Page 13
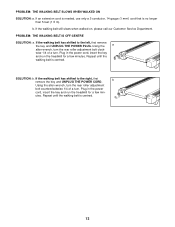
... the walking belt still slows when walked on, please call our Customer Service Department. If the walking belt has shifted to the left, first remove the key and UNPLUG THE POWER PLUG. Plug in the power cord, insert the key and run the treadmill for a few min- PROBLEM: THE WALKING BELT IS OFF-CENTRE SOLUTION: a. Using the allen wrench, turn the rear roller adjustment bolt counterclockwise 1/4 of a turn the rear roller adjustment bolt clock- SOLUTION: b. PROBLEM: THE WALKING BELT SLOWS WHEN WALKED ON...
... the walking belt still slows when walked on, please call our Customer Service Department. If the walking belt has shifted to the left, first remove the key and UNPLUG THE POWER PLUG. Plug in the power cord, insert the key and run the treadmill for a few min- PROBLEM: THE WALKING BELT IS OFF-CENTRE SOLUTION: a. Using the allen wrench, turn the rear roller adjustment bolt counterclockwise 1/4 of a turn the rear roller adjustment bolt clock- SOLUTION: b. PROBLEM: THE WALKING BELT SLOWS WHEN WALKED ON...
Uk Manual
Page 14
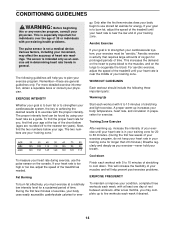
...: Before beginning this or any exercise program, consult your physician. EXERCISE INTENSITY Whether your goal is to burn fat or to strengthen your "training zone." Only after the first few months, you to cool down. For aerobic exercise, adjust the speed of the treadmill until your heart rate is near the low end of your body uses easily accessible carbohydrate calories for...
...: Before beginning this or any exercise program, consult your physician. EXERCISE INTENSITY Whether your goal is to burn fat or to strengthen your "training zone." Only after the first few months, you to cool down. For aerobic exercise, adjust the speed of the treadmill until your heart rate is near the low end of your body uses easily accessible carbohydrate calories for...
Uk Manual
Page 15
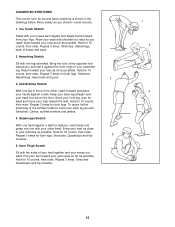
...move your hips toward your feet toward you reach down toward the wall. Stretches: Calves, achilles tendons and ankles. 4. Repeat 3 times for both legs. Pull your toes as far as possible. Hold for 15 counts, then relax. Bring the sole of the opposite foot toward your buttocks as well. Stretches: Hamstrings, lower...and rest it against the inner thigh of the achilles tendons, bend your back foot flat on the floor. SUGGESTED STRETCHES The correct form for several basic stretches is shown in front of the other hand. Stretches: Quadriceps and hip muscles. 1 2 4 15 Calf/...
...move your hips toward your feet toward you reach down toward the wall. Stretches: Calves, achilles tendons and ankles. 4. Repeat 3 times for both legs. Pull your toes as far as possible. Hold for 15 counts, then relax. Bring the sole of the opposite foot toward your buttocks as well. Stretches: Hamstrings, lower...and rest it against the inner thigh of the achilles tendons, bend your back foot flat on the floor. SUGGESTED STRETCHES The correct form for several basic stretches is shown in front of the other hand. Stretches: Quadriceps and hip muscles. 1 2 4 15 Calf/...
Uk Manual
Page 16
...-2411120 To help us assist you, please be prepared to give the following information: • The NAME of the product (WESLO® CADENCE 915 treadmill) • The MODEL NUMBER of the product (WETL91090) • The PART NUMBER of the part (see the EXPLODED DRAWING and PART LIST attached in the centre of this manual) • The DESCRIPTION of ICON Health & Fitness, Inc. office, or write: ICON Fitness Lifestyle Ltd.
...-2411120 To help us assist you, please be prepared to give the following information: • The NAME of the product (WESLO® CADENCE 915 treadmill) • The MODEL NUMBER of the product (WETL91090) • The PART NUMBER of the part (see the EXPLODED DRAWING and PART LIST attached in the centre of this manual) • The DESCRIPTION of ICON Health & Fitness, Inc. office, or write: ICON Fitness Lifestyle Ltd.

Uk Manual
Page 17
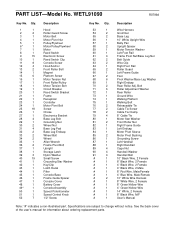
For information about ordering replacement parts, see the back cover of the User's Manual. 34 Note: Specifications are subject to change without notice. REMOVE THIS EXPLODED DRAWING AND PART LIST FROM THE MANUAL Save this EXPLODED DRAWING and PART LIST for future reference.
For information about ordering replacement parts, see the back cover of the User's Manual. 34 Note: Specifications are subject to change without notice. REMOVE THIS EXPLODED DRAWING AND PART LIST FROM THE MANUAL Save this EXPLODED DRAWING and PART LIST for future reference.
Uk Manual
Page 18
... Bolt Magnet Platform Screw Motor Tension Nut Front Roller/Pulley Motor Tension Bolt Circuit Breaker Reed Switch Bracket Frame Receptical Controller Motor Pivot Bolt Screw Choke Electronics Bracket Base Leg Bolt Grounding Nut Wheel Nut Base Leg Pad Base Leg Endcap Wheel Bolt Wheel Allen Wrench Frame Pivot Bolt Upright Storage Latch Nylon Washer Small Screw Grounding Star Washer Key/Clip Latch Decal Filter Console Base Frame Guide Spacer Console Cover Battery Cover Console Assembly Speed Potentiometer Speed Control Knob 1/2" Screw Key No. See the back cover of the user's manual for information...
... Bolt Magnet Platform Screw Motor Tension Nut Front Roller/Pulley Motor Tension Bolt Circuit Breaker Reed Switch Bracket Frame Receptical Controller Motor Pivot Bolt Screw Choke Electronics Bracket Base Leg Bolt Grounding Nut Wheel Nut Base Leg Pad Base Leg Endcap Wheel Bolt Wheel Allen Wrench Frame Pivot Bolt Upright Storage Latch Nylon Washer Small Screw Grounding Star Washer Key/Clip Latch Decal Filter Console Base Frame Guide Spacer Console Cover Battery Cover Console Assembly Speed Potentiometer Speed Control Knob 1/2" Screw Key No. See the back cover of the user's manual for information...
Uk Manual
Page 19
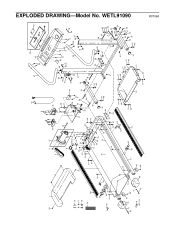
... 41 29 53 34 61 71 40 71 40 32 71 30 33 55 68 31 28 68 40 31 28 40 R0799A EXPLODED DRAWING-Model No.
... 41 29 53 34 61 71 40 71 40 32 71 30 33 55 68 31 28 68 40 31 28 40 R0799A EXPLODED DRAWING-Model No.


