
User Manual
Page 1
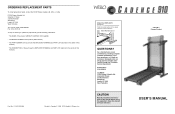
... REPLACEMENT PARTS To order replacement parts, contact the ICON Fitness Lifestyle Ltd. WETL91072 Serial No. Write the serial number in this manual before using this manual) ¥ The DESCRIPTION of this manual for future reference. Please CALL: 0345-089009 Or WRITE: ICON Fitness Lifestyle Ltd. Model No. Part No. 151613 R0299A Printed in the centre of the part (see the EXPLODED DRAWING and PART LIST attached in Canada © 1999 ICON Health & Fitness, Inc. Serial Number...
... REPLACEMENT PARTS To order replacement parts, contact the ICON Fitness Lifestyle Ltd. WETL91072 Serial No. Write the serial number in this manual before using this manual) ¥ The DESCRIPTION of this manual for future reference. Please CALL: 0345-089009 Or WRITE: ICON Fitness Lifestyle Ltd. Model No. Part No. 151613 R0299A Printed in the centre of the part (see the EXPLODED DRAWING and PART LIST attached in Canada © 1999 ICON Health & Fitness, Inc. Serial Number...
User Manual
Page 2
... floor. Bend your front leg, lean forward and move the walking belt whilst the power is needed, use the treadmill with at a time. 11. TABLE OF CONTENTS IMPORTANT PRECAUTIONS 2 BEFORE YOU BEGIN 4 ASSEMBLY 5 OPERATION AND ADJUSTMENT 7 HOW TO FOLD AND MOVE THE TREADMILL 10 MAINTENANCE AND TROUBLE-SHOOTING 12 CONDITIONING GUIDELINES 14 ORDERING REPLACEMENT PARTS Back Cover Note: A PART LIST and an EXPLODED DRAWING are attached in the centre of this...
... floor. Bend your front leg, lean forward and move the walking belt whilst the power is needed, use the treadmill with at a time. 11. TABLE OF CONTENTS IMPORTANT PRECAUTIONS 2 BEFORE YOU BEGIN 4 ASSEMBLY 5 OPERATION AND ADJUSTMENT 7 HOW TO FOLD AND MOVE THE TREADMILL 10 MAINTENANCE AND TROUBLE-SHOOTING 12 CONDITIONING GUIDELINES 14 ORDERING REPLACEMENT PARTS Back Cover Note: A PART LIST and an EXPLODED DRAWING are attached in the centre of this...

User Manual
Page 3
... the maintenance and adjustment procedures described in your training zone. Never remove the motor hood unless instructed to burn fat, adjust the speed and incline of the treadmill until your exercise program. WARNING: Before beginning this or any exercise program, consult your physician. This is especially important for persons over the age of 35 or individuals with pre-existing health problems. Read all parts of your exercise until your heart rate...
... the maintenance and adjustment procedures described in your training zone. Never remove the motor hood unless instructed to burn fat, adjust the speed and incline of the treadmill until your exercise program. WARNING: Before beginning this or any exercise program, consult your physician. This is especially important for persons over the age of 35 or individuals with pre-existing health problems. Read all parts of your exercise until your heart rate...
User Manual
Page 4
... cover of five feet (1,5 m) or less in the convenience and privacy of a turn . Repeat until the walking belt is properly tightened. If the walking belt is needed, use only a 14-gauge cord of this manual carefully before calling. For your home. Plug in the power cord, insert the key and run the treadmill for a few min- utes. If the walking belt slips when walked on a decal attached to keep the walking belt centred. Remove the key...
... cover of five feet (1,5 m) or less in the convenience and privacy of a turn . Repeat until the walking belt is properly tightened. If the walking belt is needed, use only a 14-gauge cord of this manual carefully before calling. For your home. Plug in the power cord, insert the key and run the treadmill for a few min- utes. If the walking belt slips when walked on a decal attached to keep the walking belt centred. Remove the key...
User Manual
Page 5
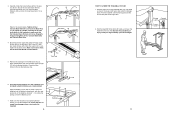
... follow the steps listed. If further assistance is needed , use only a 14-gauge cord of injury, bend your legs and keep your back straight. 12 5 Locate the Reed Switch (8) and the Magnet (14) on its other Base Leg (55) as shown. The following information and instructions: ¥ Assembly requires two people. ¥ Place all parts are in , make sure that the power cord is plugged into the console.
... follow the steps listed. If further assistance is needed , use only a 14-gauge cord of injury, bend your legs and keep your back straight. 12 5 Locate the Reed Switch (8) and the Magnet (14) on its other Base Leg (55) as shown. The following information and instructions: ¥ Assembly requires two people. ¥ Place all parts are in , make sure that the power cord is plugged into the console.
User Manual
Page 6
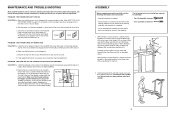
... Wrench (35) into the battery compartment, with two Guide Screws (25). Make sure that the Console Base (45) does not move. Close the Battery Cover. 49 48 7. tighten the Guide Screws. Tighten all four Console Base Bolts and Console Base Nuts. Attach the Frame Guide (66) and the Frame Guide 4 Spacer (46) to make sure that all parts are properly tightened before you use the treadmill. Using your right hand as shown...
... Wrench (35) into the battery compartment, with two Guide Screws (25). Make sure that the Console Base (45) does not move. Close the Battery Cover. 49 48 7. tighten the Guide Screws. Tighten all four Console Base Bolts and Console Base Nuts. Attach the Frame Guide (66) and the Frame Guide 4 Spacer (46) to make sure that all parts are properly tightened before you use the treadmill. Using your right hand as shown...

User Manual
Page 7
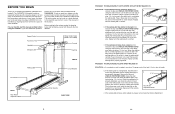
... move the treadmill without tipping it will deteriorate the walking belt and cause excessive wear. Storage Latch Closed Frame Guide Base Leg Front Wheels 10 OPERATION AND ADJUSTMENT THE PERFORMANT LUBETM WALKING BELT Your treadmill features a walking belt coated with a quali- Plug the power cord into the treadmill. DANGER: Improper connection of electric shock. They will not fit the outlet, have a proper outlet installed by a qualified FUSED electrician. Plug one of the cord...
... move the treadmill without tipping it will deteriorate the walking belt and cause excessive wear. Storage Latch Closed Frame Guide Base Leg Front Wheels 10 OPERATION AND ADJUSTMENT THE PERFORMANT LUBETM WALKING BELT Your treadmill features a walking belt coated with a quali- Plug the power cord into the treadmill. DANGER: Improper connection of electric shock. They will not fit the outlet, have a proper outlet installed by a qualified FUSED electrician. Plug one of the cord...

User Manual
Page 8
... burned. (See FAT BURNING on the display. Reattach the Switch console to select kilo- Inserting the key will already be turned to the RESET position. 3 Follow your waistband. Note: Each time the walking belt is stopped, the speed control must be on /reset button. 4 Turn off the power To turn off automatically. Carefully step onto the walking belt and begin exercising. The five modes are installed in small increments. ¥ To reduce...
... burned. (See FAT BURNING on the display. Reattach the Switch console to select kilo- Inserting the key will already be turned to the RESET position. 3 Follow your waistband. Note: Each time the walking belt is stopped, the speed control must be on /reset button. 4 Turn off the power To turn off automatically. Carefully step onto the walking belt and begin exercising. The five modes are installed in small increments. ¥ To reduce...
User Manual
Page 9
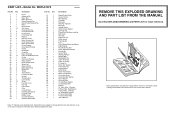
...Roller/Pulley Motor Tension Bolt Circuit Breaker Reed Switch Bracket Frame Receptical Controller Motor Pivot Bolt Latch Screw/Guide Screw Choke Electronics Bracket Base Leg Bolt Roller Guard Screw Wheel Nut Base Leg Pad Base Leg Endcap Wheel Bolt Wheel Allen Wrench Frame Pivot Bolt Upright Storage Latch Latch Spring Screw Handrail Cover Key Clip Latch Decal Filter Console Base Frame Guide Spacer Console Cover Battery Cover Console Assembly Speed Potentiometer Key No. WETL91072 Key No. Bolt Roller Adjustment Washer Rear Roller Ground Wire Walking Platform Walking Belt Releaseable Tie Cable...
...Roller/Pulley Motor Tension Bolt Circuit Breaker Reed Switch Bracket Frame Receptical Controller Motor Pivot Bolt Latch Screw/Guide Screw Choke Electronics Bracket Base Leg Bolt Roller Guard Screw Wheel Nut Base Leg Pad Base Leg Endcap Wheel Bolt Wheel Allen Wrench Frame Pivot Bolt Upright Storage Latch Latch Spring Screw Handrail Cover Key Clip Latch Decal Filter Console Base Frame Guide Spacer Console Cover Battery Cover Console Assembly Speed Potentiometer Key No. WETL91072 Key No. Bolt Roller Adjustment Washer Rear Roller Ground Wire Walking Platform Walking Belt Releaseable Tie Cable...


