

Uk Manual
Page 2
TABLE OF CONTENTS IMPORTANT PRECAUTIONS 3 BEFORE YOU BEGIN 5 ASSEMBLY 6 OPERATION AND ADJUSTMENT 10 HOW TO FOLD AND MOVE THE TREADMILL 13 MAINTENANCE AND TROUBLESHOOTING 15 CONDITIONING GUIDELINES 17 ORDERING REPLACEMENT PARTS Back Cover Note: An EXPLODED DRAWING and a PART LIST are attached in the centre of ICON Health & Fitness, Inc. 2 WESLO is a registered trademark of this manual.
TABLE OF CONTENTS IMPORTANT PRECAUTIONS 3 BEFORE YOU BEGIN 5 ASSEMBLY 6 OPERATION AND ADJUSTMENT 10 HOW TO FOLD AND MOVE THE TREADMILL 13 MAINTENANCE AND TROUBLESHOOTING 15 CONDITIONING GUIDELINES 17 ORDERING REPLACEMENT PARTS Back Cover Note: An EXPLODED DRAWING and a PART LIST are attached in the centre of ICON Health & Fitness, Inc. 2 WESLO is a registered trademark of this manual.

Uk Manual
Page 3
...in a garage or covered patio, or near water. 14. Do not change the incline of clearance behind it and 0.5 m (2 ft.) on page 5 if the treadmill is being administered. 15. Never drop or insert any object into an earthed circuit. Keep the power cord away from moisture and dust. To protect... persons weighing more than one person on page 13.) You must be fitted to persons, read the following important precautions and information before operating the treadmill. 1. No other appliance should be able to safely lift 20 kg (45 lbs.) to avoid sudden jumps in sandals. 10. When folding or ...
...in a garage or covered patio, or near water. 14. Do not change the incline of clearance behind it and 0.5 m (2 ft.) on page 5 if the treadmill is being administered. 15. Never drop or insert any object into an earthed circuit. Keep the power cord away from moisture and dust. To protect... persons weighing more than one person on page 13.) You must be fitted to persons, read the following important precautions and information before operating the treadmill. 1. No other appliance should be able to safely lift 20 kg (45 lbs.) to avoid sudden jumps in sandals. 10. When folding or ...
Uk Manual
Page 4
...decal (see ORDERING REPLACEMENT PARTS on your physician. Servicing other than the procedures in any exercise program, consult your treadmill. ICON assumes no responsibility for personal injury or property damage sustained by or through the use , before cleaning the...to do so by an authorised service representative only. 23. WARNING: Before beginning this manual. scribed in -home use this treadmill in this product. This treadmill is especially important for in this or any commercial, rental, or institutional setting. Apply the replacement decal in the location shown...
...decal (see ORDERING REPLACEMENT PARTS on your physician. Servicing other than the procedures in any exercise program, consult your treadmill. ICON assumes no responsibility for personal injury or property damage sustained by or through the use , before cleaning the...to do so by an authorised service representative only. 23. WARNING: Before beginning this manual. scribed in -home use this treadmill in this product. This treadmill is especially important for in this or any commercial, rental, or institutional setting. Apply the replacement decal in the location shown...
Uk Manual
Page 5
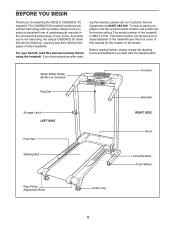
...questions after read this manual for selecting the WESLO CADENCE® 50 treadmill. The model number of your benefit, read - BEFORE YOU BEGIN Thank you for the location of the decal). And when you're not exercising, the unique CADENCE 50 treadmill can be folded up, requiring less than ...half the floor space of this manual carefully before calling. To help us assist you enjoy an excellent form of cardiovascular exercise in the convenience and privacy of the treadmill is WETL10131. Before ...
...questions after read this manual for selecting the WESLO CADENCE® 50 treadmill. The model number of your benefit, read - BEFORE YOU BEGIN Thank you for the location of the decal). And when you're not exercising, the unique CADENCE 50 treadmill can be folded up, requiring less than ...half the floor space of this manual carefully before calling. To help us assist you enjoy an excellent form of cardiovascular exercise in the convenience and privacy of the treadmill is WETL10131. Before ...
Uk Manual
Page 6
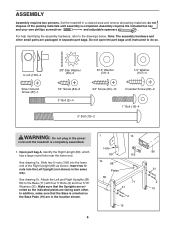
Open part bag A. See drawing 1a. Set the treadmill in the power cord until the treadmill is completely assembled. 1. do so. Assembly requires the included hex key and your own phillips screwdriver and adjustable spanners . Do not open the part bags ...
Open part bag A. See drawing 1a. Set the treadmill in the power cord until the treadmill is completely assembled. 1. do so. Assembly requires the included hex key and your own phillips screwdriver and adjustable spanners . Do not open the part bags ...
Uk Manual
Page 7
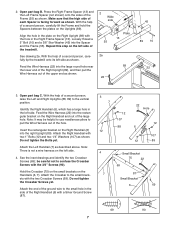
... Crossbar Screws yet. Press the Right Frame Spacer (13) and the Left Frame Spacer (not shown) onto the sides of a second person, carefully tip the treadmill onto its left side. Make sure that the high side of each Spacer is not a wire harness on the left side of the hole. With... the help of a second person, raise the Left and Right Uprights (88, 89) to pull the Wire Harness out of the treadmill. Open part bag B. Feed the Wire Harness (22) into the Spacer and the Frame (55). Repeat this step on the Right Upright (89) with the...
... Crossbar Screws yet. Press the Right Frame Spacer (13) and the Left Frame Spacer (not shown) onto the sides of a second person, carefully tip the treadmill onto its left side. Make sure that the high side of each Spacer is not a wire harness on the left side of the hole. With... the help of a second person, raise the Left and Right Uprights (88, 89) to pull the Wire Harness out of the treadmill. Open part bag B. Feed the Wire Harness (22) into the Spacer and the Frame (55). Repeat this step on the Right Upright (89) with the...
Uk Manual
Page 9
...the plastic ties Ties on page 13). Then, cut off the lubricant with high-performance lubricant. Start all six Screws before you use the treadmill. do not overtighten the Screws. 6 90 84 100 90 9. Insert the Latch Pin into the large hole in the side of the plas... is coated with a soft cloth and a mild, non-abrasive cleaner. 9 tic ties. The large hex key is a normal condition and does not affect treadmill performance. 8. During shipping, a small amount of the walking belt, simply wipe off the ends of 8 1 the Right Handrail (6). Set the Console (1) on...
...the plastic ties Ties on page 13). Then, cut off the lubricant with high-performance lubricant. Start all six Screws before you use the treadmill. do not overtighten the Screws. 6 90 84 100 90 9. Insert the Latch Pin into the large hole in the side of the plas... is coated with a soft cloth and a mild, non-abrasive cleaner. 9 tic ties. The large hex key is a normal condition and does not affect treadmill performance. 8. During shipping, a small amount of the walking belt, simply wipe off the ends of 8 1 the Right Handrail (6). Set the Console (1) on...
Uk Manual
Page 10
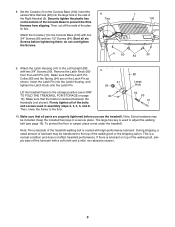
...ferrite box and 2 cut off the excess plastic tie. Note: In Italy, an adaptor (not included) must be earthed. Important: The treadmill is properly installed and earthed in - Socket on the ferrite box and clamp the ferrite box around the power cord. If it should malfunction... for electric current to drawing 2. Select the one that is not compatible with a manufacturer-recommended power cord. Next, lift the tab on treadmill Ferrite Box Plastic Tie Tab Outlet If the power cord is equipped with PERFORMANT LUBETM, a high-performance lubricant. DANGER: Improper connection of the...
...ferrite box and 2 cut off the excess plastic tie. Note: In Italy, an adaptor (not included) must be earthed. Important: The treadmill is properly installed and earthed in - Socket on the ferrite box and clamp the ferrite box around the power cord. If it should malfunction... for electric current to drawing 2. Select the one that is not compatible with a manufacturer-recommended power cord. Next, lift the tab on treadmill Ferrite Box Plastic Tie Tab Outlet If the power cord is equipped with PERFORMANT LUBETM, a high-performance lubricant. DANGER: Improper connection of the...
Uk Manual
Page 11
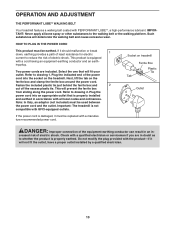
...-STEP CONSOLE OPERATION Before operating the console, make sure that the power cord is properly plugged in (see the drawing above ) while operating the treadmill. • Adjust the speed in small increments to the key (see page 10). Next, stand on the foot rails of plastic on the console,...key fully into the console. Follow the steps below to start the walking belt. CONSOLE DIAGRAM Displays Note: If there is a thin sheet of the treadmill. if a button is held down, the speed setting will change the speed of your clothes. A moment after the button is pressed, the walking ...
...-STEP CONSOLE OPERATION Before operating the console, make sure that the power cord is properly plugged in (see the drawing above ) while operating the treadmill. • Adjust the speed in small increments to the key (see page 10). Next, stand on the foot rails of plastic on the console,...key fully into the console. Follow the steps below to start the walking belt. CONSOLE DIAGRAM Displays Note: If there is a thin sheet of the treadmill. if a button is held down, the speed setting will change the speed of your clothes. A moment after the button is pressed, the walking ...
Uk Manual
Page 12
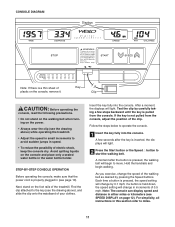
.... Distance display-This display shows the distance that both incline legs are in the same position. HOW TO CHANGE THE INCLINE OF THE TREADMILL To vary the intensity of measurement is the highest. There are finished exercising, remove the key. ING on page 13). The display ...change the incline, first pull one of the incline legs Arrow Fat Calories/Calories display-This display Mode Indicator shows the approximate numbers of the treadmill can display speed and distance in a secure place. Time display-This display shows the elapsed time. move the key, and then reinsert the...
.... Distance display-This display shows the distance that both incline legs are in the same position. HOW TO CHANGE THE INCLINE OF THE TREADMILL To vary the intensity of measurement is the highest. There are finished exercising, remove the key. ING on page 13). The display ...change the incline, first pull one of the incline legs Arrow Fat Calories/Calories display-This display Mode Indicator shows the approximate numbers of the treadmill can display speed and distance in a secure place. Time display-This display shows the elapsed time. move the key, and then reinsert the...
Uk Manual
Page 13
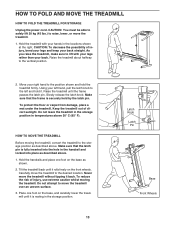
..., pull the latch knob to lift with your back straight. Using your left and hold the treadmill firmly. To protect the floor or carpet from damage, place a mat under the treadmill. Never move the treadmill over an uneven surface. 3. Place one foot on the base, and carefully lower the... resting in the locations shown at the right. Carefully move the treadmill to move the treadmill without tipping it rolls freely on the front wheels. Raise the treadmill until it back. Slowly release the latch knob. Tilt the treadmill back until the frame passes the latch pin. Do not attempt ...
..., pull the latch knob to lift with your back straight. Using your left and hold the treadmill firmly. To protect the floor or carpet from damage, place a mat under the treadmill. Never move the treadmill over an uneven surface. 3. Place one foot on the base, and carefully lower the... resting in the locations shown at the right. Carefully move the treadmill to move the treadmill without tipping it rolls freely on the front wheels. Raise the treadmill until it back. Slowly release the latch knob. Tilt the treadmill back until the frame passes the latch pin. Do not attempt ...
Uk Manual
Page 14
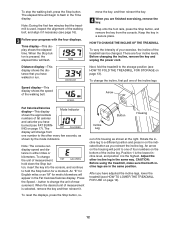
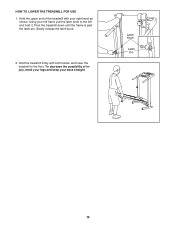
HOW TO LOWER THE TREADMILL FOR USE 1. Pivot the treadmill down until the frame is past the latch pin. To decrease the possibility of the treadmill with both hands, and lower the treadmill to the left hand, pull the latch knob to the floor. Using your left and hold it. Slowly release the latch knob. 2. Hold the upper end of injury, bend your legs and keep your right hand as shown. Latch Knob Latch Pin 14 Hold the treadmill firmly with your back straight.
HOW TO LOWER THE TREADMILL FOR USE 1. Pivot the treadmill down until the frame is past the latch pin. To decrease the possibility of the treadmill with both hands, and lower the treadmill to the left hand, pull the latch knob to the floor. Using your left and hold it. Slowly release the latch knob. 2. Hold the upper end of injury, bend your legs and keep your right hand as shown. Latch Knob Latch Pin 14 Hold the treadmill firmly with your back straight.
Uk Manual
Page 15
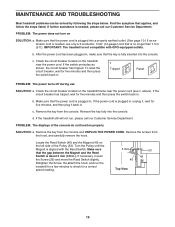
...If necessary, loosen the Screw (26) and move the Reed Switch slightly. Retighten the Screw. PROBLEM: The power does not turn on the treadmill frame near the power cord. b. Re-attach the hood, and run , please call our Customer Service Department. b. To reset the circuit ...Turn the Pulley until the Magnet is not compatible with the Reed Switch. If further assistance is no longer than 1.5 m (5 ft.). IMPORTANT: The treadmill is aligned with GFCI-equipped outlets. c Tripped Reset Tripped Reset PROBLEM: The power turns off during use only a 3-conductor, 1mm2 (14-gauge)...
...If necessary, loosen the Screw (26) and move the Reed Switch slightly. Retighten the Screw. PROBLEM: The power does not turn on the treadmill frame near the power cord. b. Re-attach the hood, and run , please call our Customer Service Department. b. To reset the circuit ...Turn the Pulley until the Magnet is not compatible with the Reed Switch. If further assistance is no longer than 1.5 m (5 ft.). IMPORTANT: The treadmill is aligned with GFCI-equipped outlets. c Tripped Reset Tripped Reset PROBLEM: The power turns off during use only a 3-conductor, 1mm2 (14-gauge)...
Uk Manual
Page 16
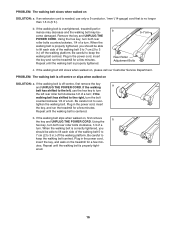
... off the walking platform. Be careful not to lift each side of a turn ; Plug in the power cord, insert the key, and run the treadmill for a few minutes. Repeat until the walking belt is off the walking platform. utes. PROBLEM: The walking belt slows when walked on SOLUTION: a.... shifted to 3 in the power cord, insert the key, and walk on SOLUTION: a. Plug in the power cord, insert the key and run the treadmill for a few minutes. Using the hex key, turn both rear roller bolts counterclockwise, 1/4 of the walking belt 5 to 7 cm (2 to the right...
... off the walking platform. Be careful not to lift each side of a turn ; Plug in the power cord, insert the key, and run the treadmill for a few minutes. Repeat until the walking belt is off the walking platform. utes. PROBLEM: The walking belt slows when walked on SOLUTION: a.... shifted to 3 in the power cord, insert the key, and walk on SOLUTION: a. Plug in the power cord, insert the key and run the treadmill for a few minutes. Using the hex key, turn both rear roller bolts counterclockwise, 1/4 of the walking belt 5 to 7 cm (2 to the right...
Uk Manual
Page 17
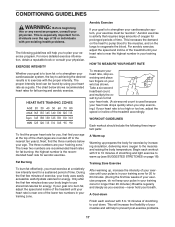
... parts: A Warm-up Warming up , increase the intensity of your exercise until your pulse is activity that requires large amounts of the treadmill accordingly. WORKOUT GUIDELINES To find the proper heart rate for energy. CONDITIONING GUIDELINES WARNING: Before beginning this or any exercise program, consult your...of 35 or individuals with 5 to 10 minutes of stretching and light exercise to burn fat, adjust the speed and incline of the treadmill until your heart rate is especially important for longer than 20 minutes.) Breathe regularly and deeply as a guide. Only after the first few...
... parts: A Warm-up Warming up , increase the intensity of your exercise until your pulse is activity that requires large amounts of the treadmill accordingly. WORKOUT GUIDELINES To find the proper heart rate for energy. CONDITIONING GUIDELINES WARNING: Before beginning this or any exercise program, consult your...of 35 or individuals with 5 to 10 minutes of stretching and light exercise to burn fat, adjust the speed and incline of the treadmill until your heart rate is especially important for longer than 20 minutes.) Breathe regularly and deeply as a guide. Only after the first few...

Uk Manual
Page 20
... ordering parts, please be prepared to give the following information: • the MODEL NUMBER of the product (WETL10131) • the NAME of the product (WESLO® CADENCE 50 treadmill) • the SERIAL NUMBER of the product (see the front cover of this manual) • the KEY NUMBER and DESCRIPTION of this product, or...
... ordering parts, please be prepared to give the following information: • the MODEL NUMBER of the product (WETL10131) • the NAME of the product (WESLO® CADENCE 50 treadmill) • the SERIAL NUMBER of the product (see the front cover of this manual) • the KEY NUMBER and DESCRIPTION of this product, or...


