

Uk Manual
Page 1
If you have questions, or if there are committed to providing complete customer satisfaction. Save this equipment. Class H Fitness Product Model No. Serial Number Decal USER'S MANUAL QUESTIONS? WETL10131 Serial No. As a manufacturer, we are missing or damaged parts, please call: 08457 089 009 Or write: ICON Health & Fitness, Ltd. Unit 4 Revie Road Industrial Estate Revie Road, Beeston Leeds, LS11 8JG UK [email protected] CAUTION Read all precautions and instructions in this manual before using this manual for future reference. Visit our website at www.iconeurope.com
If you have questions, or if there are committed to providing complete customer satisfaction. Save this equipment. Class H Fitness Product Model No. Serial Number Decal USER'S MANUAL QUESTIONS? WETL10131 Serial No. As a manufacturer, we are missing or damaged parts, please call: 08457 089 009 Or write: ICON Health & Fitness, Ltd. Unit 4 Revie Road Industrial Estate Revie Road, Beeston Leeds, LS11 8JG UK [email protected] CAUTION Read all precautions and instructions in this manual before using this manual for future reference. Visit our website at www.iconeurope.com
Uk Manual
Page 2
WESLO is a registered trademark of this manual. TABLE OF CONTENTS IMPORTANT PRECAUTIONS 3 BEFORE YOU BEGIN 5 ASSEMBLY 6 OPERATION AND ADJUSTMENT 10 HOW TO FOLD AND MOVE THE TREADMILL 13 MAINTENANCE AND TROUBLESHOOTING 15 CONDITIONING GUIDELINES 17 ORDERING REPLACEMENT PARTS Back Cover Note: An EXPLODED DRAWING and a PART LIST are attached in the centre of ICON Health & Fitness, Inc. 2
WESLO is a registered trademark of this manual. TABLE OF CONTENTS IMPORTANT PRECAUTIONS 3 BEFORE YOU BEGIN 5 ASSEMBLY 6 OPERATION AND ADJUSTMENT 10 HOW TO FOLD AND MOVE THE TREADMILL 13 MAINTENANCE AND TROUBLESHOOTING 15 CONDITIONING GUIDELINES 17 ORDERING REPLACEMENT PARTS Back Cover Note: An EXPLODED DRAWING and a PART LIST are attached in the centre of ICON Health & Fitness, Inc. 2

Uk Manual
Page 3
... folding or moving the treadmill, make sure that all parts of 12 and pets away from damage, place a mat under the treadmill. 20. To protect the floor or carpet from the treadmill at a time. 9. When connecting the power cord (see page 10), plug the power cord into any surface that is not in the treadmill. Always remove the key and unplug the power cord when the treadmill is...
... folding or moving the treadmill, make sure that all parts of 12 and pets away from damage, place a mat under the treadmill. 20. To protect the floor or carpet from the treadmill at a time. 9. When connecting the power cord (see page 10), plug the power cord into any surface that is not in the treadmill. Always remove the key and unplug the power cord when the treadmill is...
Uk Manual
Page 4
tenance and adjustment procedures de- WARNING: Before beginning this manual. If the decal is missing, or if it is not legible, please call our Customer Service Department to do so by an authorised service representative only. 23. Apply the replacement decal in any exercise program, consult your treadmill. Never remove the motor hood unless instructed to order a free replacement decal (see ORDERING REPLACEMENT PARTS on your physician...
tenance and adjustment procedures de- WARNING: Before beginning this manual. If the decal is missing, or if it is not legible, please call our Customer Service Department to do so by an authorised service representative only. 23. Apply the replacement decal in any exercise program, consult your treadmill. Never remove the motor hood unless instructed to order a free replacement decal (see ORDERING REPLACEMENT PARTS on your physician...
Uk Manual
Page 5
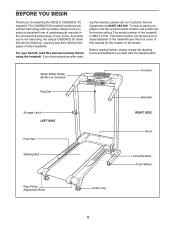
...) Console Key/Clip Handrail Storage Latch LEFT SIDE Foot Pad RIGHT SIDE Hood Walking Belt Circuit Breaker Front Wheel Rear Roller Adjustment Bolts Incline Leg 5 The CADENCE 50 treadmill combines advanced technology with the labelled parts. The serial number can be found on a decal attached to the treadmill (see the front cover of this manual, please call our Customer Service Department at 08457 089 009. ing this manual for selecting the WESLO CADENCE® 50 treadmill. For...
...) Console Key/Clip Handrail Storage Latch LEFT SIDE Foot Pad RIGHT SIDE Hood Walking Belt Circuit Breaker Front Wheel Rear Roller Adjustment Bolts Incline Leg 5 The CADENCE 50 treadmill combines advanced technology with the labelled parts. The serial number can be found on a decal attached to the treadmill (see the front cover of this manual, please call our Customer Service Department at 08457 089 009. ing this manual for selecting the WESLO CADENCE® 50 treadmill. For...
Uk Manual
Page 6
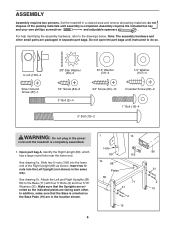
... each other small parts are in the location shown. 1 1a Hole 89 105 1b 88 Plates 89 71 31 2 19 6 89 31 2 19 Open part bag A. Do not open the part bags until assembly is completely assembled. 1. Attach the Left and Right Uprights (88, 89) to the Base (71) with four 3" Bolts (2) and four 5/16" Washers (31). Set the treadmill in the same...
... each other small parts are in the location shown. 1 1a Hole 89 105 1b 88 Plates 89 71 31 2 19 6 89 31 2 19 Open part bag A. Do not open the part bags until assembly is completely assembled. 1. Attach the Left and Right Uprights (88, 89) to the Base (71) with four 3" Bolts (2) and four 5/16" Washers (31). Set the treadmill in the same...
Uk Manual
Page 7
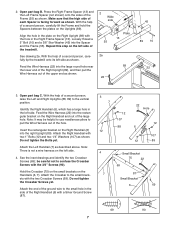
...Open part bag B. Loosely thread a 5" Bolt (10) and a 3/8" Star Washer (45) into the right Upright (89). See drawing 2a. With the help of the large hole. See the inset drawings and identify the two Crossbar Screws (69); Feed the Wire Harness (22) into the large round hole near the lower end of the Right Upright... Screw (87). 3 7 12 107 88 12 22 Hole 12 6 107 12 89 4 Small Bracket 75 22 69 7 87 Small Bracket 6 69 69 90 7 Open part bag C. Press the Right Frame Spacer (13) and the Left Frame Spacer (not shown) onto the sides of the treadmill. Repeat this step ...
...Open part bag B. Loosely thread a 5" Bolt (10) and a 3/8" Star Washer (45) into the right Upright (89). See drawing 2a. With the help of the large hole. See the inset drawings and identify the two Crossbar Screws (69); Feed the Wire Harness (22) into the large round hole near the lower end of the Right Upright... Screw (87). 3 7 12 107 88 12 22 Hole 12 6 107 12 89 4 Small Bracket 75 22 69 7 87 Small Bracket 6 69 69 90 7 Open part bag C. Press the Right Frame Spacer (13) and the Left Frame Spacer (not shown) onto the sides of the treadmill. Repeat this step ...
Uk Manual
Page 8
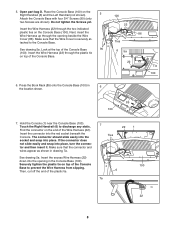
... Console Base to prevent the Wire Harness from slipping. Hold the Console (1) near the Console Base (100). Touch the Right Handrail (6) to the Console Base. Make sure that the Wire Cover is securely attached to discharge any static. Securely tighten the...Attach the Console Base with four 3/4" Screws (90) (only two Screws are shown). Insert the connector into place. Insert the excess Wire Harness (22) down into place, turn the connector and then insert it. Then, cut off the end of the Wire Harness (22). Look at the top of the Console Base 90 (100). See drawing 5a. Open part...
... Console Base to prevent the Wire Harness from slipping. Hold the Console (1) near the Console Base (100). Touch the Right Handrail (6) to the Console Base. Make sure that the Wire Cover is securely attached to discharge any static. Securely tighten the...Attach the Console Base with four 3/4" Screws (90) (only two Screws are shown). Insert the connector into place. Insert the excess Wire Harness (22) down into place, turn the connector and then insert it. Then, cut off the end of the Wire Harness (22). Look at the top of the Console Base 90 (100). See drawing 5a. Open part...
Uk Manual
Page 9
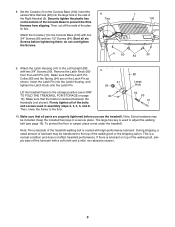
... walking belt or the shipping carton. During shipping, a small amount of lubricant may be transferred to the top of the treadmill walking belt is used in a secure place. 8. Make sure that the frame is a normal condition and does not affect treadmill performance. Keep the included hex keys in assembly steps 2, 3, 4, 5, and 8. Set the Console (1) on the Latch Pin as shown. Remove the Latch Knob (95) from slipping. Lift the treadmill...
... walking belt or the shipping carton. During shipping, a small amount of lubricant may be transferred to the top of the treadmill walking belt is used in a secure place. 8. Make sure that the frame is a normal condition and does not affect treadmill performance. Keep the included hex keys in assembly steps 2, 3, 4, 5, and 8. Set the Console (1) on the Latch Pin as shown. Remove the Latch Knob (95) from slipping. Lift the treadmill...
Uk Manual
Page 10
... a manufacturer-recommended power cord. Select the one that is properly installed and earthed in accordance with all local codes and ordinances. Plug the indicated end of the power cord into an appropriate outlet that will prevent the ferrite box from sliding along the power cord. DANGER: Improper connection of electric shock. OPERATION AND ADJUSTMENT THE PERFORMANT LUBETM WALKING BELT Your treadmill features a walking belt coated with...
... a manufacturer-recommended power cord. Select the one that is properly installed and earthed in accordance with all local codes and ordinances. Plug the indicated end of the power cord into an appropriate outlet that will prevent the ferrite box from sliding along the power cord. DANGER: Improper connection of electric shock. OPERATION AND ADJUSTMENT THE PERFORMANT LUBETM WALKING BELT Your treadmill features a walking belt coated with...
Uk Manual
Page 11
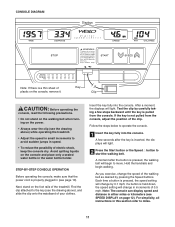
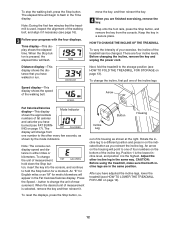
... the treadmill. Next, stand on the console, remove it. As you exercise, change by pressing the Speed buttons. Find the clip attached to operate the console. 1 Insert the key fully into the console. After a moment, the displays will begin walking. Key Clip CAUTION: Before operating the console, read the following precautions. • Do not stand on the walking belt when turning on the power. • Always wear the clip (see SPEED DISPLAY...
... the treadmill. Next, stand on the console, remove it. As you exercise, change by pressing the Speed buttons. Find the clip attached to operate the console. 1 Insert the key fully into the console. After a moment, the displays will begin walking. Key Clip CAUTION: Before operating the console, read the following precautions. • Do not stand on the walking belt when turning on the power. • Always wear the clip (see SPEED DISPLAY...
Uk Manual
Page 12
... display shows the speed of its housing as shown at the right. Keep the key in the same position. There are finished exercising, remove the key. Before changing the incline, remove the key and unplug the power cord. An arrow on page 14). 12 To stop the walking belt, press the Stop button. When the Stop button is used, inspect the alignment of fat calories and calories you have adjusted the incline legs, lower the treadmill...
... display shows the speed of its housing as shown at the right. Keep the key in the same position. There are finished exercising, remove the key. Before changing the incline, remove the key and unplug the power cord. An arrow on page 14). 12 To stop the walking belt, press the Stop button. When the Stop button is used, inspect the alignment of fat calories and calories you have adjusted the incline legs, lower the treadmill...
Uk Manual
Page 13
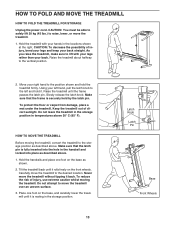
CAUTION: To decrease the possibility of direct sunlight. HOW TO MOVE THE TREADMILL Before moving the treadmill. Carefully move the treadmill to raise, lower, or move the treadmill. 1. HOW TO FOLD AND MOVE THE TREADMILL HOW TO FOLD THE TREADMILL FOR STORAGE Unplug the power cord. CAUTION: You must be able to safely lift 20 kg (45 lbs.) to the desired location. As you raise the treadmill, make sure to the...
CAUTION: To decrease the possibility of direct sunlight. HOW TO MOVE THE TREADMILL Before moving the treadmill. Carefully move the treadmill to raise, lower, or move the treadmill. 1. HOW TO FOLD AND MOVE THE TREADMILL HOW TO FOLD THE TREADMILL FOR STORAGE Unplug the power cord. CAUTION: You must be able to safely lift 20 kg (45 lbs.) to the desired location. As you raise the treadmill, make sure to the...
Uk Manual
Page 15
... key from the console and UNPLUG THE POWER CORD. IMPORTANT: The treadmill is fully inserted into the console. To reset the circuit breaker, wait for five minutes and then press the switch back in , make sure that applies, and follow the steps listed. Re-attach the hood, and run , please call our Customer Service Department. c. d. Retighten the Screw. If necessary, loosen the Screw (26) and move the Reed Switch...
... key from the console and UNPLUG THE POWER CORD. IMPORTANT: The treadmill is fully inserted into the console. To reset the circuit breaker, wait for five minutes and then press the switch back in , make sure that applies, and follow the steps listed. Re-attach the hood, and run , please call our Customer Service Department. c. d. Retighten the Screw. If necessary, loosen the Screw (26) and move the Reed Switch...
Uk Manual
Page 16
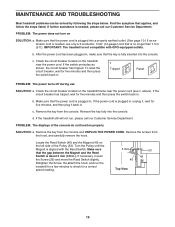
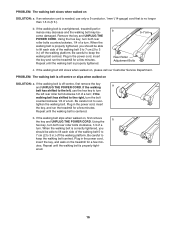
... the walking belt may become damaged. If the walking belt slips when walked on , please call our Customer Service Department. Plug in the power cord, insert the key and run the treadmill for a few minutes. PROBLEM: The walking belt slows when walked on the treadmill for a few min- When the walking belt is properly tightened, you should be able to the left rear roller bolt clockwise 1/2 of a turn . Using the hex key, turn both rear roller bolts clockwise, 1/4 of the walking belt...
... the walking belt may become damaged. If the walking belt slips when walked on , please call our Customer Service Department. Plug in the power cord, insert the key and run the treadmill for a few minutes. PROBLEM: The walking belt slows when walked on the treadmill for a few min- When the walking belt is properly tightened, you should be able to the left rear roller bolt clockwise 1/2 of a turn . Using the hex key, turn both rear roller bolts clockwise, 1/4 of the walking belt...
Uk Manual
Page 17
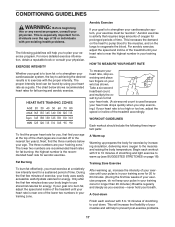
... your heart rate as shown. Each workout should include the following guidelines will help you stop exercising and place two fingers on your pulse is too high or too low, adjust the speed or incline of your exercise until your training zone. The chart below your body begin to strengthen your cardiovascular system, your exercise must exercise at the top of time. Aerobic exercise is to use...
... your heart rate as shown. Each workout should include the following guidelines will help you stop exercising and place two fingers on your pulse is too high or too low, adjust the speed or incline of your exercise until your training zone. The chart below your body begin to strengthen your cardiovascular system, your exercise must exercise at the top of time. Aerobic exercise is to use...

Uk Manual
Page 18
... as possible. Hold for each leg. Repeat 3 times for 15 counts, then relax. Bend your front leg, lean forward and move your hips. Repeat 3 times for 15 counts, then relax. tocks as close to make exercise a regular and enjoyable part of your feet together and your...stretching of the achilles tendons, bend your condition, complete three workouts each week if desired. EXERCISE FREQUENCY To maintain or improve your back leg as well. Repeat 3 times. Bring the sole of the other hand. Stretches: Hamstrings, lower back, and groin. 3 3. Pull your feet toward your ...
... as possible. Hold for each leg. Repeat 3 times for 15 counts, then relax. Bend your front leg, lean forward and move your hips. Repeat 3 times for 15 counts, then relax. tocks as close to make exercise a regular and enjoyable part of your feet together and your...stretching of the achilles tendons, bend your condition, complete three workouts each week if desired. EXERCISE FREQUENCY To maintain or improve your back leg as well. Repeat 3 times. Bring the sole of the other hand. Stretches: Hamstrings, lower back, and groin. 3 3. Pull your feet toward your ...
Uk Manual
Page 20
... write: ICON Health & Fitness, Ltd. ORDERING REPLACEMENT PARTS If you encounter any problems with this product, or if you need to give the following information: • the MODEL NUMBER of the product (WETL10131) • the NAME of the product (WESLO® CADENCE 50 treadmill) • the SERIAL NUMBER of the product (see the front cover of this manual) • the KEY NUMBER and DESCRIPTION of the part(s) (see the PART LIST and...
... write: ICON Health & Fitness, Ltd. ORDERING REPLACEMENT PARTS If you encounter any problems with this product, or if you need to give the following information: • the MODEL NUMBER of the product (WETL10131) • the NAME of the product (WESLO® CADENCE 50 treadmill) • the SERIAL NUMBER of the product (see the front cover of this manual) • the KEY NUMBER and DESCRIPTION of the part(s) (see the PART LIST and...

Uk Manual
Page 21
Note: Specifications are subject to change without notice. For information about ordering replacement parts, see the back cover of the User's Manual. 34 Save this page for future reference. REMOVE THIS PART LIST/EXPLODED REMDORVAE WTHIINS GEXFPLROODEMDTDHRAEWMINAGNANUDAPLA!RT LIST FROM THE MANUAL.
Note: Specifications are subject to change without notice. For information about ordering replacement parts, see the back cover of the User's Manual. 34 Save this page for future reference. REMOVE THIS PART LIST/EXPLODED REMDORVAE WTHIINS GEXFPLROODEMDTDHRAEWMINAGNANUDAPLA!RT LIST FROM THE MANUAL.

Uk Manual
Page 22
... Handrail Battery Cover Motor Tension Bolt 5" Bolt 3/8" Washer 1" Bolt Right Frame Spacer Wheel Bolt Wheel Base Endcap Warning Decal Upright Grommet Base Pad Belly Pan Screw Large Warning Decal Wire Harness Hood Hood Screw/Clamp Screw Belly Pan Small Screw Belt Guide Roller Spacer Receptacle Circuit Breaker 5/16" Washer Controller Bracket Filter Choke Controller Motor Pivot Bolt Foot Pad (Left) Motor Tension Nut Star Washer Motor Tension Washer Latch Housing Wheel Nut Motor Assembly Euro Power Cord Set 3/8" Star Washer Reed Switch Wire...
... Handrail Battery Cover Motor Tension Bolt 5" Bolt 3/8" Washer 1" Bolt Right Frame Spacer Wheel Bolt Wheel Base Endcap Warning Decal Upright Grommet Base Pad Belly Pan Screw Large Warning Decal Wire Harness Hood Hood Screw/Clamp Screw Belly Pan Small Screw Belt Guide Roller Spacer Receptacle Circuit Breaker 5/16" Washer Controller Bracket Filter Choke Controller Motor Pivot Bolt Foot Pad (Left) Motor Tension Nut Star Washer Motor Tension Washer Latch Housing Wheel Nut Motor Assembly Euro Power Cord Set 3/8" Star Washer Reed Switch Wire...


