
English Manual
Page 4
... information before performing the maintenance and adjustment procedures described in this manual if the treadmill is being administered. 2. Do not operate where aerosol products are standing on the treadmill. 6. Use the treadmill only as described in this manual. Keep small children away from heated surfaces. ... speed. Plug the power cord directly into any object into a grounded circuit carrying 12 or more than the procedures in use the treadmill with a three-wire conductor. 3. If an extension cord is not in this manual for both men and women. 5. Adjust the...
... information before performing the maintenance and adjustment procedures described in this manual if the treadmill is being administered. 2. Do not operate where aerosol products are standing on the treadmill. 6. Use the treadmill only as described in this manual. Keep small children away from heated surfaces. ... speed. Plug the power cord directly into any object into a grounded circuit carrying 12 or more than the procedures in use the treadmill with a three-wire conductor. 3. If an extension cord is not in this manual for both men and women. 5. Adjust the...
English Manual
Page 5
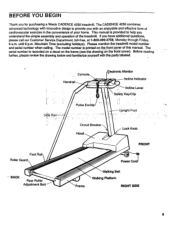
... familiarize yourself with the parts labeled. until 6 p.m. This manual is printed on the front cover). The model number is provided to provide you for purchasing a Weslo CADENCE 4250 treadmill. Foot Rail Roller Guard BACK Rear Roller Adjustment Bolt Console Handrail Pulse Earblip Electronic Monitor Incline Indicator Incline Lever Sf ty Key/Clip Upright Post...
... familiarize yourself with the parts labeled. until 6 p.m. This manual is printed on the front cover). The model number is provided to provide you for purchasing a Weslo CADENCE 4250 treadmill. Foot Rail Roller Guard BACK Rear Roller Adjustment Bolt Console Handrail Pulse Earblip Electronic Monitor Incline Indicator Incline Lever Sf ty Key/Clip Upright Post...
English Manual
Page 6
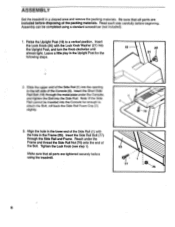
Read each step carefully before using a standard screwdriver (not included). 1. Note: If the Side Rail cannot be completed using the treadmill. 77 76 6 Insert the Side Rail Bolt (77) through the metal plate under the Frame and thread the Side Rail Nut (76) onto the end ... a cleared area and remove the packing materials. Reach under the Console, and tighten the Bolt into the opening in the Frame (65). ASSEMBLY Set the treadmill in the Upright Post for the following steps. 19 20 21 2. Raise the Upright Post (19) to 2 attach the Bolt, roll back the Side Rail...
Read each step carefully before using a standard screwdriver (not included). 1. Note: If the Side Rail cannot be completed using the treadmill. 77 76 6 Insert the Side Rail Bolt (77) through the metal plate under the Frame and thread the Side Rail Nut (76) onto the end ... a cleared area and remove the packing materials. Reach under the Console, and tighten the Bolt into the opening in the Frame (65). ASSEMBLY Set the treadmill in the Upright Post for the following steps. 19 20 21 2. Raise the Upright Post (19) to 2 attach the Bolt, roll back the Side Rail...
English Manual
Page 7
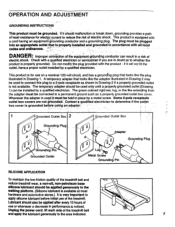
...extending from the adapter must be used only until a properly grounded outlet (Drawing 1) can result in a risk of the treadmill belt and reduce treadmill wear, a non-oil, non-petroleum base silicone lubricant should be connected to determine if the outlet box cover is not available... SILICONE APPLICATION To maintain the low-friction quality of electric shock. Lubricant should malfunction or break down, grounding provides a path of the treadmill. Do not modify the plug provided with all local codes and ordinances. ' ' DANGER: Improper cOlinliCtion of electric shock. The plug...
...extending from the adapter must be used only until a properly grounded outlet (Drawing 1) can result in a risk of the treadmill belt and reduce treadmill wear, a non-oil, non-petroleum base silicone lubricant should be connected to determine if the outlet box cover is not available... SILICONE APPLICATION To maintain the low-friction quality of electric shock. Lubricant should malfunction or break down, grounding provides a path of the treadmill. Do not modify the plug provided with all local codes and ordinances. ' ' DANGER: Improper cOlinliCtion of electric shock. The plug...
English Manual
Page 8
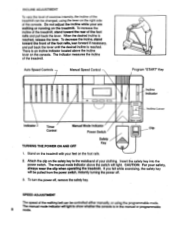
... decrease the incline, stand toward the rear of the foot rails and pull back the lever. CAUTION: For your are walking or running on the treadmill. To turn the power off . 3. Insert the safety key into the power switch. Auto Speed Controls 4 Manual Speed Control 1 0 t= o Program "... can be changed, using the programmable mode. Do not adjust the incline while your safety, always wear the clip when operating the treadmill. When the desired incline is in the manual or programmable 8 mode. If you fall while exercising, the safety key will be controlled...
... decrease the incline, stand toward the rear of the foot rails and pull back the lever. CAUTION: For your are walking or running on the treadmill. To turn the power off . 3. Insert the safety key into the power switch. Auto Speed Controls 4 Manual Speed Control 1 0 t= o Program "... can be changed, using the programmable mode. Do not adjust the incline while your safety, always wear the clip when operating the treadmill. When the desired incline is in the manual or programmable 8 mode. If you fall while exercising, the safety key will be controlled...
English Manual
Page 9
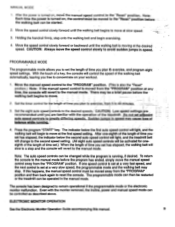
... auto speed controls to greatly differing speeds. To return the console to the manual mode. The programmable mode can then be restarted or the treadmill can be controlled as described above. The console has been designed to the desired speeds/ CAUTION; With the touch of a key, the ...MODE The programmable mode allows you to a stop . Set the timer control for oneeighth of the length of time set the length of the treadmill. Set the eight auto speed controls to remain operational if the programmable mode or the electronic monitor malfunction. Do not set at the desired speed...
... auto speed controls to greatly differing speeds. To return the console to the manual mode. The programmable mode can then be restarted or the treadmill can be controlled as described above. The console has been designed to the desired speeds/ CAUTION; With the touch of a key, the ...MODE The programmable mode allows you to a stop . Set the timer control for oneeighth of the length of time set the length of the treadmill. Set the eight auto speed controls to remain operational if the programmable mode or the electronic monitor malfunction. Do not set at the desired speed...
English Manual
Page 10
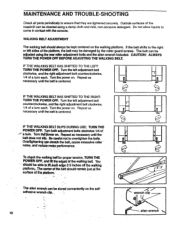
... shifts to overtighten the bolts. Repeat as necessary until the belt does not Slip: Be careful not to the right or loft sides of the treadmill can -Stretch the beltt cause exbessive roller noise, and redu00materperfermance. Turn the left adjustment bolt clockwise, and the right adjustment bolt counterclockwise, 1/4 of ti' -a turn...
... shifts to overtighten the bolts. Repeat as necessary until the belt does not Slip: Be careful not to the right or loft sides of the treadmill can -Stretch the beltt cause exbessive roller noise, and redu00materperfermance. Turn the left adjustment bolt clockwise, and the right adjustment bolt counterclockwise, 1/4 of ti' -a turn...
English Manual
Page 11
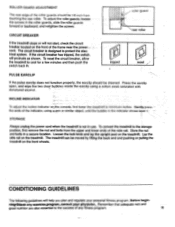
...function properly, the earclip should be 1/8 inch from the upper and lower ends of the side rail. Before begin- CIRCUIT BREAKER If the treadmill stops or will protrude as shown. Store the nut and bolts in the roller guards, slide the roller guards forward or backward, and ... the circuit breaker has tripped, the switch. To adjust the roller guards; Loosen the lock knob and lay the upright post on the treadmill. Gently press the ends of the indicator, using a cotton swab saturated with denatured alcohol. INCLINE INDICATOR e . ,,• :, To adjust the incline indicator...
...function properly, the earclip should be 1/8 inch from the upper and lower ends of the side rail. Before begin- CIRCUIT BREAKER If the treadmill stops or will protrude as shown. Store the nut and bolts in the roller guards, slide the roller guards forward or backward, and ... the circuit breaker has tripped, the switch. To adjust the roller guards; Loosen the lock knob and lay the upright post on the treadmill. Gently press the ends of the indicator, using a cotton swab saturated with denatured alcohol. INCLINE INDICATOR e . ,,• :, To adjust the incline indicator...
English Manual
Page 16
... SERIAL MBER of the product (see the front cover of the product (WL425010). 2. If possibl , place the treadmill near your telephone for easy reference when calling. • Part No. 1050131/92 Printed in U.S.A. 0 1992 Weslo, Inc. The KEY N BER of the part(s) from page 14 of this manual. 5. Friday, 6 a.m. - 6 p.m. ...-3756, during our business hours: Monday - The NAME of this manual. The DESC IPTION of the part(s) from page 14 of the product (Weslo CADENCE 4250 treadmill). 3. ORDERING REPLACEMENT PARTS Replacement parts can be prepared to give the following information: 1.
... SERIAL MBER of the product (see the front cover of the product (WL425010). 2. If possibl , place the treadmill near your telephone for easy reference when calling. • Part No. 1050131/92 Printed in U.S.A. 0 1992 Weslo, Inc. The KEY N BER of the part(s) from page 14 of this manual. 5. Friday, 6 a.m. - 6 p.m. ...-3756, during our business hours: Monday - The NAME of this manual. The DESC IPTION of the part(s) from page 14 of the product (Weslo CADENCE 4250 treadmill). 3. ORDERING REPLACEMENT PARTS Replacement parts can be prepared to give the following information: 1.


