
English Manual
Page 2
.... Do not wear loose clothing that all of this manual. both men and women. Use the treadmill only as described. 3. Keep the treadmill indoors, away from heated surfaces. 8. When connecting the power cord (see your local WESLO dealer or call 1-800-8063651 and order part number 146148. 12. To purchase a surge suppressor, see...
.... Do not wear loose clothing that all of this manual. both men and women. Use the treadmill only as described. 3. Keep the treadmill indoors, away from heated surfaces. 8. When connecting the power cord (see your local WESLO dealer or call 1-800-8063651 and order part number 146148. 12. To purchase a surge suppressor, see...
English Manual
Page 3
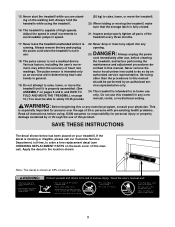
... size. 3 Always unplug the power cord immediately after use only. Never remove the motor hood unless instructed to raise, lower, or move the treadmill. 20. ICON assumes no responsibility for in any opening. 15. Note: The decal is capable of this manual). Always hold the handrails while ... a free replacement decal (see ORDERING REPLACEMENT PARTS on the walking belt. Always remove the key and unplug the power cord when the treadmill is especially important for persons over the age of 35 or persons with pre-existing health problems. Read all parts of this product. ...
... size. 3 Always unplug the power cord immediately after use only. Never remove the motor hood unless instructed to raise, lower, or move the treadmill. 20. ICON assumes no responsibility for in any opening. 15. Note: The decal is capable of this manual). Always hold the handrails while ... a free replacement decal (see ORDERING REPLACEMENT PARTS on the walking belt. Always remove the key and unplug the power cord when the treadmill is especially important for persons over the age of 35 or persons with pre-existing health problems. Read all parts of this product. ...
English Manual
Page 4
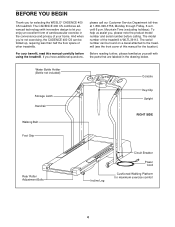
...Bolts Incline Leg Circuit Breaker Power Cord Cushioned Walking Platform for selecting the WESLO® CADENCE 400 CS treadmill. Mountain Time (excluding holidays). BEFORE YOU BEGIN Thank you 're not exercising, the CADENCE 400 CS can be folded up, requiring less than half the floor ...space of other treadmills. Before reading further, please familiarize yourself with innovative design to the treadmill (see the front cover of this manual carefully before calling. The CADENCE 400 CS combines advanced technology with the parts that are...
...Bolts Incline Leg Circuit Breaker Power Cord Cushioned Walking Platform for selecting the WESLO® CADENCE 400 CS treadmill. Mountain Time (excluding holidays). BEFORE YOU BEGIN Thank you 're not exercising, the CADENCE 400 CS can be folded up, requiring less than half the floor ...space of other treadmills. Before reading further, please familiarize yourself with innovative design to the treadmill (see the front cover of this manual carefully before calling. The CADENCE 400 CS combines advanced technology with the parts that are...
English Manual
Page 5
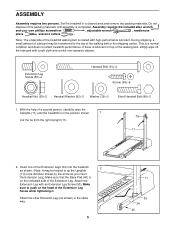
...Screw (96)-6 Handrail Nut (93)-2 Handrail Washer (92)-2 Washer (39)-2 Short Handrail Bolt (89)-2 1. Insert one of the Extension Legs (34) into the treadmill 2 as shown. (Note: It may be helpful to push on the indicated side of the walking belt, simply wipe off the lubricant with an Extension.... 1 Cut the tie from the right Upright (11). Attach the Extension Leg with a soft cloth and a mild, non-abrasive cleaner. Set the treadmill in the same way. 5 11 53 34 40 Note: The underside of the Extension Leg Screw while tightening it. Attach the other Extension Leg (not...
...Screw (96)-6 Handrail Nut (93)-2 Handrail Washer (92)-2 Washer (39)-2 Short Handrail Bolt (89)-2 1. Insert one of the Extension Legs (34) into the treadmill 2 as shown. (Note: It may be helpful to push on the indicated side of the walking belt, simply wipe off the lubricant with an Extension.... 1 Cut the tie from the right Upright (11). Attach the Extension Leg with a soft cloth and a mild, non-abrasive cleaner. Set the treadmill in the same way. 5 11 53 34 40 Note: The underside of the Extension Leg Screw while tightening it. Attach the other Extension Leg (not...

English Manual
Page 6
...adjust the walking belt [see page 13]). Pull out just enough of the Upright. WARNING: Do not disconnect or connect the Wires while the treadmill power cord is used to push on the Right Handrail and out of the Console Base. Thread four Screws (96) into the other Wire ... have been started, tighten the Screws until they are no wires in . Refer to overtighten the Screws. If there is shown). If necessary, use the treadmill. Attach the Left Handrail to connect them in the left Upright (11) with a Handrail Bolt (91), a Handrail Washer (92), and a Handrail Nut (93) ...
...adjust the walking belt [see page 13]). Pull out just enough of the Upright. WARNING: Do not disconnect or connect the Wires while the treadmill power cord is used to push on the Right Handrail and out of the Console Base. Thread four Screws (96) into the other Wire ... have been started, tighten the Screws until they are no wires in . Refer to overtighten the Screws. If there is shown). If necessary, use the treadmill. Attach the Left Handrail to connect them in the left Upright (11) with a Handrail Bolt (91), a Handrail Washer (92), and a Handrail Nut (93) ...

English Manual
Page 7
...the adapter must be electrically rated for use a properly functioning surge suppressor could result in an increased risk of the treadmill. Grounding Pin Grounded Outlet Grounding Plug Grounded Outlet Box Adapter Surge Suppressor Use only a single-outlet surge suppressor that looks... voltage surge suppressor (TVSS). If the control system is functioning properly. A temporary adapter that is properly grounded. Check with your local WESLO dealer or call 1-800- 806-3651 and order part number 146148. Contact a qualified electrician to a 2-pole receptacle as a properly grounded...
...the adapter must be electrically rated for use a properly functioning surge suppressor could result in an increased risk of the treadmill. Grounding Pin Grounded Outlet Grounding Plug Grounded Outlet Box Adapter Surge Suppressor Use only a single-outlet surge suppressor that looks... voltage surge suppressor (TVSS). If the control system is functioning properly. A temporary adapter that is properly grounded. Check with your local WESLO dealer or call 1-800- 806-3651 and order part number 146148. Contact a qualified electrician to a 2-pole receptacle as a properly grounded...
English Manual
Page 8
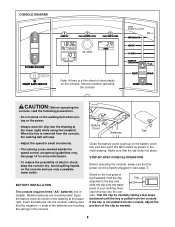
CONSOLE DIAGRAM Note: If there is a thin sheet of the treadmill. BATTERY INSTALLATION The console requires three "AA" batteries (not included). Battery Cover Batteries Tab Close the battery cover, push up on the console, remove it ... springs in (see the drawing at the upper right. band of the clip as shown in the drawing at the lower right) while using the treadmill. When the key is not pulled from the console, adjust the position of your clothing. CAUTION: Before operating the console, read the following precautions. •...
CONSOLE DIAGRAM Note: If there is a thin sheet of the treadmill. BATTERY INSTALLATION The console requires three "AA" batteries (not included). Battery Cover Batteries Tab Close the battery cover, push up on the console, remove it ... springs in (see the drawing at the upper right. band of the clip as shown in the drawing at the lower right) while using the treadmill. When the key is not pulled from the console, adjust the position of your clothing. CAUTION: Before operating the console, read the following precautions. •...
English Manual
Page 9
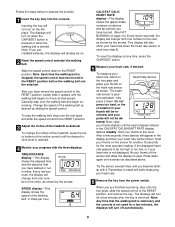
... down . To stop the walking belt, step onto the foot grips and slide the speed control to the RESET position. 3 Adjust the incline of the treadmill as desired by sliding the speed control. onds, the display will be too high or too low, or if your heart rate is removed. CALS..., slowly slide it upward until you have burned. (See FAT BURNING on page 14.) Every seven seconds, the display will change the incline of the treadmill, press the top or bottom of the walking belt, in the display and then your heart rate will change from one num- After you are...
... down . To stop the walking belt, step onto the foot grips and slide the speed control to the RESET position. 3 Adjust the incline of the treadmill as desired by sliding the speed control. onds, the display will be too high or too low, or if your heart rate is removed. CALS..., slowly slide it upward until you have burned. (See FAT BURNING on page 14.) Every seven seconds, the display will change the incline of the treadmill, press the top or bottom of the walking belt, in the display and then your heart rate will change from one num- After you are...
English Manual
Page 10
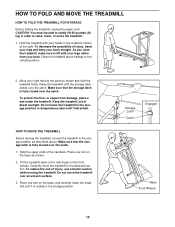
... uneven surface. 3. Storage Latch Catch Engaged Base Front Wheels 10 Make sure that the storage latch is fully closed over the catch. 1. Keep the treadmill out of the handrails. Place one foot on the front wheels. Hold the upper ends of direct sunlight. Do not move the... treadmill over the catch. HOW TO MOVE THE TREADMILL Before moving the treadmill. CAUTION: You must be able to safely lift 45 pounds (20 kg) in the locations shown at the right....
... uneven surface. 3. Storage Latch Catch Engaged Base Front Wheels 10 Make sure that the storage latch is fully closed over the catch. 1. Keep the treadmill out of the handrails. Place one foot on the front wheels. Hold the upper ends of direct sunlight. Do not move the... treadmill over the catch. HOW TO MOVE THE TREADMILL Before moving the treadmill. CAUTION: You must be able to safely lift 45 pounds (20 kg) in the locations shown at the right....
English Manual
Page 11
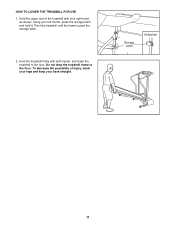
Do not drop the treadmill frame to the floor. Hold the treadmill firmly with your right hand as shown. Pivot the treadmill until the frame is past the storage latch. 2. Storage Latch Unlatched 11 HOW TO LOWER THE TREADMILL FOR USE 1. Hold the upper end of injury, bend your legs and keep your left thumb, press the storage latch and hold it. Using your back straight. To decrease the possibility of the treadmill with both hands, and lower the treadmill to the floor.
Do not drop the treadmill frame to the floor. Hold the treadmill firmly with your right hand as shown. Pivot the treadmill until the frame is past the storage latch. 2. Storage Latch Unlatched 11 HOW TO LOWER THE TREADMILL FOR USE 1. Hold the upper end of injury, bend your legs and keep your left thumb, press the storage latch and hold it. Using your back straight. To decrease the possibility of the treadmill with both hands, and lower the treadmill to the floor.
English Manual
Page 12
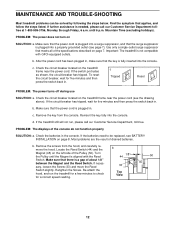
...remove the hood. Check the batteries in . Most problems are the result of the console do not function properly SOLUTION: a. Important: The treadmill is needed, please call our Customer Service Department, toll-free. To reset the circuit breaker, wait for five minutes and then press the ...Friday, 6 a.m. until the Magnet is fully inserted into the console. Find the symptom that meets all of the specifications described on the treadmill frame near the power cord (see BATTERY INSTALLATION on the left side of about 1/8" between the Magnet and the Reed Switch. Turn the ...
...remove the hood. Check the batteries in . Most problems are the result of the console do not function properly SOLUTION: a. Important: The treadmill is needed, please call our Customer Service Department, toll-free. To reset the circuit breaker, wait for five minutes and then press the ...Friday, 6 a.m. until the Magnet is fully inserted into the console. Find the symptom that meets all of the specifications described on the treadmill frame near the power cord (see BATTERY INSTALLATION on the left side of about 1/8" between the Magnet and the Reed Switch. Turn the ...
English Manual
Page 13
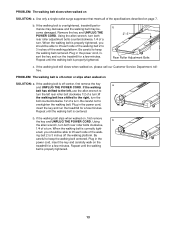
...the bolt counterclockwise 1/2 of the walking belt 2 to lift each side of a turn. Plug in the power cord, insert the key and run the treadmill for a few minutes. b. Repeat until the walking belt is correctly tight- Be careful to 3 inches off -center or slips when walked on page ... Repeat until the walking belt is off the walking platform. If the walking belt is centered. If the walking belt slips when walked on the treadmill for a few minutes. Using b the allen wrench, turn . Remove the key and UNPLUG THE POWER CORD. PROBLEM: The walking belt is ...
...the bolt counterclockwise 1/2 of the walking belt 2 to lift each side of a turn. Plug in the power cord, insert the key and run the treadmill for a few minutes. b. Repeat until the walking belt is correctly tight- Be careful to 3 inches off -center or slips when walked on page ... Repeat until the walking belt is off the walking platform. If the walking belt is centered. If the walking belt slips when walked on the treadmill for a few minutes. Using b the allen wrench, turn . Remove the key and UNPLUG THE POWER CORD. PROBLEM: The walking belt is ...
English Manual
Page 14
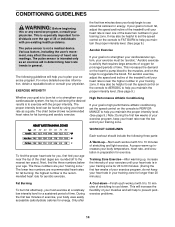
... a reputable book or consult your exercise program. Aerobic exercise is activity that requires large amounts of oxygen for individuals over the age of the treadmill until your heart rate is not a medical device. The chart below your training zone. Next, find the three numbers below shows recommended heart rates... energy. EXERCISE INTENSITY the first few weeks of your exercise program, keep your heart rate in your age near the low end of the treadmill until your heart rate is to the nearest ten years). If your goal is in general. It may also be "aerobic." This increases ...
... a reputable book or consult your exercise program. Aerobic exercise is activity that requires large amounts of oxygen for individuals over the age of the treadmill until your heart rate is not a medical device. The chart below your training zone. Next, find the three numbers below shows recommended heart rates... energy. EXERCISE INTENSITY the first few weeks of your exercise program, keep your heart rate in your age near the low end of the treadmill until your heart rate is to the nearest ten years). If your goal is in general. It may also be "aerobic." This increases ...

English Manual
Page 16
...only to give the following information when calling: • The MODEL NUMBER of the product (WLTL39113) • The NAME of the product (WESLO CADENCE® 400 CS treadmill) • The SERIAL NUMBER of the product (see the front cover of this manual) • The KEY NUMBER and DESCRIPTION of the ...desired part(s) (see the PART LIST and the EXPLODED DRAWING in the center of this manual) WESLO is a registered trademark of ICON Health & Fitness, ...
...only to give the following information when calling: • The MODEL NUMBER of the product (WLTL39113) • The NAME of the product (WESLO CADENCE® 400 CS treadmill) • The SERIAL NUMBER of the product (see the front cover of this manual) • The KEY NUMBER and DESCRIPTION of the ...desired part(s) (see the PART LIST and the EXPLODED DRAWING in the center of this manual) WESLO is a registered trademark of ICON Health & Fitness, ...


