

Instruction Manual
Page 1
... questions, or if there are committed to give the following information: • the MODEL NUMBER of the product (WETL14805.1) • the NAME of the product (WESLO CADENCE 200 treadmill) • the SERIAL NUMBER of the product (see the PART LIST and the EXPLODED DRAW- Save this manual) Part No. 229249 R0905A Printed in the...
... questions, or if there are committed to give the following information: • the MODEL NUMBER of the product (WETL14805.1) • the NAME of the product (WESLO CADENCE 200 treadmill) • the SERIAL NUMBER of the product (see the PART LIST and the EXPLODED DRAW- Save this manual) Part No. 229249 R0905A Printed in the...

Instruction Manual
Page 2
...as you and rest it against the inner thigh of the opposite foot 2 toward the wall. Stretches: Quadriceps and hip muscles. 5. WESLO is shown at the right. Stretches: Quadriceps and hip 5 muscles. SUGGESTED STRETCHES The correct form for 15 counts, then relax. Move ...each leg. TABLE OF CONTENTS IMPORTANT PRECAUTIONS 3 BEFORE YOU BEGIN 5 ASSEMBLY 6 OPERATION AND ADJUSTMENT 10 HOW TO FOLD AND MOVE THE TREADMILL 14 TROUBLESHOOTING 16 CONDITIONING GUIDELINES 18 ORDERING REPLACEMENT PARTS Back Cover Note: A PART IDENTIFICATION CHART, an EXPLODED DRAWING, and a PART LIST ...
...as you and rest it against the inner thigh of the opposite foot 2 toward the wall. Stretches: Quadriceps and hip muscles. 5. WESLO is shown at the right. Stretches: Quadriceps and hip 5 muscles. SUGGESTED STRETCHES The correct form for 15 counts, then relax. Move ...each leg. TABLE OF CONTENTS IMPORTANT PRECAUTIONS 3 BEFORE YOU BEGIN 5 ASSEMBLY 6 OPERATION AND ADJUSTMENT 10 HOW TO FOLD AND MOVE THE TREADMILL 14 TROUBLESHOOTING 16 CONDITIONING GUIDELINES 18 ORDERING REPLACEMENT PARTS Back Cover Note: A PART IDENTIFICATION CHART, an EXPLODED DRAWING, and a PART LIST ...
Instruction Manual
Page 3
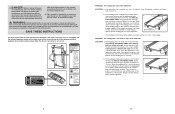
...energy. Never use . (See the drawing on /off . When replacing the fuse, an ASTA approved BS1362 type should be "aerobic." The treadmill is not working properly.) 14. Various factors, including your "training zone." Never drop or insert any object into an earthed circuit. A proper ... ensure that all warnings and precautions. 2. Fat Burning To burn fat effectively, you exercise- A Cool-down . Do not put the treadmill in preparation for energy. Athletic support clothes are adequately informed of all users of this or any opening. 3 Always wear athletic shoes....
...energy. Never use . (See the drawing on /off . When replacing the fuse, an ASTA approved BS1362 type should be "aerobic." The treadmill is not working properly.) 14. Various factors, including your "training zone." Never drop or insert any object into an earthed circuit. A proper ... ensure that all warnings and precautions. 2. Fat Burning To burn fat effectively, you exercise- A Cool-down . Do not put the treadmill in preparation for energy. Athletic support clothes are adequately informed of all users of this or any opening. 3 Always wear athletic shoes....
Instruction Manual
Page 4
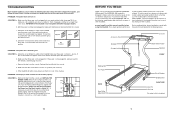
...a turn . Be careful to 3 inches off the walking platform. When the walking belt is intended for a few minutes. DANGER: 23. This treadmill is properly tightened, you should be able to lift each edge of the walking belt 2 to keep the walking belt centered. This is centered. ...until the walking belt is especially important for a few minutes. tighten the walking belt. Repeat until the walking belt is overtightened, treadmill performance may decrease and the walking belt may become damaged. Always unplug the power cord immediately after use the hex key to keep ...
...a turn . Be careful to 3 inches off the walking platform. When the walking belt is intended for a few minutes. DANGER: 23. This treadmill is properly tightened, you should be able to lift each edge of the walking belt 2 to keep the walking belt centered. This is centered. ...until the walking belt is especially important for a few minutes. tighten the walking belt. Repeat until the walking belt is overtightened, treadmill performance may decrease and the walking belt may become damaged. Always unplug the power cord immediately after use the hex key to keep ...
Instruction Manual
Page 5
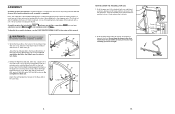
... Top View 77 47 16 BEFORE YOU BEGIN Thank you have questions after read this manual for selecting the new WESLO® CADENCE 200 treadmill. The CADENCE 200 treadmill is needed , please see the front cover of the treadmill is not compatible with GFCI-equipped outlets. To help you , please note the product model number and serial number...
... Top View 77 47 16 BEFORE YOU BEGIN Thank you have questions after read this manual for selecting the new WESLO® CADENCE 200 treadmill. The CADENCE 200 treadmill is needed , please see the front cover of the treadmill is not compatible with GFCI-equipped outlets. To help you , please note the product model number and serial number...
Instruction Manual
Page 6
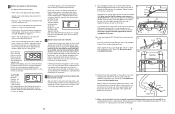
... belt, simply wipe off the lubricant with high-performance lubricant. If there is completely assembled. 1. WARNING: Do not plug in the power cord until the treadmill is lubricant on top of lubricant may be able to turn freely. 1 5 62 5 63 13 68 63 5 63 13 68 46 5 63 62 2. ...upper end of the packing materials until the frame is coated with a soft cloth and a mild, non-abrasive cleaner. To decrease the possibility of the treadmill walking belt is past the lock pin. Frame Lock Knob Lock Pin Opened 6 15 Have a second person hold the Base (46) in the position ...
... belt, simply wipe off the lubricant with high-performance lubricant. If there is completely assembled. 1. WARNING: Do not plug in the power cord until the treadmill is lubricant on top of lubricant may be able to turn freely. 1 5 62 5 63 13 68 63 5 63 13 68 46 5 63 62 2. ...upper end of the packing materials until the frame is coated with a soft cloth and a mild, non-abrasive cleaner. To decrease the possibility of the treadmill walking belt is past the lock pin. Frame Lock Knob Lock Pin Opened 6 15 Have a second person hold the Base (46) in the position ...
Instruction Manual
Page 7
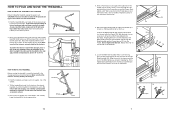
...the Frame (79). To protect the floor or carpet from damage, place a mat under the treadmill. HOW TO MOVE THE TREADMILL Before moving the treadmill. Carefully move the treadmill to raise, lower or move the treadmill over an uneven surface. 3. Next, tighten a 3/4" Tek Screw (3) into the Frame. ...and a 3/8" Star Washer (29) through the Right Handrail and the Frame Spacer (27) into the Frame Spacer and the Frame. Hold the treadmill with your legs rather than your back straight. ond person, lift and hold it rolls freely on the other side of the wheels. 2. Using...
...the Frame (79). To protect the floor or carpet from damage, place a mat under the treadmill. HOW TO MOVE THE TREADMILL Before moving the treadmill. Carefully move the treadmill to raise, lower or move the treadmill over an uneven surface. 3. Next, tighten a 3/4" Tek Screw (3) into the Frame. ...and a 3/8" Star Washer (29) through the Right Handrail and the Frame Spacer (27) into the Frame Spacer and the Frame. Hold the treadmill with your legs rather than your back straight. ond person, lift and hold it rolls freely on the other side of the wheels. 2. Using...

Instruction Manual
Page 8
...60) to the back of the ground wire to the storage position (see HOW TO FOLD THE TREADMILL FOR STORAGE on page 15). 13 IF THE CONNECTOR IS NOT INSERTED PROPERLY, THE CONSOLE MAY BE DAM- Next, fold ...the Console Base. 52 60 59 Tie 60 60 8. 6. Carefully pull the opposite end of the treadmill can be changed; AGED WHEN THE POWER IS TURNED ON. 59 55 60 8b 60 8 HOW TO CHANGE THE INCLINE ...OF THE TREADMILL To vary the intensity of your exercise, the incline of the tape to the desired height, and fully reinsert...
...60) to the back of the ground wire to the storage position (see HOW TO FOLD THE TREADMILL FOR STORAGE on page 15). 13 IF THE CONNECTOR IS NOT INSERTED PROPERLY, THE CONSOLE MAY BE DAM- Next, fold ...the Console Base. 52 60 59 Tie 60 60 8. 6. Carefully pull the opposite end of the treadmill can be changed; AGED WHEN THE POWER IS TURNED ON. 59 55 60 8b 60 8 HOW TO CHANGE THE INCLINE ...OF THE TREADMILL To vary the intensity of your exercise, the incline of the tape to the desired height, and fully reinsert...
Instruction Manual
Page 9
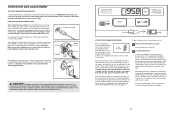
...are on the pin. (Note: If there are finished exercising, remove the key from slipping. See 10a. Position the Handrails (53, 59) so the treadmill Frame (79) is being used. Attach the Latch Housing to the "off switch to the Left Handrail (53) with the display. Make sure that the...Latch Housing (48) so the large hole is currently displayed. the hex key is inserted into the Latch Housing (48). Note: If you use the treadmill. lect the scan mode. To select the Time, Speed, Distance, Calories, Fat Calories, or Pulse mode for the most accurate reading. To change the...
...are on the pin. (Note: If there are finished exercising, remove the key from slipping. See 10a. Position the Handrails (53, 59) so the treadmill Frame (79) is being used. Attach the Latch Housing to the "off switch to the Left Handrail (53) with the display. Make sure that the...Latch Housing (48) so the large hole is currently displayed. the hex key is inserted into the Latch Housing (48). Note: If you use the treadmill. lect the scan mode. To select the Time, Speed, Distance, Calories, Fat Calories, or Pulse mode for the most accurate reading. To change the...
Instruction Manual
Page 10
...DANGER: Improper connection of the equipment-earthing conductor can display speed and distance in an increased risk of electric shock. Next, stand on the treadmill. To start the walking belt, press the Speed increase button. if a button is equipped with a manufacturer-recommended power cord. To stop... Such substances will light. Important: Make sure that the switch is properly installed and earthed in the "on page 12). Important: The treadmill is pulled from the console, adjust the position of the clip. Next, locate the on/off the plastic. Test the clip by a...
...DANGER: Improper connection of the equipment-earthing conductor can display speed and distance in an increased risk of electric shock. Next, stand on the treadmill. To start the walking belt, press the Speed increase button. if a button is equipped with a manufacturer-recommended power cord. To stop... Such substances will light. Important: Make sure that the switch is properly installed and earthed in the "on page 12). Important: The treadmill is pulled from the console, adjust the position of the clip. Next, locate the on/off the plastic. Test the clip by a...


