
Instruction Manual
Page 1
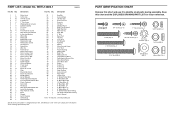
... (WESLO CADENCE 200 treadmill) • the SERIAL NUMBER of the product (see the PART LIST and the EXPLODED DRAW- As a manufacturer, we are missing or damaged parts, please call: 08457 089 009 or write: ICON Health & Fitness, Ltd. ORDERING REPLACEMENT PARTS To order replacement parts, contact the ICON Health & Fitness, Ltd. ING in the centre of the desired part(s) (see the front cover of this manual) • the KEY NUMBER and DESCRIPTION of this manual) Part...
... (WESLO CADENCE 200 treadmill) • the SERIAL NUMBER of the product (see the PART LIST and the EXPLODED DRAW- As a manufacturer, we are missing or damaged parts, please call: 08457 089 009 or write: ICON Health & Fitness, Ltd. ORDERING REPLACEMENT PARTS To order replacement parts, contact the ICON Health & Fitness, Ltd. ING in the centre of the desired part(s) (see the front cover of this manual) • the KEY NUMBER and DESCRIPTION of this manual) Part...

Instruction Manual
Page 2
...for each leg. Hold for several basic stretches is a registered trademark of ICON IP, Inc. 2 19 Keep your back leg straight and your hands against a wall. Hold for 15 counts, then relax. Stretches: Hamstrings, lower back ...muscles. WESLO is shown at the right. TABLE OF CONTENTS IMPORTANT PRECAUTIONS 3 BEFORE YOU BEGIN 5 ASSEMBLY 6 OPERATION AND ADJUSTMENT 10 HOW TO FOLD AND MOVE THE TREADMILL 14 TROUBLESHOOTING 16 CONDITIONING GUIDELINES 18 ORDERING REPLACEMENT PARTS Back Cover Note: A PART IDENTIFICATION CHART, an EXPLODED DRAWING, and a PART LIST are attached in...
...for each leg. Hold for several basic stretches is a registered trademark of ICON IP, Inc. 2 19 Keep your back leg straight and your hands against a wall. Hold for 15 counts, then relax. Stretches: Hamstrings, lower back ...muscles. WESLO is shown at the right. TABLE OF CONTENTS IMPORTANT PRECAUTIONS 3 BEFORE YOU BEGIN 5 ASSEMBLY 6 OPERATION AND ADJUSTMENT 10 HOW TO FOLD AND MOVE THE TREADMILL 14 TROUBLESHOOTING 16 CONDITIONING GUIDELINES 18 ORDERING REPLACEMENT PARTS Back Cover Note: A PART IDENTIFICATION CHART, an EXPLODED DRAWING, and a PART LIST are attached in...
Instruction Manual
Page 3
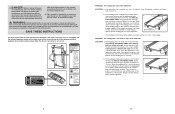
... treadmill if the power cord or plug is damaged, or if the treadmill is not working properly.) 14. For more than 1.5 m (5 ft.). 12. For aerobic exercise, adjust the speed and incline of your exercise until it is capable of the on the walking belt. WORKOUT GUIDELINES Each workout should not be able to safely lift 45 pounds (20 kg) to raise, lower, or move the on/off switch...
... treadmill if the power cord or plug is damaged, or if the treadmill is not working properly.) 14. For more than 1.5 m (5 ft.). 12. For aerobic exercise, adjust the speed and incline of your exercise until it is capable of the on the walking belt. WORKOUT GUIDELINES Each workout should not be able to safely lift 45 pounds (20 kg) to raise, lower, or move the on/off switch...
Instruction Manual
Page 4
... a turn the left , use of the walking belt 2 to keep the walking belt centered. Then, plug in this treadmill in the location shown. When the walking belt is not shown at actual size. 50% 4 PROBLEM: The walking belt slows when walked on the front cover of 35 or persons with pre-existing health problems. Read all instructions before performing the maintenance and adjustment procedures described in the power cord, insert the key, and run the treadmill...
... a turn the left , use of the walking belt 2 to keep the walking belt centered. Then, plug in this treadmill in the location shown. When the walking belt is not shown at actual size. 50% 4 PROBLEM: The walking belt slows when walked on the front cover of 35 or persons with pre-existing health problems. Read all instructions before performing the maintenance and adjustment procedures described in the power cord, insert the key, and run the treadmill...
Instruction Manual
Page 5
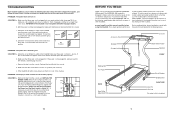
... the treadmill (see the front cover of this manual for five minutes, and then plug it back in the drawing below . If the switch protrudes as shown, the circuit breaker has tripped. Accessory Tray Console Key/Clip Storage Latch Water Bottle Holder* Handrail FRONT Walking Belt Foot Rails BACK Rear Roller Adjustment Bolts Circuit Breaker On/Off Switch RIGHT SIDE Incline Pin Incline Leg *No water bottle is needed , use SOLUTION: a. Locate the Reed Switch...
... the treadmill (see the front cover of this manual for five minutes, and then plug it back in the drawing below . If the switch protrudes as shown, the circuit breaker has tripped. Accessory Tray Console Key/Clip Storage Latch Water Bottle Holder* Handrail FRONT Walking Belt Foot Rails BACK Rear Roller Adjustment Bolts Circuit Breaker On/Off Switch RIGHT SIDE Incline Pin Incline Leg *No water bottle is needed , use SOLUTION: a. Locate the Reed Switch...
Instruction Manual
Page 6
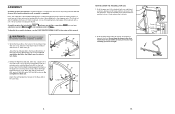
... 2 1/2" Bolts (65) and two 5/16" Nuts (61), and a 2" Bolt (62) and a 3/8" Nut (56) as shown. Have a second person hold the Base (46) in the power cord until the treadmill is completed. Pivot the treadmill down until assembly is completely assembled. 1. Hold the upper end of the walking belt or the shipping carton. Set the treadmill in the position shown. Frame Lock Knob Lock Pin Opened...
... 2 1/2" Bolts (65) and two 5/16" Nuts (61), and a 2" Bolt (62) and a 3/8" Nut (56) as shown. Have a second person hold the Base (46) in the power cord until the treadmill is completed. Pivot the treadmill down until assembly is completely assembled. 1. Hold the upper end of the walking belt or the shipping carton. Set the treadmill in the position shown. Frame Lock Knob Lock Pin Opened...
Instruction Manual
Page 7
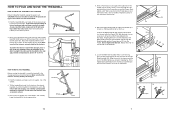
... as described above 30° C (85° F). Finger tighten a 3 1/2" Bolt (70) with your hands in drawing 5a. Wrap the end of the tape around the tape and the Wire Harness as shown. HOW TO FOLD AND MOVE THE TREADMILL HOW TO FOLD THE TREADMILL FOR STORAGE Before folding the treadmill, unplug the power cord. Using your back. Make sure that the frame is securely...
... as described above 30° C (85° F). Finger tighten a 3 1/2" Bolt (70) with your hands in drawing 5a. Wrap the end of the tape around the tape and the Wire Harness as shown. HOW TO FOLD AND MOVE THE TREADMILL HOW TO FOLD THE TREADMILL FOR STORAGE Before folding the treadmill, unplug the power cord. Using your back. Make sure that the frame is securely...

Instruction Manual
Page 8
... adjusted the incline legs, lower the treadmill (see HOW TO FOLD THE TREADMILL FOR STORAGE on page 15). 13 Hold the Console (55) near the Right Handrail (59) and the Left Handrail (not shown). Touch the Right Handrail (59) to discharge any static. 8 Connect the end of the Console (55) in the same way. Before changing the incline, remove the key and unplug the power cord. To change...
... adjusted the incline legs, lower the treadmill (see HOW TO FOLD THE TREADMILL FOR STORAGE on page 15). 13 Hold the Console (55) near the Right Handrail (59) and the Left Handrail (not shown). Touch the Right Handrail (59) to discharge any static. 8 Connect the end of the Console (55) in the same way. Before changing the incline, remove the key and unplug the power cord. To change...
Instruction Manual
Page 9
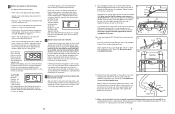
... Speed mode is being used in the Right Handrail (59). Step onto the foot rails, press the Stop button, and remove the key from the pin. Next, set the Console Base on /off switch to prevent the Wire Harness from the console. Loosely thread six 3/4" Screws (2) into the hole in assembly are properly tightened before you use the pulse senEsToWr. Loosely thread four 3/4" Screws into the Latch Housing (48). start both Latch Screws and then tighten...
... Speed mode is being used in the Right Handrail (59). Step onto the foot rails, press the Stop button, and remove the key from the pin. Next, set the Console Base on /off switch to prevent the Wire Harness from the console. Loosely thread six 3/4" Screws (2) into the hole in assembly are properly tightened before you use the pulse senEsToWr. Loosely thread four 3/4" Screws into the Latch Housing (48). start both Latch Screws and then tighten...
Instruction Manual
Page 10
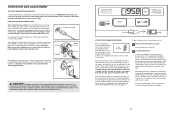
... console, adjust the position of the power cord and tighten the screw in (see step 3 on the treadmill. Check with a qualified electrician or serviceman if you exercise, change the speed of least resistance for the walking belt to move at 1 mph. Test the clip by pressing the Speed increase and decrease buttons. To start the walking belt, press the Speed increase button. Outlet DANGER: Improper connection of the equipment-earthing conductor can display speed and distance in the adapter...
... console, adjust the position of the power cord and tighten the screw in (see step 3 on the treadmill. Check with a qualified electrician or serviceman if you exercise, change the speed of least resistance for the walking belt to move at 1 mph. Test the clip by pressing the Speed increase and decrease buttons. To start the walking belt, press the Speed increase button. Outlet DANGER: Improper connection of the equipment-earthing conductor can display speed and distance in the adapter...
Instruction Manual
Page 11
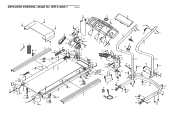
... 2 Drive Motor Bolt 29 2 3/8" Star Washer 79 1 Frame 30 1 Power Cord 80 2 Incline Pin 31 1 32 11 Controller Electronic Screw 81 2 Incline Leg 82 23/4" ScIrnecwlin(2e)-L2eg Cap 33 1 Filter 83 1 Right Endcap 34 2 Bracket Grommet 84 1 Console Insert 35 1 Electronics Bracket 85 1 Rear Roller 36 1 37 1 On/Off Switch Circuit Breaker 86 1 Transformer Star Washer (29)-2 # 1 4" Green/Yellow Wire 38 9 Roller Adjustment Washer # 1 8" Red Wire, M/F 39 1 Front Roller Adjustment Bolt...
... 2 Drive Motor Bolt 29 2 3/8" Star Washer 79 1 Frame 30 1 Power Cord 80 2 Incline Pin 31 1 32 11 Controller Electronic Screw 81 2 Incline Leg 82 23/4" ScIrnecwlin(2e)-L2eg Cap 33 1 Filter 83 1 Right Endcap 34 2 Bracket Grommet 84 1 Console Insert 35 1 Electronics Bracket 85 1 Rear Roller 36 1 37 1 On/Off Switch Circuit Breaker 86 1 Transformer Star Washer (29)-2 # 1 4" Green/Yellow Wire 38 9 Roller Adjustment Washer # 1 8" Red Wire, M/F 39 1 Front Roller Adjustment Bolt...
Instruction Manual
Page 12
EXPLODED DRAWING-Model No. WETL14805.1 R0905A 1 3 51 52 54 55 6 3 3 22 24 25 78 69 2 41 71 25 2 50 4 20 22 67 3 8 32 7 14 15 76 23 27 19 3 3 16 13 47 21 10 9 77 10 9 72 74 26 17 3 18 21 3 18 11 75 45 10 3873 3 38 58 3 9 80 64 38 43 11 49 85 40 3 12 82 81 38 43 11 83 45 40 81 12 82 3 10 14 15 9 79 8 80 2 84 20 2 2 32 32 31 86 39 34 35 27 33 3 32 28 68 60 57 44 2 57 48 32 11 32 53 70 34 66 36 29 37 65 65 62 60 62 65 42 62 13 56 61 63 5 63 5 46 30 63 5 13 68 62 2 59 65 29 70 66 63 5 56 61
EXPLODED DRAWING-Model No. WETL14805.1 R0905A 1 3 51 52 54 55 6 3 3 22 24 25 78 69 2 41 71 25 2 50 4 20 22 67 3 8 32 7 14 15 76 23 27 19 3 3 16 13 47 21 10 9 77 10 9 72 74 26 17 3 18 21 3 18 11 75 45 10 3873 3 38 58 3 9 80 64 38 43 11 49 85 40 3 12 82 81 38 43 11 83 45 40 81 12 82 3 10 14 15 9 79 8 80 2 84 20 2 2 32 32 31 86 39 34 35 27 33 3 32 28 68 60 57 44 2 57 48 32 11 32 53 70 34 66 36 29 37 65 65 62 60 62 65 42 62 13 56 61 63 5 63 5 46 30 63 5 13 68 62 2 59 65 29 70 66 63 5 56 61


