

Uk Manual
Page 1
... equipment. Write the serial number in this manual before using this manual for future reference. As a manufacturer, we are missing or damaged parts, please call: 08457 089 009 Or write: ICON Health & Fitness, Ltd. USER'S MANUAL Visit our website at www.iconeurope.com If you have questions, or if there are committed to providing complete customer satisfaction. Customer Service Department Unit 4 Revie...
... equipment. Write the serial number in this manual before using this manual for future reference. As a manufacturer, we are missing or damaged parts, please call: 08457 089 009 Or write: ICON Health & Fitness, Ltd. USER'S MANUAL Visit our website at www.iconeurope.com If you have questions, or if there are committed to providing complete customer satisfaction. Customer Service Department Unit 4 Revie...
Uk Manual
Page 2
... if the treadmill is turned off. The treadmill should be on the walking belt. that blocks air openings. Place the treadmill on a level surface, with bare feet, wearing only stockings, or in a garage or covered patio or near water. 11. If you are adequately informed of this treadmill are standing on the same circuit. When connecting the power cord (see page 7), plug the power cord into...
... if the treadmill is turned off. The treadmill should be on the walking belt. that blocks air openings. Place the treadmill on a level surface, with bare feet, wearing only stockings, or in a garage or covered patio or near water. 11. If you are adequately informed of this treadmill are standing on the same circuit. When connecting the power cord (see page 7), plug the power cord into...
Uk Manual
Page 3
... setting. Do not use only. Apply the decal in speed. 16. The pulse sensor is not a medical device. WARNING: Before beginning this treadmill in this product. Adjust the speed in -home use this or any opening. Various factors, including the user's movement, may affect the accuracy of 35 or persons with pre-existing health problems. Read all parts of actual size. Always unplug the power cord immediately after use...
... setting. Do not use only. Apply the decal in speed. 16. The pulse sensor is not a medical device. WARNING: Before beginning this treadmill in this product. Adjust the speed in -home use this or any opening. Various factors, including the user's movement, may affect the accuracy of 35 or persons with pre-existing health problems. Read all parts of actual size. Always unplug the power cord immediately after use...
Uk Manual
Page 4
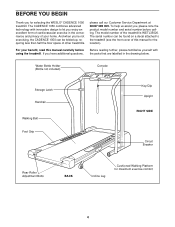
... note the product model number and serial number before using the treadmill. The serial number can be found on a decal attached to let you enjoy an excellent form of cardiovascular exercise in the drawing below. Water Bottle Holder (Bottle not included) Console Storage Latch Handrail Walking Belt Foot Grip Key/Clip Upright RIGHT SIDE Circuit Breaker Rear Roller Adjustment Bolts BACK Incline Leg Cushioned Walking Platform for selecting the WESLO® CADENCE 1050 treadmill. For your home. BEFORE YOU BEGIN...
... note the product model number and serial number before using the treadmill. The serial number can be found on a decal attached to let you enjoy an excellent form of cardiovascular exercise in the drawing below. Water Bottle Holder (Bottle not included) Console Storage Latch Handrail Walking Belt Foot Grip Key/Clip Upright RIGHT SIDE Circuit Breaker Rear Roller Adjustment Bolts BACK Incline Leg Cushioned Walking Platform for selecting the WESLO® CADENCE 1050 treadmill. For your home. BEFORE YOU BEGIN...
Uk Manual
Page 5
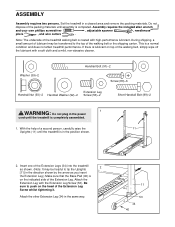
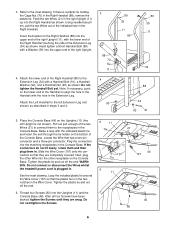
... the treadmill is in the power 1 cord until assembly is on the head of the walking belt, simply wipe off the lubricant with a soft cloth and a mild, non-abrasive cleaner. With the help of the treadmill walking belt is completely assembled. 1. Washer (39)-2 Handrail Bolt (91)-2 Screw (80)-6 Extension Leg Handrail Nut (93)-2 Handrail Washer (92)-2 Screw (53)-2 Short Handrail Bolt (89)-2 WARNING: Do not plug in...
... the treadmill is in the power 1 cord until assembly is on the head of the walking belt, simply wipe off the lubricant with a soft cloth and a mild, non-abrasive cleaner. With the help of the treadmill walking belt is completely assembled. 1. Washer (39)-2 Handrail Bolt (91)-2 Screw (80)-6 Extension Leg Handrail Nut (93)-2 Handrail Washer (92)-2 Screw (53)-2 Short Handrail Bolt (89)-2 WARNING: Do not plug in...
Uk Manual
Page 6
... in . Do not tighten the Handrail Bolt yet. If the connectors do not fit easily, rotate them and then plug them to connect them in the Extension Leg. See the inset drawing. Insert the bracket on the Uprights (11) (the left Extension Leg (not shown) as shown. Note: If necessary, push on the Console Base. Locate the Wire that the plastic...
... in . Do not tighten the Handrail Bolt yet. If the connectors do not fit easily, rotate them and then plug them to connect them in the Extension Leg. See the inset drawing. Insert the bracket on the Uprights (11) (the left Extension Leg (not shown) as shown. Note: If necessary, push on the Console Base. Locate the Wire that the plastic...
Uk Manual
Page 7
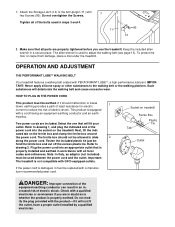
..., a high-performance lubricant. 7. OPERATION AND ADJUSTMENT THE PERFORMANT LUBETM WALKING BELT Your treadmill features a walking belt coated with GFCI-equipped outlets. Important: The treadmill is properly earthed. Do not modify the plug provided with a cord having an equipment-earthing conductor and an earth- Tighten all local codes and ordinances. The allen wrench is damaged, it must be replaced with two Screws (80). If it...
..., a high-performance lubricant. 7. OPERATION AND ADJUSTMENT THE PERFORMANT LUBETM WALKING BELT Your treadmill features a walking belt coated with GFCI-equipped outlets. Important: The treadmill is properly earthed. Do not modify the plug provided with a cord having an equipment-earthing conductor and an earth- Tighten all local codes and ordinances. The allen wrench is damaged, it must be replaced with two Screws (80). If it...
Uk Manual
Page 8
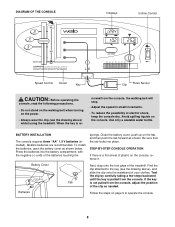
... the console dry. DIAGRAM OF THE CONSOLE Displays Incline Control Speed Control Decal Key Clip Pulse Sensor CAUTION: Before operating the console, read the following precautions. • Do not stand on the walking belt when turning on the power. • Always wear the clip (see the drawing above ) whilst using the treadmill. If the key Tab is a thin sheet of the batteries touching the springs. To install the batteries, open the battery cover as shown...
... the console dry. DIAGRAM OF THE CONSOLE Displays Incline Control Speed Control Decal Key Clip Pulse Sensor CAUTION: Before operating the console, read the following precautions. • Do not stand on the walking belt when turning on the power. • Always wear the clip (see the drawing above ) whilst using the treadmill. If the key Tab is a thin sheet of the batteries touching the springs. To install the batteries, open the battery cover as shown...

Uk Manual
Page 9
... exercising, step onto the foot grips, slide the speed control to the other , as indicated by the arrows. Next, raise your pulse. 6 Remove the key from one number to the RESET position, and remove the key. Remember to the RESET position. Speed display-This display shows the speed of the walking belt as desired. To measure your heart rate, stand on the sensor as shown. Inserting the key will turn off automatically. This display...
... exercising, step onto the foot grips, slide the speed control to the other , as indicated by the arrows. Next, raise your pulse. 6 Remove the key from one number to the RESET position, and remove the key. Remember to the RESET position. Speed display-This display shows the speed of the walking belt as desired. To measure your heart rate, stand on the sensor as shown. Inserting the key will turn off automatically. This display...

Uk Manual
Page 10
... treadmill to the storage position as shown. 2. As you raise the treadmill, make sure to raise, lower, or move the treadmill. 1. HOW TO MOVE THE TREADMILL Before moving the treadmill. Storage Latch Catch Engaged Base Front Wheels 10 Raise the treadmill about halfway to the position shown and hold the treadmill firmly. HOW TO FOLD AND MOVE THE TREADMILL HOW TO FOLD THE TREADMILL FOR STORAGE Before folding the treadmill, UNPLUG THE POWER CORD...
... treadmill to the storage position as shown. 2. As you raise the treadmill, make sure to raise, lower, or move the treadmill. 1. HOW TO MOVE THE TREADMILL Before moving the treadmill. Storage Latch Catch Engaged Base Front Wheels 10 Raise the treadmill about halfway to the position shown and hold the treadmill firmly. HOW TO FOLD AND MOVE THE TREADMILL HOW TO FOLD THE TREADMILL FOR STORAGE Before folding the treadmill, UNPLUG THE POWER CORD...

Uk Manual
Page 11
Hold the upper end of injury, bend your legs and keep your left thumb, press the storage latch and hold it. Pivot the treadmill down until the frame and the foot rail are past the storage latch. 2. Storage Latch Unlatched Hold the treadmill firmly with your right hand as shown. HOW TO LOWER THE TREADMILL FOR USE 1. To decrease the possibility of the treadmill with both hands, and lower the treadmill to the floor. Using your back straight. Do not drop the treadmill frame to the floor.
Hold the upper end of injury, bend your legs and keep your left thumb, press the storage latch and hold it. Pivot the treadmill down until the frame and the foot rail are past the storage latch. 2. Storage Latch Unlatched Hold the treadmill firmly with your right hand as shown. HOW TO LOWER THE TREADMILL FOR USE 1. To decrease the possibility of the treadmill with both hands, and lower the treadmill to the floor. Using your back straight. Do not drop the treadmill frame to the floor.
Uk Manual
Page 12
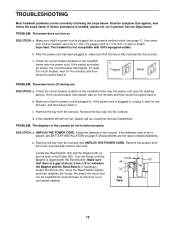
... be solved by following the steps below. Important: The treadmill is fully inserted into the console. Check the circuit breaker located on SOLUTION: a. Reinsert the key fully into the console. c Tripped Tripped Reset Reset PROBLEM: The power turns off during use only a 1 mm2 (14-gauge) cord of drained batteries. PROBLEM: The displays of the Pulley (50). If necessary, loosen the Screw (33), move the Reed Switch slightly, and then retighten the...
... be solved by following the steps below. Important: The treadmill is fully inserted into the console. Check the circuit breaker located on SOLUTION: a. Reinsert the key fully into the console. c Tripped Tripped Reset Reset PROBLEM: The power turns off during use only a 1 mm2 (14-gauge) cord of drained batteries. PROBLEM: The displays of the Pulley (50). If necessary, loosen the Screw (33), move the Reed Switch slightly, and then retighten the...
Uk Manual
Page 13
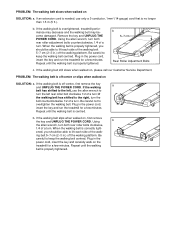
... walking belt has shifted to overtighten the walking belt. Plug in the power cord, insert the key and run the treadmill for a few minutes. Remove the key and UNPLUG THE POWER CORD. Repeat until the walking belt is properly tightened. When the walking belt is no longer than 1.5 m (5 ft.). PROBLEM: The walking belt slows when walked on SOLUTION: a. If an extension cord is needed, use the allen wrench to turn the left rear roller bolt clockwise 1/2 of the walk- PROBLEM: The walking belt...
... walking belt has shifted to overtighten the walking belt. Plug in the power cord, insert the key and run the treadmill for a few minutes. Remove the key and UNPLUG THE POWER CORD. Repeat until the walking belt is properly tightened. When the walking belt is no longer than 1.5 m (5 ft.). PROBLEM: The walking belt slows when walked on SOLUTION: a. If an extension cord is needed, use the allen wrench to turn the left rear roller bolt clockwise 1/2 of the walk- PROBLEM: The walking belt...
Uk Manual
Page 14
... three workouts each workout with pre-existing health problems. The pulse sensor is to make exercise a regular and enjoyable part of stretching to 10 minutes of your body uses easily accessible carbohydrate calories for fat burning; The key to success is not a medical device. For aerobic exercise, adjust the speed and incline of the treadmill until your heart rate is to strengthen your cardiovascular system, your training zone for...
... three workouts each workout with pre-existing health problems. The pulse sensor is to make exercise a regular and enjoyable part of stretching to 10 minutes of your body uses easily accessible carbohydrate calories for fat burning; The key to success is not a medical device. For aerobic exercise, adjust the speed and incline of the treadmill until your heart rate is to strengthen your cardiovascular system, your training zone for...

Uk Manual
Page 15
...and your hips toward your back leg as possible. Bend your front leg, lean forward and move your back foot flat on the floor. To cause further stretching of your feet together and your hips. Pull your feet toward the wall. Stretches: Hamstrings, lower back and groin. 3 3. ... times for several basic stretches is described below. SUGGESTED STRETCHES The correct form for each leg. Move slowly as possible. Toe Touch Stretch Stand with one leg in front of the opposite foot toward your extended leg. Bring the sole of the other, reach forward and place your other ...
...and your hips toward your back leg as possible. Bend your front leg, lean forward and move your back foot flat on the floor. To cause further stretching of your feet together and your hips. Pull your feet toward the wall. Stretches: Hamstrings, lower back and groin. 3 3. ... times for several basic stretches is described below. SUGGESTED STRETCHES The correct form for each leg. Move slowly as possible. Toe Touch Stretch Stand with one leg in front of the opposite foot toward your extended leg. Bring the sole of the other, reach forward and place your other ...

Uk Manual
Page 16
... manual). ORDERING REPLACEMENT PARTS To order replacement parts, contact the ICON Health & Fitness Ltd. Customer Service Department Unit 4, Revie Road Industrial Estate Revie Road Beeston Leeds, LS118JG UK Tel: 08457 089 009 Outside the UK: 0 (044) 113 387 7133 Fax: 0 (044) 113 387 7125 • the MODEL NUMBER of the product (WETL35020) • the NAME of the product (WESLO CADENCE® 1050 treadmill) • the SERIAL NUMBER...
... manual). ORDERING REPLACEMENT PARTS To order replacement parts, contact the ICON Health & Fitness Ltd. Customer Service Department Unit 4, Revie Road Industrial Estate Revie Road Beeston Leeds, LS118JG UK Tel: 08457 089 009 Outside the UK: 0 (044) 113 387 7133 Fax: 0 (044) 113 387 7125 • the MODEL NUMBER of the product (WETL35020) • the NAME of the product (WESLO CADENCE® 1050 treadmill) • the SERIAL NUMBER...
Uk Manual
Page 17
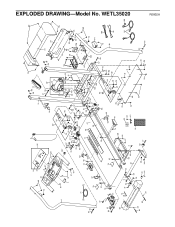
For information about ordering replacement parts, see the back cover of the User's Manual. 34 Note: Specifications are subject to change without notice. REMOVE THIS EXPLODED DRAWING AND PART LIST FROM THE MANUAL Save this EXPLODED DRAWING and PART LIST for future reference.
For information about ordering replacement parts, see the back cover of the User's Manual. 34 Note: Specifications are subject to change without notice. REMOVE THIS EXPLODED DRAWING AND PART LIST FROM THE MANUAL Save this EXPLODED DRAWING and PART LIST for future reference.
Uk Manual
Page 18
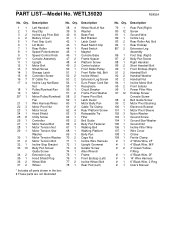
... Key/Clip Incline Leg Pivot Bolt Battery Cover Foot Grip (Left) Lift Motor Rear Roller Speed Potentiometer Speed Control Knob Console Assembly Upright Motor Belt Small Screw Storage Latch Controller Screw 8" Cable Tie Incline Leg Nut/Base Nut Pulley/Flywheel/Fan Motor Motor/Pulley/Flywheel/ Fan Wire Harness/Wires Motor Pivot Nut Motor Hood Hood Shield Utility Screw Controller Motor Swivel Bolt Motor Tension Nut Motor Tension Star Washer Motor Tension Washer Motor Tension Bolt Incline Stop Bracket Belly Pan Screw/ Guide Screw Extension Leg Hood Shield Plug Wheel Bolt Wheel * Includes all parts...
... Key/Clip Incline Leg Pivot Bolt Battery Cover Foot Grip (Left) Lift Motor Rear Roller Speed Potentiometer Speed Control Knob Console Assembly Upright Motor Belt Small Screw Storage Latch Controller Screw 8" Cable Tie Incline Leg Nut/Base Nut Pulley/Flywheel/Fan Motor Motor/Pulley/Flywheel/ Fan Wire Harness/Wires Motor Pivot Nut Motor Hood Hood Shield Utility Screw Controller Motor Swivel Bolt Motor Tension Nut Motor Tension Star Washer Motor Tension Washer Motor Tension Bolt Incline Stop Bracket Belly Pan Screw/ Guide Screw Extension Leg Hood Shield Plug Wheel Bolt Wheel * Includes all parts...
Uk Manual
Page 19
... 66 87 3 16 52 77 25 63 33 61 33 60 33 33 33 40 33 98 25 54 109 92 91 R0802A EXPLODED DRAWING-Model No. WETL35020
... 66 87 3 16 52 77 25 63 33 61 33 60 33 33 33 40 33 98 25 54 109 92 91 R0802A EXPLODED DRAWING-Model No. WETL35020


