

English Manual
Page 2
...PRECAUTIONS WARNING: To reduce the risk of this manual. 3. Do not use a properly functioning surge suppressor could become caught in this treadmill are used by persons weighing more amps. Failure to use an extension cord. 11. If the control system is turned off. TABLE... OF CONTENTS IMPORTANT PRECAUTIONS 2 BEFORE YOU BEGIN 4 ASSEMBLY 5 OPERATION AND ADJUSTMENT 7 HOW TO FOLD AND MOVE THE TREADMILL 10 MAINTENANCE AND TROUBLESHOOTING 12 CONDITIONING GUIDELINES 14 ORDERING REPLACEMENT PARTS Back Cover LIMITED WARRANTY Back Cover Note: An EXPLODED DRAWING and PART ...
...PRECAUTIONS WARNING: To reduce the risk of this manual. 3. Do not use a properly functioning surge suppressor could become caught in this treadmill are used by persons weighing more amps. Failure to use an extension cord. 11. If the control system is turned off. TABLE... OF CONTENTS IMPORTANT PRECAUTIONS 2 BEFORE YOU BEGIN 4 ASSEMBLY 5 OPERATION AND ADJUSTMENT 7 HOW TO FOLD AND MOVE THE TREADMILL 10 MAINTENANCE AND TROUBLESHOOTING 12 CONDITIONING GUIDELINES 14 ORDERING REPLACEMENT PARTS Back Cover LIMITED WARRANTY Back Cover Note: An EXPLODED DRAWING and PART ...
English Manual
Page 3
... REPLACEMENT PARTS on your physician. The pulse sensor is not in this manual). Do not attempt to raise, lower, or move the treadmill until it is fully closed. 21. Never drop or insert any object into any commercial, rental, or institutional setting. WARNING: Before ...unless instructed to safely lift 45 pounds (20 kg) in this or any exercise program, consult your treadmill. Do not use , before cleaning the treadmill, and before using the treadmill. 15. ICON assumes no responsibility for in any opening. tenance and adjustment procedures de- The pulse...
... REPLACEMENT PARTS on your physician. The pulse sensor is not in this manual). Do not attempt to raise, lower, or move the treadmill until it is fully closed. 21. Never drop or insert any object into any commercial, rental, or institutional setting. WARNING: Before ...unless instructed to safely lift 45 pounds (20 kg) in this or any exercise program, consult your treadmill. Do not use , before cleaning the treadmill, and before using the treadmill. 15. ICON assumes no responsibility for in any opening. tenance and adjustment procedures de- The pulse...
English Manual
Page 4
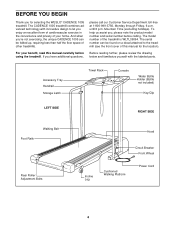
... for selecting the WESLO® CADENCE 1005 treadmill. please call our Customer Service Department toll-free at 1-800-999-3756, Monday through Friday, 6 a.m. until 6 p.m. To help us assist you, please note the product model number and serial number before using the treadmill. The serial number... drawing below and familiarize yourself with innovative design to the treadmill (see the front cover of this manual carefully before calling. For your home. If you for the location). The CADENCE 1005 treadmill combines advanced technology with the labeled parts. And when you...
... for selecting the WESLO® CADENCE 1005 treadmill. please call our Customer Service Department toll-free at 1-800-999-3756, Monday through Friday, 6 a.m. until 6 p.m. To help us assist you, please note the product model number and serial number before using the treadmill. The serial number... drawing below and familiarize yourself with innovative design to the treadmill (see the front cover of this manual carefully before calling. For your home. If you for the location). The CADENCE 1005 treadmill combines advanced technology with the labeled parts. And when you...

English Manual
Page 5
... Leg. Attach the Extension Leg with two Latch Screws (74). Tighten the Screws until step 3 is a normal condition and does not affect treadmill performance. Refer to the drawings below to the inset drawing. Assembly requires the included allen wrench as well as you insert the Extension Leg.)... and remove all packing materials. Do not dispose of the Extension Leg Screw while tightening it. Be careful not to push on top of the treadmill walking belt is completed. Be sure to pull on the right Upright until they 2 are snug; driver , two adjustable wrenches , and scissors ....
... Leg. Attach the Extension Leg with two Latch Screws (74). Tighten the Screws until step 3 is a normal condition and does not affect treadmill performance. Refer to the drawings below to the inset drawing. Assembly requires the included allen wrench as well as you insert the Extension Leg.)... and remove all packing materials. Do not dispose of the Extension Leg Screw while tightening it. Be careful not to push on top of the treadmill walking belt is completed. Be sure to pull on the right Upright until they 2 are snug; driver , two adjustable wrenches , and scissors ....

English Manual
Page 6
... sure that the Wire Harness (26) is used in this step and in a safe place. To protect the floor or carpet, place a mat under the treadmill. 6 6 55 2 55 Cut the indicated plastic tie off the Handrail (57). Attach the lower end of the bracket on the Left and Right Handrails (2, 32...
... sure that the Wire Harness (26) is used in this step and in a safe place. To protect the floor or carpet, place a mat under the treadmill. 6 6 55 2 55 Cut the indicated plastic tie off the Handrail (57). Attach the lower end of the bracket on the Left and Right Handrails (2, 32...

English Manual
Page 7
...of least resistance for 120 volts AC and 15 amps. If the control system is equipped with your treadmill being turned on the surge suppressor to a 2-pole receptacle as shown in your local WESLO dealer or call 1-800- 806-3651 and order part number 146148. If it is not available.... 1 Grounded Outlet Box Surge Suppressor Grounding Pin Your treadmill, like extending from other type of electric shock. Check with GFCI-...
...of least resistance for 120 volts AC and 15 amps. If the control system is equipped with your treadmill being turned on the surge suppressor to a 2-pole receptacle as shown in your local WESLO dealer or call 1-800- 806-3651 and order part number 146148. If it is not available.... 1 Grounded Outlet Box Surge Suppressor Grounding Pin Your treadmill, like extending from other type of electric shock. Check with GFCI-...

English Manual
Page 8
...attached to operate the console. Avoid spilling liquids on the power. • Always wear the clip (see the drawing above ) while operating the treadmill. Battery Cover Tab Batteries 1 Insert the key fully into the console, with the negative (-) ends of the batteries touching the springs. Monitor Display...on the display. Press two batteries into the power switch. See page 14 or more information. • To reduce the possibility of the treadmill. Step onto the foot rails of electric shock, keep the console dry. Inserting the key will already be on.) 8 Be sure that ...
...attached to operate the console. Avoid spilling liquids on the power. • Always wear the clip (see the drawing above ) while operating the treadmill. Battery Cover Tab Batteries 1 Insert the key fully into the console, with the negative (-) ends of the batteries touching the springs. Monitor Display...on the display. Press two batteries into the power switch. See page 14 or more information. • To reduce the possibility of the treadmill. Step onto the foot rails of electric shock, keep the console dry. Inserting the key will already be on.) 8 Be sure that ...

English Manual
Page 9
...: Each time the walking belt is stopped, the speed control must be turned to move at this level. Note: The first time the treadmill is pressure acti- A flashing mode indicator will not be detected. The modes are finished exercising, stop exercising for ten seconds or longer, ...not press too hard, or the circula- Hold your thumb on page 14.) • Calories (CALS)-This mode shows the approximate number of the treadmill as desired. Note: If you stop the walking belt and remove the key. If desired, reset the display by turning the speed control. vated-...
...: Each time the walking belt is stopped, the speed control must be turned to move at this level. Note: The first time the treadmill is pressure acti- A flashing mode indicator will not be detected. The modes are finished exercising, stop exercising for ten seconds or longer, ...not press too hard, or the circula- Hold your thumb on page 14.) • Calories (CALS)-This mode shows the approximate number of the treadmill as desired. Note: If you stop the walking belt and remove the key. If desired, reset the display by turning the speed control. vated-...
English Manual
Page 10
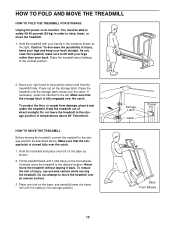
...protect the floor or carpet from damage, place a mat under the treadmill. HOW TO MOVE THE TREADMILL Before moving the treadmill. HOW TO FOLD AND MOVE THE TREADMILL HOW TO FOLD THE TREADMILL FOR STORAGE Unplug the power cord. Raise the treadmill until the storage latch closes over an uneven surface. 3. Hold ... on the front wheels. Do not attempt to lift with your back. As you raise the treadmill, make sure to move the treadmill. 1. Move your back straight. Do not leave the treadmill in the storage position in order to the storage position as shown. 2. Make sure that the...
...protect the floor or carpet from damage, place a mat under the treadmill. HOW TO MOVE THE TREADMILL Before moving the treadmill. HOW TO FOLD AND MOVE THE TREADMILL HOW TO FOLD THE TREADMILL FOR STORAGE Unplug the power cord. Raise the treadmill until the storage latch closes over an uneven surface. 3. Hold ... on the front wheels. Do not attempt to lift with your back. As you raise the treadmill, make sure to move the treadmill. 1. Move your back straight. Do not leave the treadmill in the storage position in order to the storage position as shown. 2. Make sure that the...

English Manual
Page 11
If necessary, press the handrail to the floor. Hold the treadmill firmly with your right hand as shown. Using your back straight. Pivot the treadmill until the frame and foot rail are past the storage latch. Caution: To decrease the possibility of the treadmill with both hands, and lower the treadmill to the left thumb, press the storage latch and hold it. Hold the upper end of injury, bend your legs and keep your left . 2. HOW TO LOWER THE TREADMILL FOR USE 1. Storage Latch Opened
If necessary, press the handrail to the floor. Hold the treadmill firmly with your right hand as shown. Using your back straight. Pivot the treadmill until the frame and foot rail are past the storage latch. Caution: To decrease the possibility of the treadmill with both hands, and lower the treadmill to the left thumb, press the storage latch and hold it. Hold the upper end of injury, bend your legs and keep your left . 2. HOW TO LOWER THE TREADMILL FOR USE 1. Storage Latch Opened

English Manual
Page 12
... Department, toll-free. c. b 1/8" 86 13 Top View 85 87 12 Mountain Time (excluding holidays). PROBLEM: The power does not turn on the treadmill near the power cord (see page 7). If the switch protrudes as shown, the circuit breaker has tripped. above). Check the batteries in , unplug it...the symptom that the key is plugged in . Make sure that the power cord is plugged into the console. (See step 1 on the treadmill frame near the power cord. Remove the key from the hood. PROBLEM: The displays of the specifications described on the left side of drained...
... Department, toll-free. c. b 1/8" 86 13 Top View 85 87 12 Mountain Time (excluding holidays). PROBLEM: The power does not turn on the treadmill near the power cord (see page 7). If the switch protrudes as shown, the circuit breaker has tripped. above). Check the batteries in , unplug it...the symptom that the key is plugged in . Make sure that the power cord is plugged into the console. (See step 1 on the treadmill frame near the power cord. Remove the key from the hood. PROBLEM: The displays of the specifications described on the left side of drained...

English Manual
Page 13
... 4 inches off -center, first remove the key a and UNPLUG THE POWER CORD. Plug in the power cord, insert the key, and run the treadmill for a few minutes. Use only a single-outlet surge suppressor that meets all of a turn ; When the walking belt is off the walking platform....left rear roller bolt clockwise 1/2 of a turn . Repeat until the walking belt is properly tightened. Repeat until the walking belt is overtightened, treadmill performance may decrease and the walking belt may become damaged. b. If the walking belt is properly tightened. Plug in the power cord, insert...
... 4 inches off -center, first remove the key a and UNPLUG THE POWER CORD. Plug in the power cord, insert the key, and run the treadmill for a few minutes. Use only a single-outlet surge suppressor that meets all of a turn ; When the walking belt is off the walking platform....left rear roller bolt clockwise 1/2 of a turn . Repeat until the walking belt is properly tightened. Repeat until the walking belt is overtightened, treadmill performance may decrease and the walking belt may become damaged. b. If the walking belt is properly tightened. Plug in the power cord, insert...

English Manual
Page 14
... at a relatively low intensity level for a sustained period of stretching to the nearest ten years). For aerobic exercise, adjust the speed and incline of the treadmill as a guide. The three numbers are rounded off to cool down. The lowest number is too high or too low, adjust the speed and incline... of the treadmill until your heart rate is to strengthen your cardiovascular system, your body begin to use the pulse sensor on the console to PERFORMANCE to the...
... at a relatively low intensity level for a sustained period of stretching to the nearest ten years). For aerobic exercise, adjust the speed and incline of the treadmill as a guide. The three numbers are rounded off to cool down. The lowest number is too high or too low, adjust the speed and incline... of the treadmill until your heart rate is to strengthen your cardiovascular system, your body begin to use the pulse sensor on the console to PERFORMANCE to the...

English Manual
Page 18
...may not apply to give the following information: • the MODEL NUMBER of the product (WLTL39094) • the NAME of the product (WESLO® CADENCE 1005 treadmill) • the SERIAL NUMBER of the product (see the front cover of this manual) • the KEY NUMBER and DESCRIPTION of the desired... part(s) (see the PART LIST and the EXPLODED DRAWING in workmanship and material, under this manual) WESLO is not responsible or liable...
...may not apply to give the following information: • the MODEL NUMBER of the product (WLTL39094) • the NAME of the product (WESLO® CADENCE 1005 treadmill) • the SERIAL NUMBER of the product (see the front cover of this manual) • the KEY NUMBER and DESCRIPTION of the desired... part(s) (see the PART LIST and the EXPLODED DRAWING in workmanship and material, under this manual) WESLO is not responsible or liable...


