
English Manual
Page 1
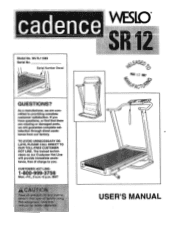
TO AVOID UNNECESSARY DELAYS, PLEASE CALL DIRECT TO OUR TOLL-FREE CUSTOMER HOT LINE. If you . ence Model No. Serial Number Decal QUESTIONS? MST ftis equipment I1U I:* '55 r.: • 0 MAR 1 2 1997 A USER'S MANUAL WLTL11563 Serial No. CUSTOMER HOT LINE: 1-800-999-3756 Mon.-Fri., 6 a.m.-6 p.m. As a manufacturer, we will provide immediate assistance, free of charge to you have questions, or find...
TO AVOID UNNECESSARY DELAYS, PLEASE CALL DIRECT TO OUR TOLL-FREE CUSTOMER HOT LINE. If you . ence Model No. Serial Number Decal QUESTIONS? MST ftis equipment I1U I:* '55 r.: • 0 MAR 1 2 1997 A USER'S MANUAL WLTL11563 Serial No. CUSTOMER HOT LINE: 1-800-999-3756 Mon.-Fri., 6 a.m.-6 p.m. As a manufacturer, we will provide immediate assistance, free of charge to you have questions, or find...

English Manual
Page 2
... CONTENTS IMPORTANT PRECAUTIONS BEFORE YOU BEGIN ASSEMBLY OPERATION AND ADJUSTMENT HOW TO FOLD AND MOVE THE TREADMILL TROUBLE-SHOOTING CONDITIONING GUIDELINES ORDERING REPLACEMENT PARTS LIMITED WARRANTY 2 4 5 7 11 12 14 Back Cover Back Cover Note: An EXPLODED DRAWING and a PART UST are inietere used or wh .:w .er6n:6l0e0bae. Save the EXPLODED DRAWING and PART LIST for future reference. i:tOi:pwrenceaarduotiepioonjhnsf.oi*i:l:t. 6 the treadmill only as in a w ...1.".4.7t-PORn...
... CONTENTS IMPORTANT PRECAUTIONS BEFORE YOU BEGIN ASSEMBLY OPERATION AND ADJUSTMENT HOW TO FOLD AND MOVE THE TREADMILL TROUBLE-SHOOTING CONDITIONING GUIDELINES ORDERING REPLACEMENT PARTS LIMITED WARRANTY 2 4 5 7 11 12 14 Back Cover Back Cover Note: An EXPLODED DRAWING and a PART UST are inietere used or wh .:w .er6n:6l0e0bae. Save the EXPLODED DRAWING and PART LIST for future reference. i:tOi:pwrenceaarduotiepioonjhnsf.oi*i:l:t. 6 the treadmill only as in a w ...1.".4.7t-PORn...
English Manual
Page 3
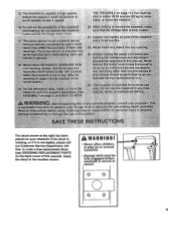
.... 22. 15. When folding or moving the treadmill, ma sure that the storage latch Is fully closed. 6 u ....a medical device: g ve- consult y0411410.10 e0 :al• al importan•t persons Vr00 0i before : :.;:::::.forming the:Maintenante.Sfid adjuit- Apply the decal In the location shown. H:AdjUst the..00-000 n sma41001.110n% to order a free replacement decal (see ORDERING REPLACEMENT PARTS on your...
.... 22. 15. When folding or moving the treadmill, ma sure that the storage latch Is fully closed. 6 u ....a medical device: g ve- consult y0411410.10 e0 :al• al importan•t persons Vr00 0i before : :.;:::::.forming the:Maintenante.Sfid adjuit- Apply the decal In the location shown. H:AdjUst the..00-000 n sma41001.110n% to order a free replacement decal (see ORDERING REPLACEMENT PARTS on your...
English Manual
Page 4
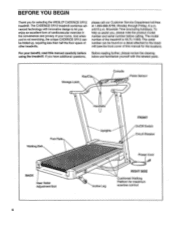
.... For your home. Key/Clip Storage Latch Console Pulse Sensor Walking Belt Foot Rails BACK Rear Roller Adjustment Bolt Handrails U Uprights FRONT On/Off Switch Circuit Breaker Power Cord RIGHT SIDE --4414111.11 Cushioned Walking Platform for maximum Incline Leg exercise comfort 4 please call our Customer Service Department toll-free at 1-800-999-3756, Monday through Friday, 6 a.m. Mountain Time (excluding holidays). To help us assist you 're not exercising, the unique CADENCE SR12 can be folded up...
.... For your home. Key/Clip Storage Latch Console Pulse Sensor Walking Belt Foot Rails BACK Rear Roller Adjustment Bolt Handrails U Uprights FRONT On/Off Switch Circuit Breaker Power Cord RIGHT SIDE --4414111.11 Cushioned Walking Platform for maximum Incline Leg exercise comfort 4 please call our Customer Service Department toll-free at 1-800-999-3756, Monday through Friday, 6 a.m. Mountain Time (excluding holidays). To help us assist you 're not exercising, the unique CADENCE SR12 can be folded up...
English Manual
Page 5
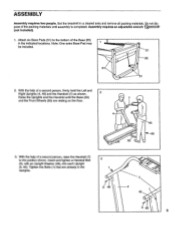
Set the treadmill in the Uprights. 3 48 de ....c..).:› 7 4 45 3 48 5 Insert and tighten a Handrail Bolt 3 (3), with an Upright Washer (48), into each Upright (4, 45). Assembly requires an adjustable wrench (not Included). 1. Tighten the Bolts (1) that are resting on the floor. ,.- 7 \ 4 5 45 "- 50 3. Note: One extra Base Pad may be included. 51 55 51 51 2. Attach six Base Pads (51) to the position...
Set the treadmill in the Uprights. 3 48 de ....c..).:› 7 4 45 3 48 5 Insert and tighten a Handrail Bolt 3 (3), with an Upright Washer (48), into each Upright (4, 45). Assembly requires an adjustable wrench (not Included). 1. Tighten the Bolts (1) that are resting on the floor. ,.- 7 \ 4 5 45 "- 50 3. Note: One extra Base Pad may be included. 51 55 51 51 2. Attach six Base Pads (51) to the position...

English Manual
Page 6
Make sure that all parts are tightened before you use the treadmill. Note: To protect the floor or carpet, place a mat under the treadmill. 0 88 89 6 Press the Allen Wrench (87) into the Wrench Clip. Remove the paper backing from the Wrench Clip (89). 4. Press the Wrench Clip onto the Rear Roller Cover (88) 4 in the indicated location.
Make sure that all parts are tightened before you use the treadmill. Note: To protect the floor or carpet, place a mat under the treadmill. 0 88 89 6 Press the Allen Wrench (87) into the Wrench Clip. Remove the paper backing from the Wrench Clip (89). 4. Press the Wrench Clip onto the Rear Roller Cover (88) 4 in the indicated location.
English Manual
Page 7
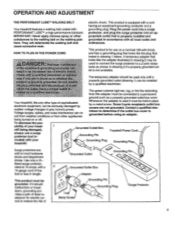
... treadmill features a walking belt coated with all local codes and ordinances. A temporary adapter that is grounded before using an adapter. Your treadmill, like extending from other appliances Whenever the adapter is not available. Plug the power cord into a surge protector, and plug the surge protector into an appropriate outlet that looks like the plug illustrated in accordance with PERFORMANT LUBETM, a high-performance lubricant. b. listed surge protector, rated...
... treadmill features a walking belt coated with all local codes and ordinances. A temporary adapter that is grounded before using an adapter. Your treadmill, like extending from other appliances Whenever the adapter is not available. Plug the power cord into a surge protector, and plug the surge protector into an appropriate outlet that looks like the plug illustrated in accordance with PERFORMANT LUBETM, a high-performance lubricant. b. listed surge protector, rated...
English Manual
Page 8
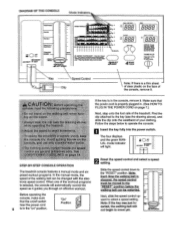
... Seib STEP-BY-STEP CONSOLE OPERATION The treadmill console features a manual mode and six preset workout programs. In the manual mode, the speed of your clothing. DIAGRAM OF THE CONSOLE Mode Indicators gTEp Per!amerce FAST Aerobic Fat Bum Warm-Up a Cool-Down TRAINING ZONES - Note: Each time the walking belt is selected, the console will automatically control the speed as it . Follow the steps below to move yet. SLOW -f INSERT KEY RESET/ PAUSE RES G SET...
... Seib STEP-BY-STEP CONSOLE OPERATION The treadmill console features a manual mode and six preset workout programs. In the manual mode, the speed of your clothing. DIAGRAM OF THE CONSOLE Mode Indicators gTEp Per!amerce FAST Aerobic Fat Bum Warm-Up a Cool-Down TRAINING ZONES - Note: Each time the walking belt is selected, the console will automatically control the speed as it . Follow the steps below to move yet. SLOW -f INSERT KEY RESET/ PAUSE RES G SET...
English Manual
Page 9
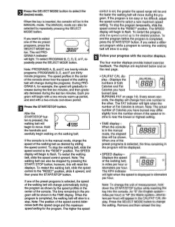
... stop the program temporarily, slide the speed control to select a new maximum speed setting. If the program is near the lowest or highest setting. • TIME display- The four monitor displays provide instant exercise feedback. onds, the display will be displayed. • SPEED display-- cline is too easy or too difficult, adjust the speed control to the "RESET" position. Note: To change the speed of the walking belt as shown by pressing the START/ STOP button; The MANUAL mode can...
... stop the program temporarily, slide the speed control to select a new maximum speed setting. If the program is near the lowest or highest setting. • TIME display- The four monitor displays provide instant exercise feedback. onds, the display will be displayed. • SPEED display-- cline is too easy or too difficult, adjust the speed control to the "RESET" position. Note: To change the speed of the walking belt as shown by pressing the START/ STOP button; The MANUAL mode can...

English Manual
Page 10
... the proper amount of the incline .0 KPH indicator beside the SPEED display is lit, the distance will be buttons until the desired incline is posi- TANCE/PULSE display also shows your pulse when the pulse sensor is not displayed, lift your thumb at this mode, hold down the START/ the circula- Press down again on page 9). Step onto the foot rails and remove I II the key from the console.
... the proper amount of the incline .0 KPH indicator beside the SPEED display is lit, the distance will be buttons until the desired incline is posi- TANCE/PULSE display also shows your pulse when the pulse sensor is not displayed, lift your thumb at this mode, hold down the START/ the circula- Press down again on page 9). Step onto the foot rails and remove I II the key from the console.
English Manual
Page 11
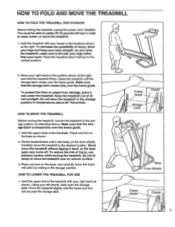
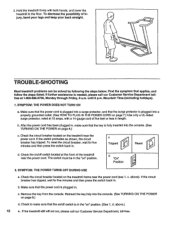
... TREADMILL FOR USE 1. Using your back. Keep the treadmill out of the handrails. Hold the upper ends of direct sunlight. i Base Front Wheels Frame Guide Closed 1 HOW TO FOLD AND MOVE THE TREADMILL HOW TO FOLD THE TREADMILL FOR STORAGE Before folding the treadmill, unplug the power cord. Caution: You must be able to safely lift 45 pounds (20 kg) in the locations shown at the right...
... TREADMILL FOR USE 1. Using your back. Keep the treadmill out of the handrails. Hold the upper ends of direct sunlight. i Base Front Wheels Frame Guide Closed 1 HOW TO FOLD AND MOVE THE TREADMILL HOW TO FOLD THE TREADMILL FOR STORAGE Before folding the treadmill, unplug the power cord. Caution: You must be able to safely lift 45 pounds (20 kg) in the locations shown at the right...
English Manual
Page 12
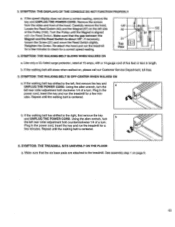
... then press the switch back in . b. Make sure that the power cord is needed, please call our Customer Service Department, toll-free. c. SYMPTOM: THE POWER DOES NOT TURN ON a. b. SYMPTOM: THE POWER TURNS OFF DURING USE a. 2. Hold the treadmill firmly with a 14-gauge cord of injury, bend your legs and keep your back straight. If further assistance is plugged in length. Check the circuit breaker located on...
... then press the switch back in . b. Make sure that the power cord is needed, please call our Customer Service Department, toll-free. c. SYMPTOM: THE POWER DOES NOT TURN ON a. b. SYMPTOM: THE POWER TURNS OFF DURING USE a. 2. Hold the treadmill firmly with a 14-gauge cord of injury, bend your legs and keep your back straight. If further assistance is plugged in length. Check the circuit breaker located on...
English Manual
Page 13
... Customer Service Department, toll-free. 5. If the walking belt has shifted to the treadmill. Plug in the power cord, insert the key and run the treadmill for a few minutes to the left rear roller adjustment bolt counterclockwise 1/4 of the hood. b. Repeat until the walking belt is centered. 6. Retighten the Screw. If the walking belt has shifted to check for a few minutes. 3. Repeat until the walking belt is centered. Plug in the power cord, insert the key...
... Customer Service Department, toll-free. 5. If the walking belt has shifted to the treadmill. Plug in the power cord, insert the key and run the treadmill for a few minutes to the left rear roller adjustment bolt counterclockwise 1/4 of the hood. b. Repeat until the walking belt is centered. 6. Retighten the Screw. If the walking belt has shifted to check for a few minutes. 3. Repeat until the walking belt is centered. Plug in the power cord, insert the key...
English Manual
Page 14
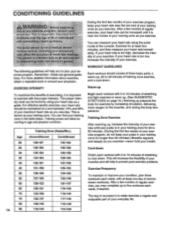
... your heart rate near the middle of stretching and light exercise to 10 minutes of the console. For effective aerobic exercise, your heart rate should consist of three basic parts: a warm-up to 10 minutes of your training zone as your training zone. Training zones are general guidelines. You can measure your maximum heart rate as a guide. Training Zone Exercise After warming up prepares the body for...
... your heart rate near the middle of stretching and light exercise to 10 minutes of the console. For effective aerobic exercise, your heart rate should consist of three basic parts: a warm-up to 10 minutes of your training zone as your training zone. Training zones are general guidelines. You can measure your maximum heart rate as a guide. Training Zone Exercise After warming up prepares the body for...
English Manual
Page 15
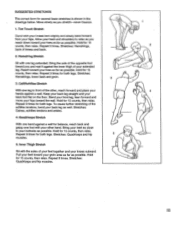
... you stretch-never bounce. 1. Repeat 3 times for both legs. Quadriceps Stretch With one hand against a wall for balance, reach back and grasp one leg extended. Repeat 3 times for both legs. Move slowly as possible. Stretches: Hamstrings, lower back and groin. 3 3. Hold for 15 counts, then...knees outward. Hold for 15 counts, then relax. Calf/Achilles Stretch With one leg in the drawings below. Repeat 3 times. Repeat 3 times. Hold for both legs. SUGGESTED STRETCHES The correct form for several basic stretches is shown in front of knees and back. 2. ...
... you stretch-never bounce. 1. Repeat 3 times for both legs. Quadriceps Stretch With one hand against a wall for balance, reach back and grasp one leg extended. Repeat 3 times for both legs. Move slowly as possible. Stretches: Hamstrings, lower back and groin. 3 3. Hold for 15 counts, then...knees outward. Hold for 15 counts, then relax. Calf/Achilles Stretch With one leg in the drawings below. Repeat 3 times. Repeat 3 times. Hold for both legs. SUGGESTED STRETCHES The correct form for several basic stretches is shown in front of knees and back. 2. ...
English Manual
Page 16
... . LIMITED WARRANTY ICON Health & Fitness, Inc. (ICON), warrants this product to be prepared to give the following information: • The MODEL NI IMRER OF THE PRODUCT em TI 11563). • The NAME OF THE PRODUCT (WESLO® CADENCE SR12 treadmill). • The SERIAL NUMBER OF THE PRODUCT (see the front cover of this manual). • The KEY NUMBER OF THE PART(S) (see the EXPLODED DRAWING and PART LIST attached to the terms set...
... . LIMITED WARRANTY ICON Health & Fitness, Inc. (ICON), warrants this product to be prepared to give the following information: • The MODEL NI IMRER OF THE PRODUCT em TI 11563). • The NAME OF THE PRODUCT (WESLO® CADENCE SR12 treadmill). • The SERIAL NUMBER OF THE PRODUCT (see the front cover of this manual). • The KEY NUMBER OF THE PART(S) (see the EXPLODED DRAWING and PART LIST attached to the terms set...
English Manual
Page 17
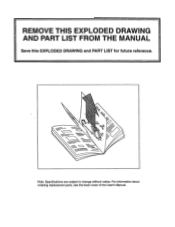
For information about ordering replacement parts, see the back cover of the User's Manual. 1REMOVE THIS EXPLODED DRAWING AND PART LIST FROM THE MANUAL Save this EXPLODED DRAWING and PART LIST for future reference. o Note: Specifications are subject to change without notice.
For information about ordering replacement parts, see the back cover of the User's Manual. 1REMOVE THIS EXPLODED DRAWING AND PART LIST FROM THE MANUAL Save this EXPLODED DRAWING and PART LIST for future reference. o Note: Specifications are subject to change without notice.

English Manual
Page 19
...Decal Walking Platform Walking Belt Right Foot Rail Frame Cover Guide Screw Frame Guide Incline Leg Pivot Bolt Belt Tension Nut/Cover Nut Spring Sleeve Belt Tension Spring Rear Roller Adjustment Bolt (long) Incline Leg Wheel Bolt Incline Leg Wheel Incline Leg Wheel Nut Adjustment Bolt (short) Frame Incline Leg Allen Wrench Rear Roller Cover Wrench Clip Cover Screw Washer Incline Arm Cover Screw Lift Shock Incline Motor Incline Motor Bolt Incline Motor Spacer Magnet Platform Screw Upright Plug Isolator Incline Motor Shield Front Roller/Pulley Motor-Controller Wire Reed Switch Clip 4" Black Wire...
...Decal Walking Platform Walking Belt Right Foot Rail Frame Cover Guide Screw Frame Guide Incline Leg Pivot Bolt Belt Tension Nut/Cover Nut Spring Sleeve Belt Tension Spring Rear Roller Adjustment Bolt (long) Incline Leg Wheel Bolt Incline Leg Wheel Incline Leg Wheel Nut Adjustment Bolt (short) Frame Incline Leg Allen Wrench Rear Roller Cover Wrench Clip Cover Screw Washer Incline Arm Cover Screw Lift Shock Incline Motor Incline Motor Bolt Incline Motor Spacer Magnet Platform Screw Upright Plug Isolator Incline Motor Shield Front Roller/Pulley Motor-Controller Wire Reed Switch Clip 4" Black Wire...


