
English Manual
Page 1
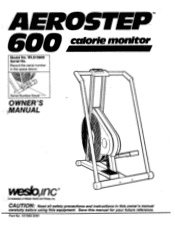
Record the serial number in this owner's manual carefully before using this manual for your future reference. Serial Number Decal OWNER'S MANUAL 0 Inc )A Subsidiary of WelderHealth andFitness, inc. CAUTION: Read all safety precautions and instructions in the space above. Part No. 101584 8/90 WL510900 Serial No. AIEROST'EP:TM 600 calorie monitor Model No. Save this equipment.
Record the serial number in this owner's manual carefully before using this manual for your future reference. Serial Number Decal OWNER'S MANUAL 0 Inc )A Subsidiary of WelderHealth andFitness, inc. CAUTION: Read all safety precautions and instructions in the space above. Part No. 101584 8/90 WL510900 Serial No. AIEROST'EP:TM 600 calorie monitor Model No. Save this equipment.
English Manual
Page 2
... warranty beyond that specifically set forth above is limited to freight damage, abuse, misuse, improper or abnormal usage or repairs not provided by Weslo. All returns must be obtained by calling Weslo's Customer Service Department at one of its authorized service centers. This warranty does not extend to any product or damage to a product caused by or attributable to replacing or repairing...
... warranty beyond that specifically set forth above is limited to freight damage, abuse, misuse, improper or abnormal usage or repairs not provided by Weslo. All returns must be obtained by calling Weslo's Customer Service Department at one of its authorized service centers. This warranty does not extend to any product or damage to a product caused by or attributable to replacing or repairing...

English Manual
Page 3
... that all instructions before each workout. 3. Keep small children away from the stepper during use of direct sunlight or the LCD display may be damaged. 2. Position the stepper on a level surface. AEIZOSTEP 600 caloriemonitor TABLE OF CONTENTS Warranty Important Safety Precautions Before You Begin Assembly Operation and Adjustment Maintenance and Trouble-Shooting Conditioning Guidelines Part List Exploded Drawing Ordering Replacement Parts 2 3 4 5 6 6 7 10 11 Back Cover IMPORTANT...
... that all instructions before each workout. 3. Keep small children away from the stepper during use of direct sunlight or the LCD display may be damaged. 2. Position the stepper on a level surface. AEIZOSTEP 600 caloriemonitor TABLE OF CONTENTS Warranty Important Safety Precautions Before You Begin Assembly Operation and Adjustment Maintenance and Trouble-Shooting Conditioning Guidelines Part List Exploded Drawing Ordering Replacement Parts 2 3 4 5 6 6 7 10 11 Back Cover IMPORTANT...
English Manual
Page 4
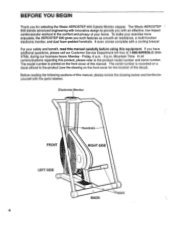
... the front cover of this product, please refer to provide you with the parts labeled. For your home. In all communications regarding this manual, please review the drawing below and familiarize yourself with an effective, low-impact cardiovascular workout in the comfort and privacy of your safety and benefit, read this manual carefully before using this manual. The Weslo AEROSTEP 600 blends...
... the front cover of this product, please refer to provide you with the parts labeled. For your home. In all communications regarding this manual, please review the drawing below and familiarize yourself with an effective, low-impact cardiovascular workout in the comfort and privacy of your safety and benefit, read this manual carefully before using this manual. The Weslo AEROSTEP 600 blends...
English Manual
Page 5
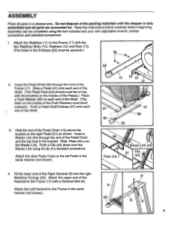
...end of a standard screwdriver. Attach the other Pedal Chain to the Frame in the same manner (not shown). 4. Attach the upper end of the packing materials until the stepper is fully assembled and all parts in the bracket. ASSEMBLY Place all parts are accounted for. Do not... over the Master Link. Fit the lower end of the Pedal Chain and the top hole in a cleared area. Slide Plate (44) over the Master Link using the tool included and your own adjustable wrench, phillips screwdriver and standard screwdriver. 1. Read the instructions below carefully before beginning. Hold...
...end of a standard screwdriver. Attach the other Pedal Chain to the Frame in the same manner (not shown). 4. Attach the upper end of the packing materials until the stepper is fully assembled and all parts in the bracket. ASSEMBLY Place all parts are accounted for. Do not... over the Master Link. Fit the lower end of the Pedal Chain and the top hole in a cleared area. Slide Plate (44) over the Master Link using the tool included and your own adjustable wrench, phillips screwdriver and standard screwdriver. 1. Read the instructions below carefully before beginning. Hold...
English Manual
Page 6
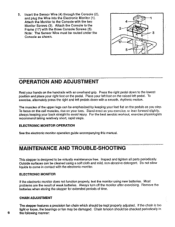
... the three Console Screws (5). 2 Note: The Sensor Wire must be checked periodically in contact with a smooth, rhythmic motion. Outside surfaces can be cleaned using new batteries. Stand erect as you step. Inspect and tighten all parts periodically. Insert the Sensor Wire (4) through the Console (2), and plug the Wire into the Electronic Monitor (1). CHAIN ADJUSTMENT The stepper features a precision fan chain which should be routed under the 3 Console as...
... the three Console Screws (5). 2 Note: The Sensor Wire must be checked periodically in contact with a smooth, rhythmic motion. Outside surfaces can be cleaned using new batteries. Stand erect as you step. Inspect and tighten all parts periodically. Insert the Sensor Wire (4) through the Console (2), and plug the Wire into the Electronic Monitor (1). CHAIN ADJUSTMENT The stepper features a precision fan chain which should be routed under the 3 Console as...
English Manual
Page 7
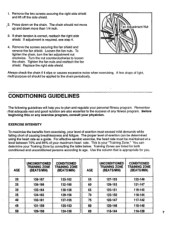
.... Remove the two screws securing the right side shield and lift off the side shield. 2. If adjustment is your Training Zone by consulting the table below. Press down more than 1/4 inch. Replace the right side shield. For effective aerobic exercise, the heart rate must be applied to loosen the chain. EXERCISE INTENSITY To maximize the benefits from exercising, your maximum heart rate. To tighten...
.... Remove the two screws securing the right side shield and lift off the side shield. 2. If adjustment is your Training Zone by consulting the table below. Press down more than 1/4 inch. Replace the right side shield. For effective aerobic exercise, the heart rate must be applied to loosen the chain. EXERCISE INTENSITY To maximize the benefits from exercising, your maximum heart rate. To tighten...
English Manual
Page 8
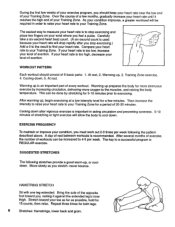
... your heart rate to measure your heart rate is recommended. At rest, 2. Warming-up , begin exercising at a low intensity level for both legs. 8 Stretches: Hamstrings, lower back and groin. Training Zone exercise, 4. Cooling down after you feel a pulse. A day of rest between workouts is to stop exercising and place two fingers on your wrist where you stop exercising.) Add a 0 to the result to cool down , 5. Move...
... your heart rate to measure your heart rate is recommended. At rest, 2. Warming-up , begin exercising at a low intensity level for both legs. 8 Stretches: Hamstrings, lower back and groin. Training Zone exercise, 4. Cooling down after you feel a pulse. A day of rest between workouts is to stop exercising and place two fingers on your wrist where you stop exercising.) Add a 0 to the result to cool down , 5. Move...
English Manual
Page 9
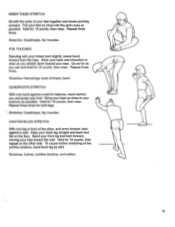
... three times. Repeat three times. QUADRICEPS STRETCH With one leg in front of your foot. Stretches: Quadriceps, hip muscles. Bend your front leg and lean forward, moving your back leg straight and back foot flat on the other , and arms forward, lean against a wall for 15 counts, then relax...on the floor. CALF/ACHILLES STRETCH With one hand against a wall. Stretches: Calves, achilles tendons, and ankles. 9 Hold for both legs. Repeat three times for 15 counts, then relax. Keep your hips toward your feet as close to your knees bent slightly, slowly bend ...
... three times. Repeat three times. QUADRICEPS STRETCH With one leg in front of your foot. Stretches: Quadriceps, hip muscles. Bend your front leg and lean forward, moving your back leg straight and back foot flat on the other , and arms forward, lean against a wall for 15 counts, then relax...on the floor. CALF/ACHILLES STRETCH With one hand against a wall. Stretches: Calves, achilles tendons, and ankles. 9 Hold for both legs. Repeat three times for 15 counts, then relax. Keep your hips toward your feet as close to your knees bent slightly, slowly bend ...
English Manual
Page 10
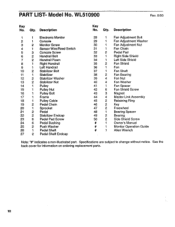
... 42 6 Fan Shield Screw 43 3 Magnet 44 4 Master Link Assembly 45 2 Retaining Ring 46 2 Key 47 2 Freewheel 48 1 Bearing Spacer 49 2 Bearing 50 2 Side Shield Screw # 1 Owner's Manual # 1 Monitor Operation Guide # 1 Allen Wrench Note: "#" indicates a non-illustrated part. Model No. WL510900 Rev. 8/90 Key No. Qty. Specifications are subject to change without notice. Description Key No. See the back cover for information on ordering replacement parts. 10 Qty. PART LIST-
... 42 6 Fan Shield Screw 43 3 Magnet 44 4 Master Link Assembly 45 2 Retaining Ring 46 2 Key 47 2 Freewheel 48 1 Bearing Spacer 49 2 Bearing 50 2 Side Shield Screw # 1 Owner's Manual # 1 Monitor Operation Guide # 1 Allen Wrench Note: "#" indicates a non-illustrated part. Model No. WL510900 Rev. 8/90 Key No. Qty. Specifications are subject to change without notice. Description Key No. See the back cover for information on ordering replacement parts. 10 Qty. PART LIST-
English Manual
Page 11
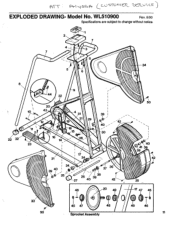
, f v-1 CGS k U Y\A et \) k CE EXPLODED DRAWING- Model No. WL510900 Rev. 8/90 Specifications are subject to change without notice. 2 7 4 7 5 5 6 8 • 9 44 32 20 10 43 12 _41 19 p 22 32 toS 18 15 16 14 23 39 29 1.2 40 30 17 2 4 i 24 9 40 i 2 3 26 3 38 27 40 46 20 4 34 50 40 41 9 38 2 17 47 45 45 47 48 49 46 50 Sprocket Assembly 11
, f v-1 CGS k U Y\A et \) k CE EXPLODED DRAWING- Model No. WL510900 Rev. 8/90 Specifications are subject to change without notice. 2 7 4 7 5 5 6 8 • 9 44 32 20 10 43 12 _41 19 p 22 32 toS 18 15 16 14 23 39 29 1.2 40 30 17 2 4 i 24 9 40 i 2 3 26 3 38 27 40 46 20 4 34 50 40 41 9 38 2 17 47 45 45 47 48 49 46 50 Sprocket Assembly 11
English Manual
Page 12
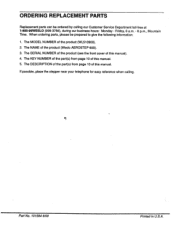
... Time. The MODEL NUMBER of the product (Weslo AEROSTEP 600). 3. The KEY NUMBER of the part(s) from page 10 of this manual. If possible, place the stepper near your telephone for easy reference when calling. When ordering parts, please be ordered by calling our Customer Service Department toll-free at 1-800-99WESLO (999-3756), during our business hours: Monday - Part No. 101584 8/90...
... Time. The MODEL NUMBER of the product (Weslo AEROSTEP 600). 3. The KEY NUMBER of the part(s) from page 10 of this manual. If possible, place the stepper near your telephone for easy reference when calling. When ordering parts, please be ordered by calling our Customer Service Department toll-free at 1-800-99WESLO (999-3756), during our business hours: Monday - Part No. 101584 8/90...


