
Owners Manual
Page 1
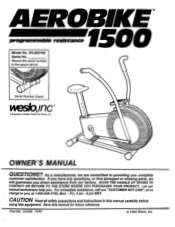
... of Welder Health and Fitness, Inc. OWNER'S MANUAL QUESTIONS?: As a manufacturer, we will guarantee you complete customer satisfaction. Let our trained technicians help you , at no charge to providing you direct assistance from our factory. WL402700 Serial No. CAUTION: Readallsafetyprecautions andInstructions in the space above. For immediate assistance, call our "CUSTOMER HOTLINE", at 1-800-999-3756, Mon. - Part No...
... of Welder Health and Fitness, Inc. OWNER'S MANUAL QUESTIONS?: As a manufacturer, we will guarantee you complete customer satisfaction. Let our trained technicians help you , at no charge to providing you direct assistance from our factory. WL402700 Serial No. CAUTION: Readallsafetyprecautions andInstructions in the space above. For immediate assistance, call our "CUSTOMER HOTLINE", at 1-800-999-3756, Mon. - Part No...
Owners Manual
Page 2
... LIEU OF ANY AND ALL OTHER WARRANTIES AND ANY IMPLIED WARRANTIES OF. TABLE OF CONTENTS Warranty Important Safety Precautions Before You Begin Assembly Operation and Adjustment Maintenance and Trouble-Shooting Conditioning Guidelines Part List Exploded Drawing Ordering Replacement Pads 2 3 4 5 7 10 11 14 15 Back Cover LIMITED WARRANTY Weslo, Inc. ("Weslo") warrants this Warranty is limited to state. Weslo's obligation under normal use and service conditions, for a period of ninety (90...
... LIEU OF ANY AND ALL OTHER WARRANTIES AND ANY IMPLIED WARRANTIES OF. TABLE OF CONTENTS Warranty Important Safety Precautions Before You Begin Assembly Operation and Adjustment Maintenance and Trouble-Shooting Conditioning Guidelines Part List Exploded Drawing Ordering Replacement Pads 2 3 4 5 7 10 11 14 15 Back Cover LIMITED WARRANTY Weslo, Inc. ("Weslo") warrants this Warranty is limited to state. Weslo's obligation under normal use and service conditions, for a period of ninety (90...
Owners Manual
Page 3
... pre-existing health problems. Read all instructions before using. Plug the power cord directly into any exercise program 'consult your physician. This Is especially important for personal Injury or property damage sustained by an authorized service representative only. Do not wear flowing clothing that could become caught in this manual should be performed by or through the use an extension cord. Use this exercise bike only as...
... pre-existing health problems. Read all instructions before using. Plug the power cord directly into any exercise program 'consult your physician. This Is especially important for personal Injury or property damage sustained by an authorized service representative only. Do not wear flowing clothing that could become caught in this manual should be performed by or through the use an extension cord. Use this exercise bike only as...
Owners Manual
Page 4
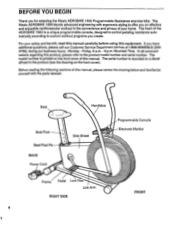
...) AEROBIKE 1500 Programmable Resistance exercise bike. Seat Seat Post Seat Post Pin BACK Power Cord Handlebar Side Shield Programmable Console Electronic Monitor Frame Pedal Lock Rod Link Arm RIGHT SIDE Ivry FRONT 4 For your home. In all communications regarding this manual. The model number is printed on the front cover). Before reading the following sections of this product, please refer to custom workout programs you create. The serial number is a unique programmable console, designed to control pedaling resistance...
...) AEROBIKE 1500 Programmable Resistance exercise bike. Seat Seat Post Seat Post Pin BACK Power Cord Handlebar Side Shield Programmable Console Electronic Monitor Frame Pedal Lock Rod Link Arm RIGHT SIDE Ivry FRONT 4 For your home. In all communications regarding this manual. The model number is printed on the front cover). Before reading the following sections of this product, please refer to custom workout programs you create. The serial number is a unique programmable console, designed to control pedaling resistance...
Owners Manual
Page 5
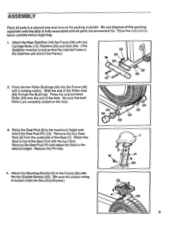
... (30) with the two Bracket Screws (55). (Be sure the excess wiring is fully assembled and all parts in the Stabilizer are toward the Frame.) 22 23 14 30 2. Press the unassembled Roller (34) onto the end of the Seat (7). Remove the Seat Post Pin and adjust the Seat to the maximum height and insert the Seat Post Pin (12). Attach the Mounting Bracket (4) to...
... (30) with the two Bracket Screws (55). (Be sure the excess wiring is fully assembled and all parts in the Stabilizer are toward the Frame.) 22 23 14 30 2. Press the unassembled Roller (34) onto the end of the Seat (7). Remove the Seat Post Pin and adjust the Seat to the maximum height and insert the Seat Post Pin (12). Attach the Mounting Bracket (4) to...

Owners Manual
Page 6
... of the Pedal should move back and forth slightly on the Shaft. Fit the end of a Pedal Shaft (39). The Pedal should be toward the outside.) Attach the Pedal with a Large Washer (71) and Nut (22). 71 6. Attach a Link Arm (27) to Left Handlebar in the Frame. Attach each Handlebar with an Outer Pedal Washer (66) and Outer Pedal Nut (67). Press a Pedal Cap...
... of the Pedal should move back and forth slightly on the Shaft. Fit the end of a Pedal Shaft (39). The Pedal should be toward the outside.) Attach the Pedal with a Large Washer (71) and Nut (22). 71 6. Attach a Link Arm (27) to Left Handlebar in the Frame. Attach each Handlebar with an Outer Pedal Washer (66) and Outer Pedal Nut (67). Press a Pedal Cap...
Owners Manual
Page 7
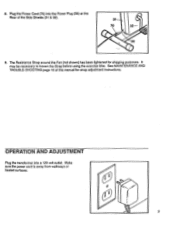
Plug the Power Cord (70) into a 120 volt outlet. See MAINTENANCE AND TROUBLE-SHOOTING page 10 of the Side Shields (31 & 32). 31 7O 3 - 9. It may be necessary to loosen the Strap before using the exercise bike. OPERATION AND ADJUSTMENT Plug the transformer into the Power Plug (56) at the Rear of this manual for shipping purposes. The Resistance Strap around the Fan (not shown) has been tightened for strap adjustment instructions. Make sure the power cord is away from walkways or heated surfaces. 0° 0° 7 8.
Plug the Power Cord (70) into a 120 volt outlet. See MAINTENANCE AND TROUBLE-SHOOTING page 10 of the Side Shields (31 & 32). 31 7O 3 - 9. It may be necessary to loosen the Strap before using the exercise bike. OPERATION AND ADJUSTMENT Plug the transformer into the Power Plug (56) at the Rear of this manual for shipping purposes. The Resistance Strap around the Fan (not shown) has been tightened for strap adjustment instructions. Make sure the power cord is away from walkways or heated surfaces. 0° 0° 7 8.
Owners Manual
Page 8
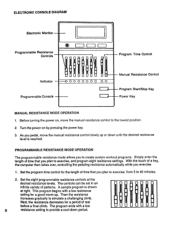
... turning the power on by pressing the power key. 3. This program begins with a low 8 resistance setting to exercise, and program eight resistance settings. The program ends with a low resistance setting for a good warm-up or down period. • .11=I HV : 0OOOOOOO OO 1 Program Time Control Manual Resistance Control Program Start/Stop Key Power Key MANUAL RESISTANCE MODE OPERATION 1. PROGRAMMABLE RESISTANCE MODE OPERATION The programmable resistance mode allows you to 40 minutes. 2. Next, the resistance decreases for the length of time that you pedal, move...
... turning the power on by pressing the power key. 3. This program begins with a low 8 resistance setting to exercise, and program eight resistance settings. The program ends with a low resistance setting for a good warm-up or down period. • .11=I HV : 0OOOOOOO OO 1 Program Time Control Manual Resistance Control Program Start/Stop Key Power Key MANUAL RESISTANCE MODE OPERATION 1. PROGRAMMABLE RESISTANCE MODE OPERATION The programmable resistance mode allows you to 40 minutes. 2. Next, the resistance decreases for the length of time that you pedal, move...
Owners Manual
Page 9
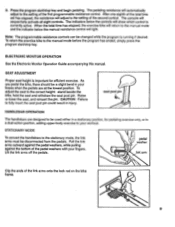
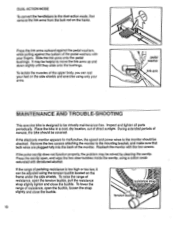
... the pedals are designed to be a slight bend in a dual-action position, adding upper-body exercise to the manual mode and the indicator below the controls will light. To adjust the seat to the manual mode before the program has ended, simply press the program start/stop key. The console will adjust to the stationary mode, the link arms must be changed while the program is currently active. The indicators below the manual resistance control...
... the pedals are designed to be a slight bend in a dual-action position, adding upper-body exercise to the manual mode and the indicator below the controls will light. To adjust the seat to the manual mode before the program has ended, simply press the program start/stop key. The console will adjust to the stationary mode, the link arms must be changed while the program is currently active. The indicators below the manual resistance control...
Owners Manual
Page 10
... the monitor with your arms. pedal washer link arm MAINTENANCE AND TROUBLE-SHOOTING This exercise bike is too high or too low, it can rest your feet on the frame. To lower the range of direct sunlight. Press the link arms outward against the pedal washers, while pulling against the bottom of the upper body, you can be helpful to the dual-action mode, first remove...
... the monitor with your arms. pedal washer link arm MAINTENANCE AND TROUBLE-SHOOTING This exercise bike is too high or too low, it can rest your feet on the frame. To lower the range of direct sunlight. Press the link arms outward against the pedal washers, while pulling against the bottom of the upper body, you can be helpful to the dual-action mode, first remove...
Owners Manual
Page 11
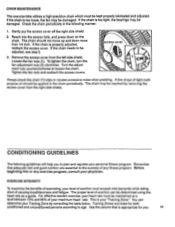
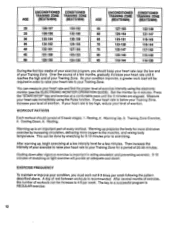
... applied to plan and regulate your personal fitness program. For effective aerobic exercise, your heart rate must be kept properly lubricated and adjusted. Gently pry the access cover off the right side shield. 2. A few drops of light multipurpose oil should not move up and down on the chain. Remember that is your "Training Zone." Use the column that adequate rest and...
... applied to plan and regulate your personal fitness program. For effective aerobic exercise, your heart rate must be kept properly lubricated and adjusted. Gently pry the access cover off the right side shield. 2. A few drops of light multipurpose oil should not move up and down on the chain. Remember that is your "Training Zone." Use the column that adequate rest and...
Owners Manual
Page 12
Press the "START/STOP" key and exercise at a low intensity level for a period of 20-30 minutes. Warming up , begin exercising at a comfortable pace until it reaches the high end of your heart rate and find the proper level of exercise intensity using the Pulse function. A day of rest between workouts is an important part of every workout. Over the course of a few months, gradually...
Press the "START/STOP" key and exercise at a low intensity level for a period of 20-30 minutes. Warming up , begin exercising at a comfortable pace until it reaches the high end of your heart rate and find the proper level of exercise intensity using the Pulse function. A day of rest between workouts is an important part of every workout. Over the course of a few months, gradually...

Owners Manual
Page 13
Move slowly as you can and hold for 15 counts, then relax...., back of the achilles tendons, bend back leg as you , resting it against the extended leg's inner thigh. Stretches: Quadriceps, hip muscles. To cause further stretching of knees, back. Stretches: Hamstrings, lower back and groin. Bring your heel as close...balance, reach behind you and grasp your hips toward your back leg straight and back foot flat on the other , and arms forward, lean against a wall for both legs. Hold for both legs. Stretches: Quadriceps, hip muscles. Repeat three times. QUADRICEPS STRETCH...
Move slowly as you can and hold for 15 counts, then relax...., back of the achilles tendons, bend back leg as you , resting it against the extended leg's inner thigh. Stretches: Quadriceps, hip muscles. To cause further stretching of knees, back. Stretches: Hamstrings, lower back and groin. Bring your heel as close...balance, reach behind you and grasp your hips toward your back leg straight and back foot flat on the other , and arms forward, lean against a wall for both legs. Hold for both legs. Stretches: Quadriceps, hip muscles. Repeat three times. QUADRICEPS STRETCH...
Owners Manual
Page 14
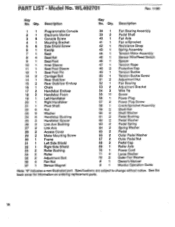
... Pedal Shaft Fan Axle Fan w/Sprocket Resistance Strap Spring Assembly Tension Motor Assembly Sensor Wire/Reed Switch Spacer Tension Rope Protective Cap Tension Buckle Tension Buckle Screw Adjustment Nut Fan Bearing Adjustment Bracket Wire Tie Screw Power Plug Power Plug Screw Crank/Sprocket Assembly Shaft Nut Shaft Washer Pedal Bushing Pedal Washer Pedal Spring Spring Washer Pedal Outer Pedal Washer Outer Pedal Nut Pedal Cap Roller Axle Power Cord Large Washer Outer Fan Washer Owner's Manual Monitor Operation Guide Note: "#" indicates a non•illustrated part. Qty. Oty. PART LIST...
... Pedal Shaft Fan Axle Fan w/Sprocket Resistance Strap Spring Assembly Tension Motor Assembly Sensor Wire/Reed Switch Spacer Tension Rope Protective Cap Tension Buckle Tension Buckle Screw Adjustment Nut Fan Bearing Adjustment Bracket Wire Tie Screw Power Plug Power Plug Screw Crank/Sprocket Assembly Shaft Nut Shaft Washer Pedal Bushing Pedal Washer Pedal Spring Spring Washer Pedal Outer Pedal Washer Outer Pedal Nut Pedal Cap Roller Axle Power Cord Large Washer Outer Fan Washer Owner's Manual Monitor Operation Guide Note: "#" indicates a non•illustrated part. Qty. Oty. PART LIST...
Owners Manual
Page 15
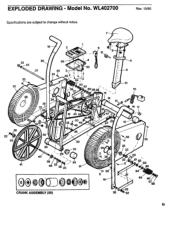
WL402700 Specifications are subject to change without notice. 7 Rev. 10/90 18 2 ) 6 12 8 22 qr6r, 23 32 k'N 00 0••0•" 0.0 55 4 55 3 24 55 i1 i I i3 63 62 927 6058 61 16 43 44 9 10 15 14 13 if s 56 70 18 17 50 ,Gt 1 35 4V 4 48 9 Al t; • 36 42 52 .40 0 0.0 55 55 24 25 /. 23 rc 4, •.§ 5 28 . • 38 • 34 22 41 46 23 5)9 55 0® 9) 19 65 66 6768 CRANK ASSEMBLY (58) 15 EXPLODED DRAWING - Model No.
WL402700 Specifications are subject to change without notice. 7 Rev. 10/90 18 2 ) 6 12 8 22 qr6r, 23 32 k'N 00 0••0•" 0.0 55 4 55 3 24 55 i1 i I i3 63 62 927 6058 61 16 43 44 9 10 15 14 13 if s 56 70 18 17 50 ,Gt 1 35 4V 4 48 9 Al t; • 36 42 52 .40 0 0.0 55 55 24 25 /. 23 rc 4, •.§ 5 28 . • 38 • 34 22 41 46 23 5)9 55 0® 9) 19 65 66 6768 CRANK ASSEMBLY (58) 15 EXPLODED DRAWING - Model No.

Owners Manual
Page 16
... the product (WL402700). 2. The MODEL NUMBER of the product (AEROBIKE 1500 Programmable Resistance exercise bike). 3. ORDERING REPLACEMENT PARTS Replacement parts can be prepared to give the following information: 1. When ordering parts, please be ordered by calling our Customer Service Department toll-free at 1-800-99WESLO (999-3756), during our business hours: Monday - The KEY NUMBER of the part(s) from page 14 of this manual). 4. Part No. 101696 10/90 Printed...
... the product (WL402700). 2. The MODEL NUMBER of the product (AEROBIKE 1500 Programmable Resistance exercise bike). 3. ORDERING REPLACEMENT PARTS Replacement parts can be prepared to give the following information: 1. When ordering parts, please be ordered by calling our Customer Service Department toll-free at 1-800-99WESLO (999-3756), during our business hours: Monday - The KEY NUMBER of the part(s) from page 14 of this manual). 4. Part No. 101696 10/90 Printed...


