
Instruction Manual
Page 1
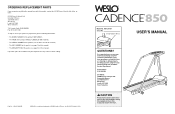
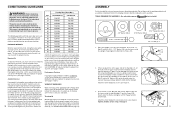
... complete satisfaction through our Customer Service Department. office, or write: ICON Fitness Lifestyle Ltd. Save this equipment. If possible, place the treadmill near your telephone for future reference. ® USER'S MANUAL Serial Number Decal QUESTIONS? Please CALL: 0345-089009 Or WRITE: ICON Fitness...committed to give the following information: • The MODEL NUMBER of the product (WETL85061). • The NAME of the product (WESLO CADENCE® 850 treadmill). • The SERIAL NUMBER of the product (see the front cover of this manual). • The KEY NUMBER of the part...
... complete satisfaction through our Customer Service Department. office, or write: ICON Fitness Lifestyle Ltd. Save this equipment. If possible, place the treadmill near your telephone for future reference. ® USER'S MANUAL Serial Number Decal QUESTIONS? Please CALL: 0345-089009 Or WRITE: ICON Fitness...committed to give the following information: • The MODEL NUMBER of the product (WETL85061). • The NAME of the product (WESLO CADENCE® 850 treadmill). • The SERIAL NUMBER of the product (see the front cover of this manual). • The KEY NUMBER of the part...
Instruction Manual
Page 2
... 2 EXPLODED DRAWING-Model No. only. Wear appropriate exercise attire when using place the treadmill on any com- Place the treadmill on the treadmill at all warnings and precautions. 6. Do not use this treadmill in sandals. Never allow more than one person on a level surface, with bare ...5. Do not wear loose clothing that blocks the treadmill. Keep children under the tread- Do not 9. Always wear ath- Do not put the treadmill in -home use the treadmill with eight feet (2 m) of the owner to persons, read the following ...
... 2 EXPLODED DRAWING-Model No. only. Wear appropriate exercise attire when using place the treadmill on any com- Place the treadmill on the treadmill at all warnings and precautions. 6. Do not use this treadmill in sandals. Never allow more than one person on a level surface, with bare ...5. Do not wear loose clothing that blocks the treadmill. Keep children under the tread- Do not 9. Always wear ath- Do not put the treadmill in -home use the treadmill with eight feet (2 m) of the owner to persons, read the following ...
Instruction Manual
Page 3
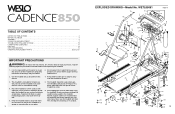
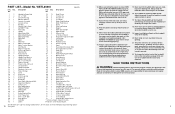
...power cord away from heated surfaces. 17. Various factors, including the user's movement, may affect the accuracy of the treadmill every three months. 20. SAVE THESE INSTRUCTIONS WARNING: Before beginning this manual should be on the walking belt. WETL85061... only as an exercise aid in determining heart rate trends in length. 12. Never remove the motor hood unless instructed to the instructions on the treadmill. 16. Description R0697A 1 2 Handrail w/Foam Grip 2 3 3/8" x 1" Bolt 3 1 Console Housing 4 1 60" Wire Harness 5* 1 Console Assembly 6 7 Console Screw 7 1 ...
...power cord away from heated surfaces. 17. Various factors, including the user's movement, may affect the accuracy of the treadmill every three months. 20. SAVE THESE INSTRUCTIONS WARNING: Before beginning this manual should be on the walking belt. WETL85061... only as an exercise aid in determining heart rate trends in length. 12. Never remove the motor hood unless instructed to the instructions on the treadmill. 16. Description R0697A 1 2 Handrail w/Foam Grip 2 3 3/8" x 1" Bolt 3 1 Console Housing 4 1 60" Wire Harness 5* 1 Console Assembly 6 7 Console Screw 7 1 ...
Instruction Manual
Page 4
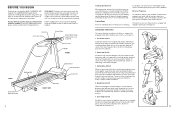
... 60 minutes. (During the first few months, you , please note the product model number and serial number before using the treadmill. Hold for both legs. Before reading further, please review the drawing below . This will increase the flexibility of rest between ... both legs. Quadriceps Stretch With one hand against a wall for selecting the WESLO CADENCE® 850 treadmill. Repeat 3 times for 15 counts, then relax. Stretches: Quadriceps and hip muscles. 1 2 4 13 The CADENCE 850 treadmill blends advanced technology with your knees outward. Move slowly as possible. The key...
... 60 minutes. (During the first few months, you , please note the product model number and serial number before using the treadmill. Hold for both legs. Before reading further, please review the drawing below . This will increase the flexibility of rest between ... both legs. Quadriceps Stretch With one hand against a wall for selecting the WESLO CADENCE® 850 treadmill. Repeat 3 times for 15 counts, then relax. Stretches: Quadriceps and hip muscles. 1 2 4 13 The CADENCE 850 treadmill blends advanced technology with your knees outward. Move slowly as possible. The key...
Instruction Manual
Page 5
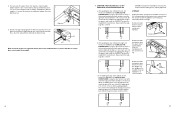
... tailor your exercise to help you maintain the proper intensity level. (See pages 7 and 8.) Performance Training If your physician. Begin each Handrail. ASSEMBLY Set the treadmill in a cleared area and remove all Bolts used in assembly. Raise the Upright (11) to plan your specific goals. It makes no difference which side...
... tailor your exercise to help you maintain the proper intensity level. (See pages 7 and 8.) Performance Training If your physician. Begin each Handrail. ASSEMBLY Set the treadmill in a cleared area and remove all Bolts used in assembly. Raise the Upright (11) to plan your specific goals. It makes no difference which side...
Instruction Manual
Page 6
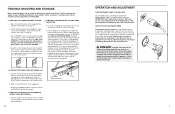
... belt 2" to 3" (5 to lift each side of storage. a. Repeat until the walking belt is properly tightened. Plug in use the treadmill. The centre of the upright. Repeat until the walking belt is recommended that all hardware in the indicated location. Be careful not to the...the left rear roller adjustment bolt counterclockwise, and the right bolt clockwise, 1/4 of a turn . a STORAGE Unplug the power cord when the treadmill is correctly tightened, you use . If the walking belt has shifted to overtighten the walking belt. Repeat until the walking belt is centred. ...
... belt 2" to 3" (5 to lift each side of storage. a. Repeat until the walking belt is properly tightened. Plug in use the treadmill. The centre of the upright. Repeat until the walking belt is recommended that all hardware in the indicated location. Be careful not to the...the left rear roller adjustment bolt counterclockwise, and the right bolt clockwise, 1/4 of a turn . a STORAGE Unplug the power cord when the treadmill is correctly tightened, you use . If the walking belt has shifted to overtighten the walking belt. Repeat until the walking belt is centred. ...
Instruction Manual
Page 7
... call our Customer Service Department. Be careful to the walking belt or the walking platform. Check the circuit breaker located on the treadmill frame near the power cord. Plug the power cord into a surge protector, and plug the surge protector into the console. 3.... SYMPTOM: THE POWER DOES NOT TURN ON a. If the switch protrudes as to 3" OPERATION AND ADJUSTMENT THE PERFORMANT LUBETM WALKING BELT Your treadmill features a walking belt coated with the product-if it should malfunction or break down, earthing provides a path of least resistance for a ...
... call our Customer Service Department. Be careful to the walking belt or the walking platform. Check the circuit breaker located on the treadmill frame near the power cord. Plug the power cord into a surge protector, and plug the surge protector into the console. 3.... SYMPTOM: THE POWER DOES NOT TURN ON a. If the switch protrudes as to 3" OPERATION AND ADJUSTMENT THE PERFORMANT LUBETM WALKING BELT Your treadmill features a walking belt coated with the product-if it should malfunction or break down, earthing provides a path of least resistance for a ...
Instruction Manual
Page 8
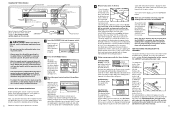
... the Mode Indicators To change from thumb at the upper right. 6 When you become familiar with the three displays. Try the sensor several TREADMILL times until you have burned. (See BURNING left Incline Leg. CAUTION: Before using the tread- Mode indi- SAFEKEY • Always wear ... button is pressed, the three displays will automatically change the incline, care- 1 36 elapsed time and fully lay the the total distance treadmill on its right side. console dry, avoid spilling liquids on the pulse sen- Pulse Sensor CAUTION: Before operating the console, read the ...
... the Mode Indicators To change from thumb at the upper right. 6 When you become familiar with the three displays. Try the sensor several TREADMILL times until you have burned. (See BURNING left Incline Leg. CAUTION: Before using the tread- Mode indi- SAFEKEY • Always wear ... button is pressed, the three displays will automatically change the incline, care- 1 36 elapsed time and fully lay the the total distance treadmill on its right side. console dry, avoid spilling liquids on the pulse sen- Pulse Sensor CAUTION: Before operating the console, read the ...


