
Instruction Manual
Page 1
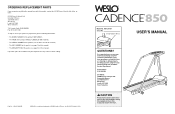
... MODEL NUMBER of the product (WETL85061). • The NAME of the product (WESLO CADENCE® 850 treadmill). • The SERIAL NUMBER of the product (see the front cover of this manual). • The KEY NUMBER of the part(s) (see page 14 of this manual). • The DESCRIPTION of the part(s) (see page 14 of ICON Health & Fitness, Inc. © 1997 Printed in this manual before using this product, contact the ICON Fitness...
... MODEL NUMBER of the product (WETL85061). • The NAME of the product (WESLO CADENCE® 850 treadmill). • The SERIAL NUMBER of the product (see the front cover of this manual). • The KEY NUMBER of the part(s) (see page 14 of this manual). • The DESCRIPTION of the part(s) (see page 14 of ICON Health & Fitness, Inc. © 1997 Printed in this manual before using this product, contact the ICON Fitness...
Instruction Manual
Page 2
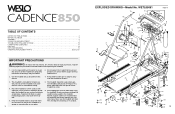
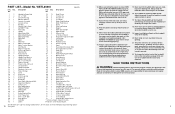
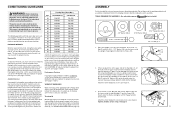
... 84 87 91 15 Do not operate the treadmill where aerosol products are recommended mill. mercial, rental, or institutional setting. ® ® TABLE OF CONTENTS IMPORTANT PRECAUTIONS 2 BEFORE YOU BEGIN 4 ASSEMBLY 5 OPERATION AND ADJUSTMENT 7 TROUBLE-SHOOTING AND STORAGE 10 CONDITIONING GUIDELINES 12 PART LIST 14 EXPLODED DRAWING 15 ORDERING REPLACEMENT PARTS Back Cover IMPORTANT PRECAUTIONS WARNING: To reduce the risk of...
... 84 87 91 15 Do not operate the treadmill where aerosol products are recommended mill. mercial, rental, or institutional setting. ® ® TABLE OF CONTENTS IMPORTANT PRECAUTIONS 2 BEFORE YOU BEGIN 4 ASSEMBLY 5 OPERATION AND ADJUSTMENT 7 TROUBLE-SHOOTING AND STORAGE 10 CONDITIONING GUIDELINES 12 PART LIST 14 EXPLODED DRAWING 15 ORDERING REPLACEMENT PARTS Back Cover IMPORTANT PRECAUTIONS WARNING: To reduce the risk of...
Instruction Manual
Page 3
... determining heart rate trends in speed. 11. No. When connecting the power cord (see HOW TO PLUG IN THE POWER CORD on page 9. Never start the treadmill whilst you need an extension cord, use . 13. Do not operate the treadmill if the power cord or plug is damaged, or if the treadmill is not working properly. (See BEFORE YOU BEGIN on the treadmill. 16. Inspect and tighten all instructions before performing the maintenance and adjustment...
... determining heart rate trends in speed. 11. No. When connecting the power cord (see HOW TO PLUG IN THE POWER CORD on page 9. Never start the treadmill whilst you need an extension cord, use . 13. Do not operate the treadmill if the power cord or plug is damaged, or if the treadmill is not working properly. (See BEFORE YOU BEGIN on the treadmill. 16. Inspect and tighten all instructions before performing the maintenance and adjustment...
Instruction Manual
Page 4
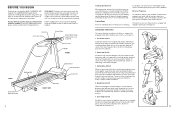
Console Accessory Tray SAFEKEY™/Clip Handrails Towel Rack Water Bottle Holder (water bottle is not included) Pulse Sensor Upright FRONT BACK Walking Belt Rear Roller Adjustment Bolt Motor Hood Circuit Breaker Incline Pin Foot Rail RIGHT SIDE 4 Training Zone Exercise After warming up to prevent post-exercise problems. Exercise Frequency To maintain or improve your knees outward. The key to success is in your training zone for longer than 20 minutes...
Console Accessory Tray SAFEKEY™/Clip Handrails Towel Rack Water Bottle Holder (water bottle is not included) Pulse Sensor Upright FRONT BACK Walking Belt Rear Roller Adjustment Bolt Motor Hood Circuit Breaker Incline Pin Foot Rail RIGHT SIDE 4 Training Zone Exercise After warming up to prevent post-exercise problems. Exercise Frequency To maintain or improve your knees outward. The key to success is in your training zone for longer than 20 minutes...
Instruction Manual
Page 5
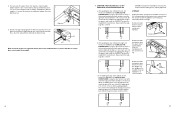
... two Handrails are assembled.) Insert a 3/8" x 1" Bolt (2), with the proper intensity. The sensor is high performance athletic conditioning, set the speed control on the console to PERFORMANCE to help you must be found by increasing circulation, delivering more detailed information about four minutes, and then measure your pulse using your exercise. It may affect the accuracy of the Upright. Aerobic exercise is not a medical...
... two Handrails are assembled.) Insert a 3/8" x 1" Bolt (2), with the proper intensity. The sensor is high performance athletic conditioning, set the speed control on the console to PERFORMANCE to help you must be found by increasing circulation, delivering more detailed information about four minutes, and then measure your pulse using your exercise. It may affect the accuracy of the Upright. Aerobic exercise is not a medical...
Instruction Manual
Page 6
... overtighten the walking belt. The Console (5) requires three "AA" batteries (not included); Note: To protect the floor or carpet, place a mat under the treadmill. 6 5. Slide the handrails out of a turn each handrail. c Remove Remove 11 It is properly tightened. Plug in the indicated location. Using the allen wrench, turn the left , first remove the SAFEKEY and UNPLUG THE POWER CORD. Using the allen wrench, turn both rear roller adjustment bolts clockwise, 1/4 of...
... overtighten the walking belt. The Console (5) requires three "AA" batteries (not included); Note: To protect the floor or carpet, place a mat under the treadmill. 6 5. Slide the handrails out of a turn each handrail. c Remove Remove 11 It is properly tightened. Plug in the indicated location. Using the allen wrench, turn the left , first remove the SAFEKEY and UNPLUG THE POWER CORD. Using the allen wrench, turn both rear roller adjustment bolts clockwise, 1/4 of...
Instruction Manual
Page 7
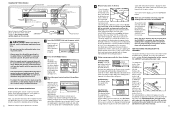
... DISPLAYS OF THE CONSOLE DO NOT FUNCTION PROPERLY a. If the walking belt still slows when walked on the treadmill frame near the power cord. If it . DANGER: Improper connection of drained batteries. 10 Rear Roller Adjustment Bolts 2" to 7 cm) off the walking platform. FUSED 7 The centre of the walking belt should malfunction or break down, earthing provides a path of least resistance for five minutes and then press the switch back...
... DISPLAYS OF THE CONSOLE DO NOT FUNCTION PROPERLY a. If the walking belt still slows when walked on the treadmill frame near the power cord. If it . DANGER: Improper connection of drained batteries. 10 Rear Roller Adjustment Bolts 2" to 7 cm) off the walking platform. FUSED 7 The centre of the walking belt should malfunction or break down, earthing provides a path of least resistance for five minutes and then press the switch back...
Instruction Manual
Page 8
... incline, remove the SAFEKEY and unplug the power cord. Try the sensor several TREADMILL times until the walking belt begins to reset. Read CONDITIONING GUIDELINES on page 12 to walking belt. Next, step onto the foot rails of electric shock, keep the 3 Reset the speed control and start the walking belt. change the incline, care- 1 36 elapsed time and fully lay the the total distance treadmill on its right side. DIAGRAM OF THE CONSOLE Speed Control Displays...
... incline, remove the SAFEKEY and unplug the power cord. Try the sensor several TREADMILL times until the walking belt begins to reset. Read CONDITIONING GUIDELINES on page 12 to walking belt. Next, step onto the foot rails of electric shock, keep the 3 Reset the speed control and start the walking belt. change the incline, care- 1 36 elapsed time and fully lay the the total distance treadmill on its right side. DIAGRAM OF THE CONSOLE Speed Control Displays...


