
Instruction Manual
Page 1
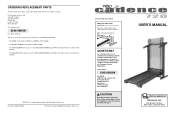
... (WESLO® CADENCE 720 treadmill) • The MODEL NUMBER of the product (WETL71500) • The PART NUMBER of the part (see the EXPLODED DRAWING and PART LIST attached in the centre of this manual). WETL71500 Serial No. Serial Number Decal QUESTIONS? USER'S MANUAL Visit our website at www.weslo.com new products, prizes, fitness tips, and much more! Write the serial number in the centre of this manual) • The DESCRIPTION of ICON Health & Fitness, Inc...
... (WESLO® CADENCE 720 treadmill) • The MODEL NUMBER of the product (WETL71500) • The PART NUMBER of the part (see the EXPLODED DRAWING and PART LIST attached in the centre of this manual). WETL71500 Serial No. Serial Number Decal QUESTIONS? USER'S MANUAL Visit our website at www.weslo.com new products, prizes, fitness tips, and much more! Write the serial number in the centre of this manual) • The DESCRIPTION of ICON Health & Fitness, Inc...
Instruction Manual
Page 2
... PART LIST and EXPLODED DRAWING before operating the treadmill. 1. Wear appropriate exercise clothing when using the treadmill. 2 SUGGESTED STRETCHES The correct form for both legs. a 13 amp fuse should not be fitted to persons, read the following important precautions and information before beginning assembly. Do not operate the treadmill if the power cord or plug is damaged, or if the treadmill is shown in a garage or covered...
... PART LIST and EXPLODED DRAWING before operating the treadmill. 1. Wear appropriate exercise clothing when using the treadmill. 2 SUGGESTED STRETCHES The correct form for both legs. a 13 amp fuse should not be fitted to persons, read the following important precautions and information before beginning assembly. Do not operate the treadmill if the power cord or plug is damaged, or if the treadmill is shown in a garage or covered...

Instruction Manual
Page 3
... tighten all instructions before performing the maintenance and adjustment procedures described in preparation for 20 to order a free replacement decal. DANGER: Always unplug the power cord before using your age. Do not use . 18. Locate the indicated warning decal on page 4). CONDITIONING GUIDELINES WARNING: Before beginning this or any exercise program, consult your heart rate is too high or too low, adjust the speed of the treadmill as needed...
... tighten all instructions before performing the maintenance and adjustment procedures described in preparation for 20 to order a free replacement decal. DANGER: Always unplug the power cord before using your age. Do not use . 18. Locate the indicated warning decal on page 4). CONDITIONING GUIDELINES WARNING: Before beginning this or any exercise program, consult your heart rate is too high or too low, adjust the speed of the treadmill as needed...
Instruction Manual
Page 4
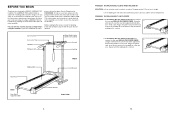
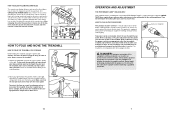
Speed Control Accessory Tray Handrails Storage Latch Water Bottle Holder (bottle not included) Console Key/Clip Foot Rails Walking Belt FRONT Circuit Breaker BACK Rear Roller Adjustment Bolt Roller Guards RIGHT SIDE 4 PROBLEM: THE WALKING BELT SLOWS WHEN WALKED ON SOLUTION: a. Plug in the power cord, insert the key and run the treadmill for the location). And when you for a few minutes. The serial number can be found on , please call our Customer Service Department at 0345...
Speed Control Accessory Tray Handrails Storage Latch Water Bottle Holder (bottle not included) Console Key/Clip Foot Rails Walking Belt FRONT Circuit Breaker BACK Rear Roller Adjustment Bolt Roller Guards RIGHT SIDE 4 PROBLEM: THE WALKING BELT SLOWS WHEN WALKED ON SOLUTION: a. Plug in the power cord, insert the key and run the treadmill for the location). And when you for a few minutes. The serial number can be found on , please call our Customer Service Department at 0345...

Instruction Manual
Page 5
... the treadmill on the treadmill frame near the power cord (see assembly step 5 on top of the walking belt, wipe off the lubricant with both hands, and lower 2 the treadmill to the floor. Important: The treadmill is coated with GFCI-equipped outlets. b. Check the circuit breaker located on its other Base Leg (55) as shown. PROBLEM: THE POWER TURNS OFF DURING USE c Tripped Tripped Reset Reset SOLUTION: a. PROBLEM: THE DISPLAYS OF THE CONSOLE...
... the treadmill on the treadmill frame near the power cord (see assembly step 5 on top of the walking belt, wipe off the lubricant with both hands, and lower 2 the treadmill to the floor. Important: The treadmill is coated with GFCI-equipped outlets. b. Check the circuit breaker located on its other Base Leg (55) as shown. PROBLEM: THE POWER TURNS OFF DURING USE c Tripped Tripped Reset Reset SOLUTION: a. PROBLEM: THE DISPLAYS OF THE CONSOLE...
Instruction Manual
Page 6
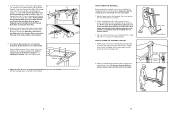
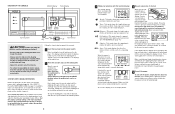
... 21 5. Press two batteries into the right Upright (37) as shown. Close the Battery Cover. 5 49 48 Batteries 11 39 53 6. Insert two Console Base Bolts (29) through each Console Base Bolts. Tilt the treadmill back until the frame guide and the foot rail are recommended. 3. alkaline batteries are past the storage latch. 2. Note: Be careful not to move . HOW TO LOWER THE TREADMILL FOR USE 1. Carefully move the treadmill without...
... 21 5. Press two batteries into the right Upright (37) as shown. Close the Battery Cover. 5 49 48 Batteries 11 39 53 6. Insert two Console Base Bolts (29) through each Console Base Bolts. Tilt the treadmill back until the frame guide and the foot rail are recommended. 3. alkaline batteries are past the storage latch. 2. Note: Be careful not to move . HOW TO LOWER THE TREADMILL FOR USE 1. Carefully move the treadmill without...
Instruction Manual
Page 7
... a walking belt coated with a power cord having an equipment-earthing conductor and a earthing plug. They will reset the console. Refer to the position shown at the right. Note: In Italy, an adapter (not included) must be able to safely lift 20 kg in order to raise, lower, or move the treadmill. 1. Outlet DANGER: Improper connection of the equipment-earthing conductor can display distance and speed...
... a walking belt coated with a power cord having an equipment-earthing conductor and a earthing plug. They will reset the console. Refer to the position shown at the right. Note: In Italy, an adapter (not included) must be able to safely lift 20 kg in order to raise, lower, or move the treadmill. 1. Outlet DANGER: Improper connection of the equipment-earthing conductor can display distance and speed...
Instruction Manual
Page 8
... number of the treadmill. To stop the walking belt, step onto the foot rails and move the speed control to operate the console. 1 Insert the key fully into the power switch. If desired, the speed, time, distance, fat calories or calories mode can be moved to the RESET position. When you become familiar with the monitor display. Hold your pulse will turn off automatically. 9 Press down . Avoid spilling liquids on when the display button is pressed...
... number of the treadmill. To stop the walking belt, step onto the foot rails and move the speed control to operate the console. 1 Insert the key fully into the power switch. If desired, the speed, time, distance, fat calories or calories mode can be moved to the RESET position. When you become familiar with the monitor display. Hold your pulse will turn off automatically. 9 Press down . Avoid spilling liquids on when the display button is pressed...
Instruction Manual
Page 9
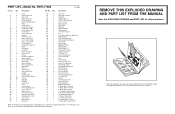
... Leg Nut Belt Guide Wire Clip Right Foot Rail Roller Guard Left Frame Guide Foot Pivot Washer/Base Leg Washer Right Endcap Rear Roller Adj. PART LIST-Model No. Bolt Roller Adjustment Washer Rear Roller Ground Wire Walking Platform Walking Belt Releaseable Tie Reed Switch Screw Cable Tie Clamp 8" Cable Tie Motor Star Washer Front Roller Nut Fan Left Endcap Motor Pivot Sleeve Motor Pivot Bushing Grounding Screw Grounding Star Washer Nylon Washer Grounding Nut Console Screw Rear Roller Bolt Tension Adjust Bracket 1/4" Plain Nut Spring Roller Guard Screw Power Cord Set...
... Leg Nut Belt Guide Wire Clip Right Foot Rail Roller Guard Left Frame Guide Foot Pivot Washer/Base Leg Washer Right Endcap Rear Roller Adj. PART LIST-Model No. Bolt Roller Adjustment Washer Rear Roller Ground Wire Walking Platform Walking Belt Releaseable Tie Reed Switch Screw Cable Tie Clamp 8" Cable Tie Motor Star Washer Front Roller Nut Fan Left Endcap Motor Pivot Sleeve Motor Pivot Bushing Grounding Screw Grounding Star Washer Nylon Washer Grounding Nut Console Screw Rear Roller Bolt Tension Adjust Bracket 1/4" Plain Nut Spring Roller Guard Screw Power Cord Set...


